
みるかなた本棚>『ポケットモンスターおりがみコレクション』>ポケモンおりがみ一覧表>0134シャワーズ
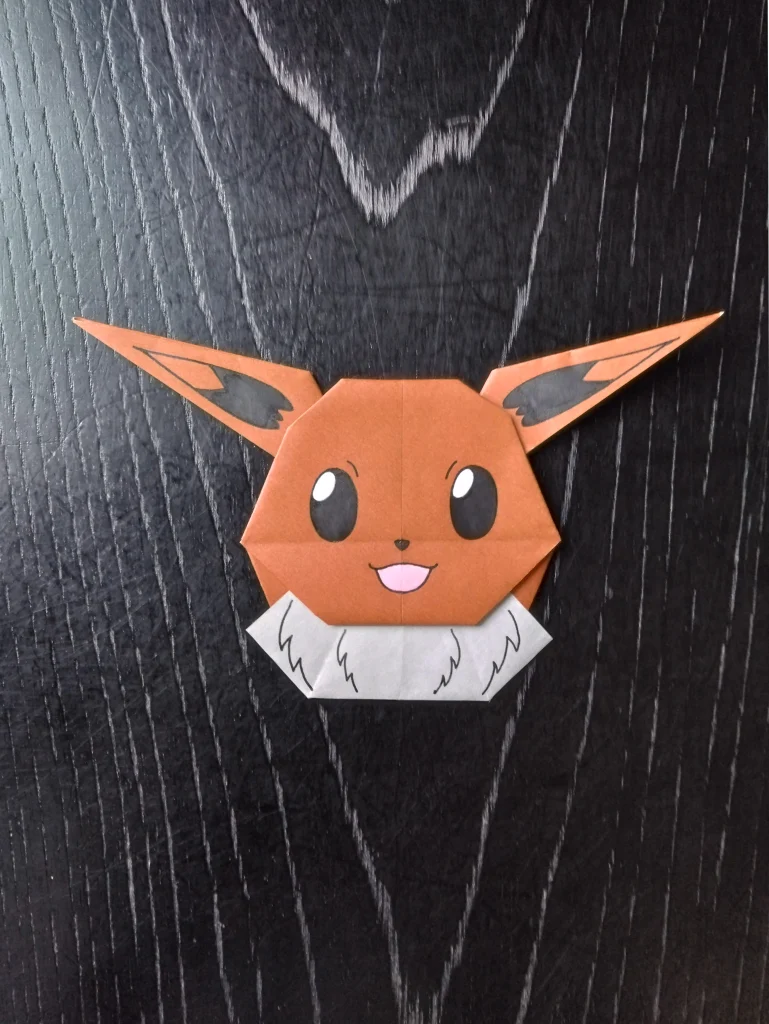
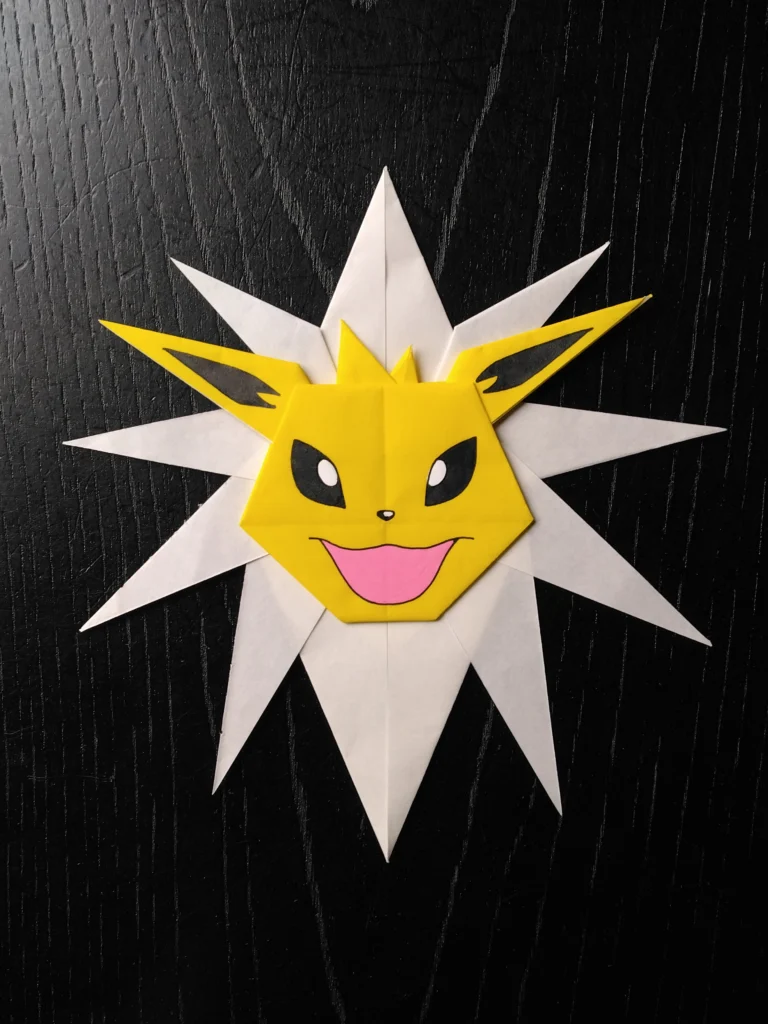
◆0133イーブイ◆0134シャワーズ◆0135サンダース◆0136ブースター◆
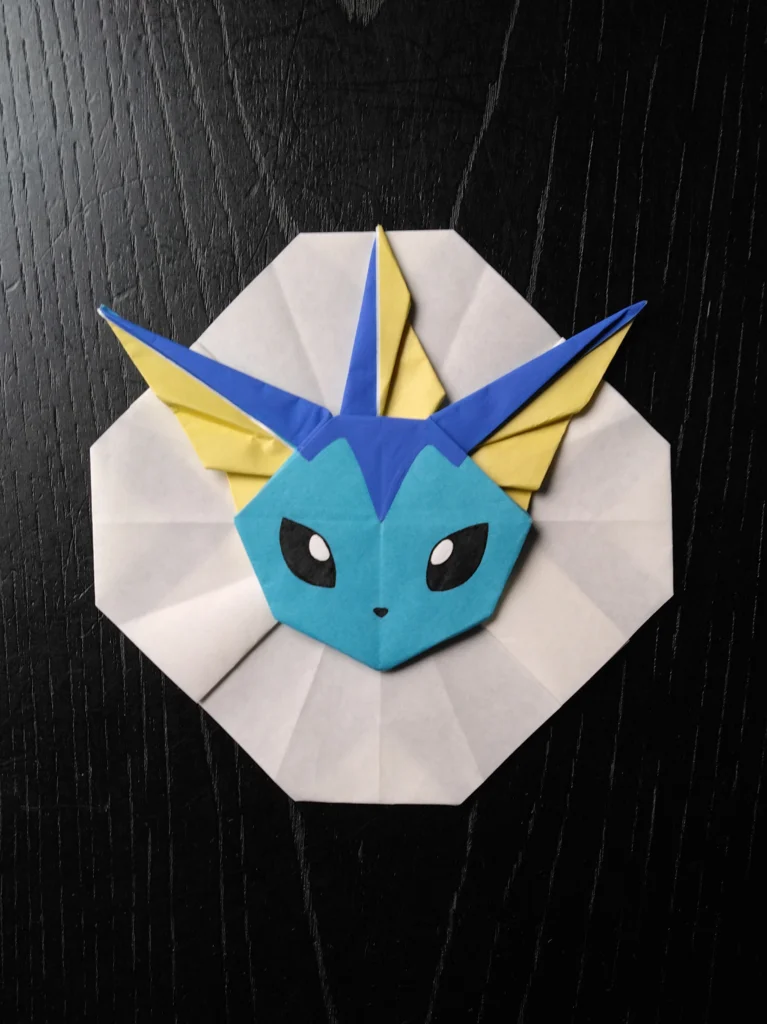
0134 シャワーズ
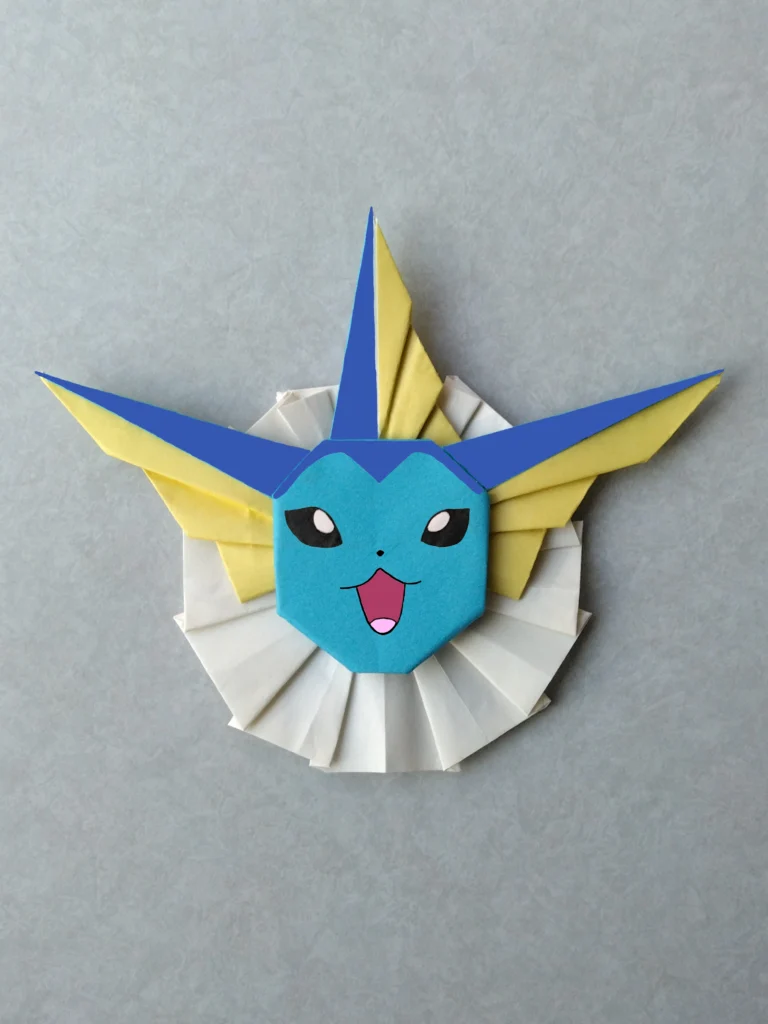
特徴的な耳のひだを実現しました。
他所では見かけたことがありませんが、シャワーズの耳には必須ポイントだと思います。
ゲームフリークのチェックで、「耳」、「たてがみ」と名指しされていました。
左右に出ているのは、「えら(鰓)」または「ひれ(鰭)」ではなく「耳」なんですね。
そしてあたまの上のは「背びれ」ではなく、「たてがみ」なんです。
部位の名前から、魚類ではなく、獣(けもの)類だと主張していて、なんか、強くなったような気がします。
はじめ1枚で折っていたのですが、ゲームフリークのご希望で、青色とクリーム色との紙の2枚重ねで折ることになりました。
そのため紙の厚みがあるだけでなく、耳の折り方は、少しばかり手が込んでいますので、落ち着いて丁寧に折ってください。
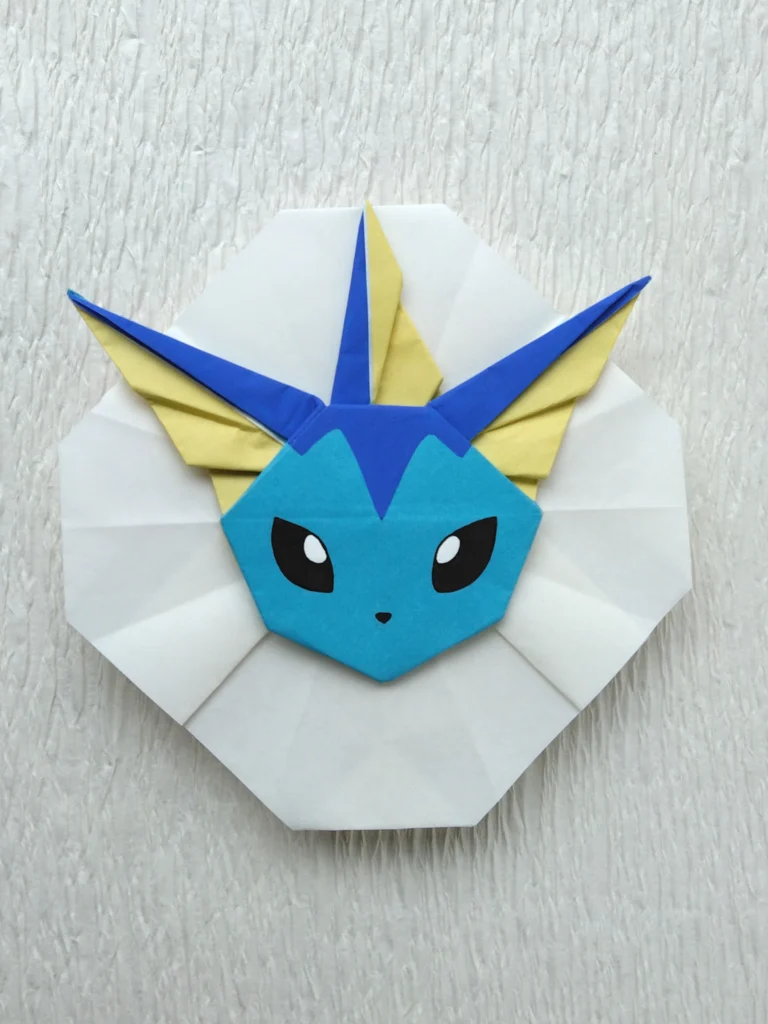
シャワーズの「えり」は、図式的な、様式化したかたちです。
子どもたちと一緒につくりながら教えていると、ある程度簡略化したものとならざるをえないのです。
◇より繊細なシャワーズのえりのかたちと顔の表現を実現した、新作は
ni-p134シャワーズのページに掲載しています。
◇別作新作ファン創作は
NiceOrigamiファン創作
のページをご覧ください。
この作品は1999年に著作権者の監修を受け正式に許諾を得たものです。
★ゲームフリークのチェック
◆姿かたちは、最初のチェックでOKをいただきました。
◆はじめ1枚で折っていましたので、紙の裏の白い面を色替えに利用していたのですが、
「耳とたてがみの裏の色を、クリーム色に」
と、変更のご指示がありました。
それで、2枚重ねで折ることになりました。
◆首周りの部分は薄い藤色でつくっていましたが、
「えり部分を、白い色に」
と、変更のご指示がありました。
◆顔は目のみ描き入れていたところ、
「おでこの模様をつける」
とのご要望がありました。
つくり方の折り図
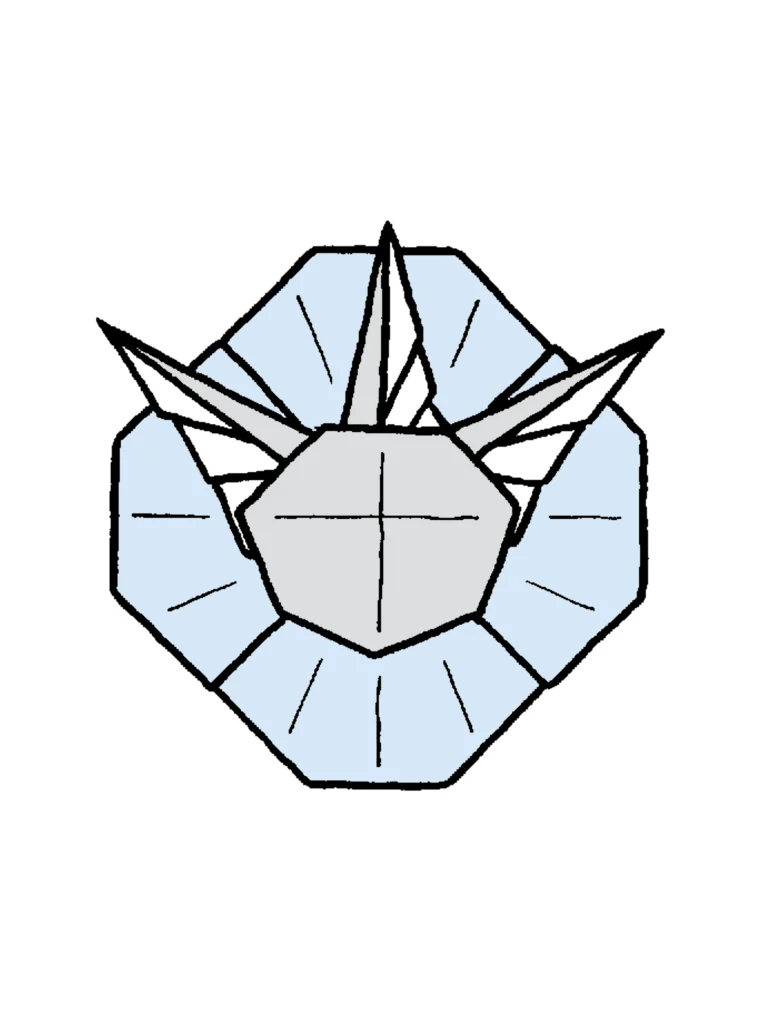
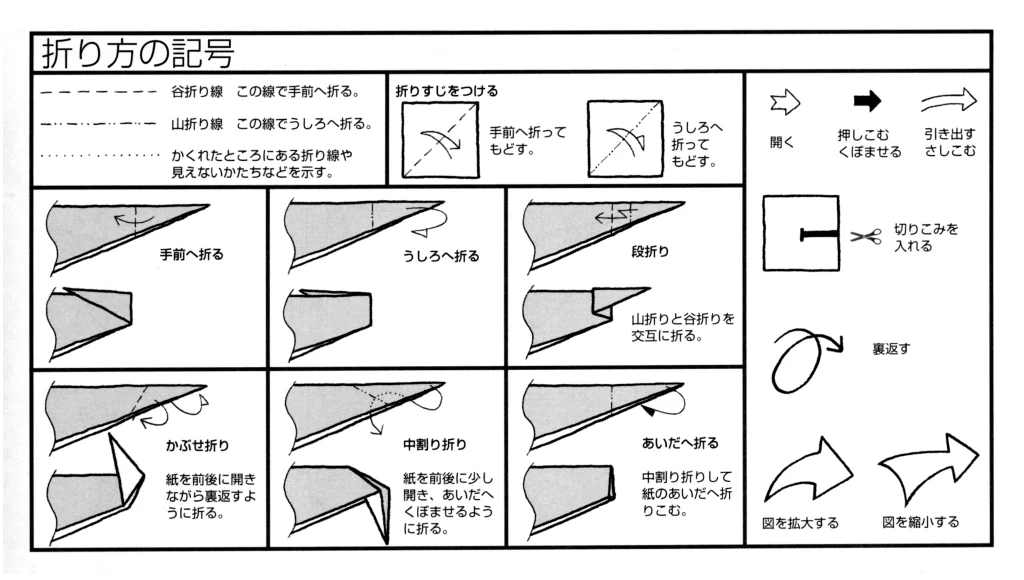
今回制作した折り図
◇折り図
1 基本折り
2 シャワーズのあたま
3 シャワーズのえり
■シャワーズのあたまは、青色の紙を外側に、クリーム色の紙を内側にして、紙の裏の白い面を合わせて重ね、2枚一緒に、まず基本折りの20のかたちまで折る。
■シャワーズのえりは、白色の紙で折る。
1 基本折り
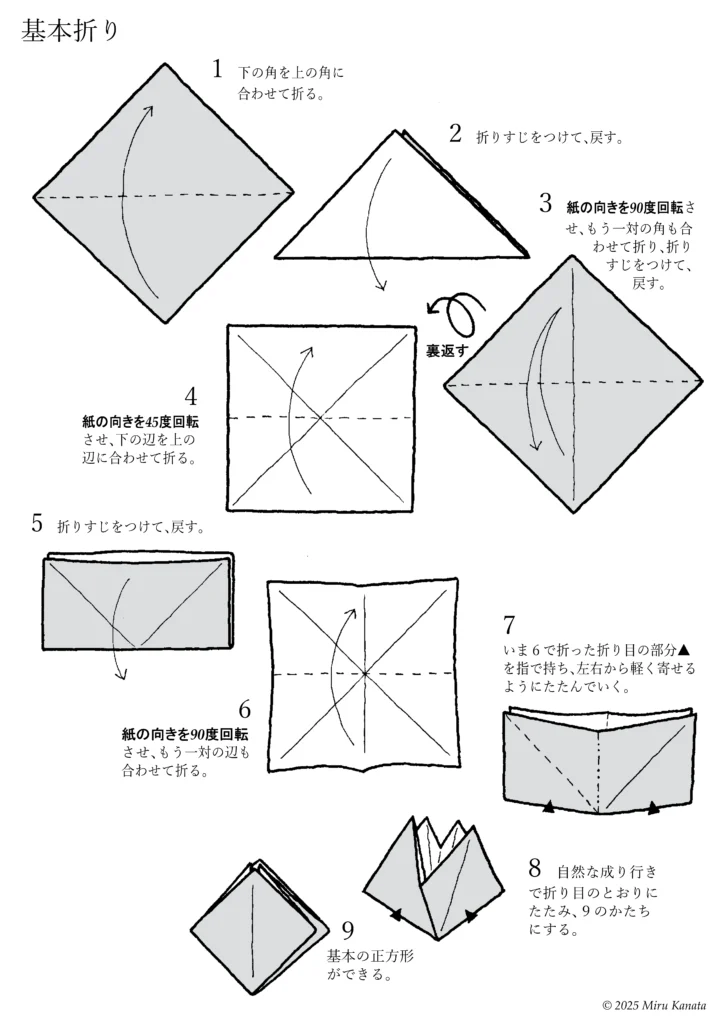
English Commentary
Basic Folding
1 Fold the bottom corner to meet the top corner.
2 Make a crease and return it to its original position.
3 Rotate the paper 90 degrees, fold the other pair of corners together, make a crease and return it to its original position.
{Flip}
4 Rotate the paper 45 degrees and fold the bottom edge to line up with the top edge.
5 Make a crease and return it to its original position.
6 Rotate the paper 90 degrees and fold the other pair of edges together.
7 Hold the crease ▲ made in step 6 with your fingers and fold gently from both sides together.
8 Let the paper naturally fold along the creases to form the shape of 9.
9 A basic square is created.
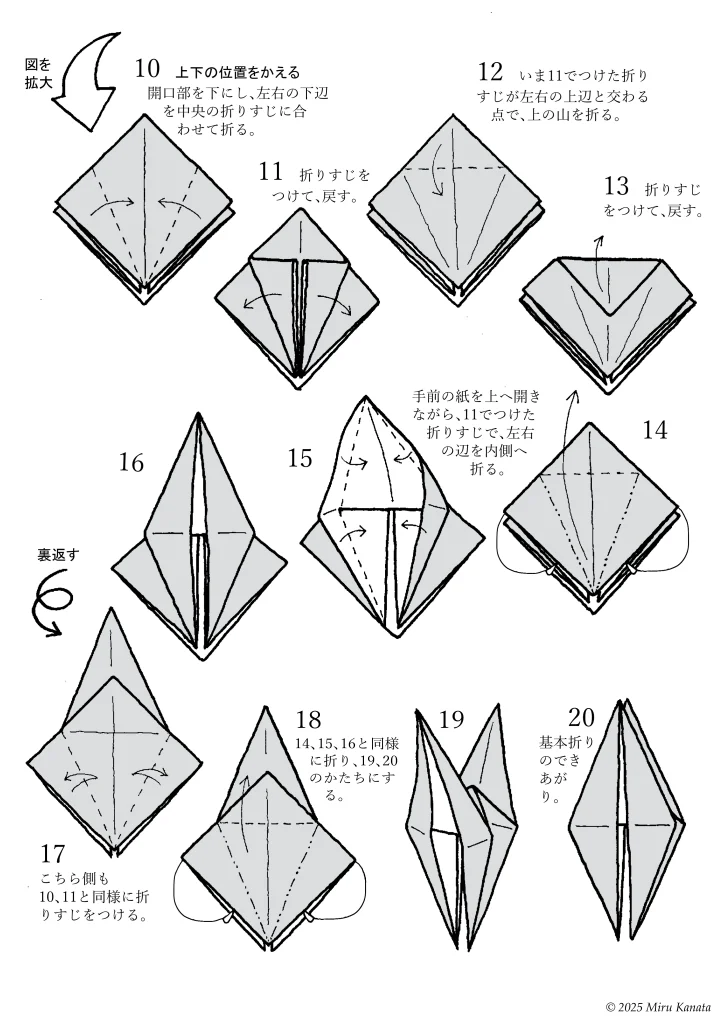
English Commentary
{Enlarge image}
10 Change the top and bottom positions.
With the opening facing downwards, fold the bottom left and right edges to meet the crease in the middle.
11 Make a crease and return.
12 Fold the top at the point where the crease made in 11 intersects with the top left and right edges.
13 Make a crease and return.
14 While opening the front paper upwards, fold the left and right edges inward along the crease made in 11.
15
16
{Flip}
17 Make creases on this side in the same way as 10 and 11.
18 Fold in the same way as 14, 15 and 16 to form 19 and 20.
19
20 The basic fold is complete.
2 シャワーズのあたま
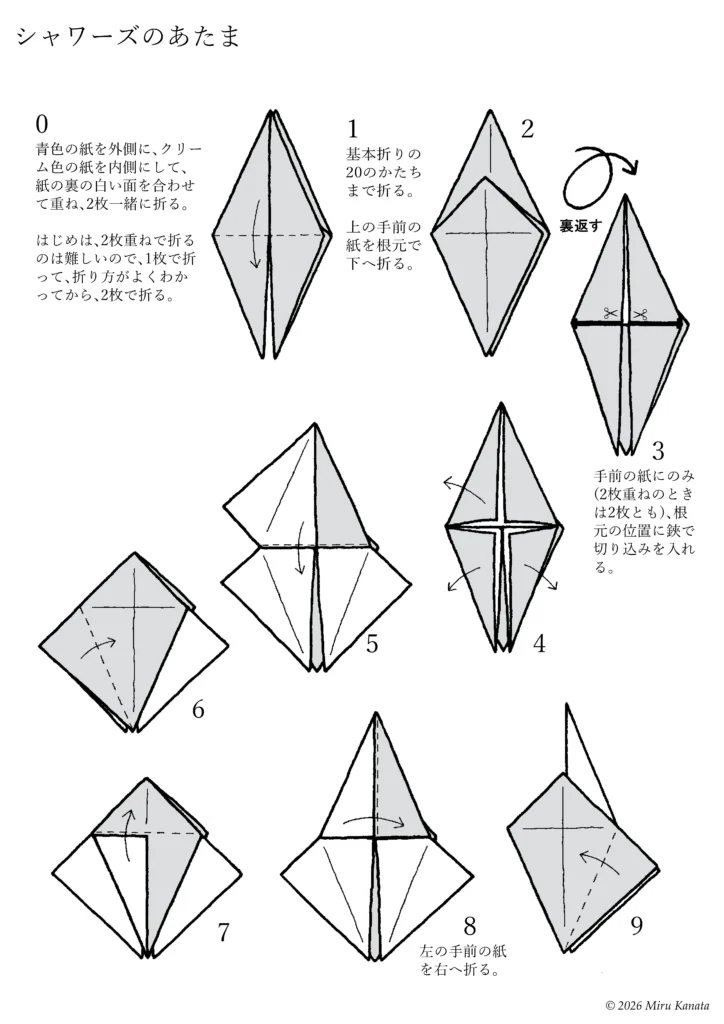
English Commentary
Vaporeon’s head
0 Place the yellow paper on the outside and the cream-colored paper on the inside, aligning the white backs of the papers, and fold both together. Initially, folding two sheets together is difficult, so fold one sheet first to understand the folding method, and then fold two sheets together.
1 Fold up to the shape of basic fold 20. Fold the top front sheet downwards at the base.
2
{Flip}
3 Make a cut with scissors at the base of only the front sheet (both sheets if using two sheets).
4
5
6
7
8 Fold the left front sheet to the right.
9
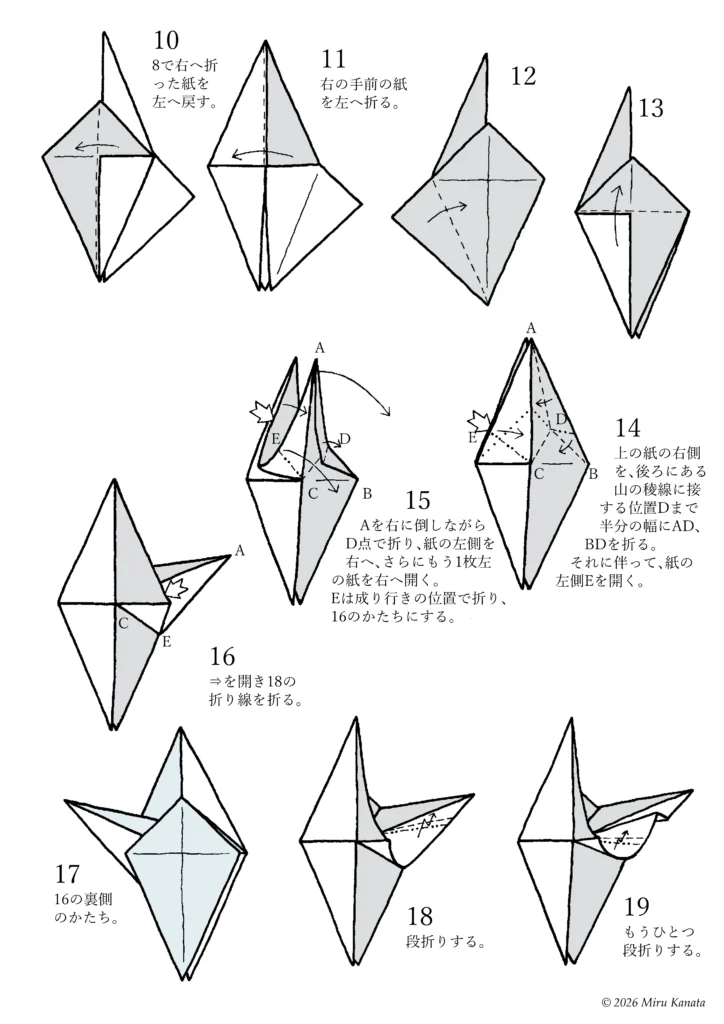
English Commentary
10 Fold the paper that was folded to the right in step 8 back to the left.
11 Fold the front right piece of paper to the left.
12
13
14 Fold the right side of the top piece of paper in half along AD and BD until it touches the mountain ridge at point D. Open the left side of the paper E accordingly.
15 Fold A to the right at point D, open the left side of the paper to the right, and then open the next piece of paper to the left to the right. Fold E to its natural position to form the shape of 16.
16 Open the arrow and fold along the fold line of 18.
17 The shape of the back of 16.
18 Make a step fold.
19 Make another step fold.
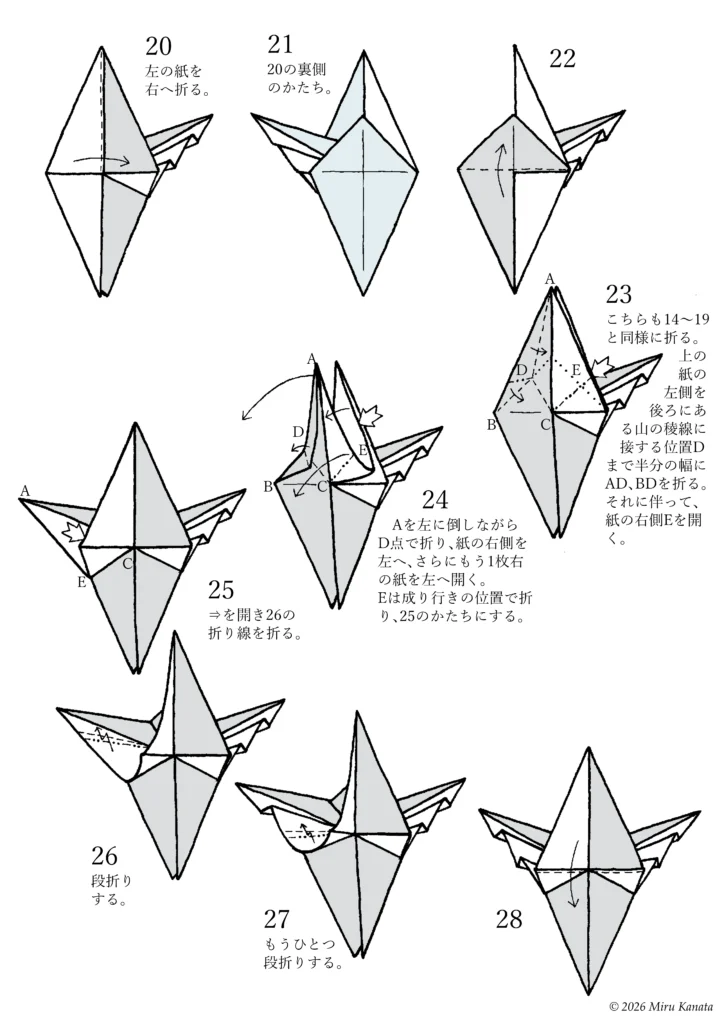
English Commentary
20 Fold the left piece of paper to the right.
21 The shape of the back of 20.
22
23 Fold this in the same way as 14-19. Fold the left side of the top piece of paper in half lengthwise, AD and BD, to point D where it touches the mountain ridge in the background. Open the left side of the paper E accordingly.
24 Fold A to the right at point D, open the left side of the paper to the right, and then open the other piece of paper to the left to the right. Fold E to its natural position to get the shape of 25.
25 Open the arrow and fold along the fold line of 26.
26 Make a step fold.
27 Make another step fold.
28
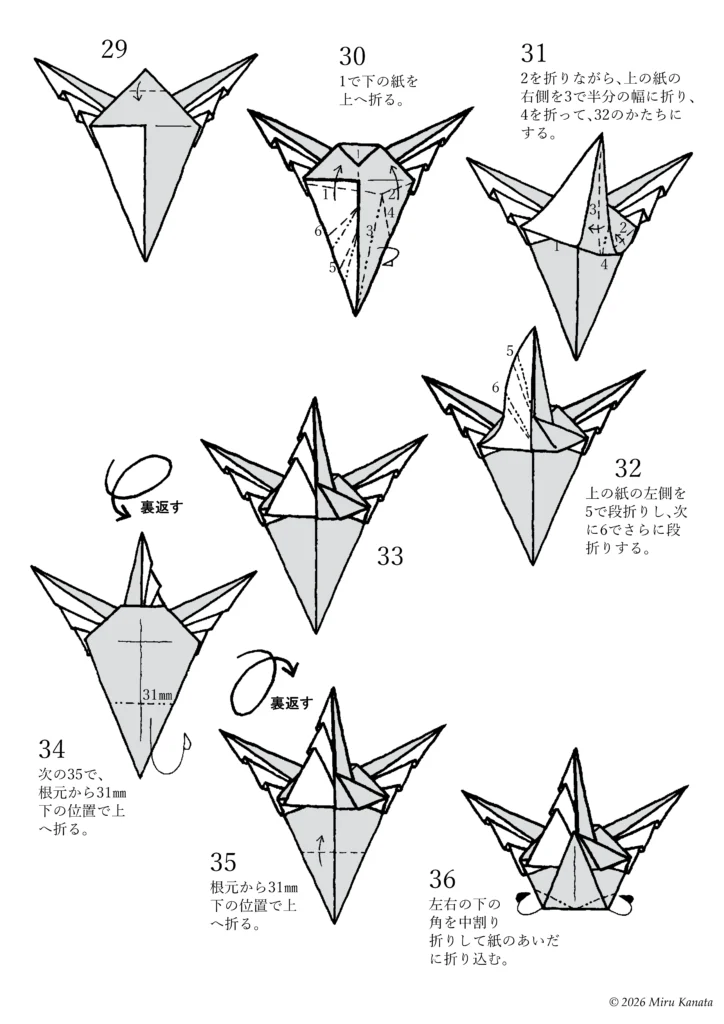
English Commentary
29
30 Fold the bottom paper upwards at 1.
31 While folding at 2, fold the right side of the top paper in half at 3, then fold at 4 to make the shape of 32.
32 Fold the left side of the top paper in a step fold at 5, then make another step fold at 6.
33
{Flip}
34 At the next 35, fold upwards at a position 31 mm below the base.
{Flip}
35 Fold upwards at a position 31 mm below the base.
36 Fold the bottom left and right corners inwards and tuck them between the sheets of paper.
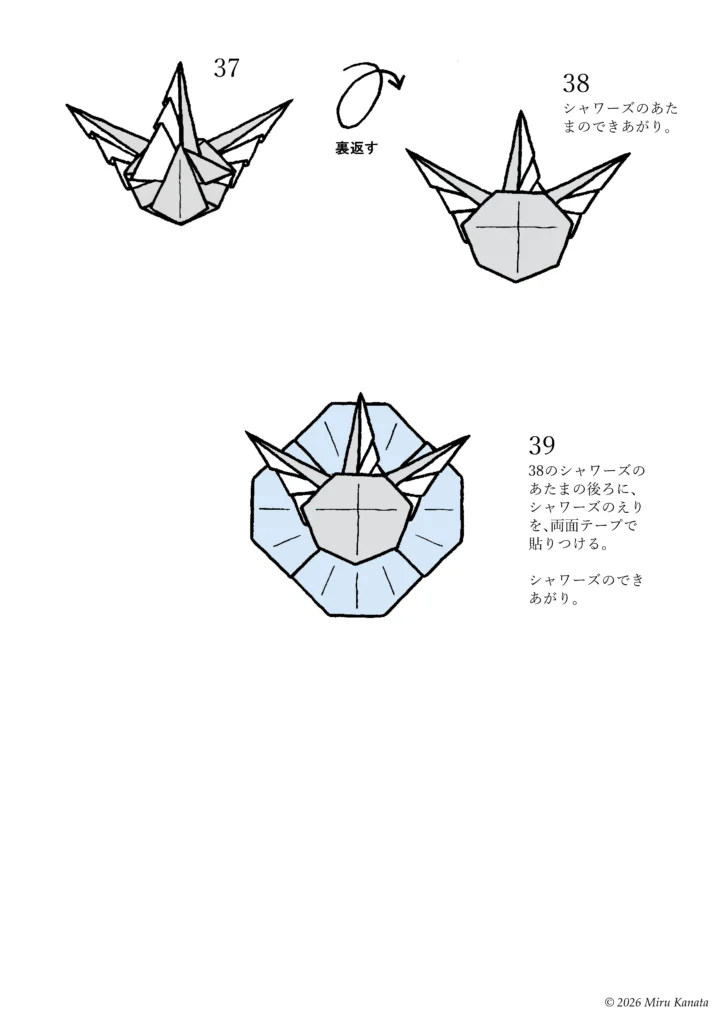
English Commentary
37
{Flip}
38 The head of Vaporeon is complete.
39 Attach the collar of Vaporeon to the back of the head of Vaporeon from step 38 using double-sided tape. Vaporeon is complete.
3 シャワーズのえり
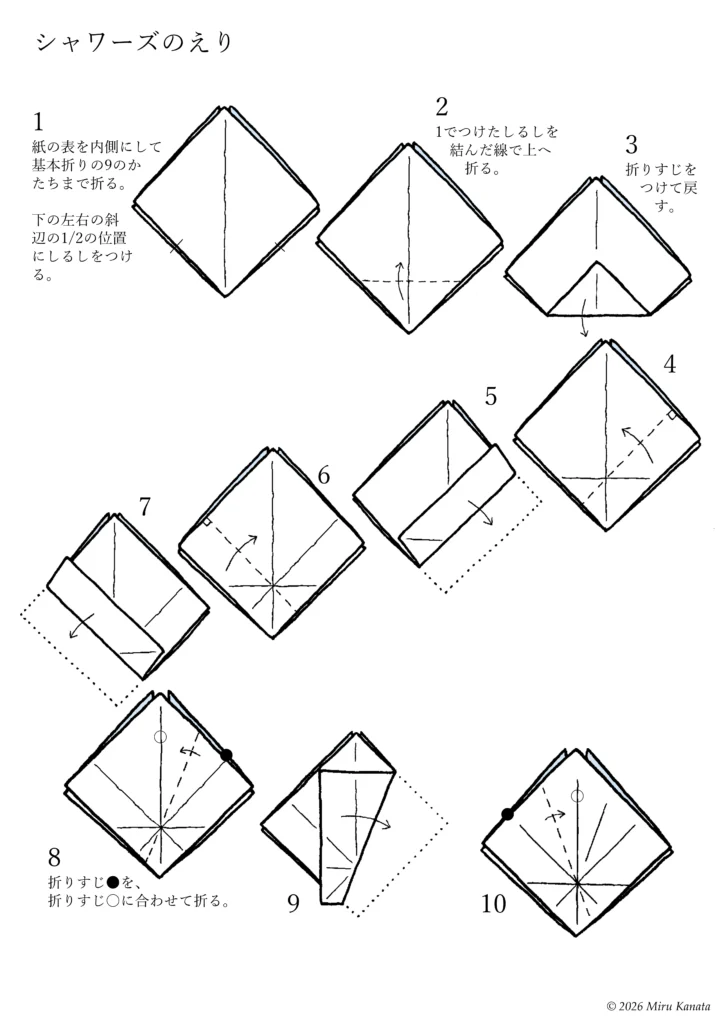
English Commentary
The collar of Vaporeon
1. With the right side of the paper facing inward, fold it to the shape of basic fold 9. Mark the halfway point on the left and right diagonal edges at the bottom.
2. Fold upward along the line connecting the marks made in step 1.
3. Make a crease and unfold.
4.
5.
6.
7.
8. Fold along the crease ● to the crease ○.
9.
10.
English Commentary
11
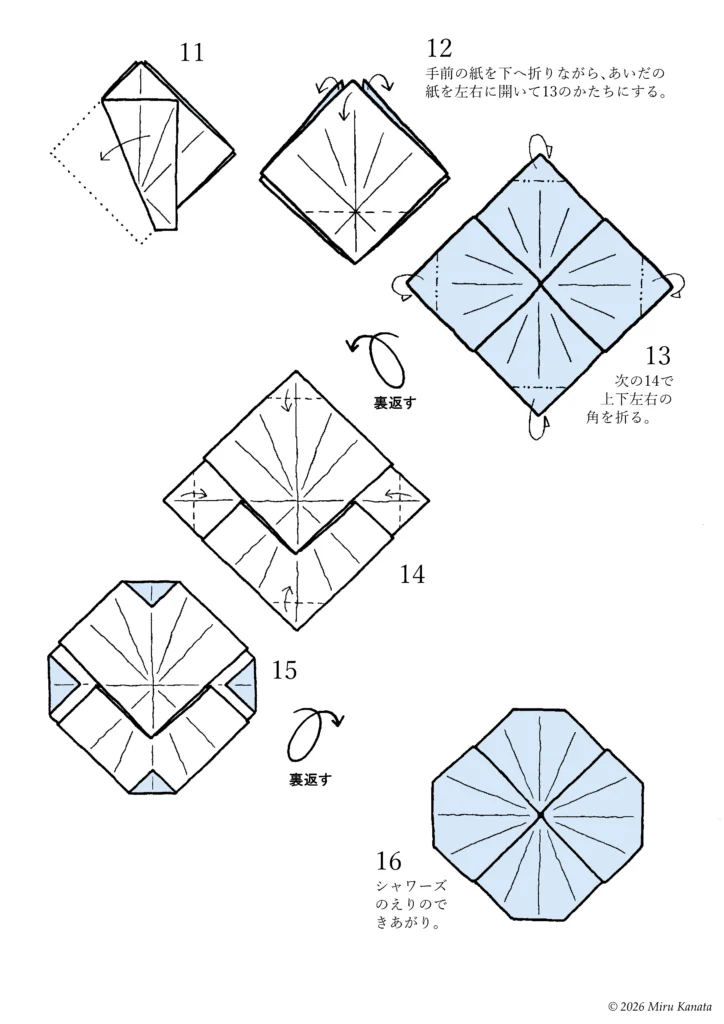
12 Fold the front piece of paper downwards, then open the paper in between to the left and right to create the shape shown in 13.
13 In the next step, 14, fold the top, bottom, left, and right corners.
{Flip}
14
15
{Flip}
16 The collar of Vaporeon is complete.
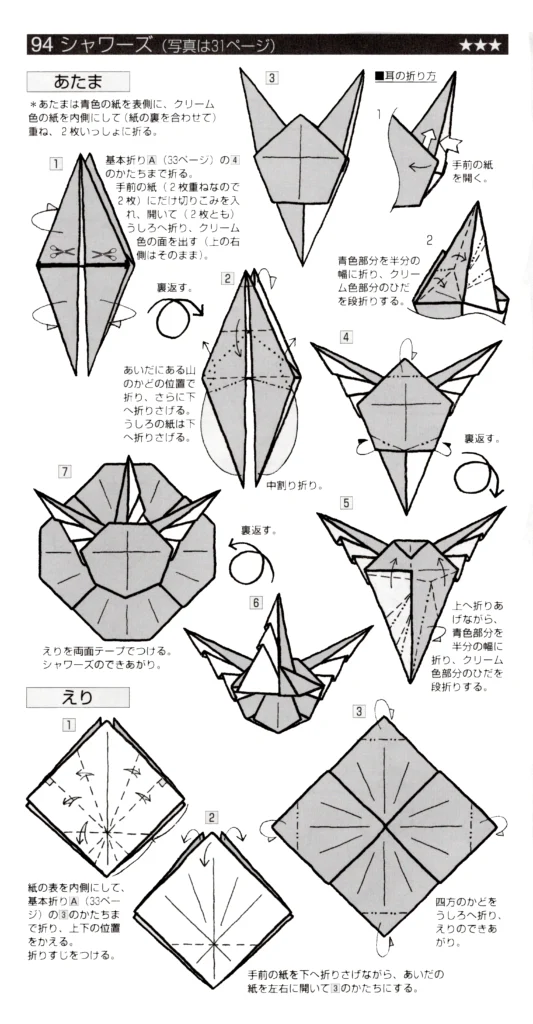
参考・2000年の本に掲載した折り図
みるかなた本棚>『ポケットモンスターおりがみコレクション』>ポケモンおりがみ一覧表>0134シャワーズ

◆別作新作ファン創作
◇ ◇ ◇