
みるかなた本棚>Nice Origami素敵折紙>p134シャワーズ
◆p134シャワーズ◆p135サンダース◆
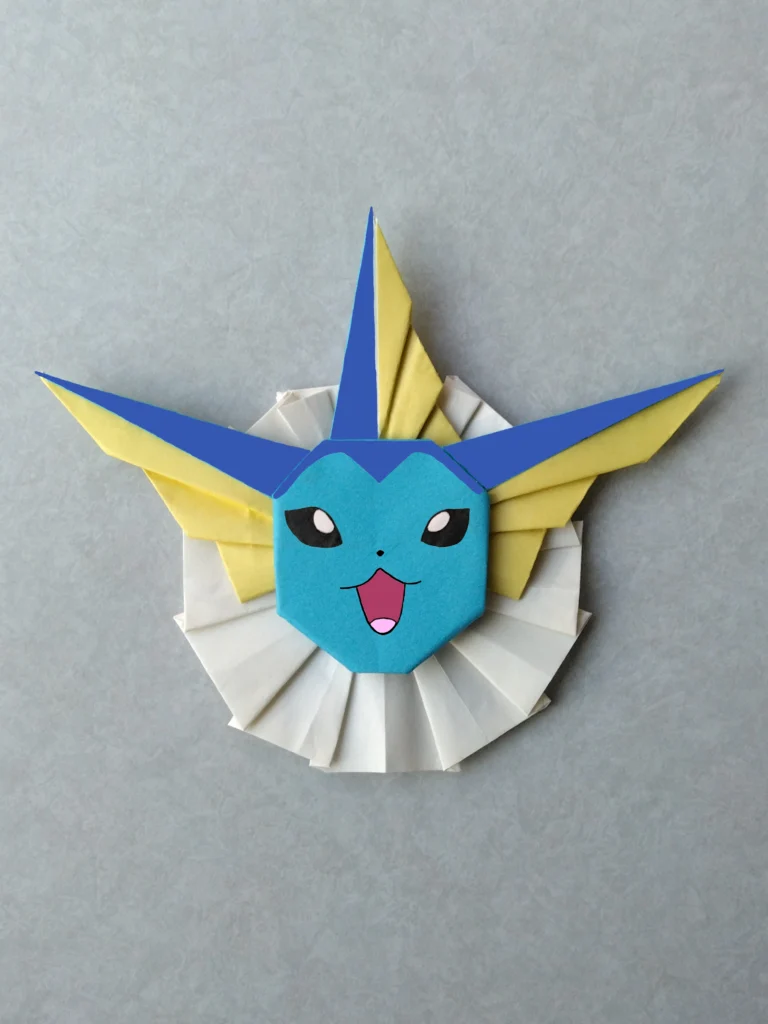
0134 シャワーズ 2号
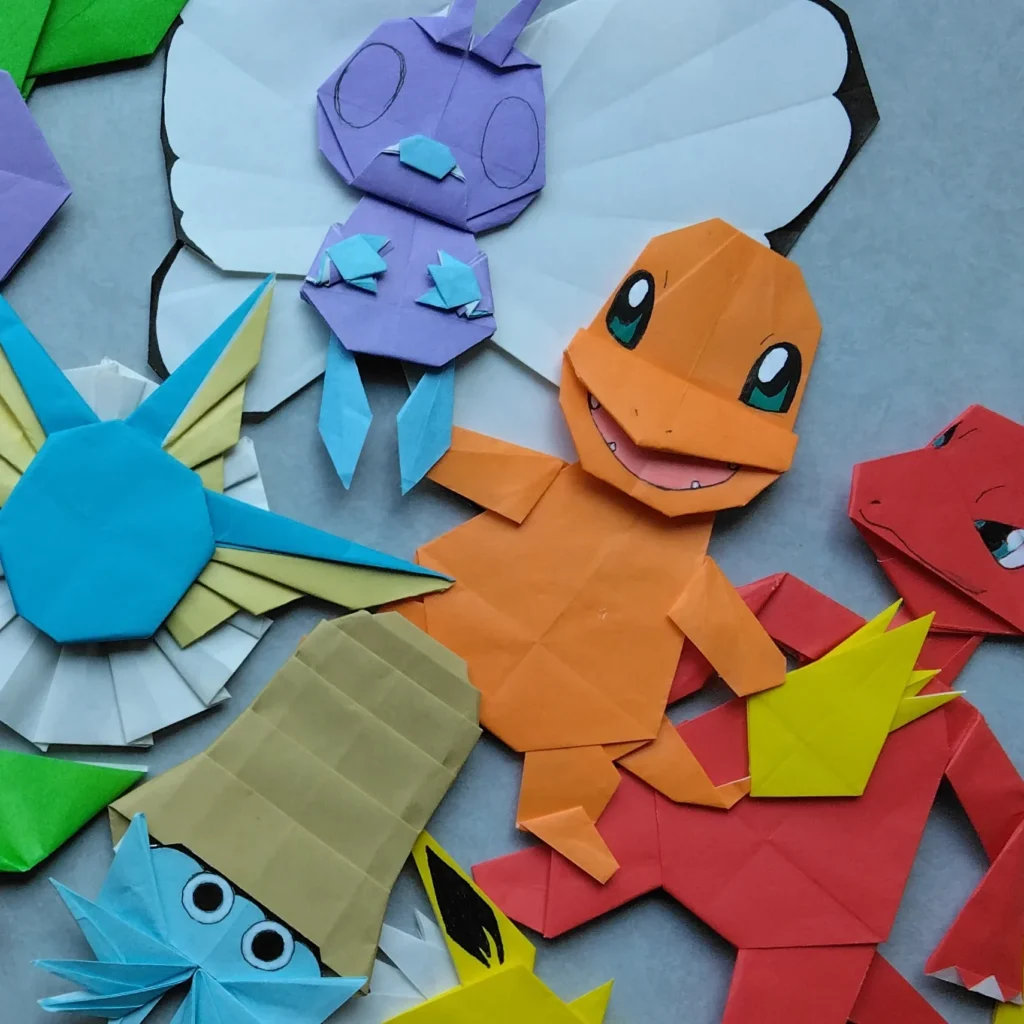
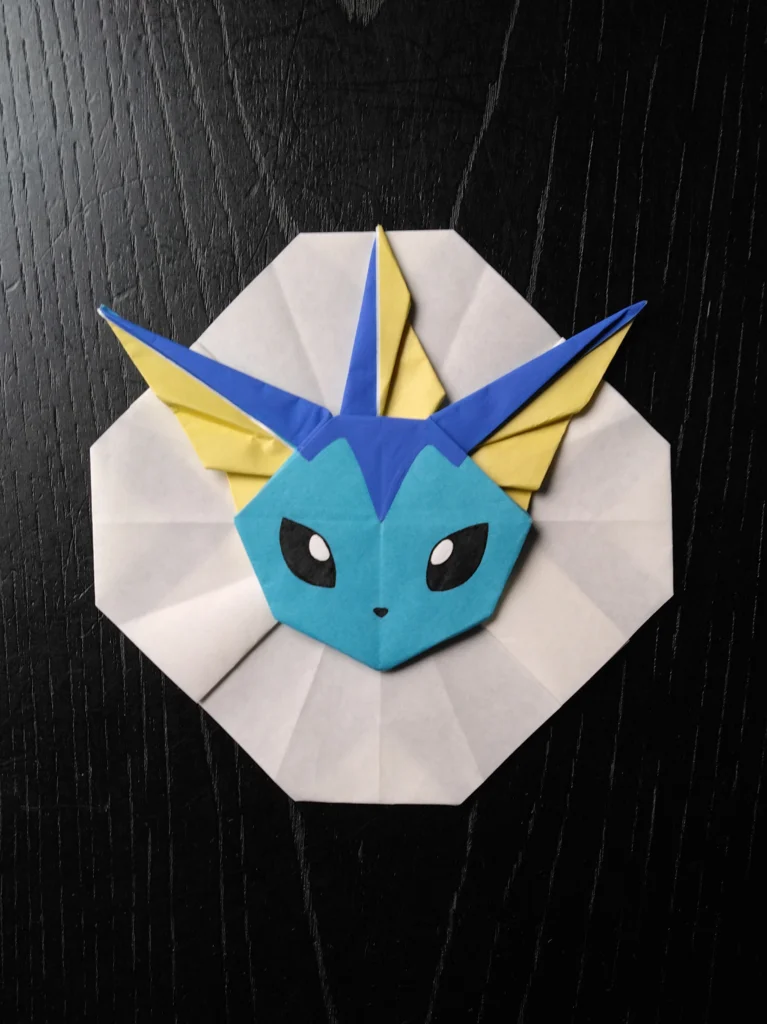
青色とクリーム色との紙の、2枚重ねで折っています。紙の厚みがあるうえに、耳の折り方は、少しばかり手が込んでいますので、落ち着いて丁寧に折ってください。
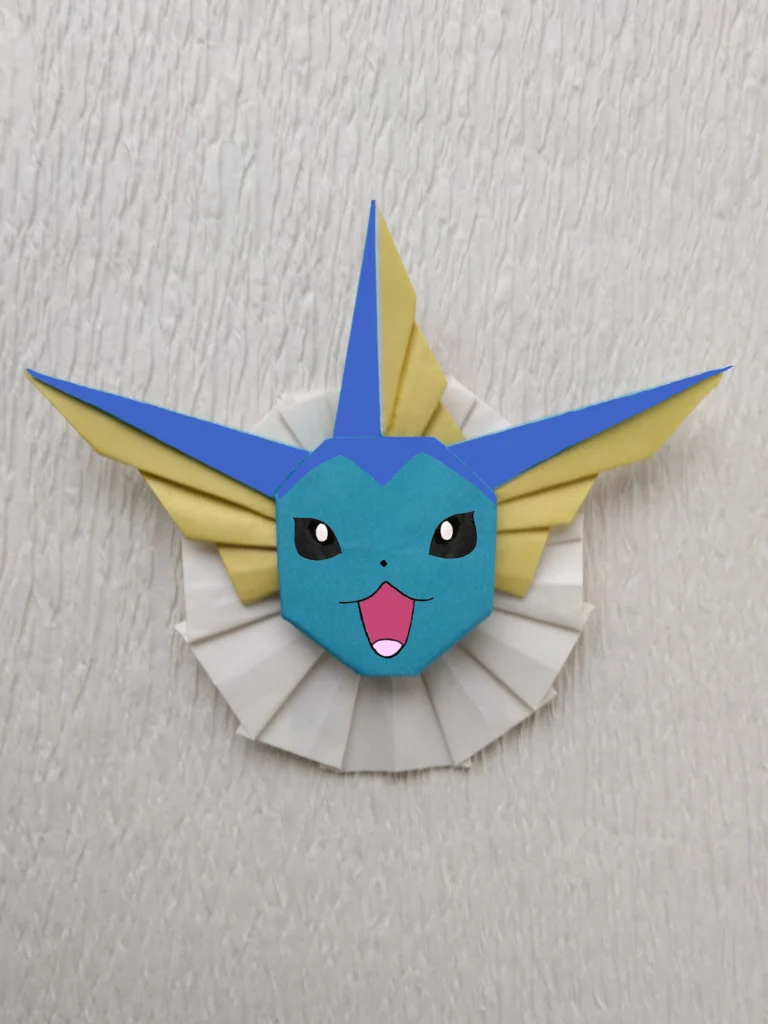
2000年の本に掲載したシャワーズの「えり」は、図式的な、様式化したものでした。
子どもたちと一緒に折り紙をつくりながら教えていると、ある程度簡略化したものとならざるをえないからです。
以前のえりは、ひだを4折りでつくっています。
今回、8折り、12折り、16折りと、いろいろつくってみました。
そして、16折りでつくるのがいちばんシャワーズのえりに近いという結論に達しました。
◇ここにご紹介するものは個人的に制作したファン創作です。
◇著作権者の許諾を受けていない未監修のものです。
つくり方の折り図
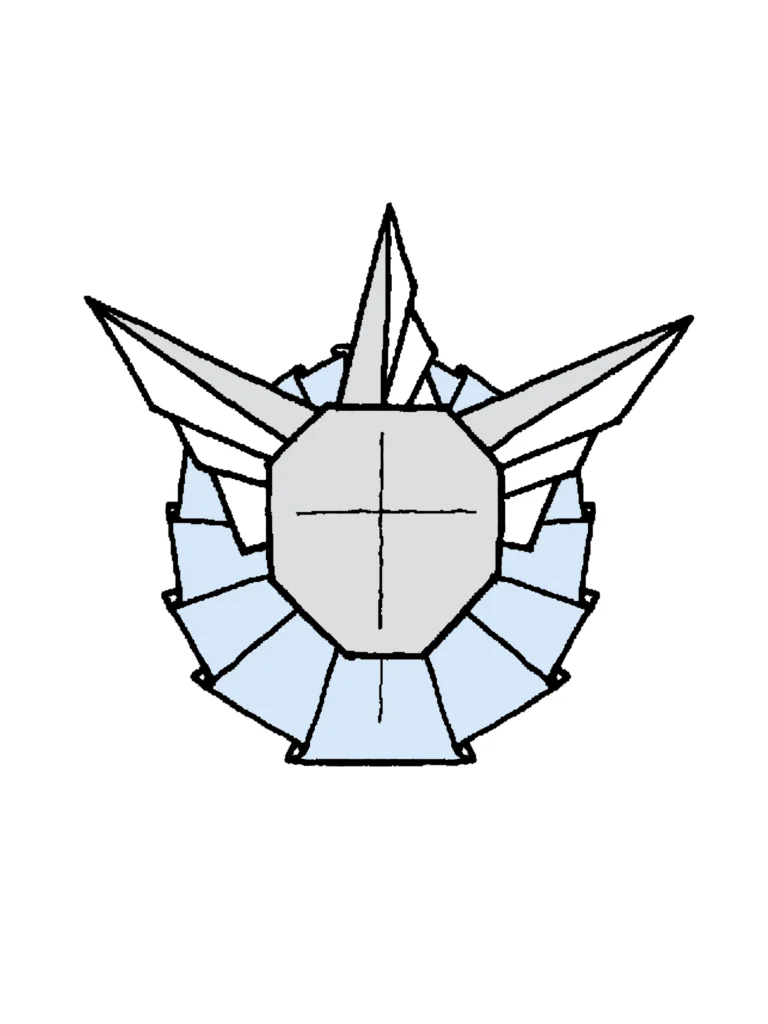
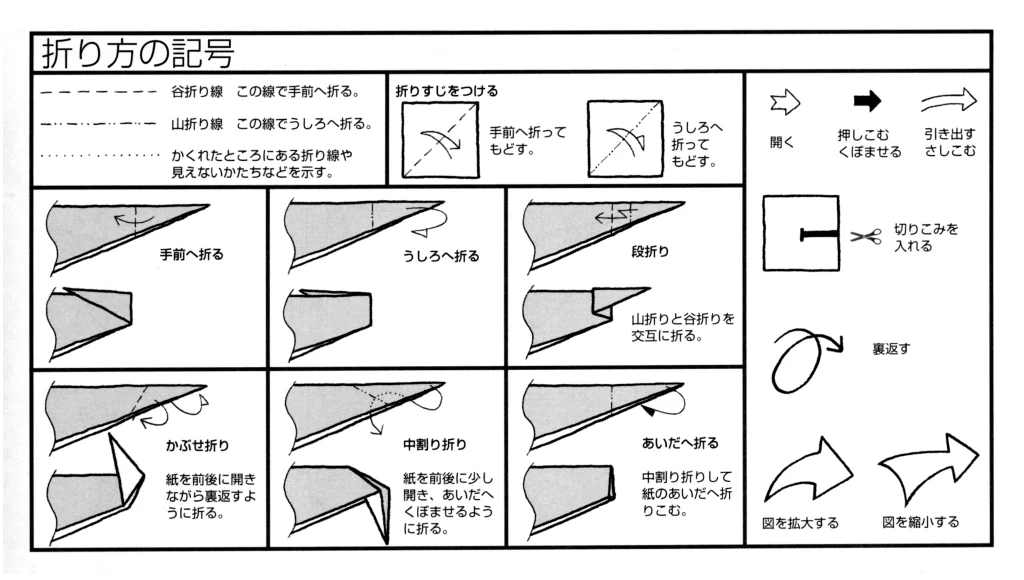
今回制作した折り図
◇折り図
1 基本折り
2 シャワーズのあたま 2号
3 シャワーズのえり 2号
■シャワーズのあたまは、青色の紙を外側に、クリーム色の紙を内側にして、紙の裏の白い面を合わせて重ね、2枚一緒に、まず基本折りの20のかたちまで折る。
■シャワーズのえりは、白色の紙で折る。
1 基本折り
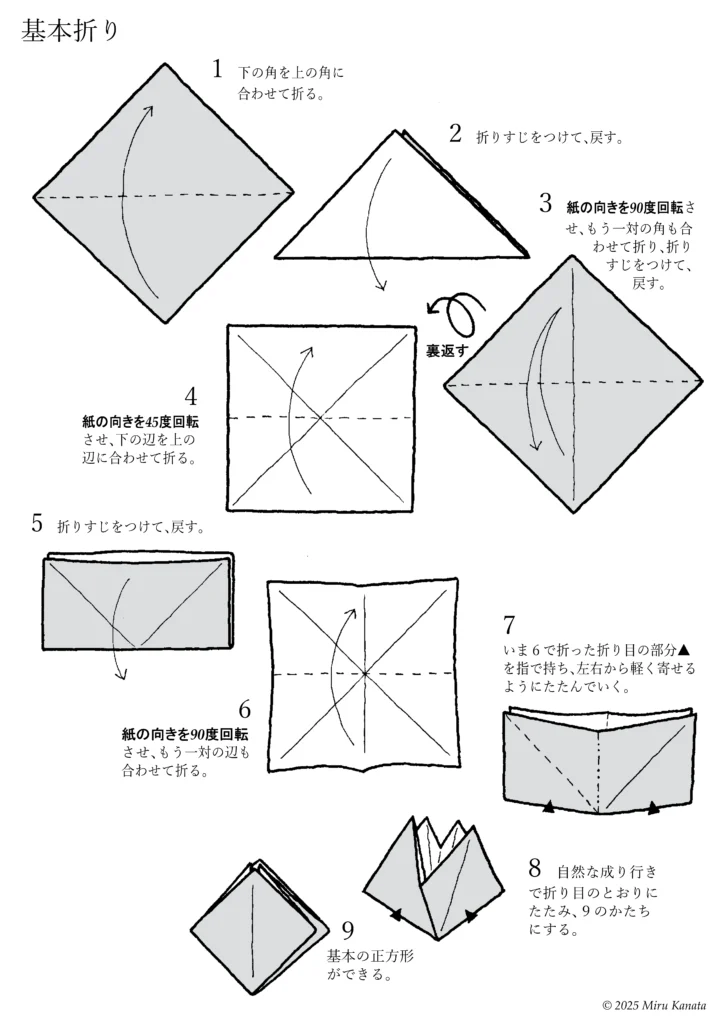
English Commentary
Basic Folding
1 Fold the bottom corner to meet the top corner.
2 Make a crease and return it to its original position.
3 Rotate the paper 90 degrees, fold the other pair of corners together, make a crease and return it to its original position.
{Flip}
4 Rotate the paper 45 degrees and fold the bottom edge to line up with the top edge.
5 Make a crease and return it to its original position.
6 Rotate the paper 90 degrees and fold the other pair of edges together.
7 Hold the crease ▲ made in step 6 with your fingers and fold gently from both sides together.
8 Let the paper naturally fold along the creases to form the shape of 9.
9 A basic square is created.
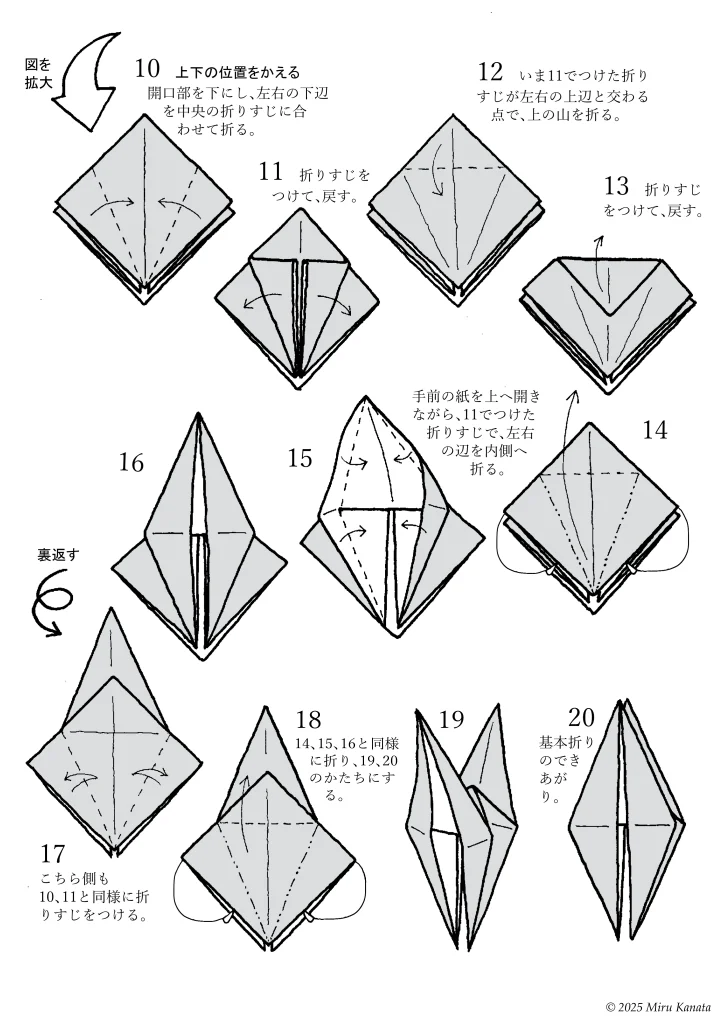
English Commentary
{Enlarge image}
10 Change the top and bottom positions.
With the opening facing downwards, fold the bottom left and right edges to meet the crease in the middle.
11 Make a crease and return.
12 Fold the top at the point where the crease made in 11 intersects with the top left and right edges.
13 Make a crease and return.
14 While opening the front paper upwards, fold the left and right edges inward along the crease made in 11.
15
16
{Flip}
17 Make creases on this side in the same way as 10 and 11.
18 Fold in the same way as 14, 15 and 16 to form 19 and 20.
19
20 The basic fold is complete.
2 シャワーズのあたま 2号
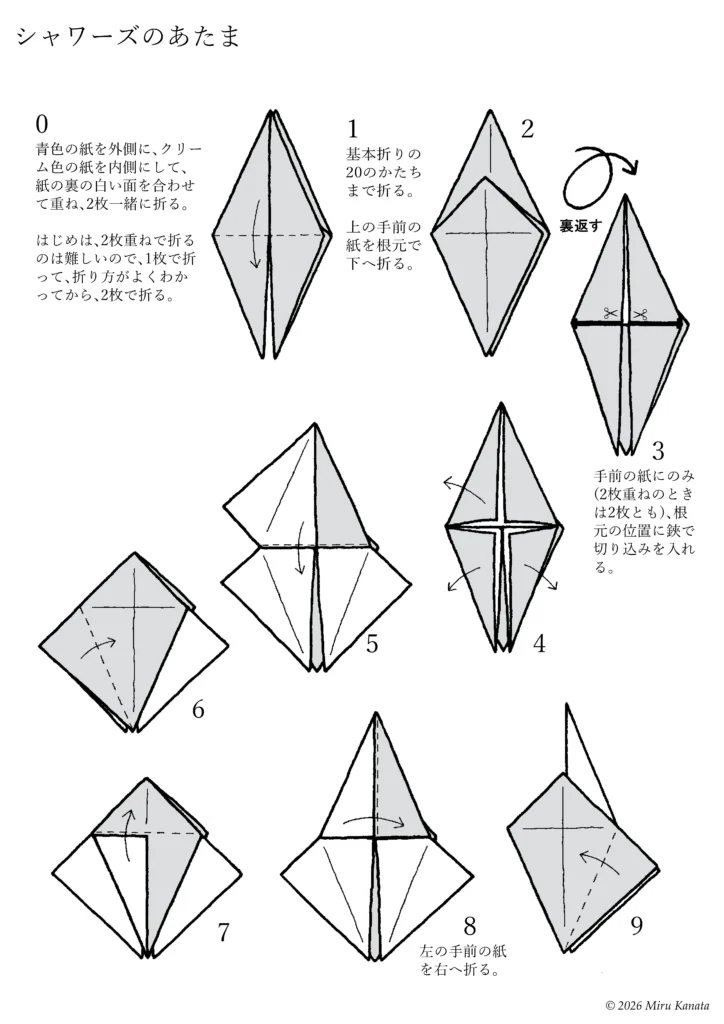
English Commentary
Vaporeon’s head
0 Place the yellow paper on the outside and the cream-colored paper on the inside, aligning the white backs of the papers, and fold both together. Initially, folding two sheets together is difficult, so fold one sheet first to understand the folding method, and then fold two sheets together.
1 Fold up to the shape of basic fold 20. Fold the top front sheet downwards at the base.
2
{Flip}
3 Make a cut with scissors at the base of only the front sheet (both sheets if using two sheets).
4
5
6
7
8 Fold the left front sheet to the right.
9
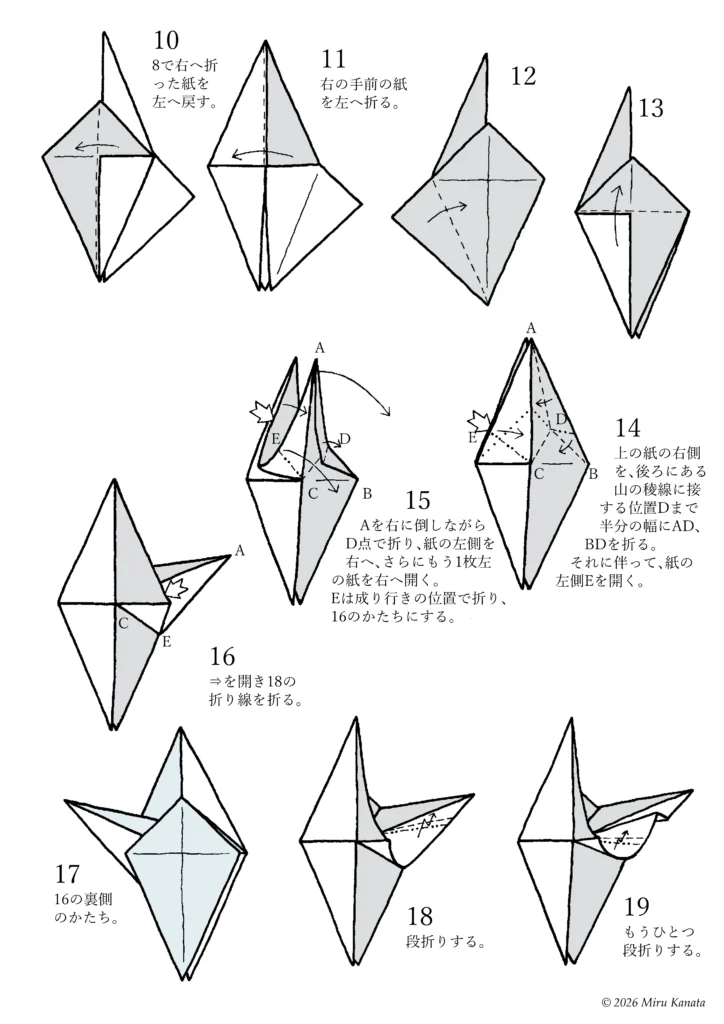
English Commentary
10 Fold the paper that was folded to the right in step 8 back to the left.
11 Fold the front right piece of paper to the left.
12
13
14 Fold the right side of the top piece of paper in half along AD and BD until it touches the mountain ridge at point D. Open the left side of the paper E accordingly.
15 Fold A to the right at point D, open the left side of the paper to the right, and then open the next piece of paper to the left to the right. Fold E to its natural position to form the shape of 16.
16 Open the arrow and fold along the fold line of 18.
17 The shape of the back of 16.
18 Make a step fold.
19 Make another step fold.
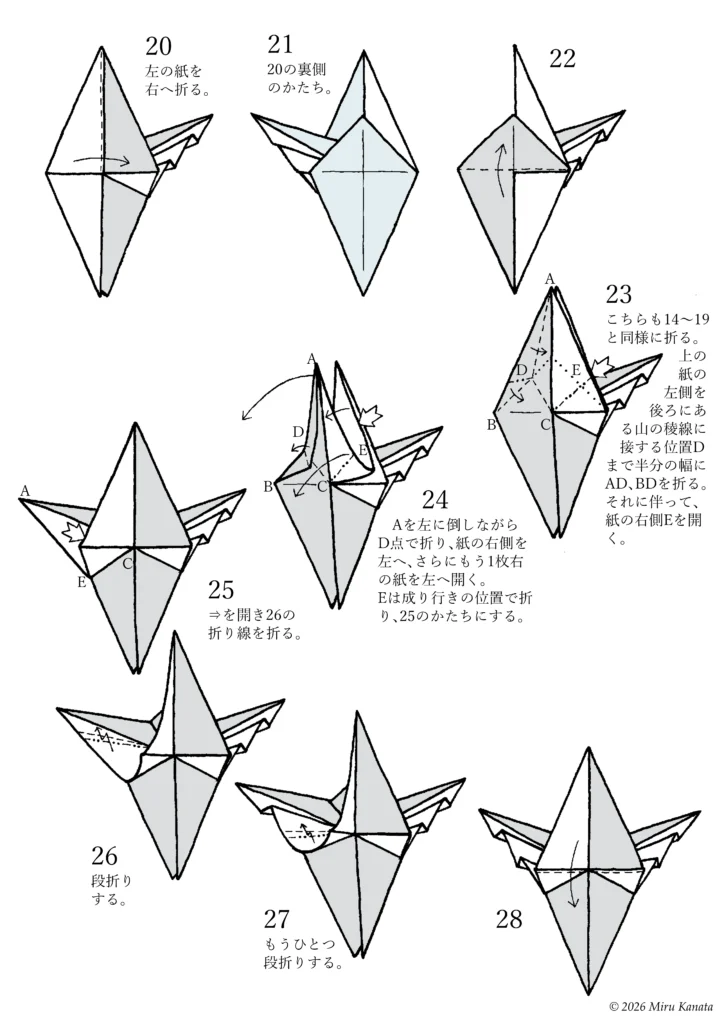
English Commentary
20 Fold the left piece of paper to the right.
21 The shape of the back of 20.
22
23 Fold this in the same way as 14-19. Fold the left side of the top piece of paper in half lengthwise, AD and BD, to point D where it touches the mountain ridge in the background. Open the left side of the paper E accordingly.
24 Fold A to the right at point D, open the left side of the paper to the right, and then open the other piece of paper to the left to the right. Fold E to its natural position to get the shape of 25.
25 Open the arrow and fold along the fold line of 26.
26 Make a step fold.
27 Make another step fold.
28
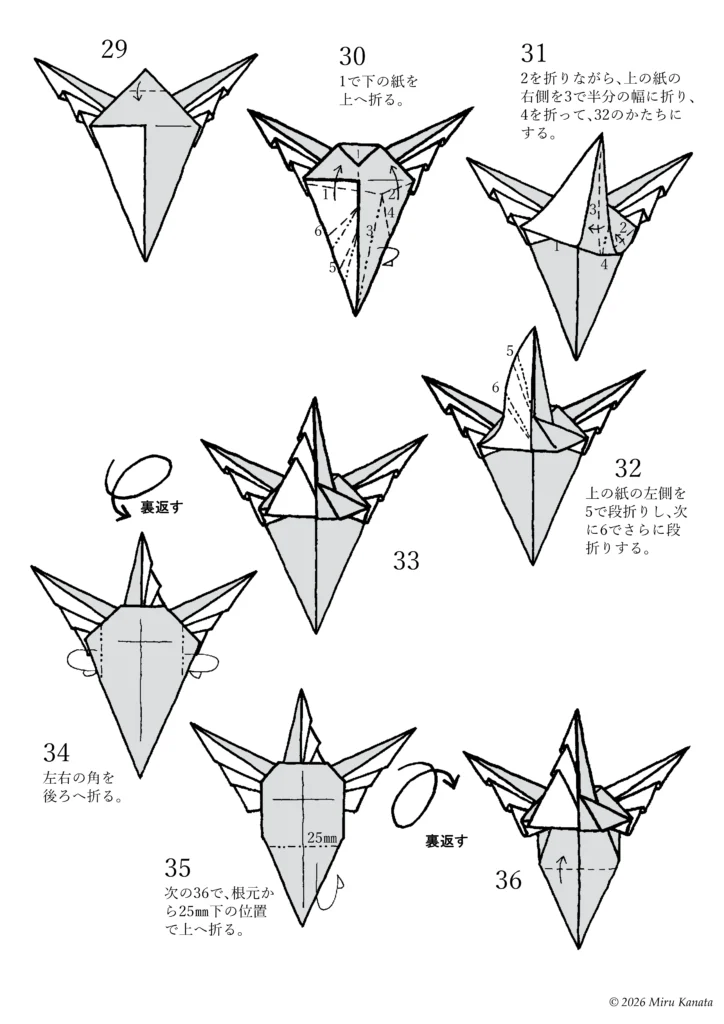
English Commentary
29
30 Fold the bottom paper upwards at 1.
31 While folding at 2, fold the right side of the top paper in half at 3, then fold at 4 to make the shape of 32.
32 Fold the left side of the top paper in a step fold at 5, then make another step fold at 6.
33
{Flip}
34 Fold the left and right corners backward.
35 In the next step, 36, fold upward at a point 25 mm below the base.
{Flip}
36
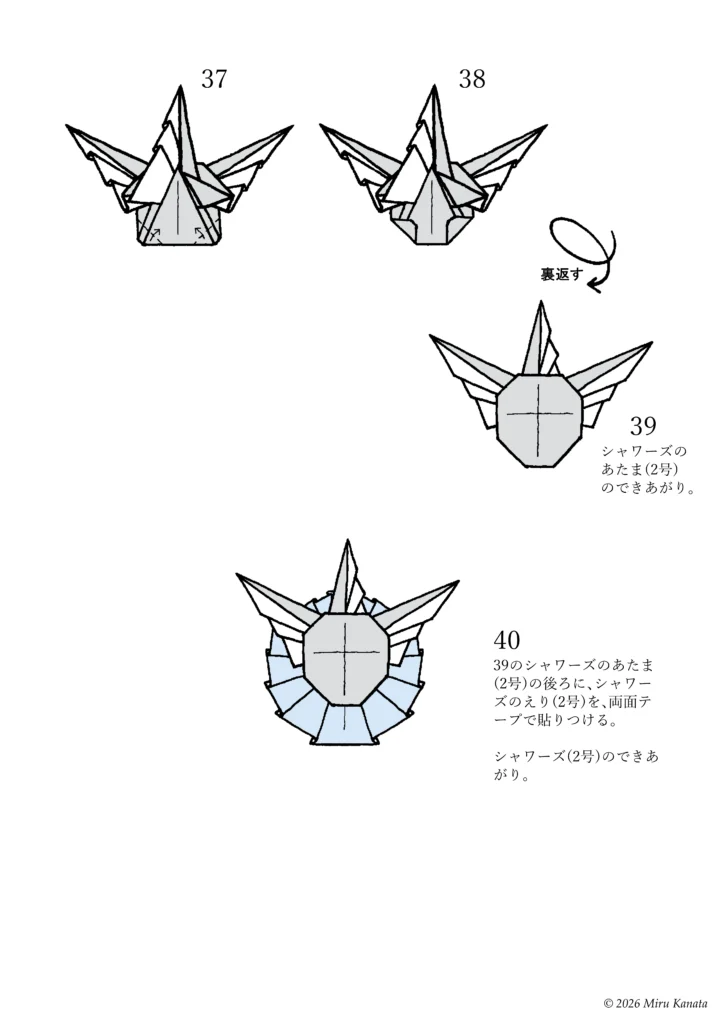
English Commentary
37
38
{Flip}
39 The head (No. 2) of Vaporeon is complete.
40 Attach the collar (No. 2) of Vaporeon to the back of the head (No. 2) of Vaporeon from step 39 using double-sided tape. The Vaporeon (No. 2) is complete.
3 シャワーズのえり 2号
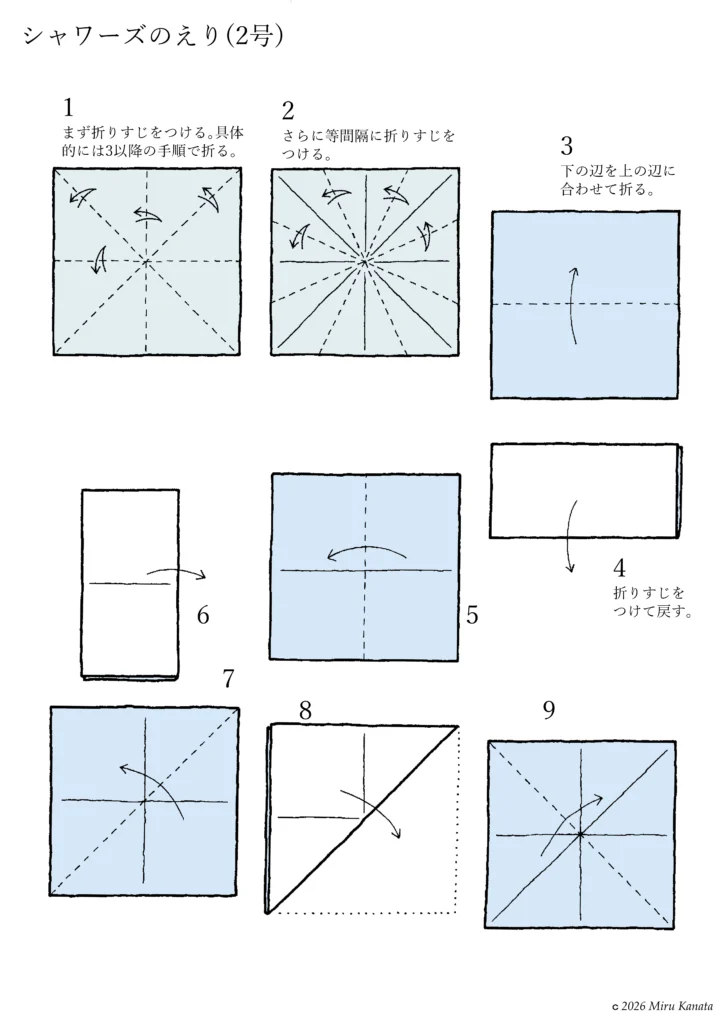
English Commentary
The collar (No. 2) of Vaporeon
1. First, make a crease. Specifically, fold using the steps from 3 onwards.
2. Make further creases at equal intervals.
3. Fold the bottom edge to meet the top edge.
4. Make a crease and unfold.
5.
6.
7.
8.
9.
English Commentary
10
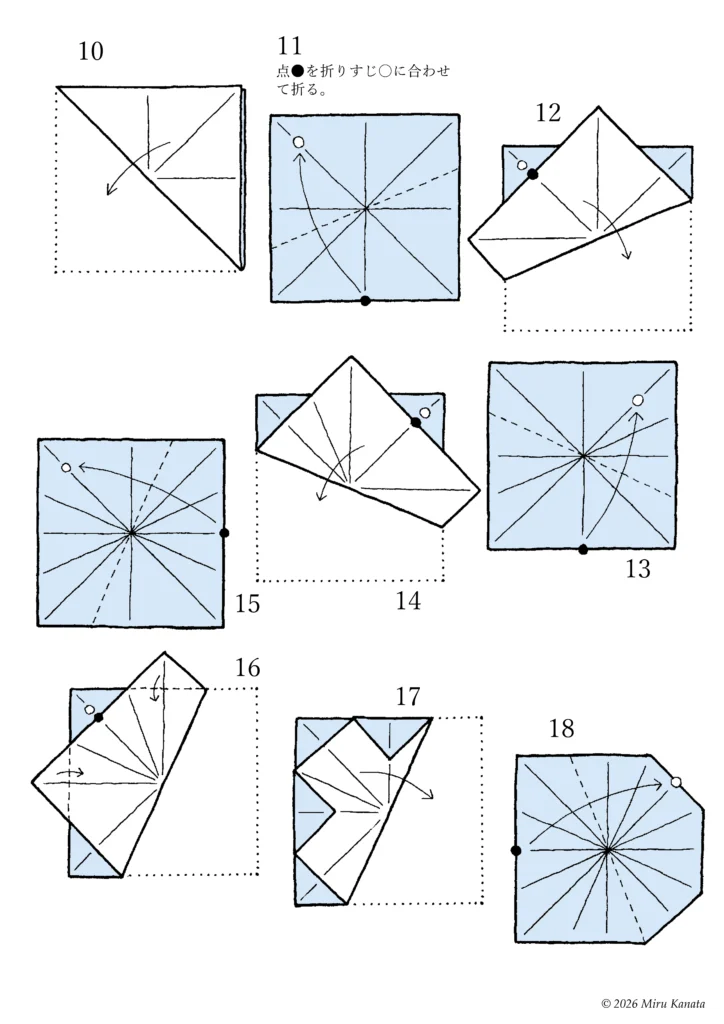
11 Fold along the crease ○ marked with ●.
12
13
14
15
16
17
18
English Commentary
19
20
21
{Flip}
{Enlarge diagram}
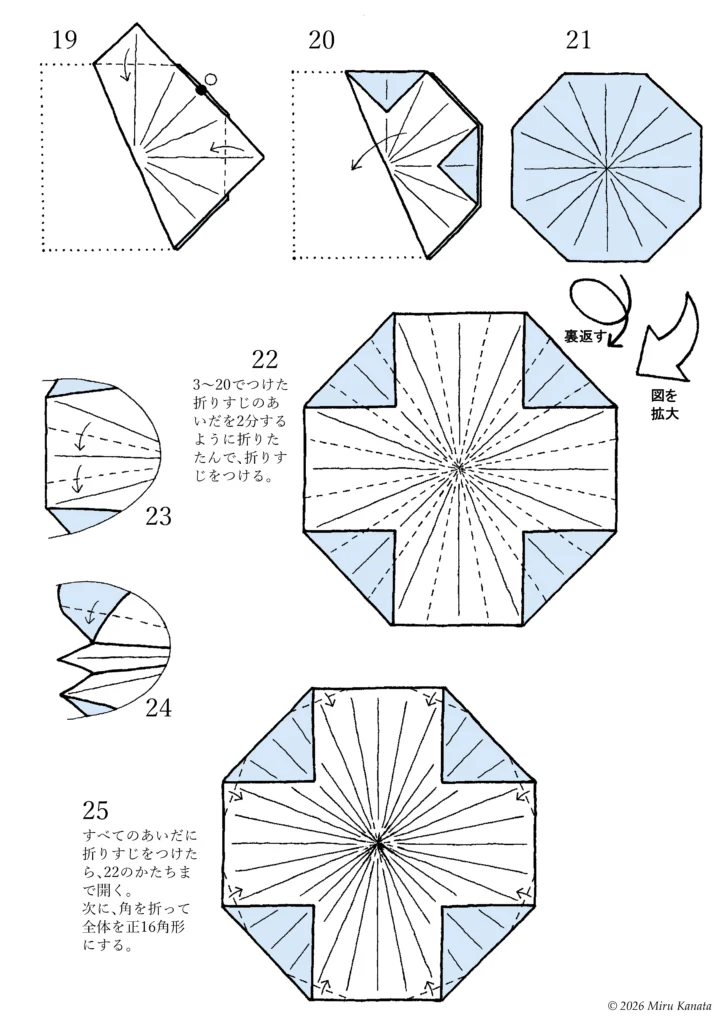
22 Fold the paper in half between the creases made in steps 3-20 to create a crease.
23
24
25 Once all the creases are made, unfold the paper to the shape shown in step 22. Next, fold the corners to make the whole thing a regular 16-sided polygon.
English Commentary
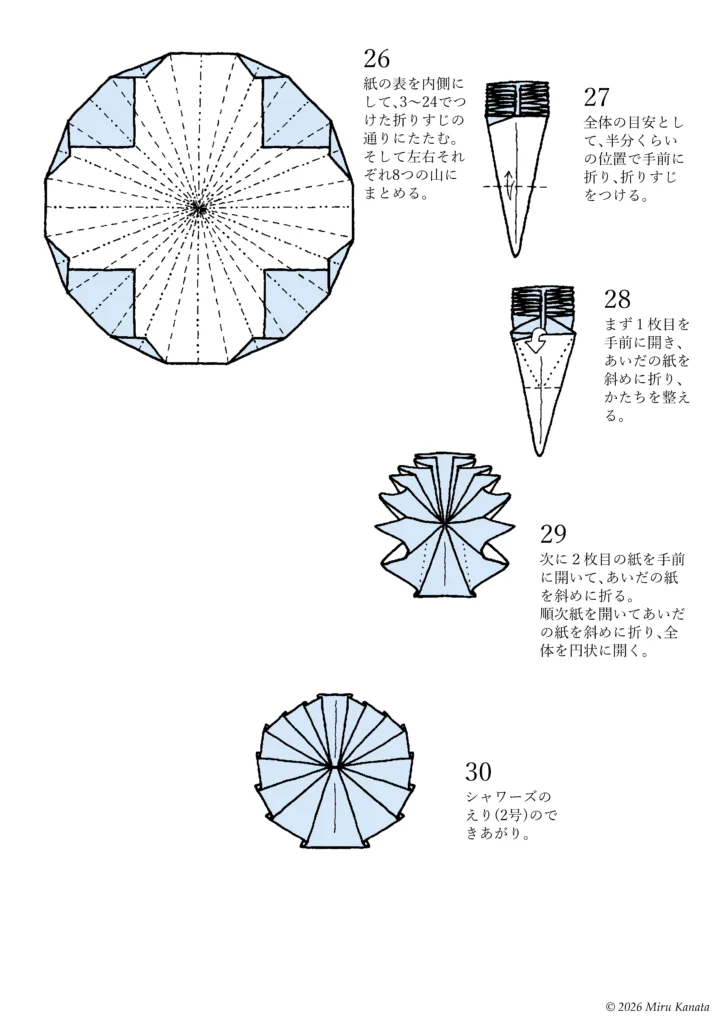
26 With the front of the paper facing inward, fold it along the creases made in steps 3-24. Then, gather it into eight sections on each side.
27 As a general guideline, fold it towards you at about the halfway point to make a crease.
28 First, open the first sheet towards you, fold the paper in between diagonally, and adjust the shape.
29 Next, open the second sheet towards you, fold the paper in between diagonally. Continue opening the sheets in order, folding the paper in between diagonally, and open the whole thing into a circular shape.
30 The collar (No. 2) for Vaporeon is complete.
みるかなた本棚>Nice Origami素敵折紙>p134 シャワーズ
p134シャワーズ
◆ポケットモンスターおりがみコレクション
◇ ◇ ◇