
みるかなた本棚>『ポケットモンスターおりがみコレクション』>ポケモンおりがみ一覧表>0006 リザードン03
◆0004 ヒトカゲ◆0005 リザード◆0006 リザードン01◆0006 リザードン02◆0006 リザードン03◆
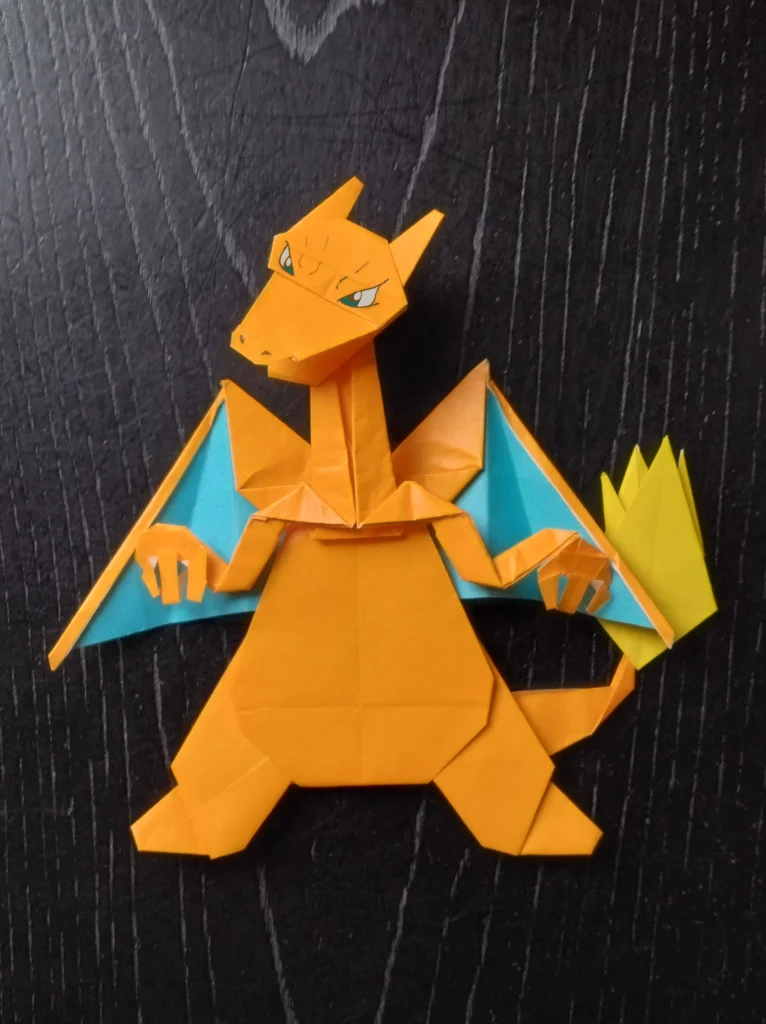
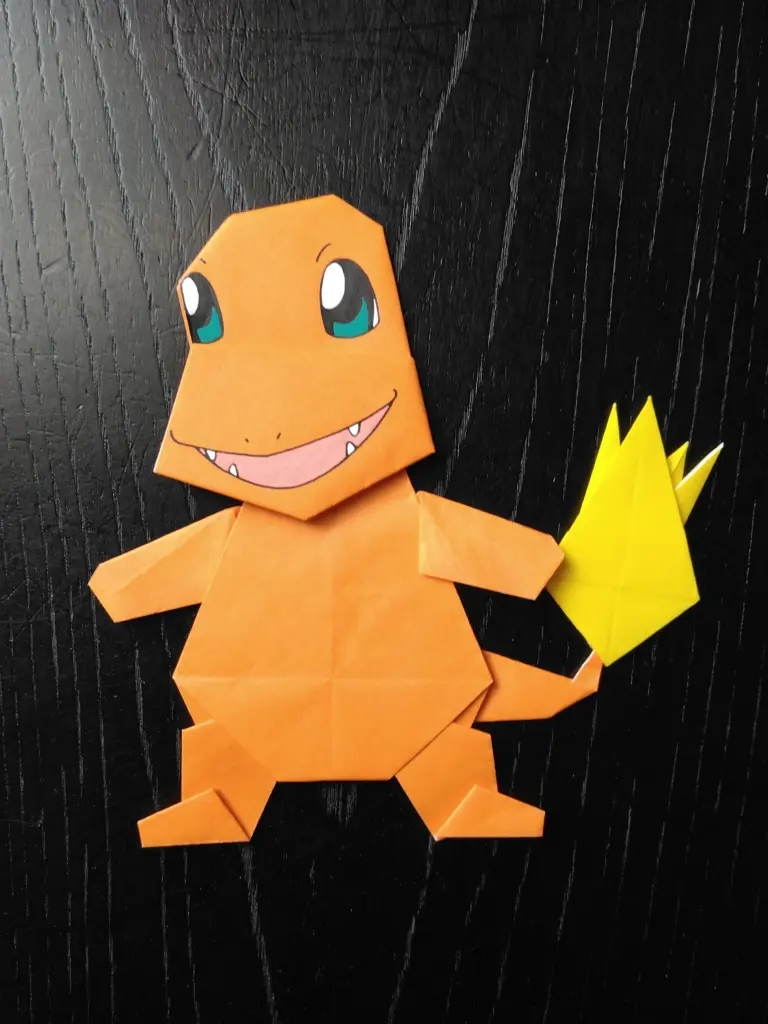
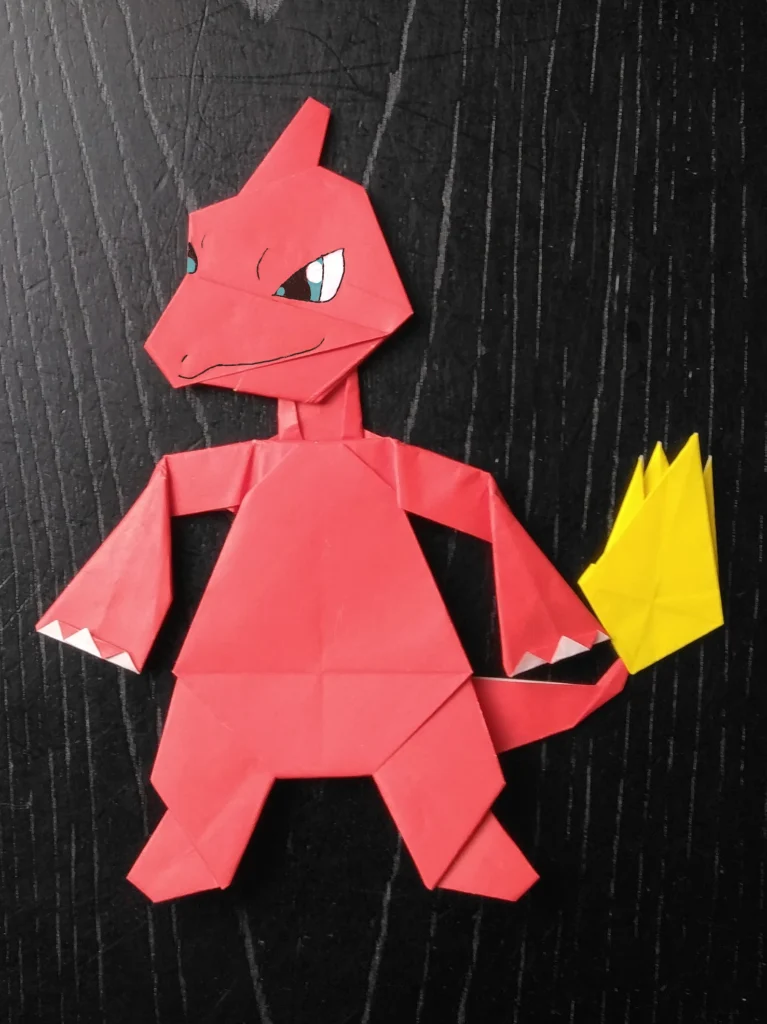
0006 リザードン 3号(地上形)
このリザードンは、ゲームフリークのチェックでOKをいただいたのですが、誌面の制約のため、本に掲載しませんでした。
今回、初公開です。
リザードと同様、あたま、からだ、そして首・肩・腕、の部分に分けてつくっていますが、首・肩・腕の部分はリザードとは異なる構造をベースにしています。
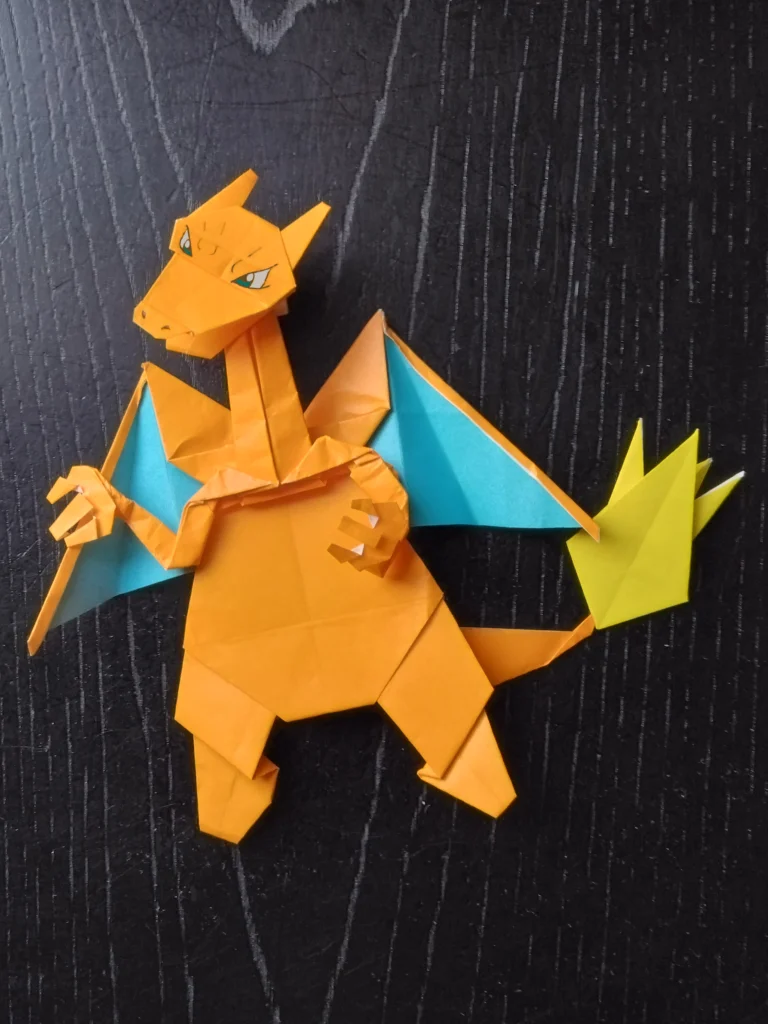
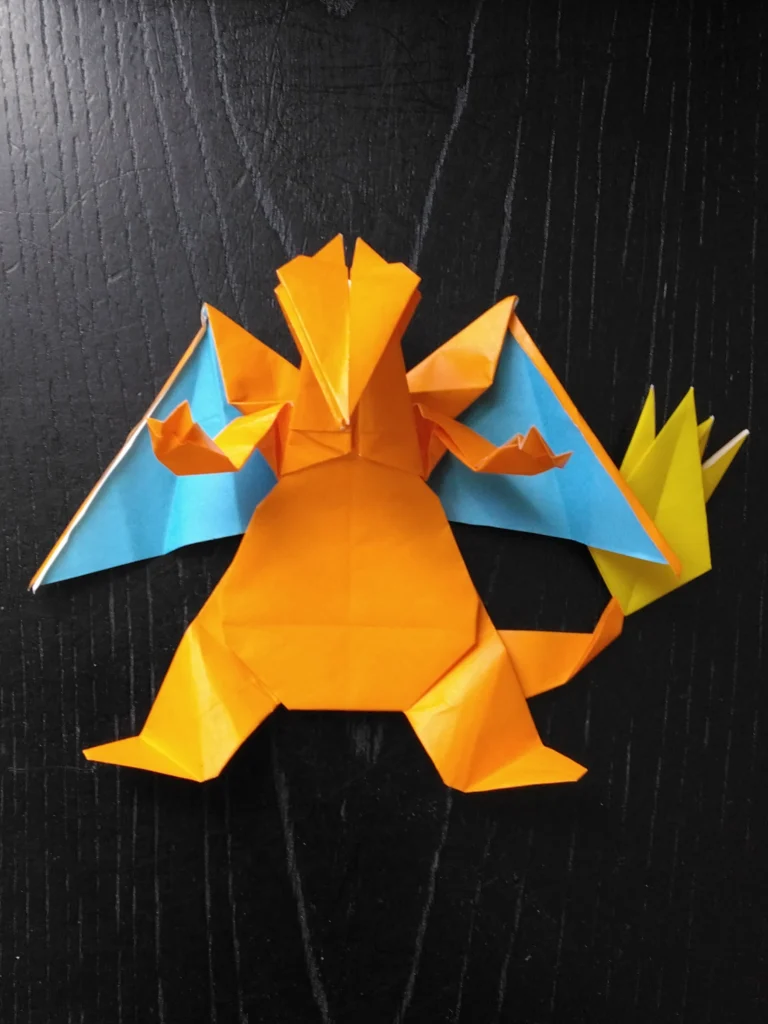
0006 リザードン 3号(飛行形)
上のリザードン3号の、飛行ヴァージョンの足のかたちです。
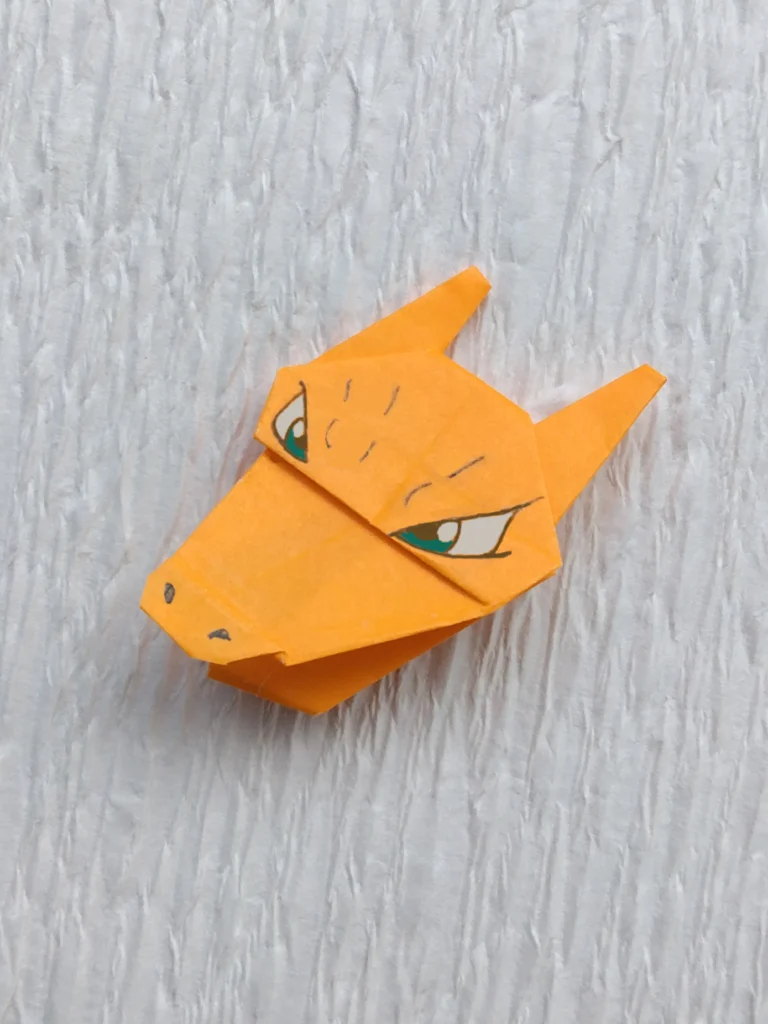
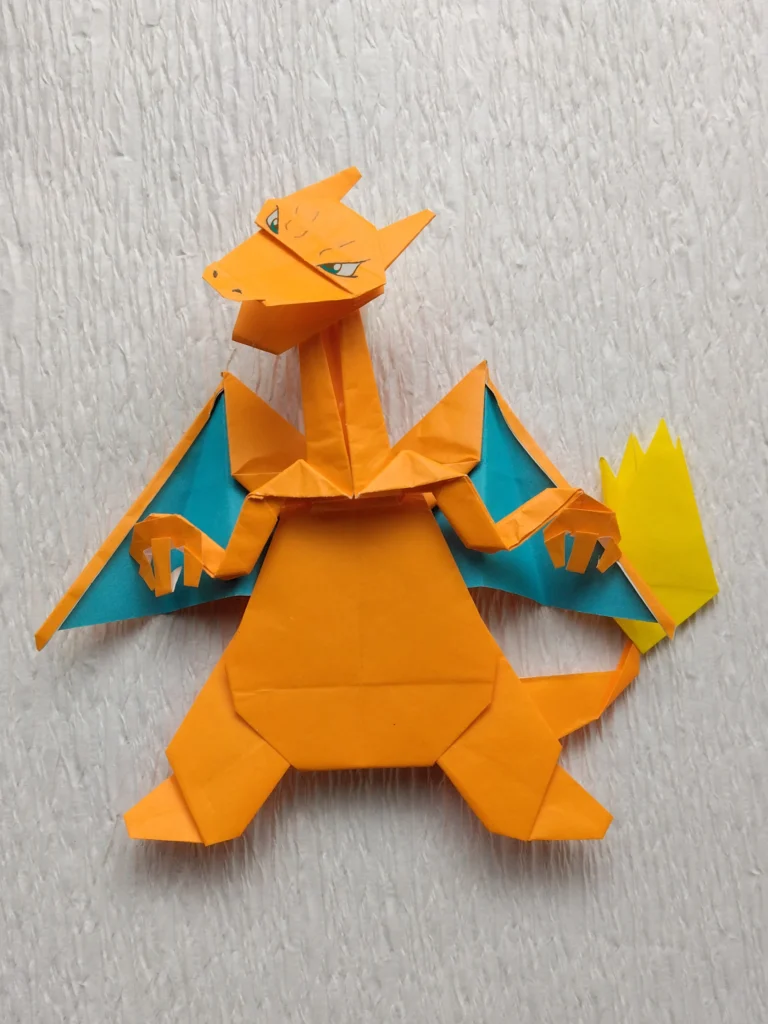
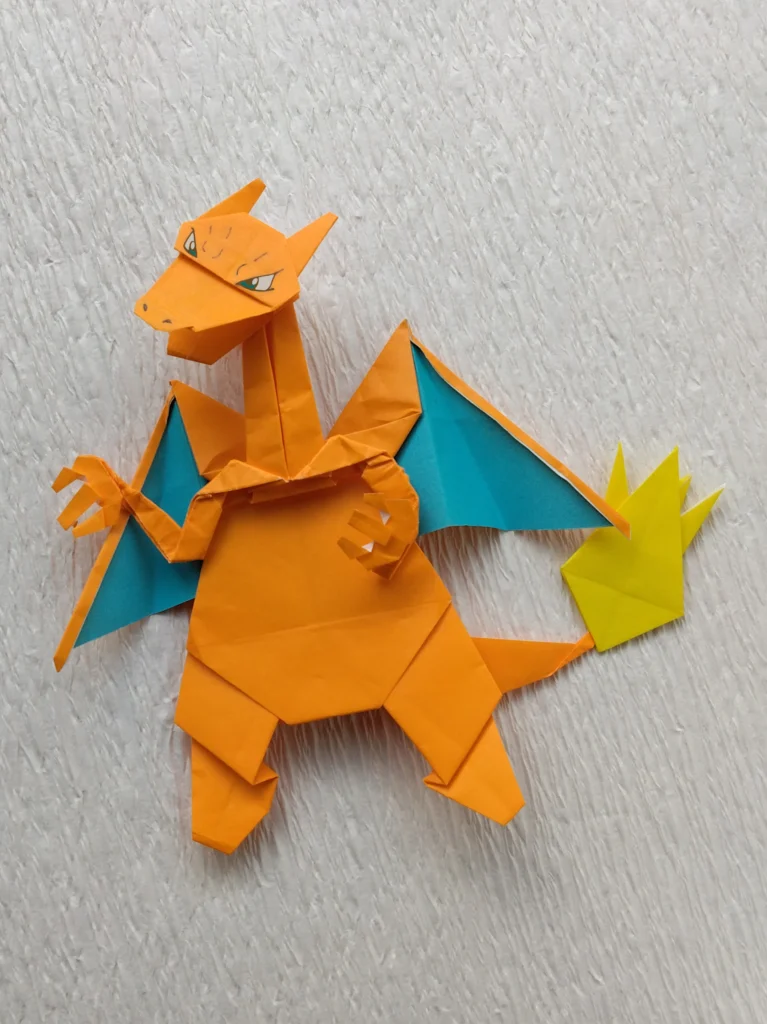
リザードン 3号
リザードン3号の、首・肩・腕の部分は、リザードとは異なる構造をベースにしていますが、やはり紙の厚みがあってちょっと折りにくいと思います。
いい加減に折らないで、論理的に折っていけば、きれいにできあがります。
0006 リザードン 初号
顔を描き込むタイプのおりがみとは違う、別のスタイルのおりがみになります。
ごくはじめのころにつくったもので、特にプランもなく、紙と戯れているうち無意識に、なんとなくできあがっていたのでした。
そのため、なんか愛おしくて捨てがたい存在です。
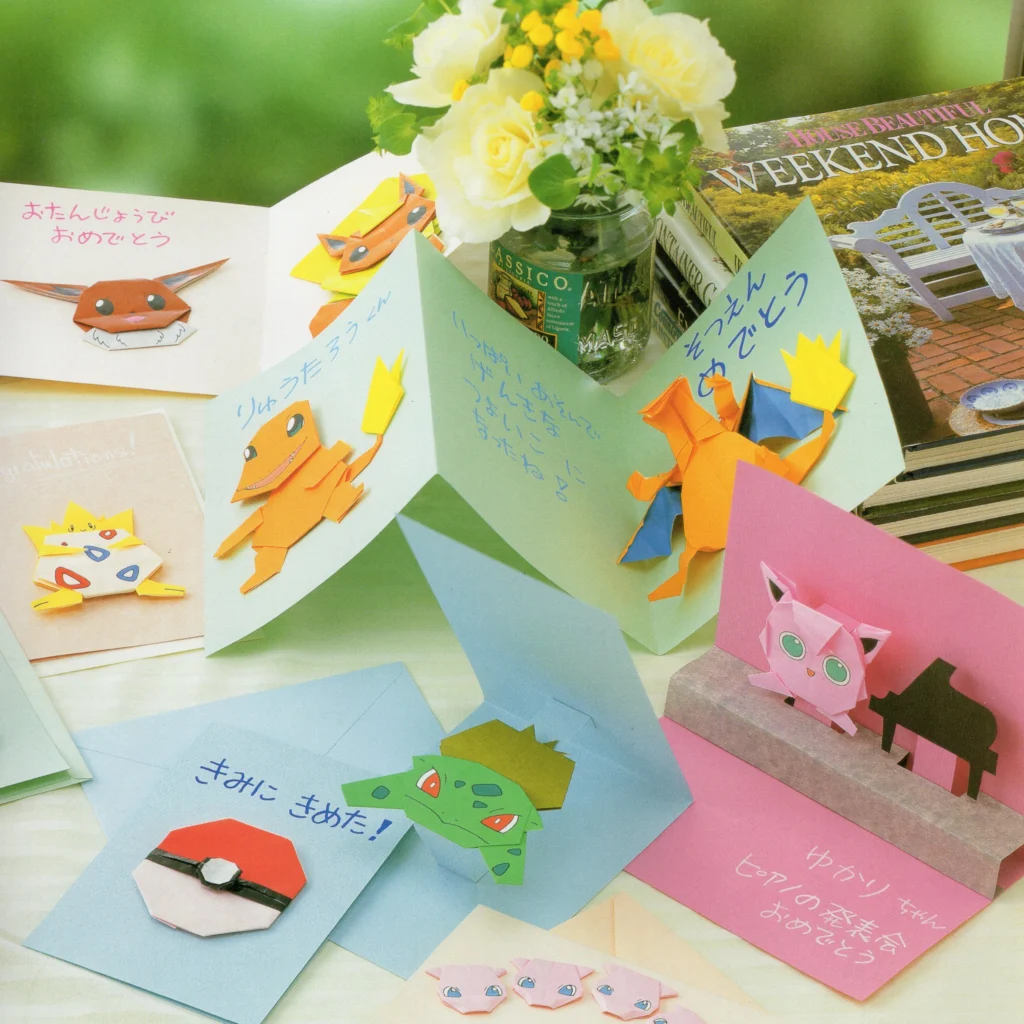
ほかのおりがみとは明らかに異なる表現形式ですが、2000年の本に収録しました。
そうしたら
「リザードンに顔が描いてないけれど、これでいいんですか?」
「どうしてリザードンの顔が描かれてないのかと、子どもが、こだわっているのですが」
と、出版社の小学館に問い合わせが多数あったそうです。
お騒がせしました。
★リザードン初号のつくり方は、0006リザードン01のページをご覧ください。
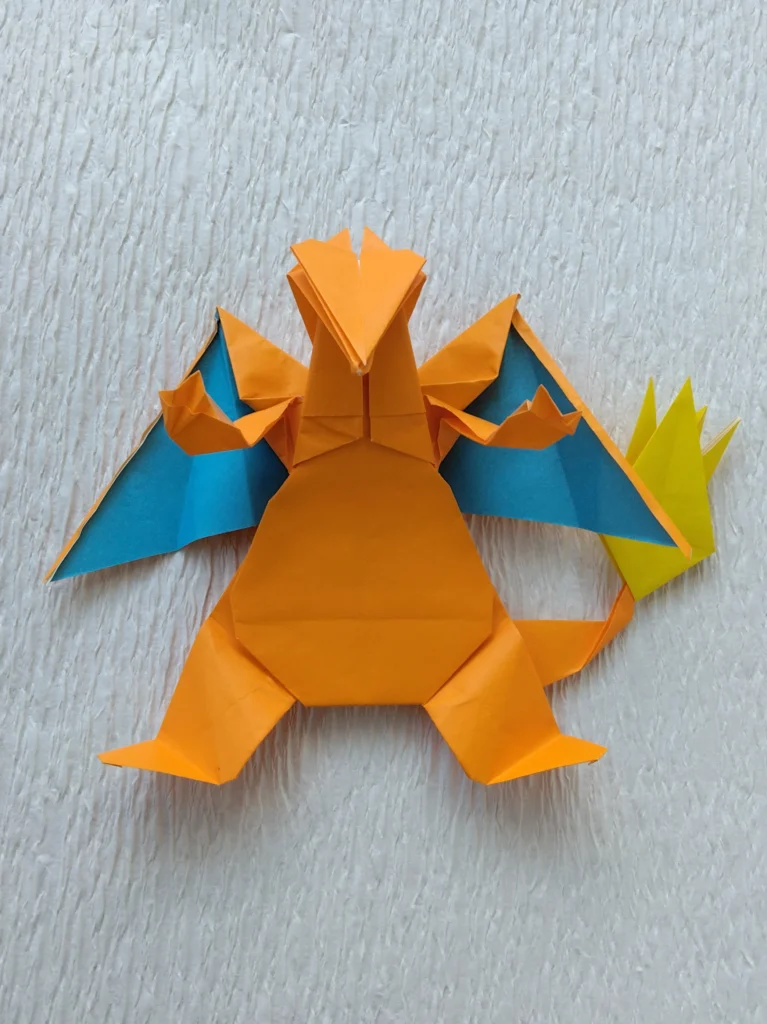
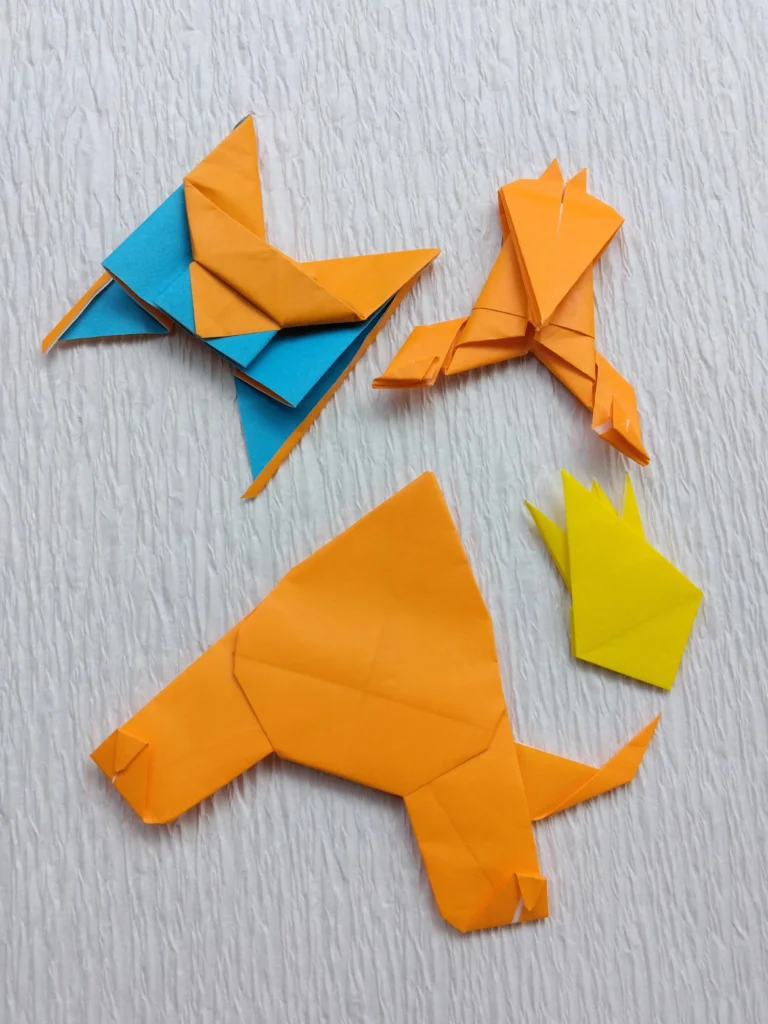
リザードン 初号
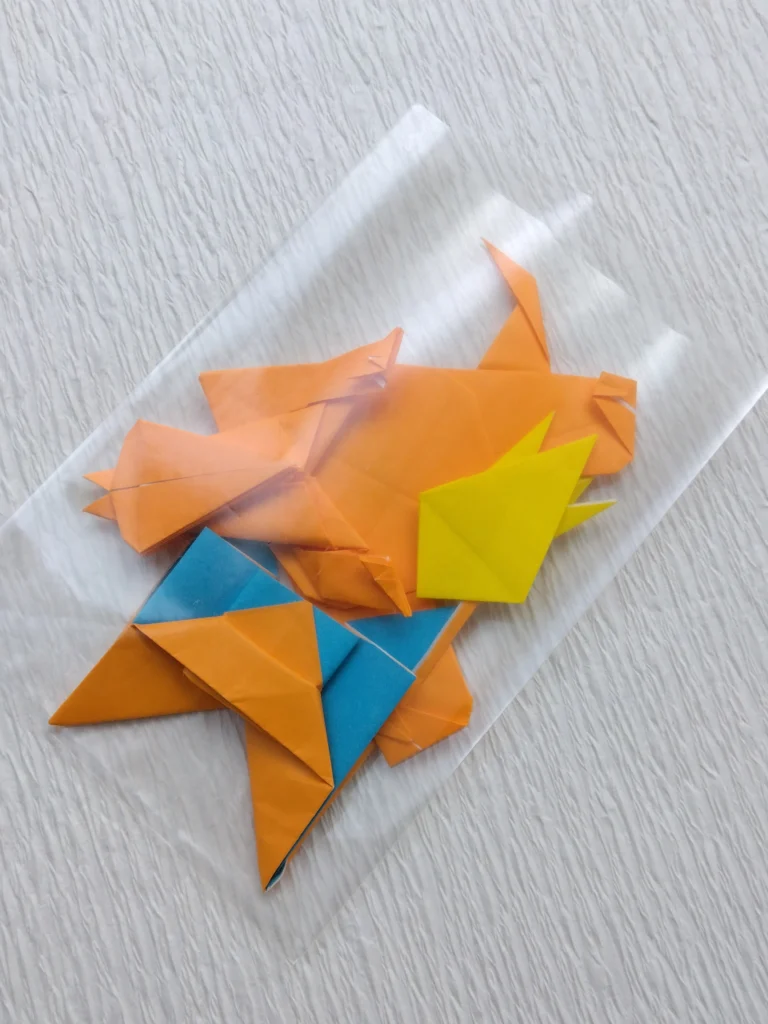
使用しないときは、たたんで、透明袋に入れて保管しています。
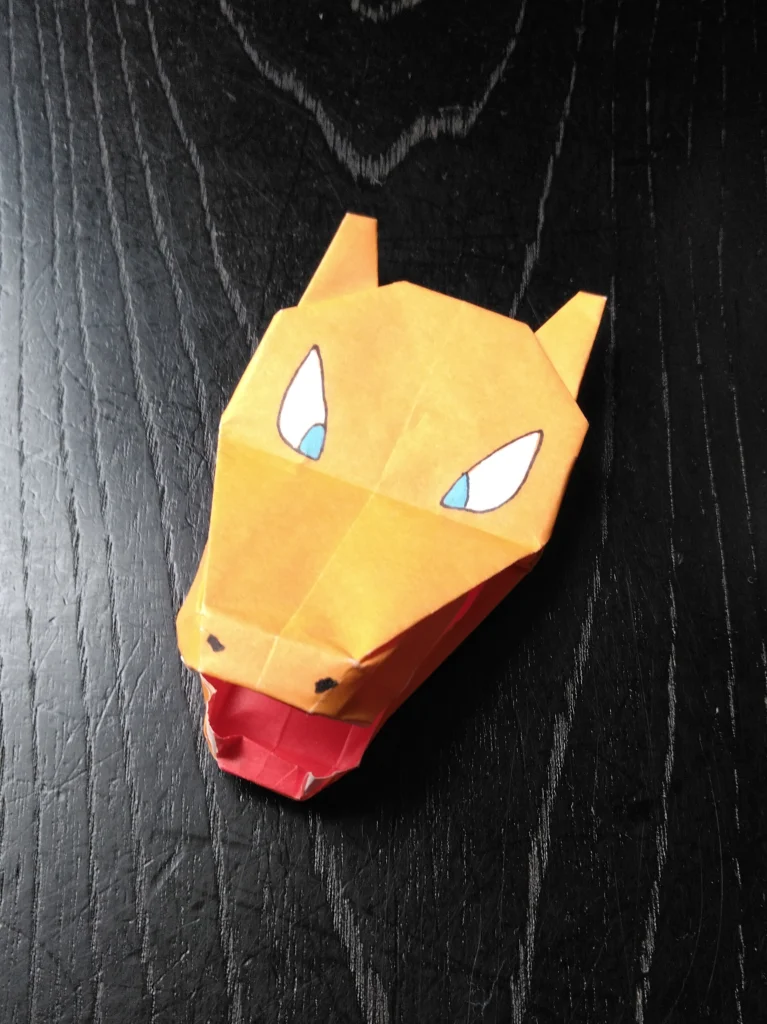
0006 リザードン 2号
このリザードンのあたまは、ゲームフリークのチェックでOKをいただいたのですが、誌面の制約のため、本に掲載しませんでした。
今回、初公開です。
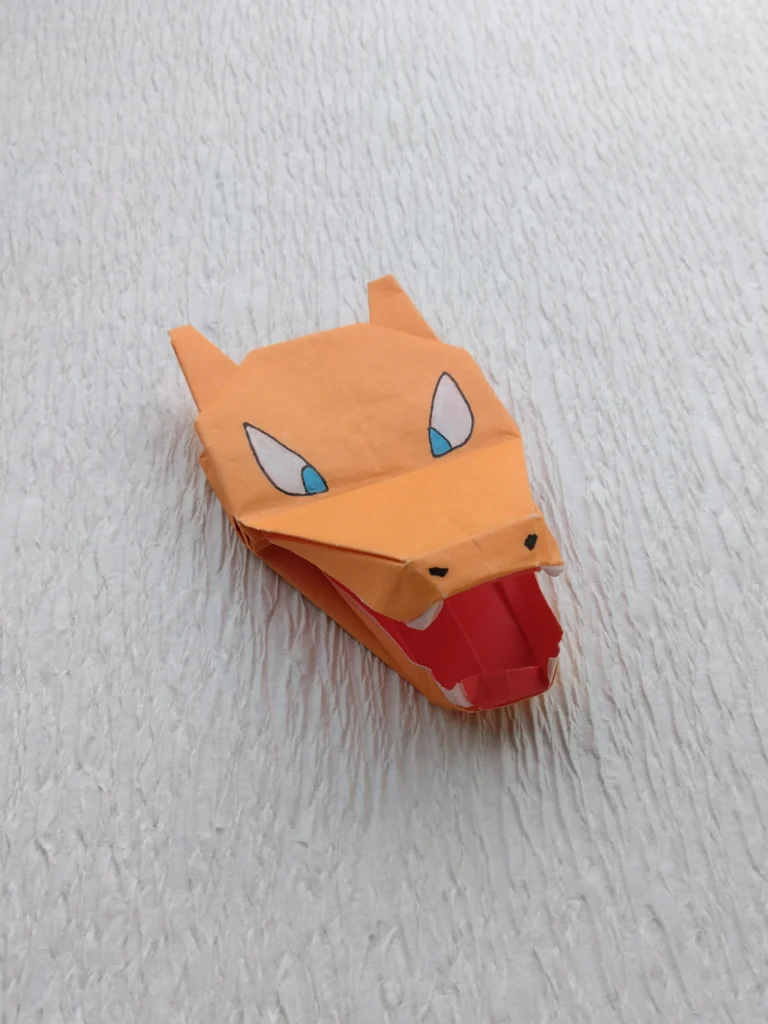
顔が描かれていますが、初号のリザードンと同様、ほかのおりがみとはちょっと異なる表現形式です。
これも、ごくはじめのころにつくったもので、特にプランもなく折りだして、表現スタイルも定まっていなかったので、思いを自由にかたちにしています。
リザードンというと、口を開き炎を出して威嚇しているポーズがすぐ思い浮かんで、それをつくりたかったんです。
上顎、下顎、それぞれ2本ずつ牙をつくっています。
★リザードン2号のつくり方は、0006リザードン02のページをご覧ください。
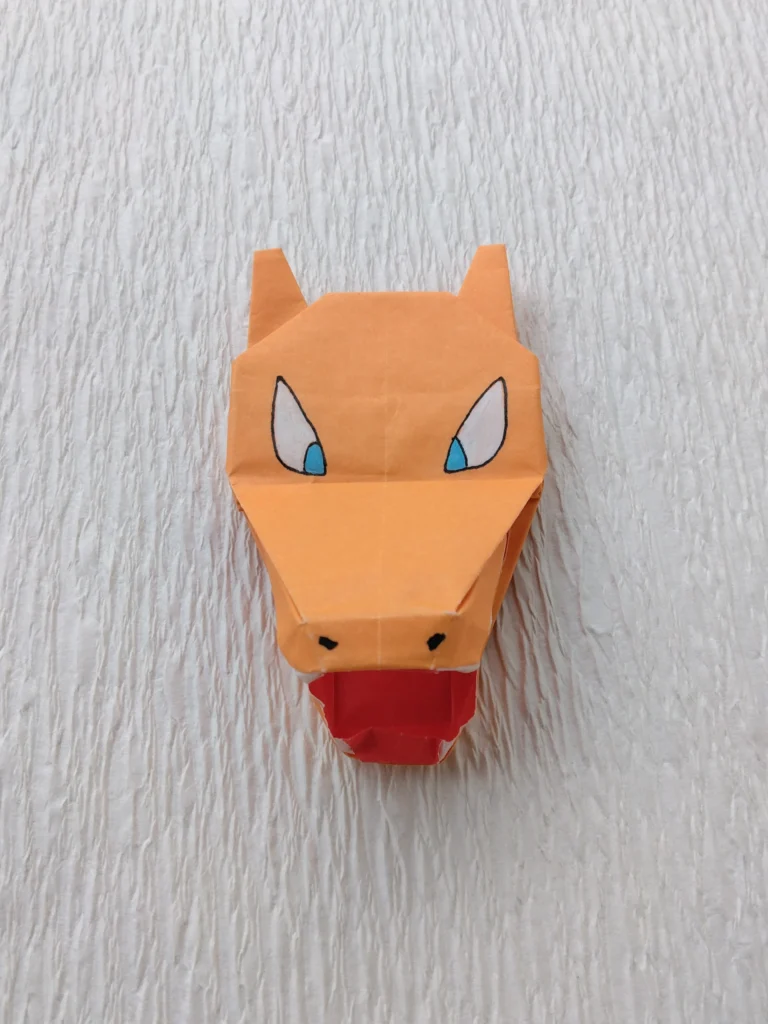
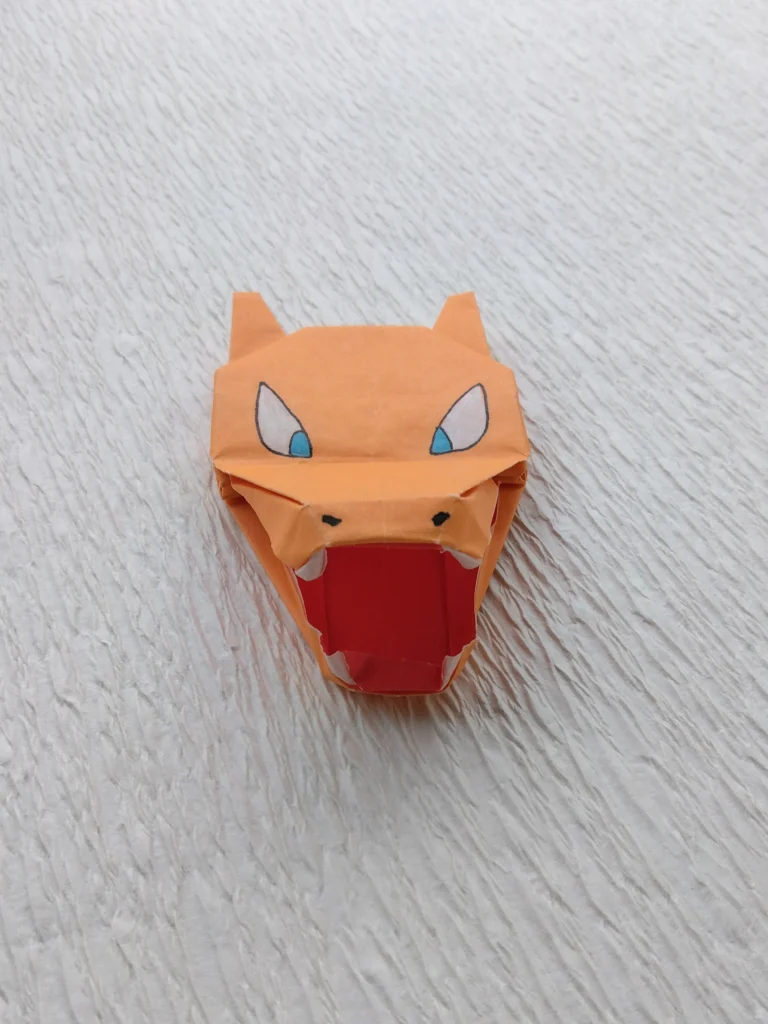
リザードン 2号
上顎、下顎、それぞれ2本ずつ牙をつくっています。
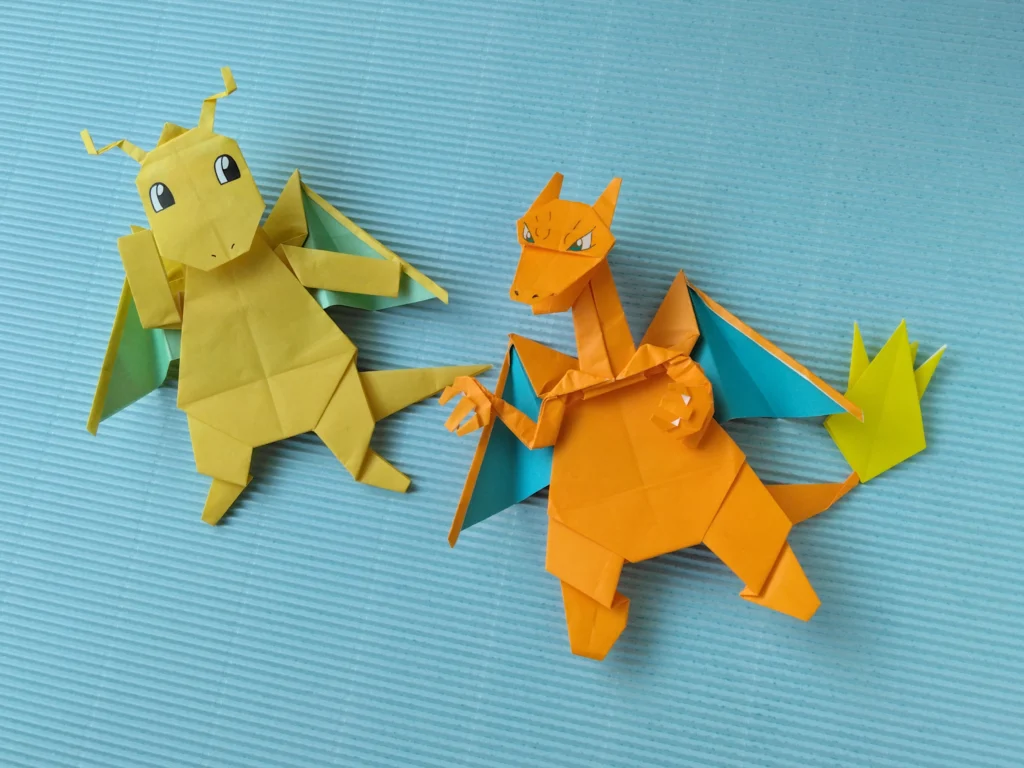
★ゲームフリークのチェック 初号 3号
◆1回目のチェックで「基本はOKですが、足のかたちをもう少し外向きになるようにしてください」とのことでした。
それで、足を開いて、踏ん張っている感じにつくりました。
◆また、「胴の部分が5ミリ強短くなるとよいのですが」というご指摘があり、手直しをしました。
◆紙の色は、はじめヒトカゲと同じオレンジ色でつくっていたところ、少し黄色みをおびた、みかん色に変更してほしいというご要望がありました。
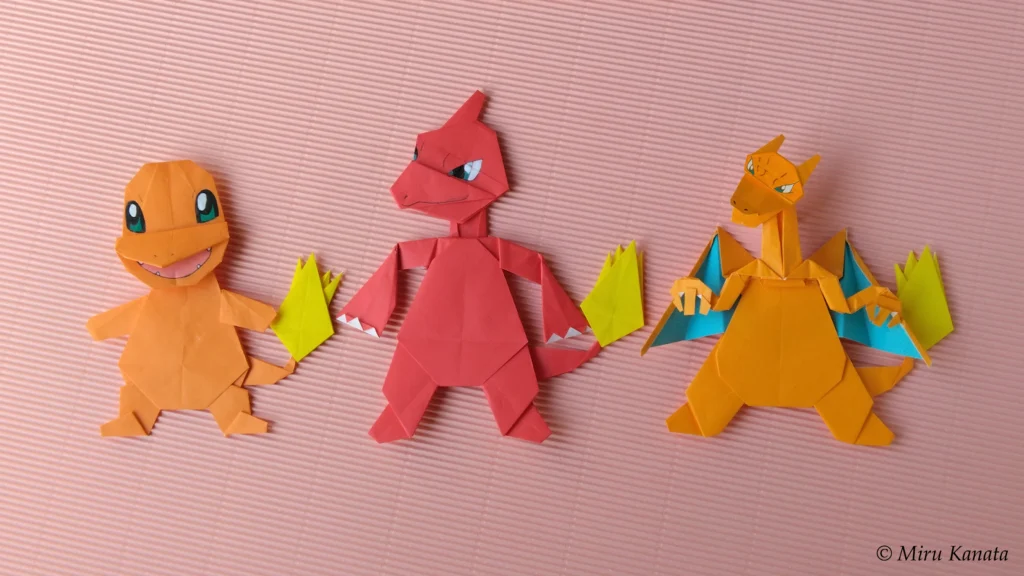
Evolution
つくり方
動画制作予定
つくり方の折り図
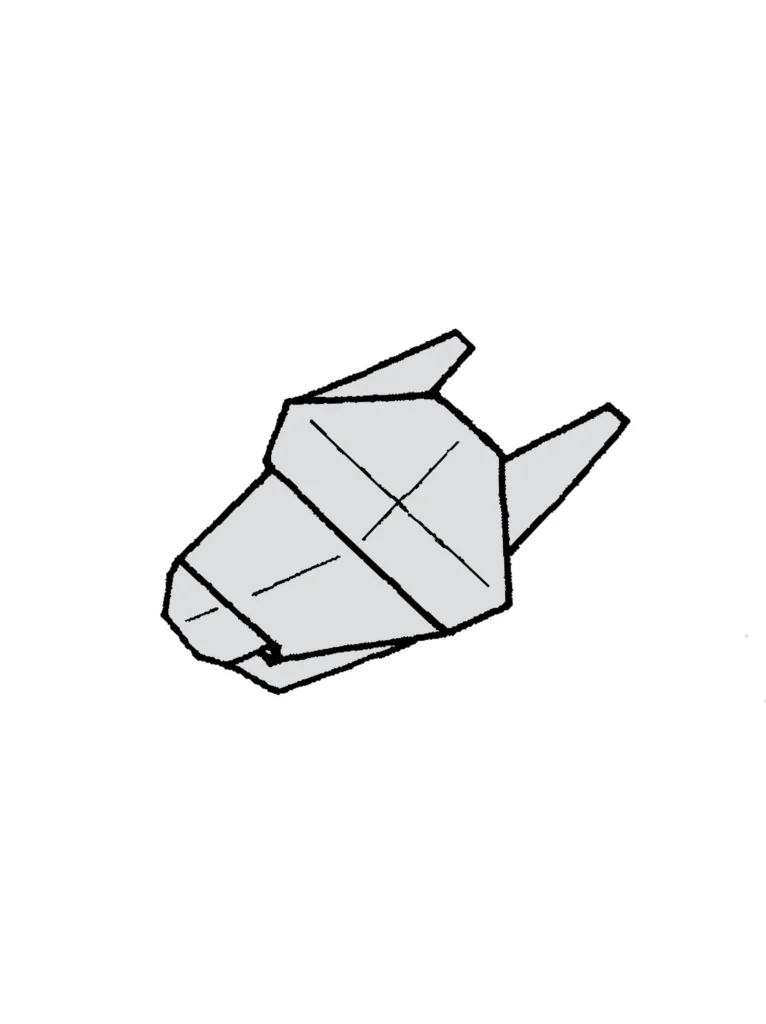
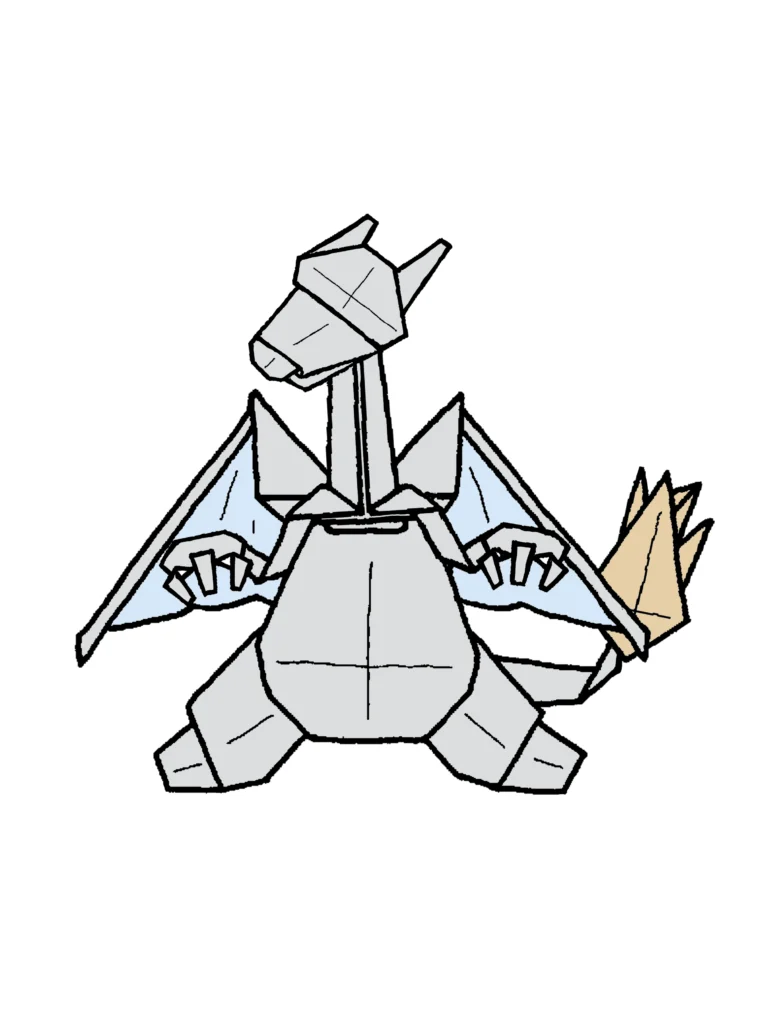
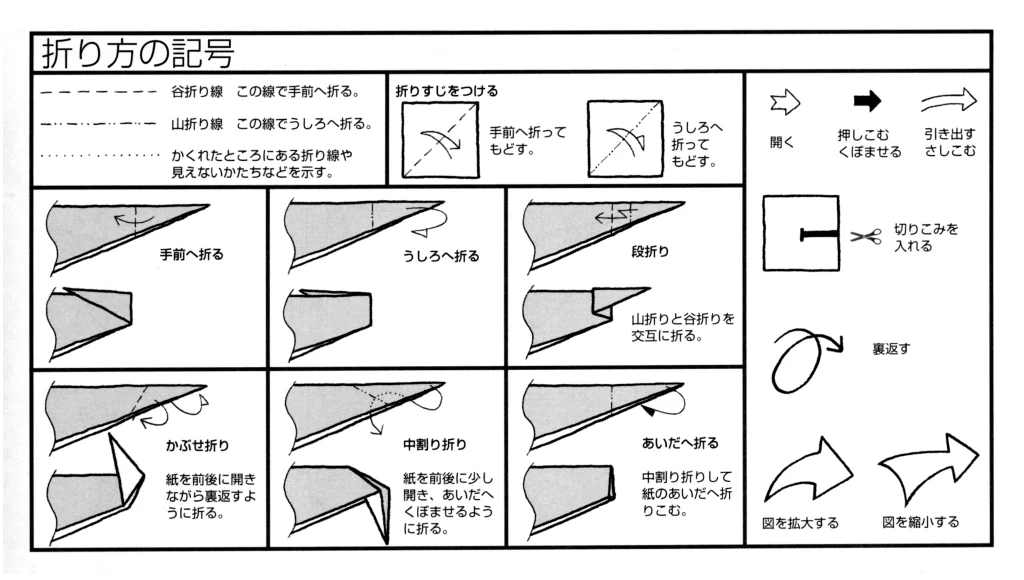
今回制作した折り図
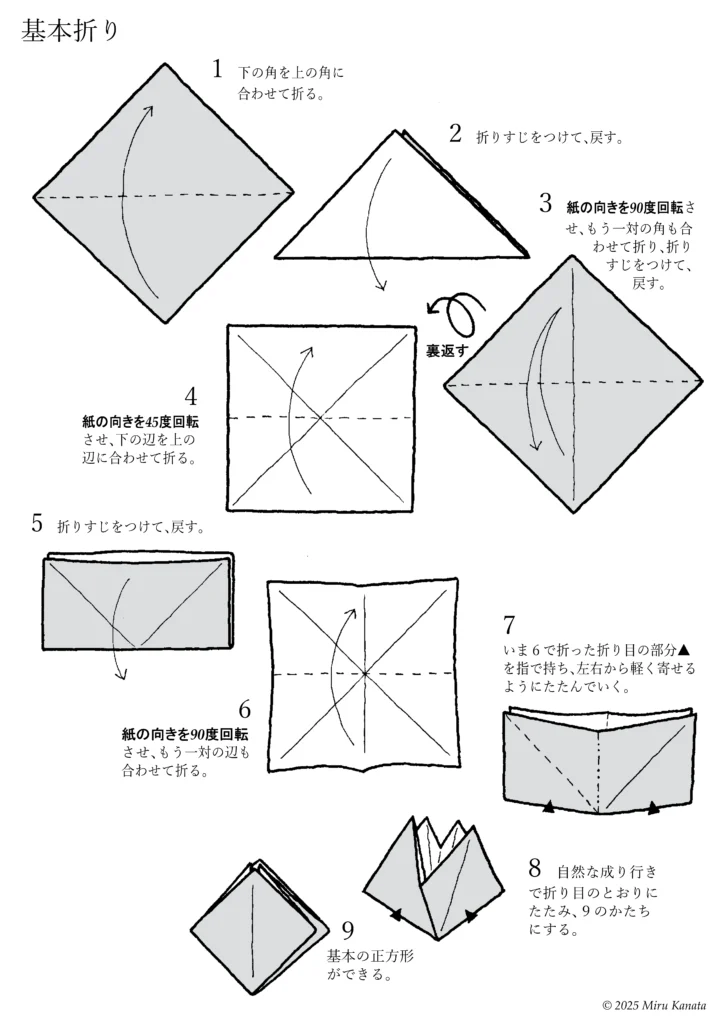
■1 リザードンのからだは、オレンジ色よりも黄色みの強い、みかん色の紙で、まず基本折りの図20まで折る。
■2 リザードンのあたまは、みかん色の紙で折る。
■3 しっぽの先の炎は、4分の1のサイズに切った黄色の紙で、こちらも基本折りの図20まで折る。
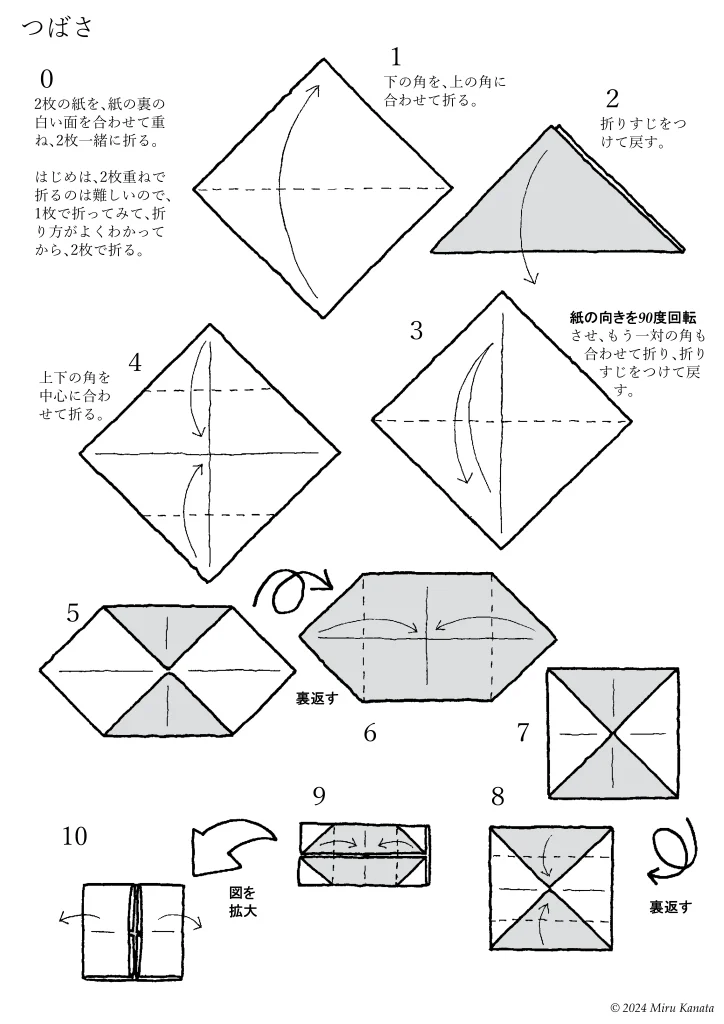
■4 つばさは、みかん色の紙を外側に、青色の紙を内側にして、紙の裏の白い面を合わせて重ね、2枚一緒に折る。
English Commentary
Basic Folding
1 Fold the bottom corner to meet the top corner.
2 Make a crease and return it to its original position.
3 Rotate the paper 90 degrees, fold the other pair of corners together, make a crease and return it to its original position.
{Flip}
4 Rotate the paper 45 degrees and fold the bottom edge to line up with the top edge.
5 Make a crease and return it to its original position.
6 Rotate the paper 90 degrees and fold the other pair of edges together.
7 Hold the crease ▲ made in step 6 with your fingers and fold gently from both sides together.
8 Let the paper naturally fold along the creases to form the shape of 9.
9 A basic square is created.
English Commentary
{Enlarge image}
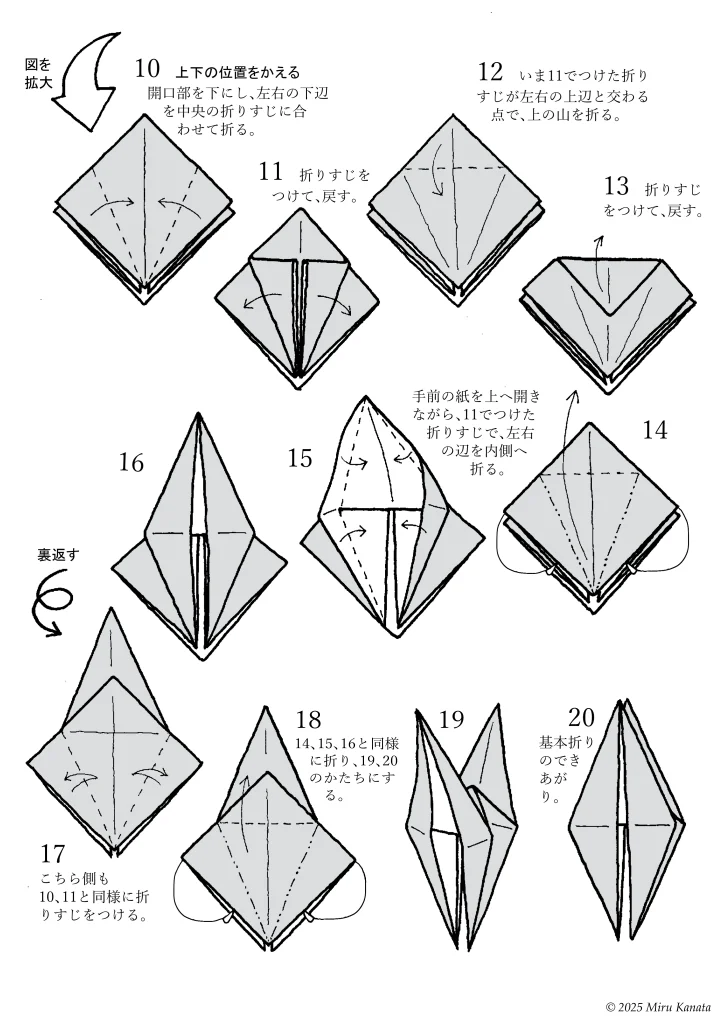
10 Change the top and bottom positions.
With the opening facing downwards, fold the bottom left and right edges to meet the crease in the middle.
11 Make a crease and return.
12 Fold the top at the point where the crease made in 11 intersects with the top left and right edges.
13 Make a crease and return.
14 While opening the front paper upwards, fold the left and right edges inward along the crease made in 11.
15
16
{Flip}
17 Make creases on this side in the same way as 10 and 11.
18 Fold in the same way as 14, 15 and 16 to form 19 and 20.
19
20 The basic fold is complete.
English Commentary
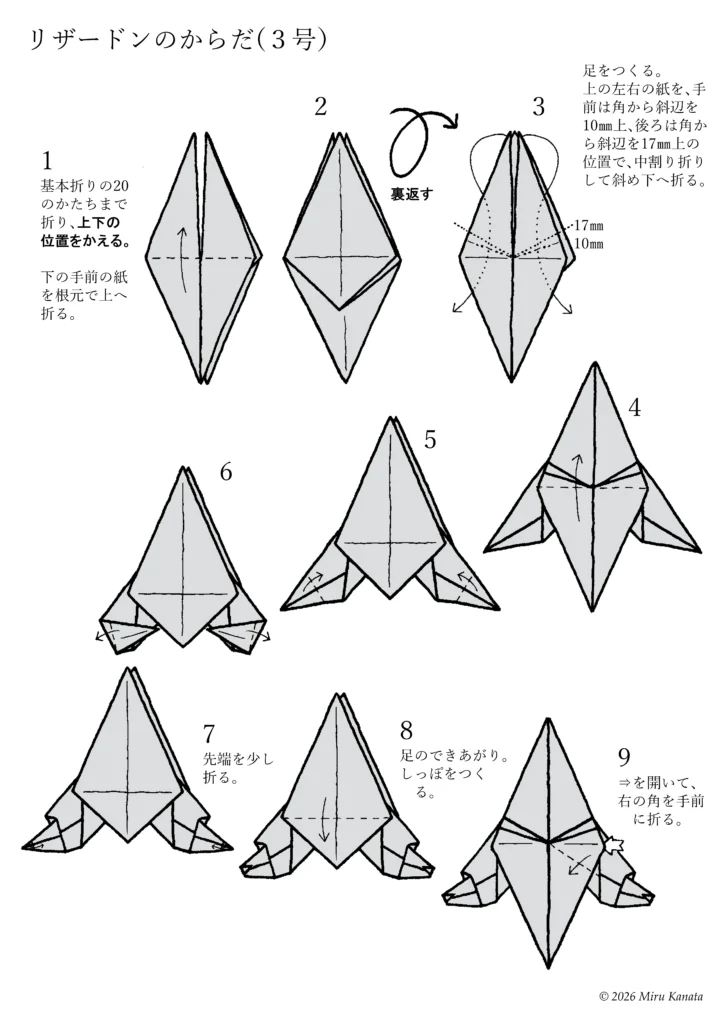
Charizard (No. 3)’s body
1 Fold to the shape of the 20th basic fold, then change the top and bottom positions.
2
{Flip}
3 Make the legs. Fold the top left and right pieces of paper diagonally downwards using an inside reverse fold, with the front piece 10 mm above the corner and the back piece 17 mm above the corner.
4
5
6
7 Fold the tip slightly.
8 The legs are complete. Make the tail.
9 Open the arrow and fold the right corner towards you.
English Commentary
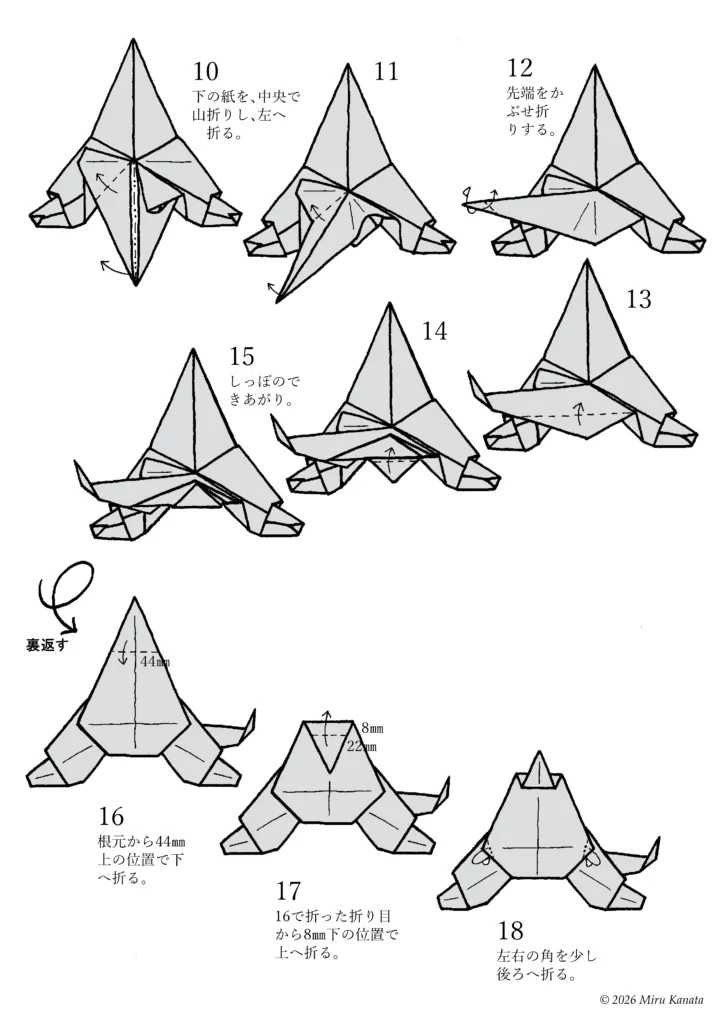
10 Fold the bottom piece of paper in half lengthwise, then fold it to the left.
11
12 Fold the tip over.
13
14
15 The tail is complete.
{Flip}
16 Fold it down 44 mm above the base.
17 Fold it up 8 mm below the crease made in step 16.
18 Fold the left and right corners slightly backward.
English Commentary
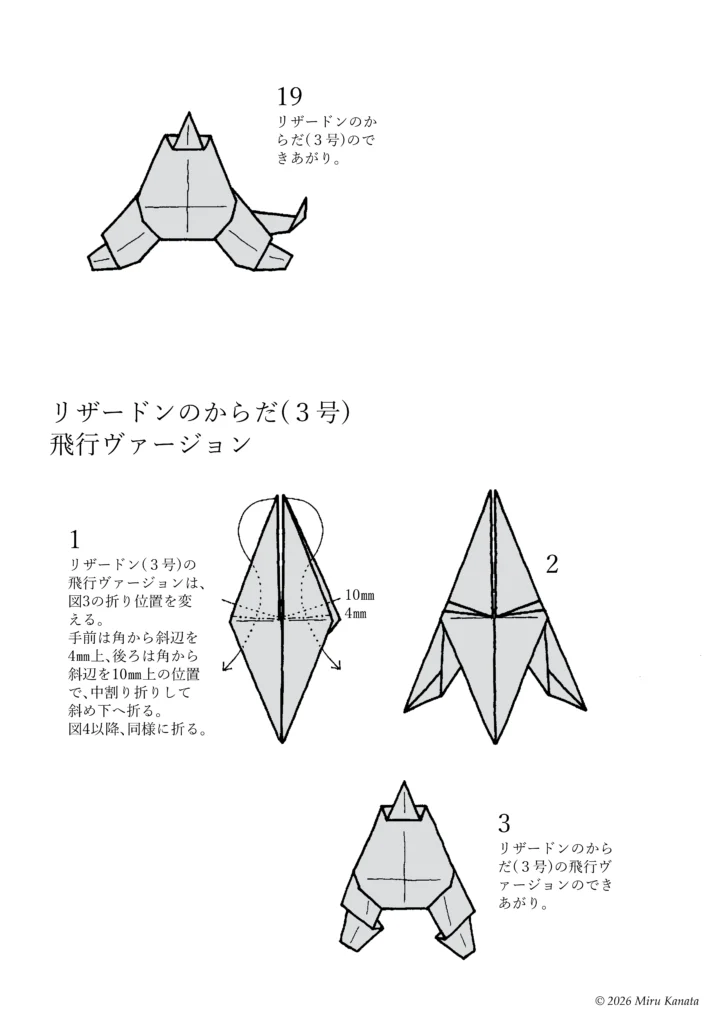
19. Charizard (No. 3)’s body is complete.
Charizard (No. 3) body, Flying Version
1. To make the flying version of Charizard (No. 3), change the folding position in Figure 3. On the front, make an inside reverse fold 4 mm above the corner along the hypotenuse, and on the back, make an inside reverse fold 10 mm above the corner along the hypotenuse, and fold diagonally downwards. Fold similarly from Figure 4 onwards.
2.
3. The flying version of Charizard (No. 3)’s body is now complete.
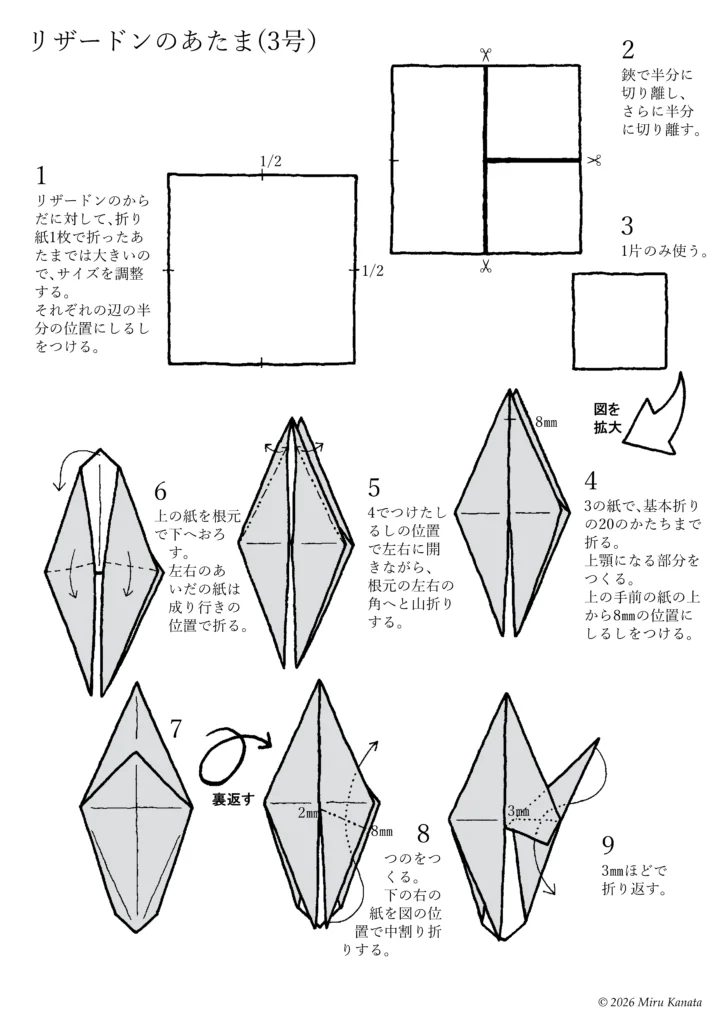
English Commentary
Charizard(No. 3)’s head
1. The head, made from a single sheet of origami paper, is too large for Charizard’s body, so adjust the size. Mark the halfway point on each side.
2. Cut in half with scissors, then cut in half again.
3. Use only one piece.
(Enlarge the diagram)
4. Fold the paper from step 3 to the shape of basic fold 20. Create the part that will become the upper jaw. Mark 8 mm below the top of the upper front piece of paper.
5. Open the paper to the left and right at the marks made in step 4, and make mountain folds towards the left and right corners of the base.
6. Bring the top piece of paper down at the base. Fold the paper in between on the left and right as it will naturally be.
7.
{Flip}
8. Make the horns. Fold the bottom right piece of paper in the middle at the position shown in the diagram.
9. Fold back about 3 mm.
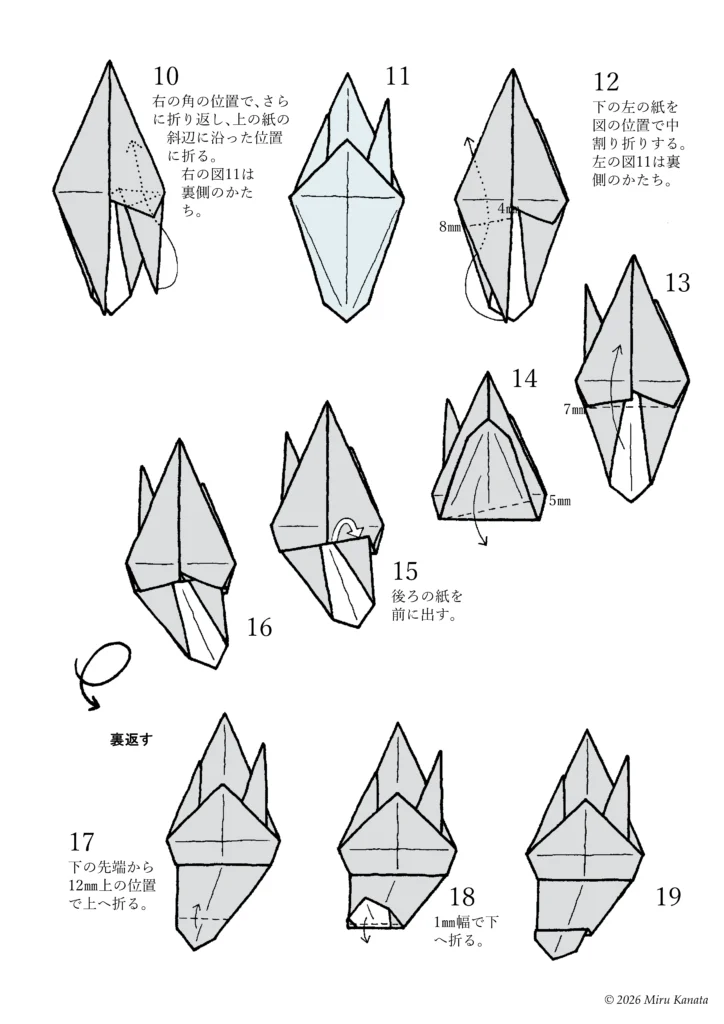
English Commentary
10 Fold it again at the right corner, and fold it along the diagonal edge of the top paper. Figure 11 on the right shows the shape of the back.
11
12 Fold the bottom left paper in the middle at the position shown in the figure. Figure on the left shows the shape of the back.
13
14
15 Bring the back paper forward.
16
{Flip}
17 Fold it upwards at a position 12 mm above the bottom tip.
18 Fold it downwards by a width of 1 mm.
19
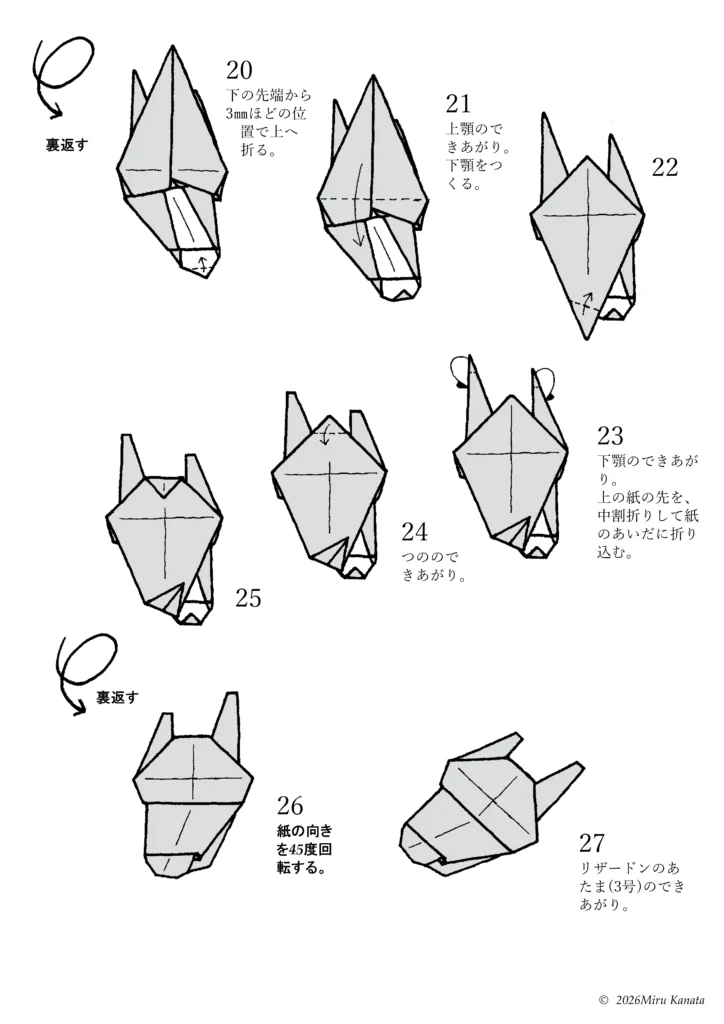
English Commentary
{Flip}
20 Fold upwards about 3 mm from the bottom tip.
21 The upper jaw is complete.
22
23 The lower jaw is complete. Fold the tip of the top paper inwards and tuck it into the gap between the papers.
24 The horns are complete.
25
{Flip}
26 Rotate 45 degrees.
27 The head of Charizard (No. 3) is complete.
English Commentary
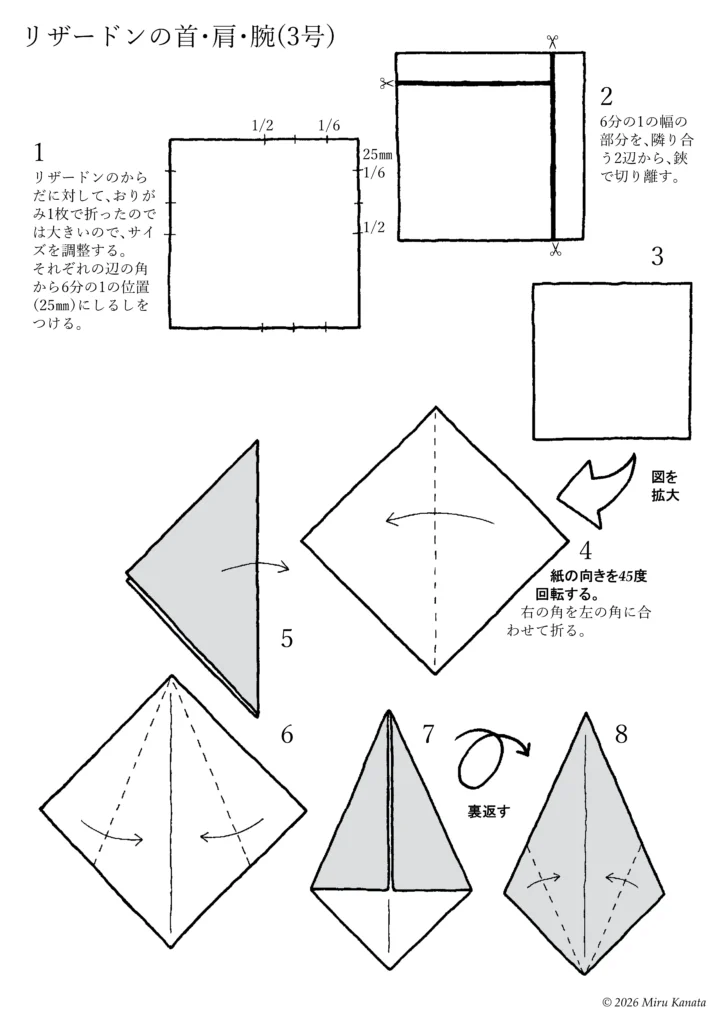
Charizard (No. 3)’s neck, shoulders, and arms
1. Since one sheet of origami paper is too large for Charizard’s body, adjust the size. Mark each side at a point 1/6 of the way from the corner (25 mm).
2. Cut off the 1/6 width section from two adjacent sides with scissors.
3.
[Enlarge the diagram]
4. Rotate the paper 45 degrees. Fold the right corner to meet the left corner.
5
6
7
{Flip}
8
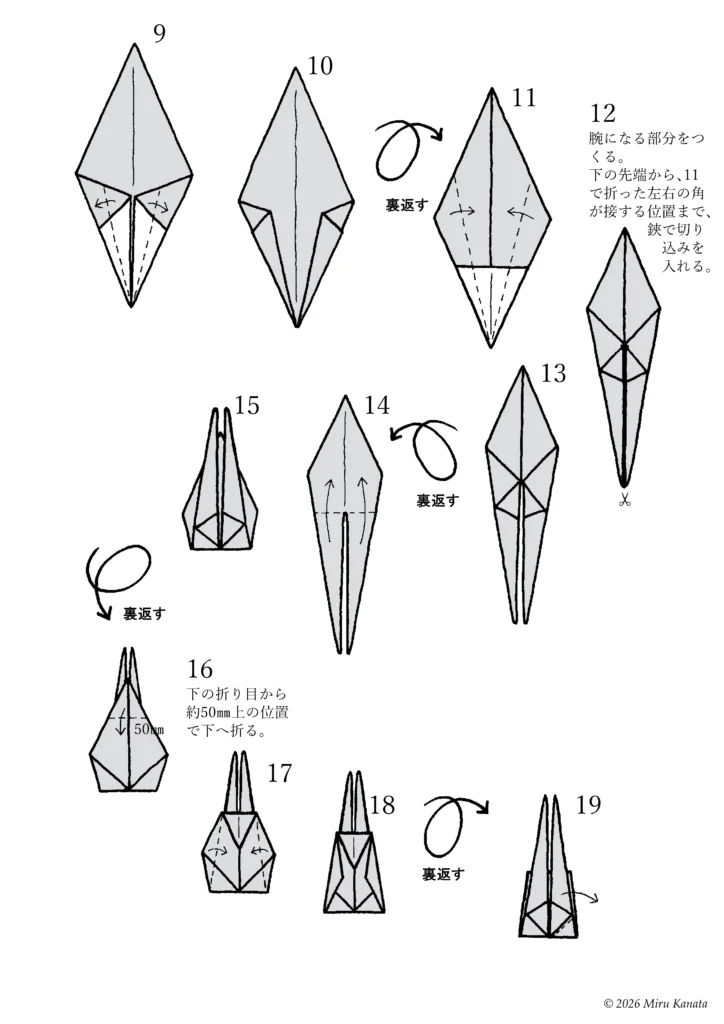
English Commentary
9
10
{Flip}
11
12 Create the arm section. Make cuts with scissors from the bottom tip up to where the left and right corners folded in step 11 meet.
13
{Flip}
14
15
{Flip}
16 Fold downwards at a position approximately 50 mm above the bottom fold.
17
18
{Flip}
19
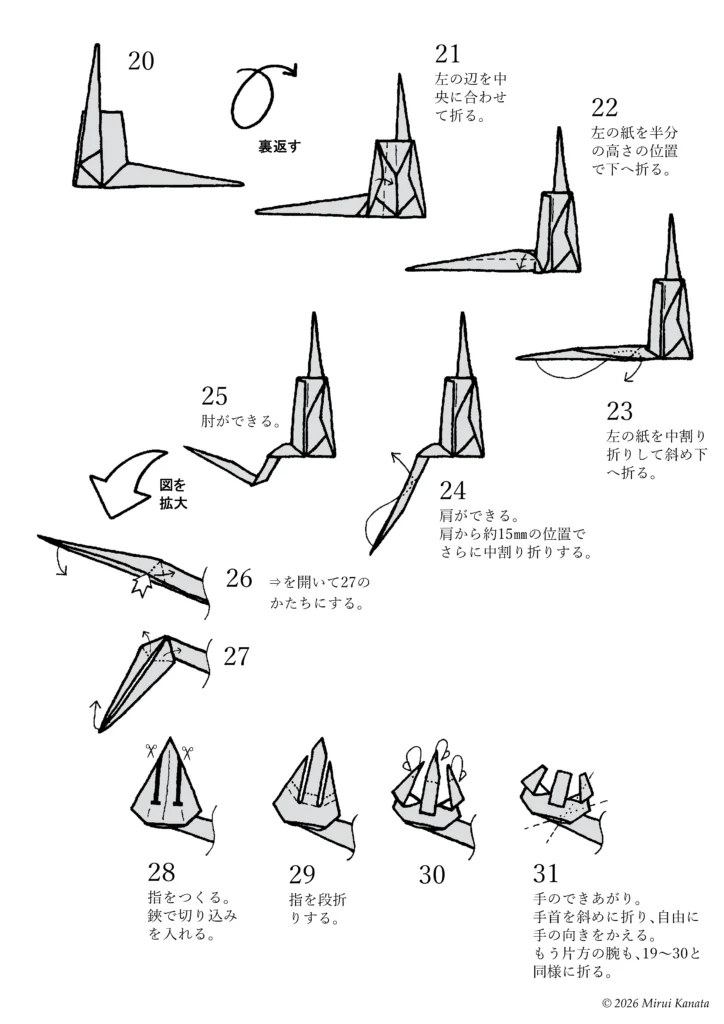
English Commentary
20
{Flip}
21 Fold the left edge to the center.
22 Fold the left piece of paper down to half its height.
23 Fold the left piece of paper diagonally downwards using an inside reverse fold.
24 The shoulder is formed. Fold the inside reverse fold again about 15 mm from the shoulder.
25 The elbow is formed.
(Enlarge diagram)
26 Open the arrow to form the shape of 27.
27
28 Make the fingers. Make cuts with scissors.
29 Fold the fingers in a step fold.
30
31 The hand is complete. Fold the wrist diagonally to change the angle of the hand. Fold the other arm in the same way as 19-30.
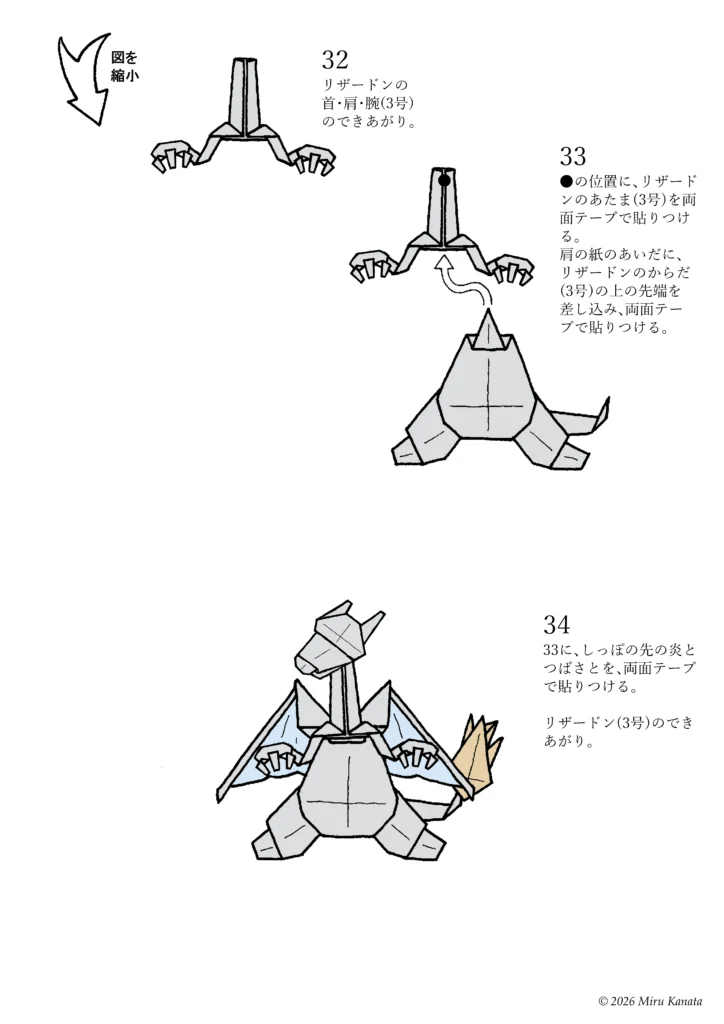
English Commentary
(Reduce the diagram)
32 The neck, shoulders, and arms of Charizard (No. 3) are complete.
33 Attach Charizard (No. 3)’s head to the position marked with ● using double-sided tape. Insert the upper end of Charizard (No. 3)’s body between the paper shoulders and attach it with double-sided tape.
34 Attach the flame at the end of the tail and the wings to 33 using double-sided tape. Charizard (No. 3) is complete.
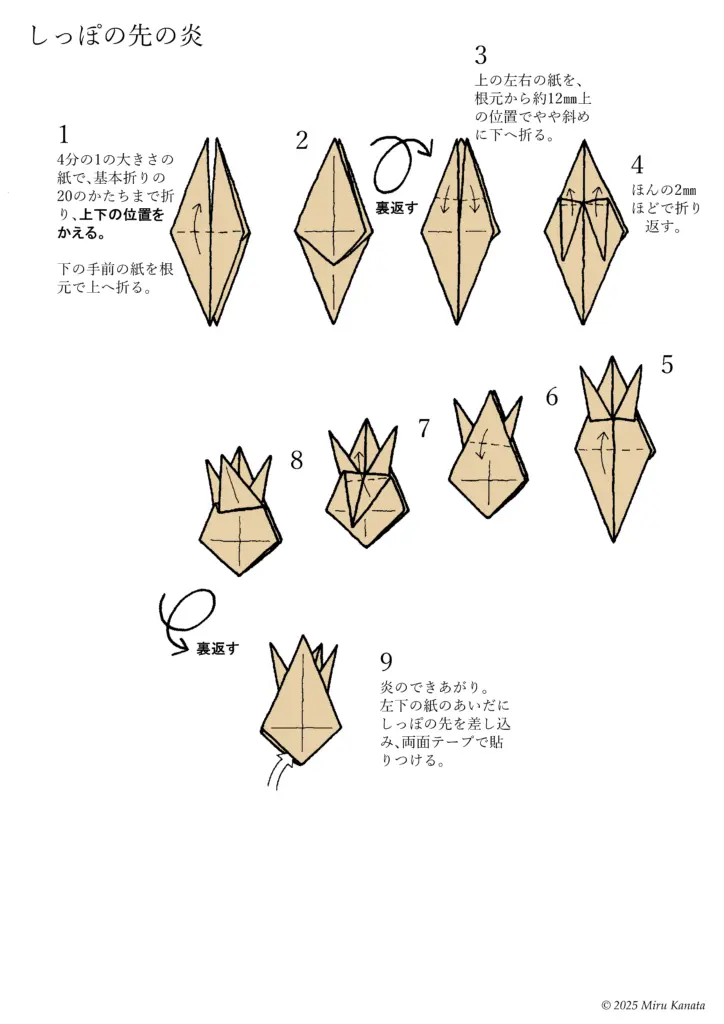
English Commentary
Flame on the tip of the tail
1 Fold a quarter-sized piece of paper into the basic 20 shape, then change the top and bottom positions.
Fold the bottom front piece of paper up at the base.
2
{Flip}
3 Fold the top left and right pieces of paper down at a slight diagonal, about 12 mm above the base.
4 Fold just 2 mm back.
5
6
7
8
{Flip}
9 The flame is complete. Insert the tip of the tail between the pieces of paper on the bottom left and attach with double-sided tape.
English Commentary
Wings
0 Place two sheets of paper together, with the white backs facing each other, and fold both sheets together. Initially, folding two sheets together is difficult, so try folding one sheet first to understand the process before attempting to fold two sheets together.
1 Fold the bottom corner to meet the top corner.
2 Make a crease and unfold.
3 Rotate the paper 90 degrees, fold the other pair of corners together, make a crease, and unfold.
4 Fold the top and bottom corners to meet the center.
5
{Flip}
6
7
{Flip}
8
9
《Enlarge diagram》
10
English Commentary
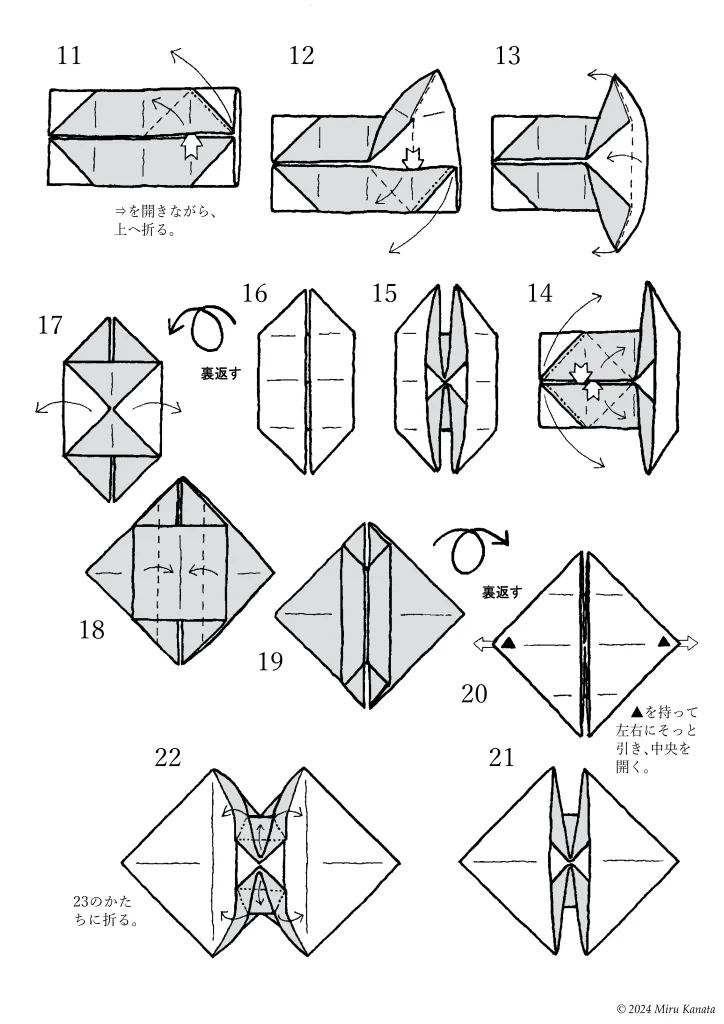
11 Fold upwards while opening the arrow.
12
13
14
15
16
{Flip}
17
18
19
{Flip}
20 Hold the triangle and gently pull to the left and right to open the center.
21
22 Fold into the shape shown the step 23.
English Commentary
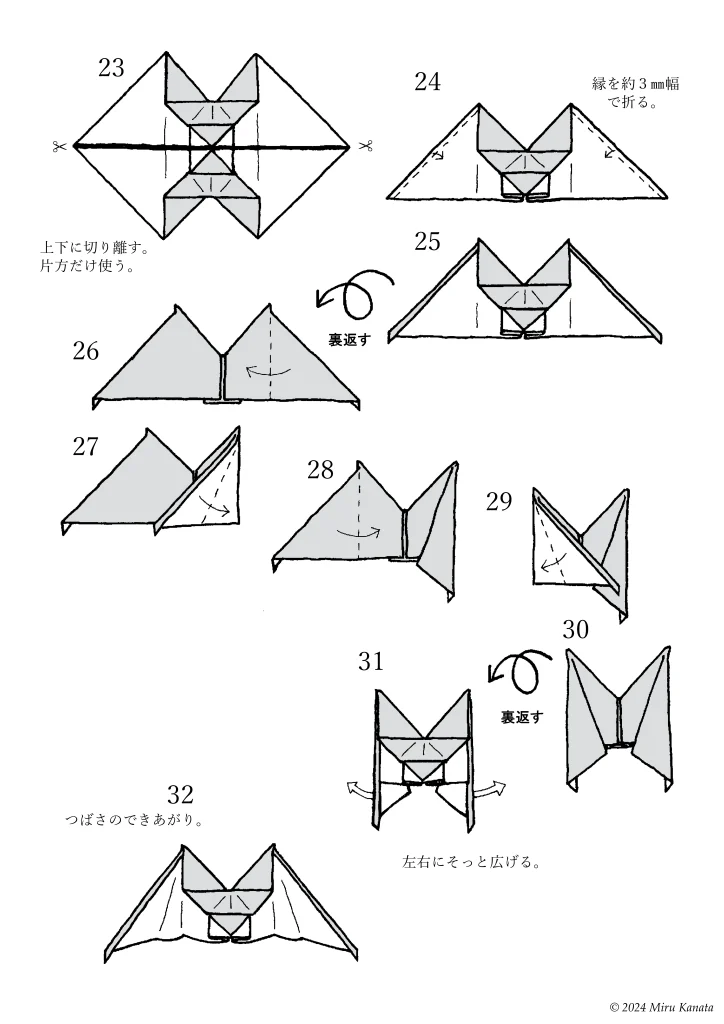
23 Separate the top and bottom halves. Use only one half.
24 Fold the top slanted edge by about 3 mm.
25
{Flip}
26
27
28
29
30
{Flip}
31 Gently spread them out to the left and right.
32 The wings are complete.
ORIGAMI Topics
■つばさは、リザードン、ズバット、ゴルバット、カイリューとも共通です。
これは古典の伝承おりがみの『宝船』の、折り方の途中のかたちと、構造は同じです。
ですので、2000年の本の折り図には、図を節約するため一般的に認知されている『宝船』の手順を示しました。
でも、実際はそれとはちょっと異なる折り方でつくっています。今回の折り図がそうなのですが、より自然で無理のない折り方です。
また、このかたちを翼に応用した前例はありませんでした。*
これを思いついたおかげで、素敵な翼が実現したのです。
*本の出版後、日本折紙協会の、おりがみ専門の月刊の機関誌『おりがみ』のその時点で入手できたバックナンバー65冊の、おりがみ作品をすべて折って確認しましたが、前例はありませんでしたし、似た考え方もありませんでした。
参考・2000年の本に掲載した折り図
リザードン3号は、ゲームフリークのチェックでOKをいただいたのですが、本の誌面の制約のため、掲載することができませんでしたので、2000年の本の折り図はありません。
みるかなた本棚>『ポケットモンスターおりがみコレクション』>ポケモンおりがみ一覧表>0006リザードン03
◇ ◇ ◇