みるかなた本棚>『ポケットモンスターおりがみコレクション』>ポケモンおりがみ一覧表>0005 リザード
◆0004 ヒトカゲ◆0005 リザード◆0006 リザードン01◆0006 リザードン02◆0006 リザードン03◆
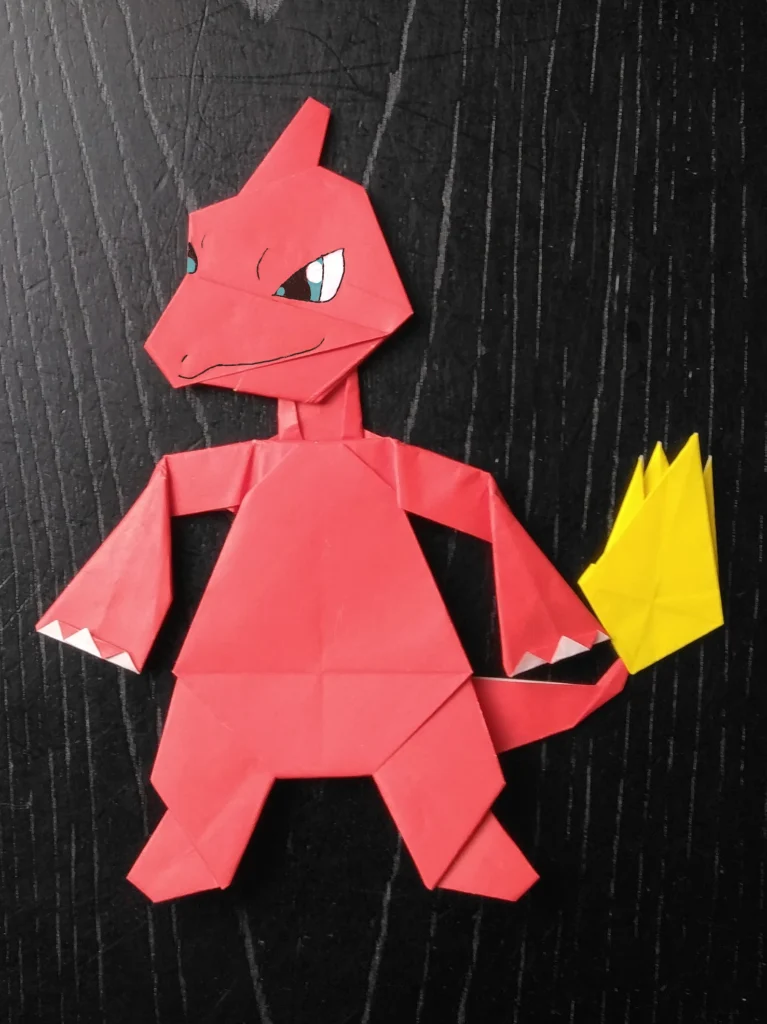
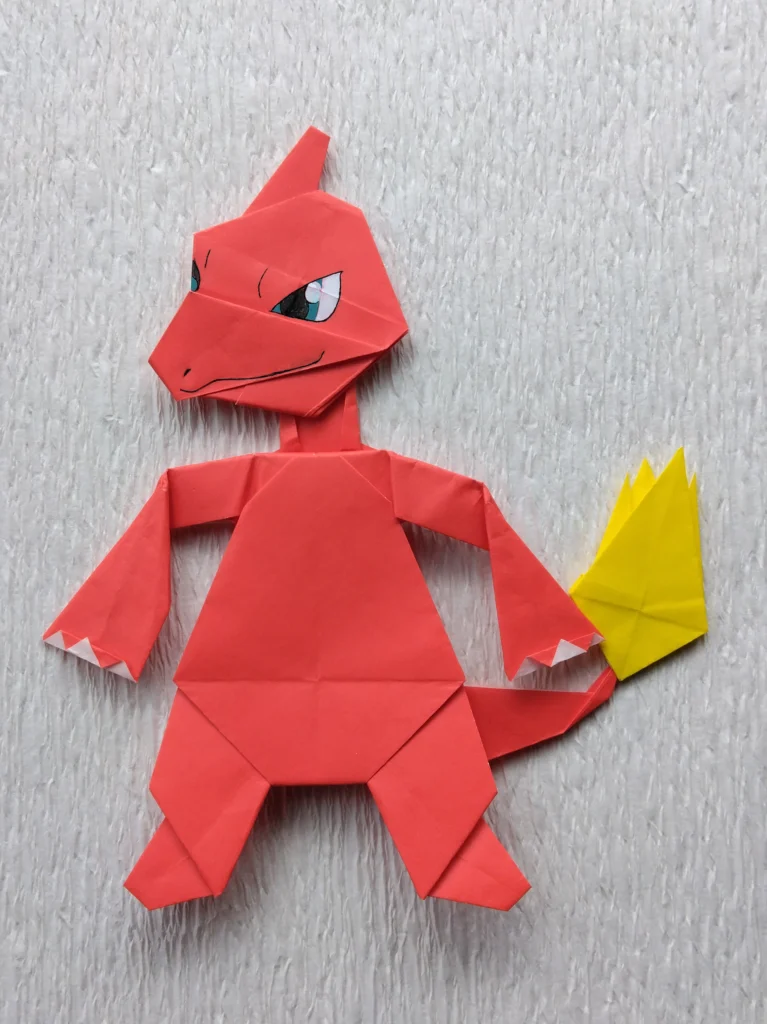
0005 リザード
リザードは、ゲームフリークのチェックでOKをいただいたのですが、誌面の制約のため、本に掲載することができませんでした。
今回、初公開です。
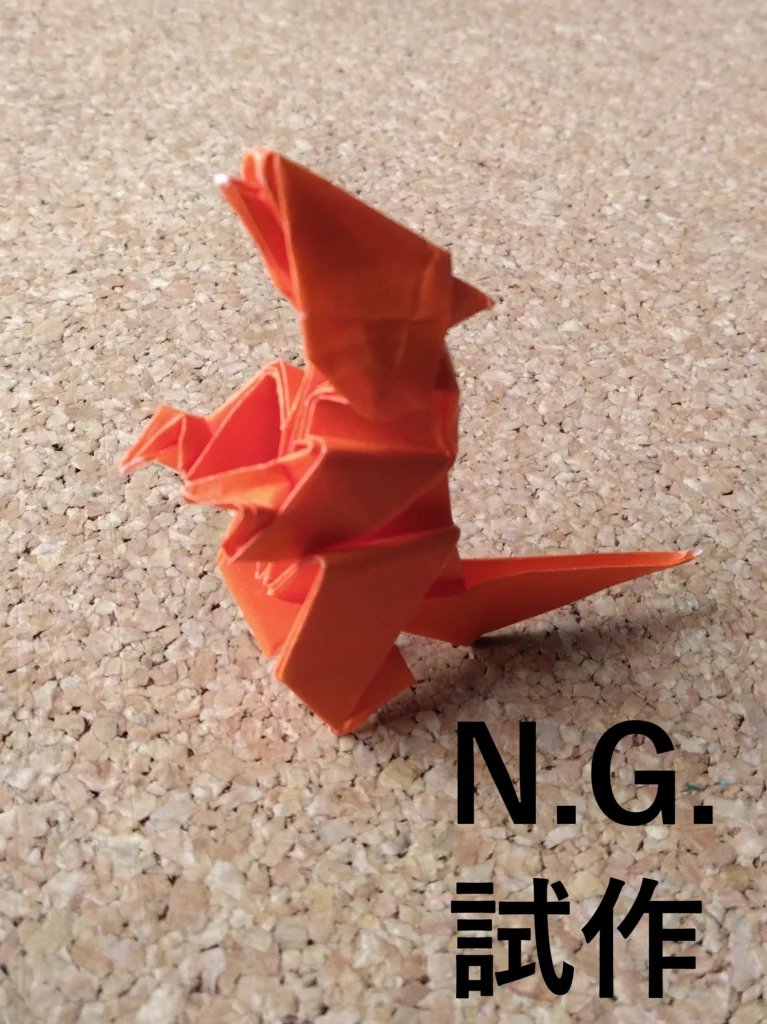
初めにつくったリザードのあたまの試作は、N.G.となりました。
ヒトカゲと同様、「正面からの顔はN.G.」というゲームフリークからのお達しでした。
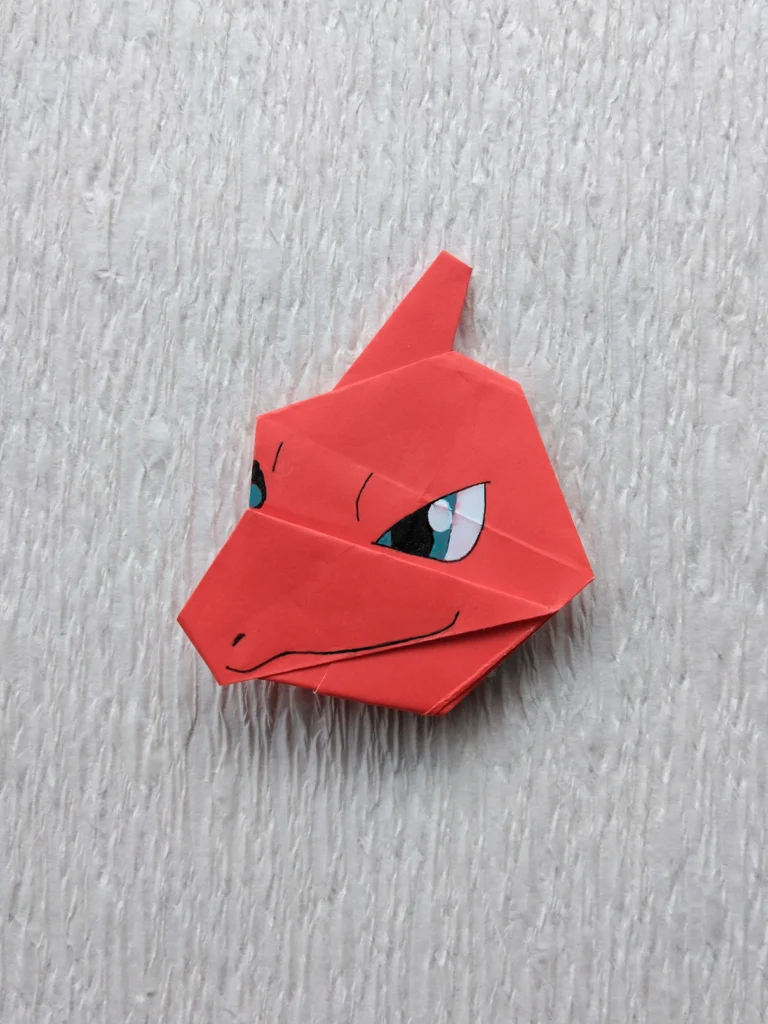
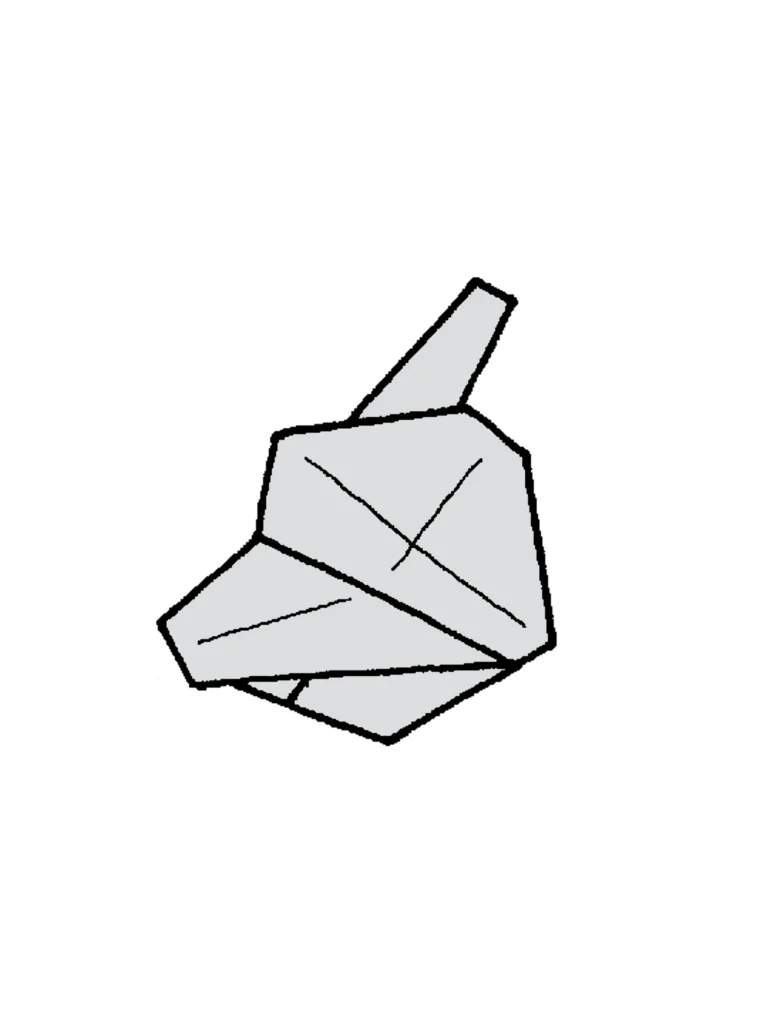
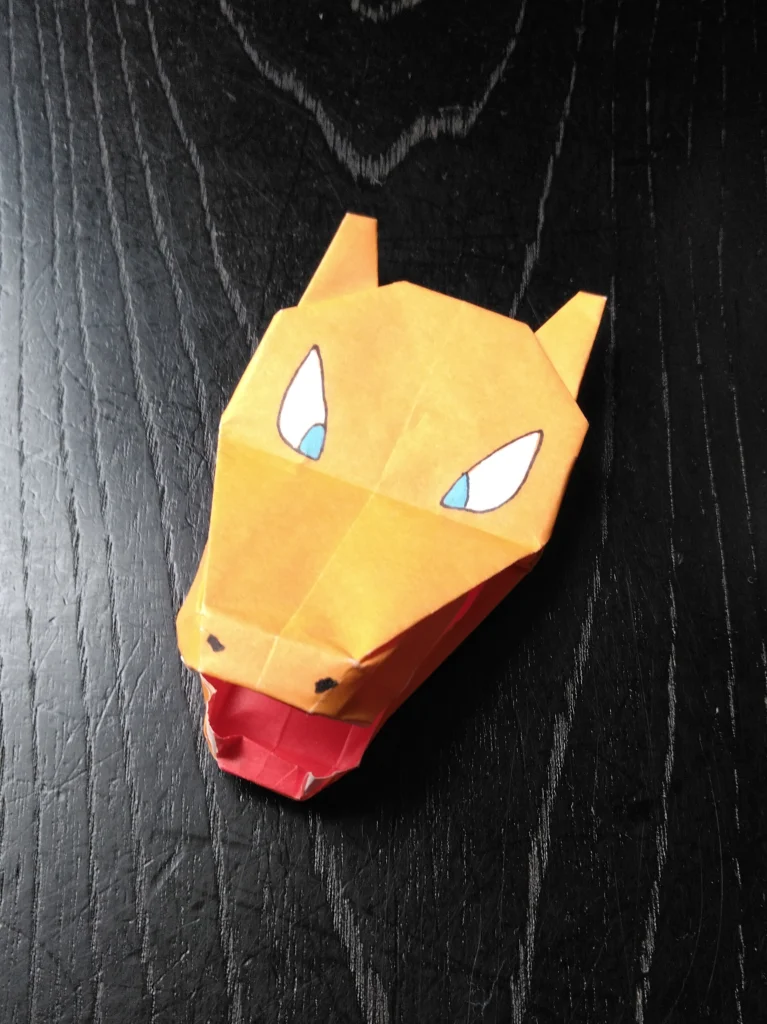
そしてつくり直してOKとなった、少し斜めに振った角度からのあたまです。
精悍なリザードらしさが何倍も増しました。
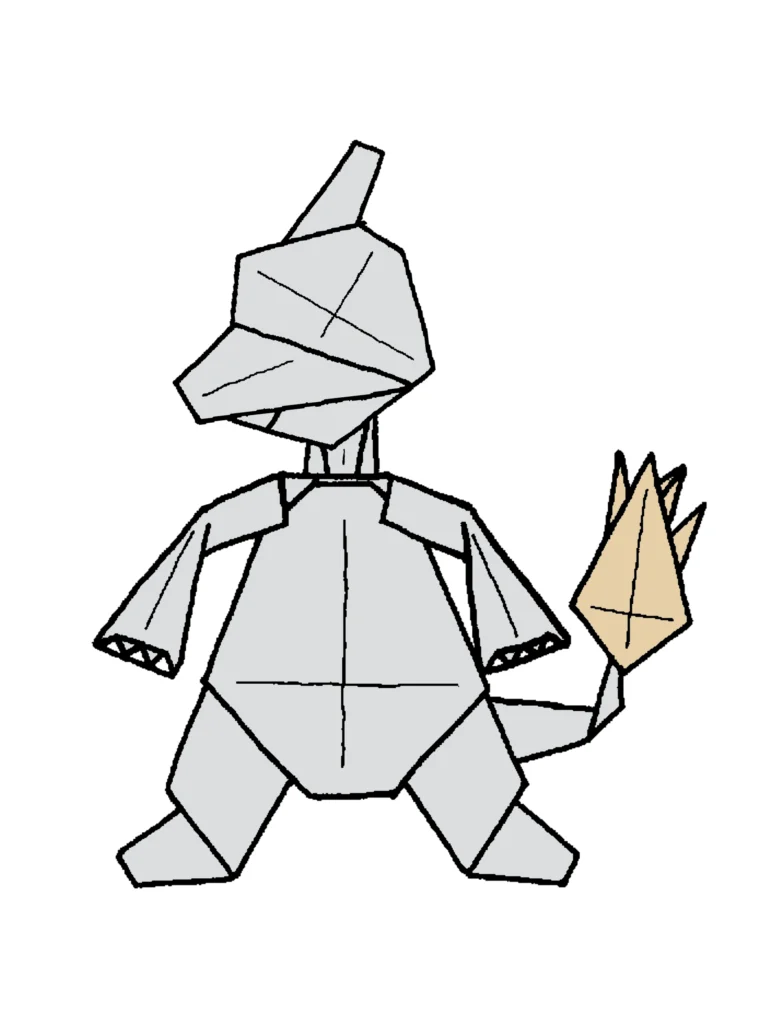
リザードの、首・肩・腕の部分は、折り重なった紙の厚みがあって、きれいに折るのがちょっと難しいと思います。
手の先の爪は、裏へ折り込んでしまっても構わないのですが、そうしたところ手先の三角形が目立って気になりました。爪をつくったら、違和感が緩和されたので、このかたちでいくことにしました。
そこで、足の爪をつくれないか検討しましたが、いまのところよい方法を見つけることはできていません。
★ゲームフリークのチェック
◆リザードのあたまは、1回目のチェックでN.G.となってしまいました。
「形は、顔は横向きで。正面はN.G.」
とのことでした。
それでつくり直して、2回目のチェックで、OKをいただきました。
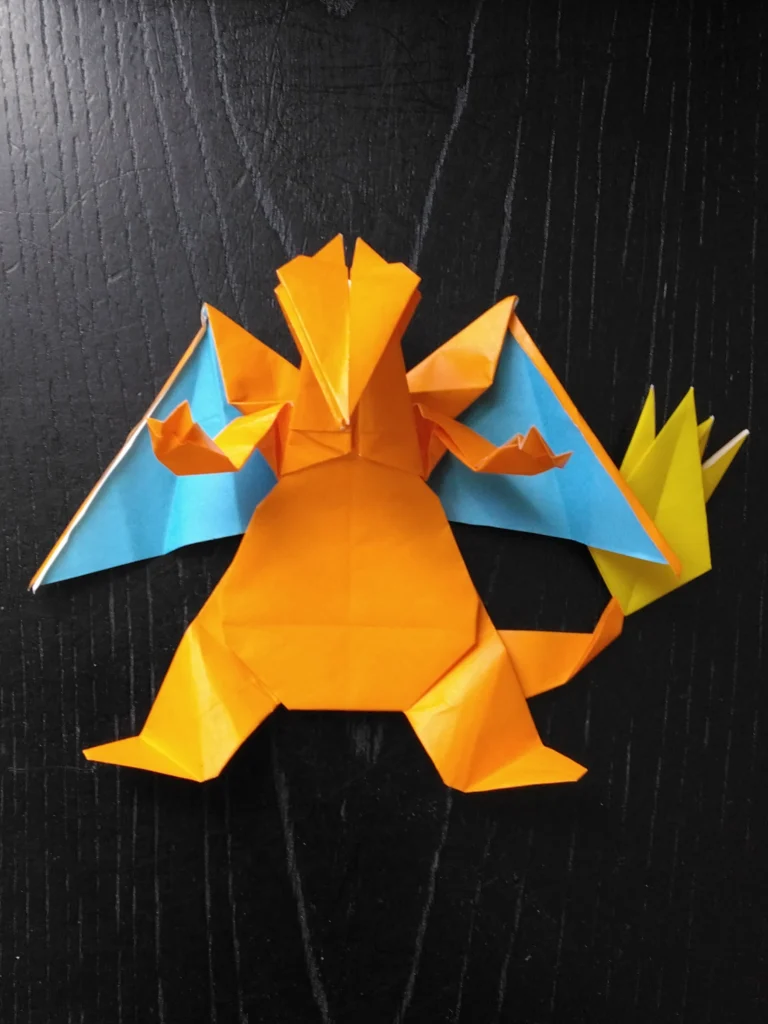
◆別ヴァージョンの、
「1枚で小さく折ってあるものは、N.G.」
という判断でした。
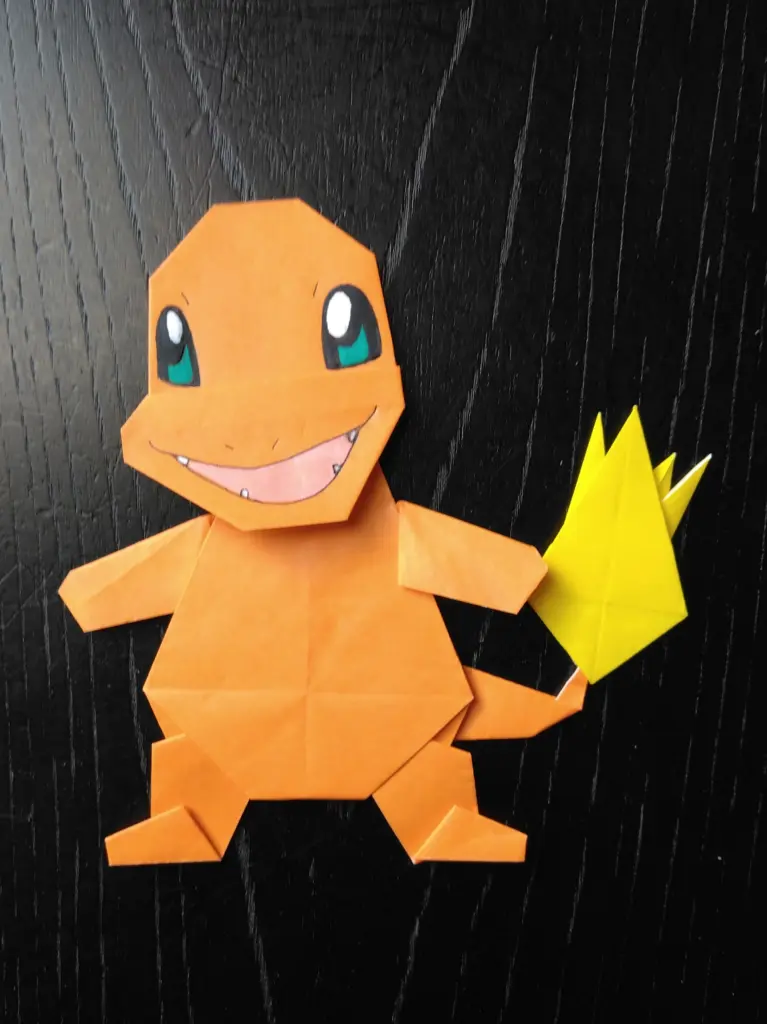
全身を折った、動物おりがみのスタンダードなタイプです。
頭上に1本のつのをつくって、ヒトカゲと区別しています。
ゲームフリークのチェックで、あっさりN.G.になりました。
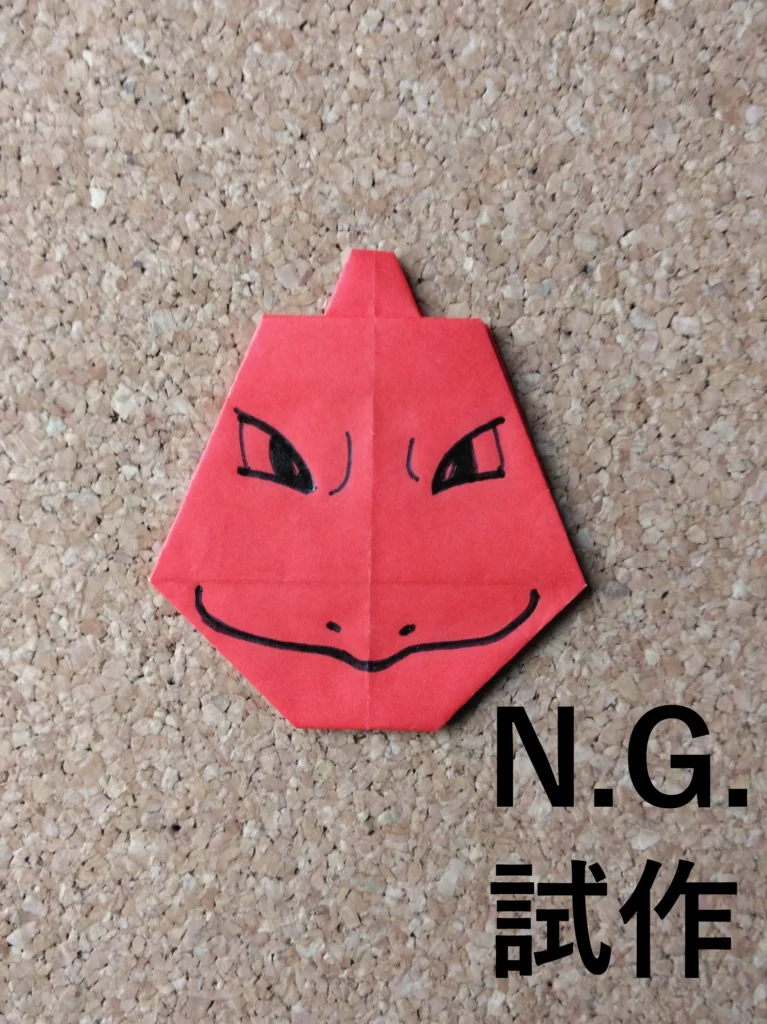
はじめにつくったあたまです。
ゲームフリークのチェックで
「正面はN.G.」
というご要望があり、このあたまは没になりました。
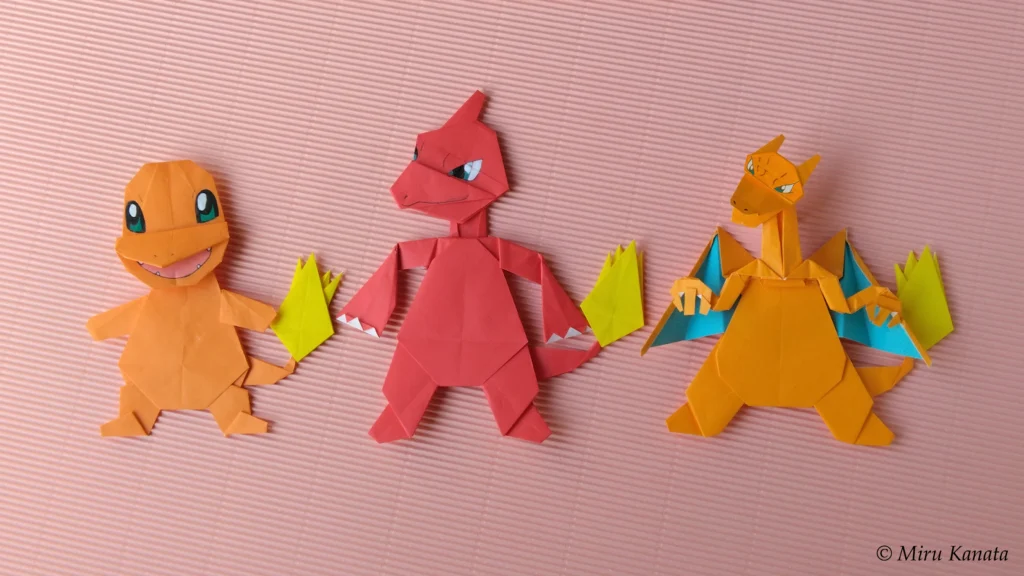
Evolution
つくり方
動画制作予定
つくり方の折り図
今回制作した折り図
■1 リザードのからだは、赤色の紙で、まず基本折りの図20まで折る。
■2リザードのあたまは、赤色の紙で折る。
■3 リザードの首・肩・腕は、赤色の紙で折る。
■4 しっぽの先の炎は、4分の1のサイズに切った黄色の紙で、こちらも基本折りの図20まで折る。
English Commentary
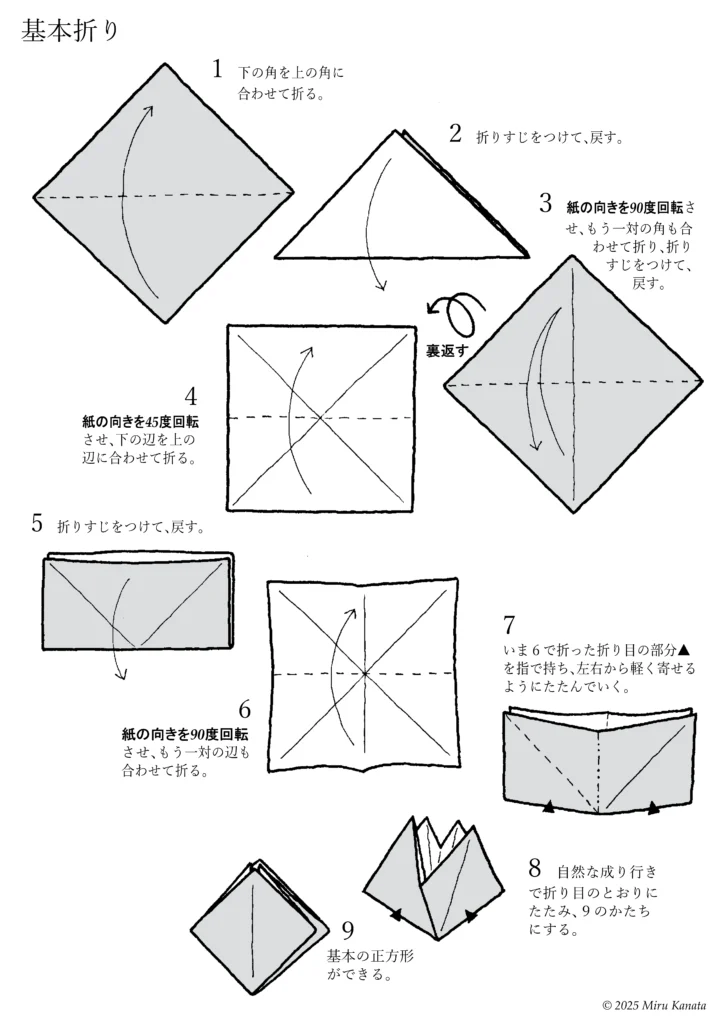
Basic Folding
1 Fold the bottom corner to meet the top corner.
2 Make a crease and return it to its original position.
3 Rotate the paper 90 degrees, fold the other pair of corners together, make a crease and return it to its original position.
{Flip}
4 Rotate the paper 45 degrees and fold the bottom edge to line up with the top edge.
5 Make a crease and return it to its original position.
6 Rotate the paper 90 degrees and fold the other pair of edges together.
7 Hold the crease ▲ made in step 6 with your fingers and fold gently from both sides together.
8 Let the paper naturally fold along the creases to form the shape of 9.
9 A basic square is created.
English Commentary
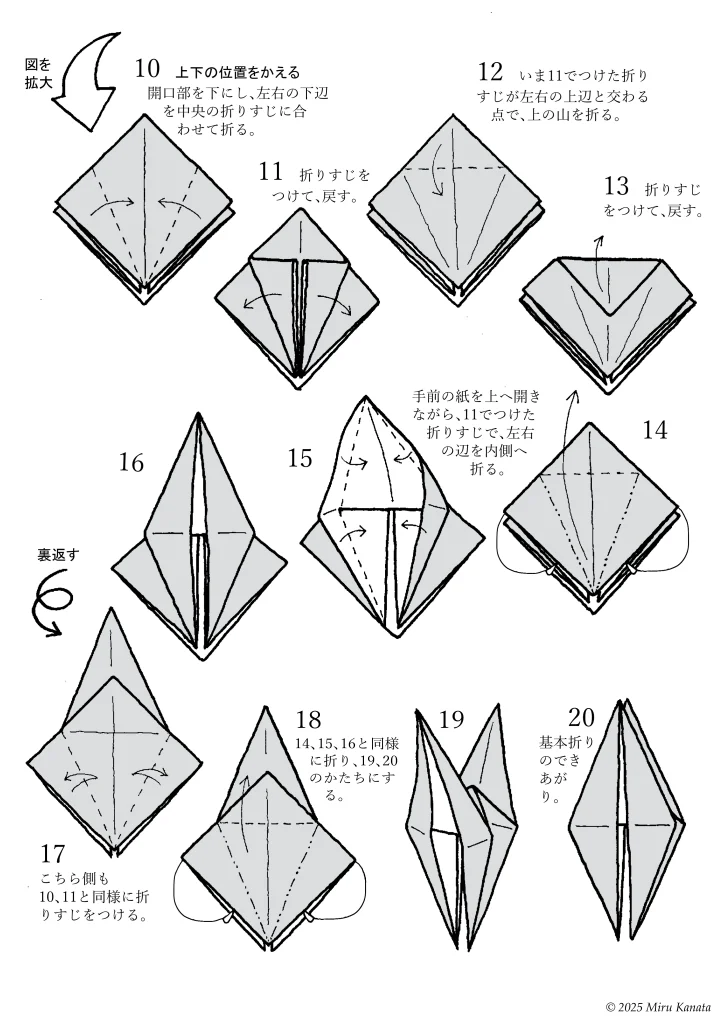
{Enlarge image}
10 Change the top and bottom positions.
With the opening facing downwards, fold the bottom left and right edges to meet the crease in the middle.
11 Make a crease and return.
12 Fold the top at the point where the crease made in 11 intersects with the top left and right edges.
13 Make a crease and return.
14 While opening the front paper upwards, fold the left and right edges inward along the crease made in 11.
15
16
{Flip}
17 Make creases on this side in the same way as 10 and 11.
18 Fold in the same way as 14, 15 and 16 to form 19 and 20.
19
20 The basic fold is complete.
English Commentary
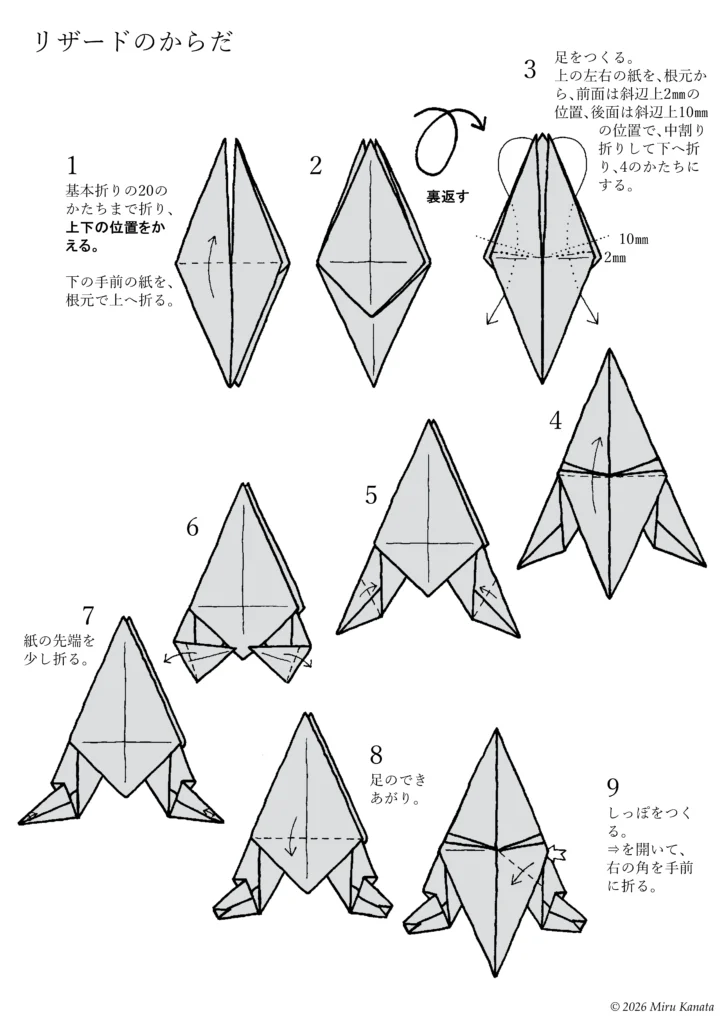
Charmeleon’s body
1 Fold the paper up to the shape of basic fold 20, then change the top and bottom positions. Fold the bottom front piece of paper upwards at the base.
2
{Flip}
3 Make the legs. Fold the top left and right pieces of paper downwards from the base, using an inside reverse fold, 2 mm above the diagonal on the front and 10 mm above the diagonal on the back, to make shape 4.
4
5
6
7. Fold the tip of the paper slightly.
8. The legs are complete.
9. Make the tail. Open the arrow and fold the right corner towards you.
English Commentary
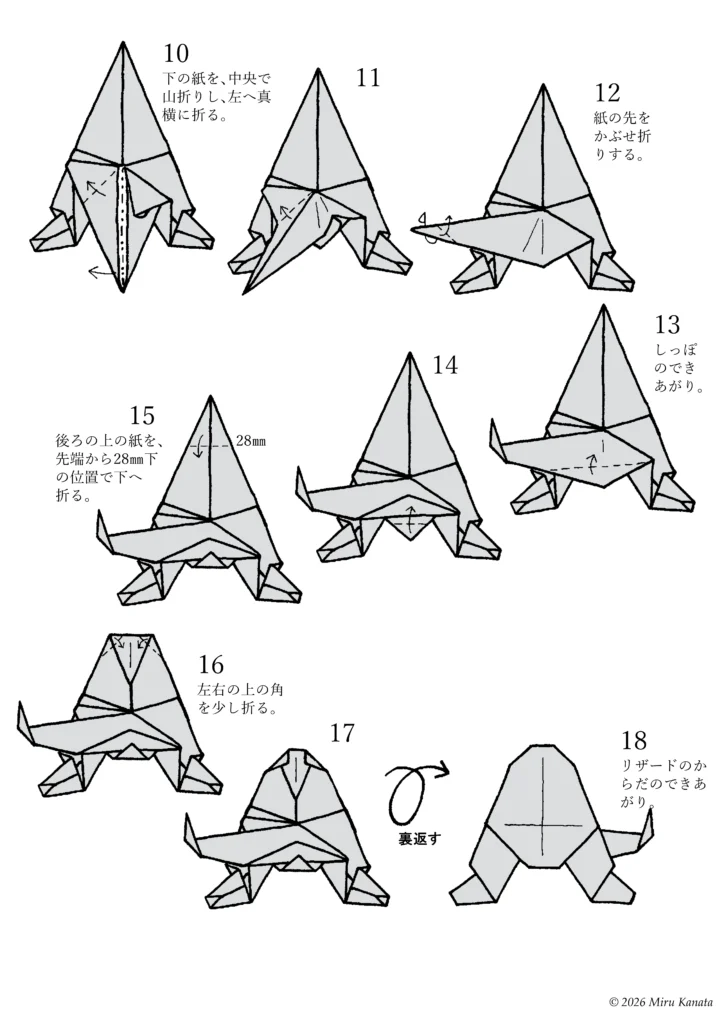
10 Fold the bottom piece of paper in half lengthwise, then fold it horizontally to the left.
11
12 Fold the end of the paper over.
13 The tail is complete.
14
15 Fold the top back piece of paper downwards at a point 28 mm below the tip.
16 Fold the top left and right corners slightly.
17
{Flip}
18 The Charmeleon’s body is complete.
English Commentary
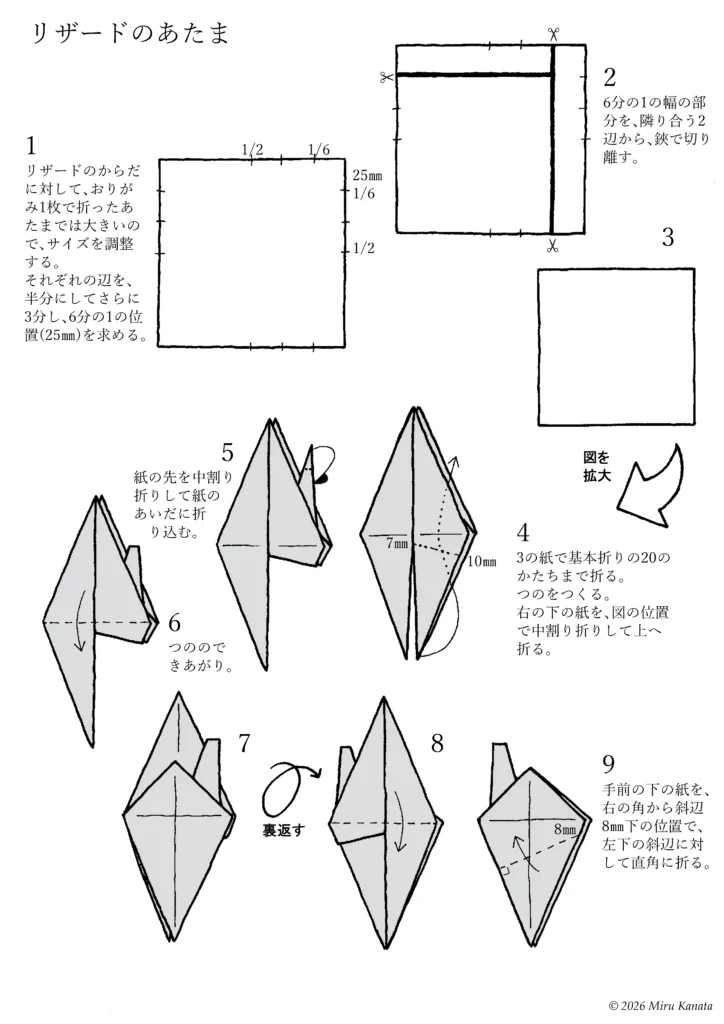
Charmeleon’s head
1 The head, made from a single sheet of origami paper, is too large for the Charmeleon’s body, so adjust the size. Divide each side in half, then divide it into thirds to find the 1/6 position (25 mm).
2 Cut off the 1/6 width section from two adjacent sides with scissors.
3
(Enlarge the diagram)
4 Fold the paper from step 3 to the shape of basic fold 20. Make the horns. Fold the bottom right piece of paper upwards using an inside reverse fold at the position shown in the diagram.
5 Fold the tip of the paper inwards using an inside reverse fold and tuck it between the pieces of paper.
6 The horns are complete.
7
(Flip)
8
9 Fold the bottom front piece of paper perpendicular to the bottom left diagonal at a position 8 mm below the right corner on the diagonal.
English Commentary
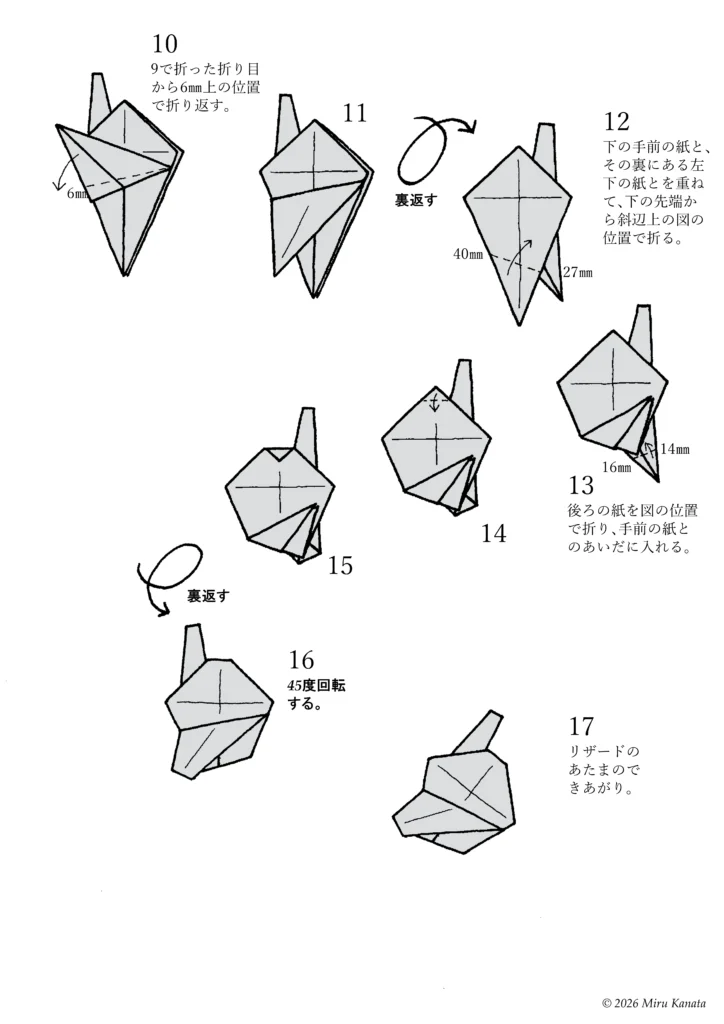
10 Fold back 6mm above the crease made in step 9.
11
{Flip}
12 Overlap the bottom front piece of paper with the bottom left piece behind it, and fold from the bottom tip at the position shown in the diagram above the hypotenuse.
13
14
15
{Flip}
16 Rotate 45 degrees.
17 The Charmeleon’s head is complete.
English Commentary
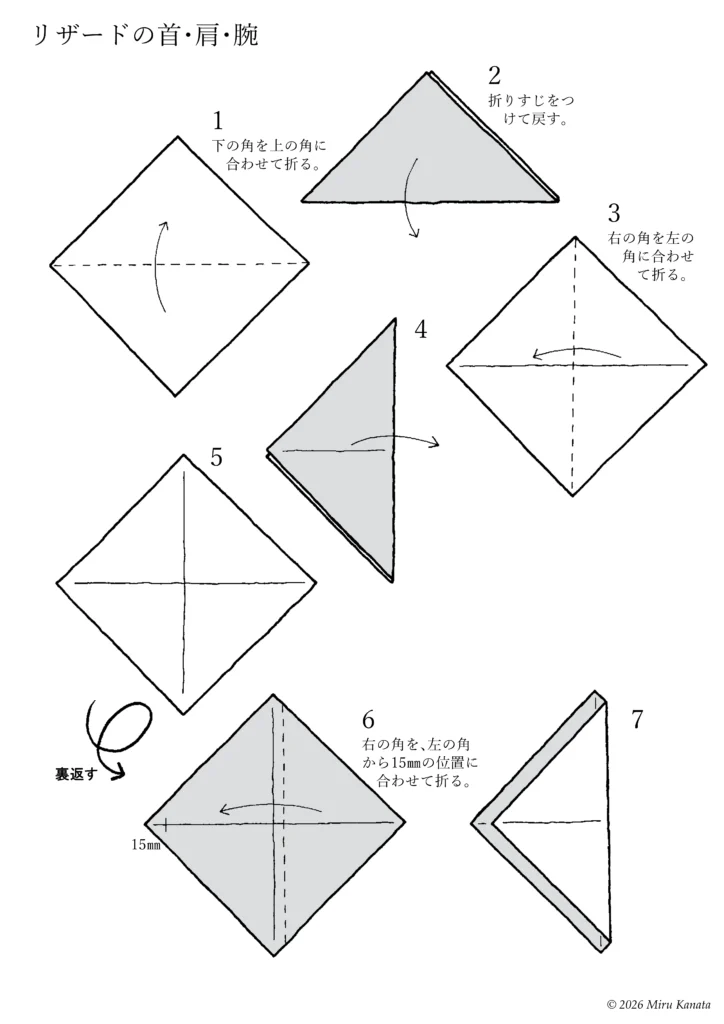
Charmeleon’s neck, shoulders, and arms
1. Fold the bottom corner to meet the top corner.
2. Make a crease and unfold.
3. Fold the right corner to meet the left corner.
4.
5.
{Flip}
6. Fold the right corner so that it is 15 mm from the left corner.
7.
English Commentary
{Flip}
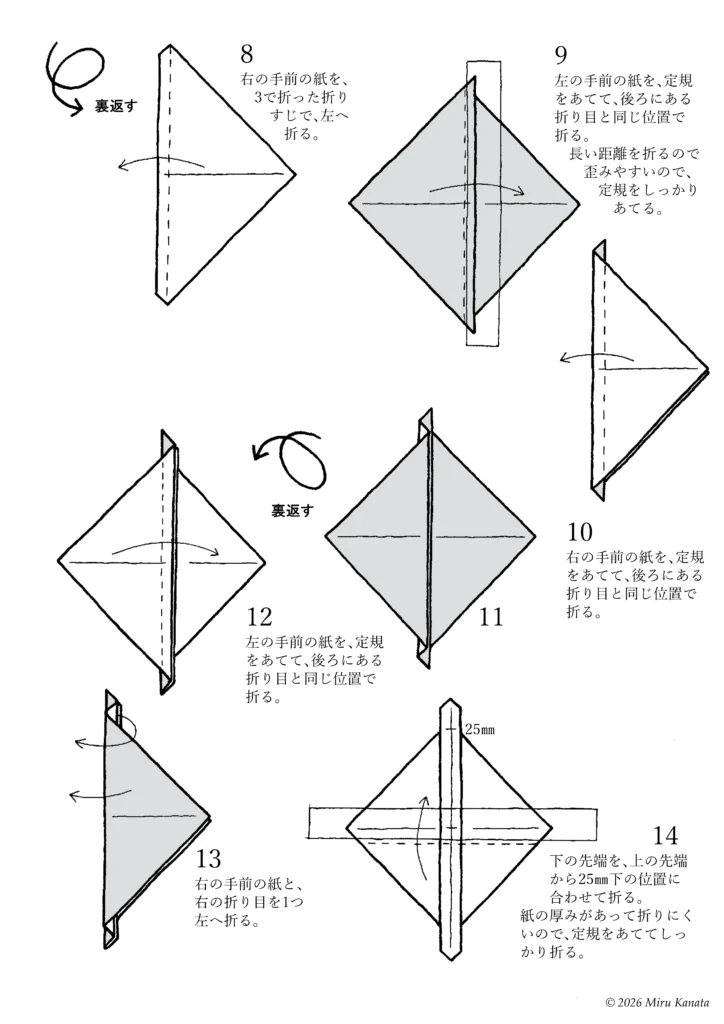
8 Fold the front right paper to the left along the crease made in step 3.
9 Fold the front left paper to the same position as the crease at the back, using a ruler as a guide. Since you are folding a long distance, it is easy to distort, so use a ruler firmly.
10 Fold the front right paper to the same position as the crease at the back, using a ruler as a guide .
11
{Flip}
12 Fold the front left paper to the same position as the crease at the back, using a ruler as a guide.
13 Fold the front right paper and the right crease to the left.
14 Fold the bottom tip to a position 25 mm below the top tip. The paper is thick and difficult to fold, so use a ruler firmly.
English Commentary
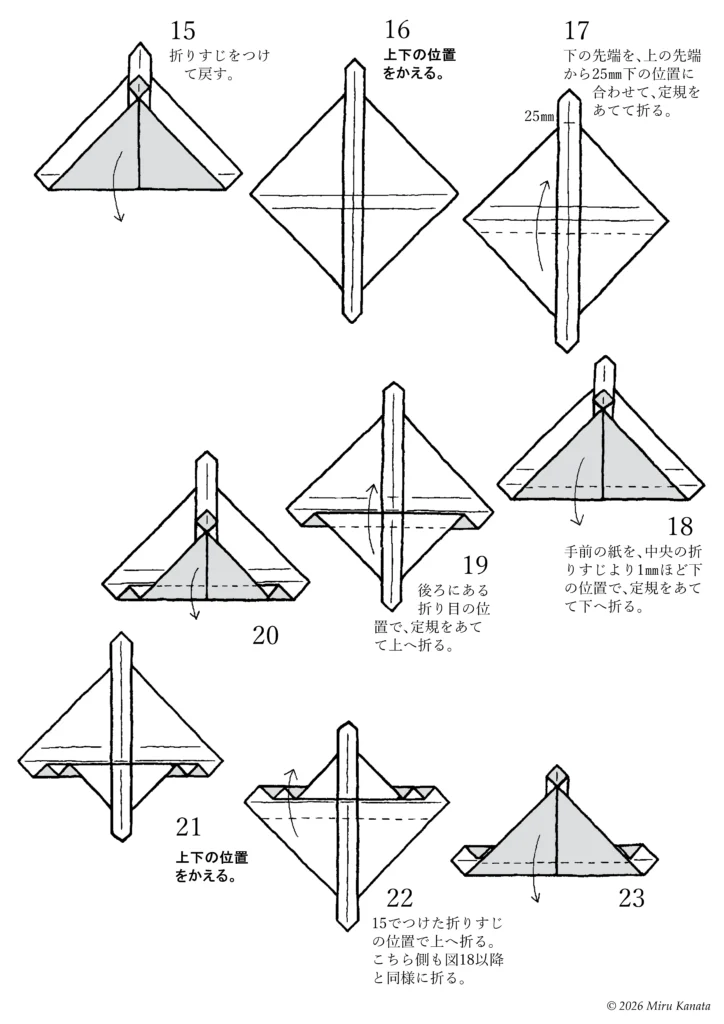
15 Make a crease and unfold.
16 Change the top and bottom positions.
17 Fold the bottom tip to 25 mm below the top tip. The paper is thick and difficult to fold, so use a ruler to fold firmly.
18 Fold the front paper downwards, using a ruler to fold it about 1 mm below the center crease.
19 Fold upwards at the crease at the back, using a ruler to fold it.
20
21 Change the top and bottom positions.
22 Fold upwards at the crease made in step 15. Fold this side in the same way as in Figure 18 and onwards.
23
English Commentary
24
25
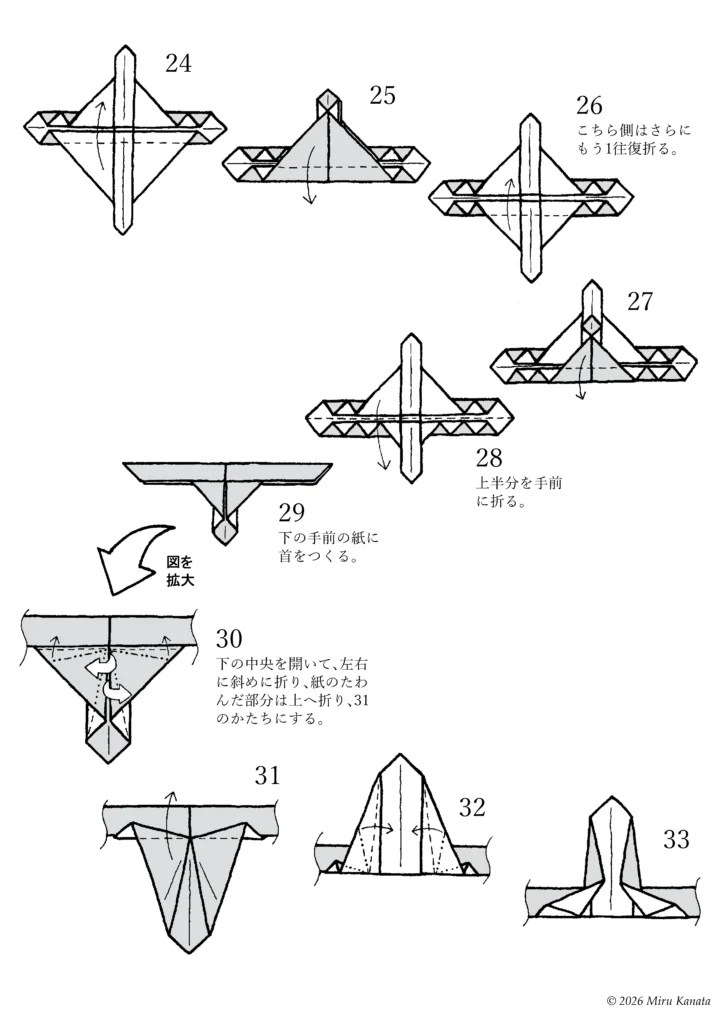
26 Fold this side back and forth one more time.
27
28 Fold the upper half towards you.
29 Create a neck on the bottom front piece of paper.
(Enlarge diagram)
30 Open the bottom center and fold diagonally to the left and right, then fold the bent part of the paper upwards.
31
32
33
English Commentary
(Reduce diagram)
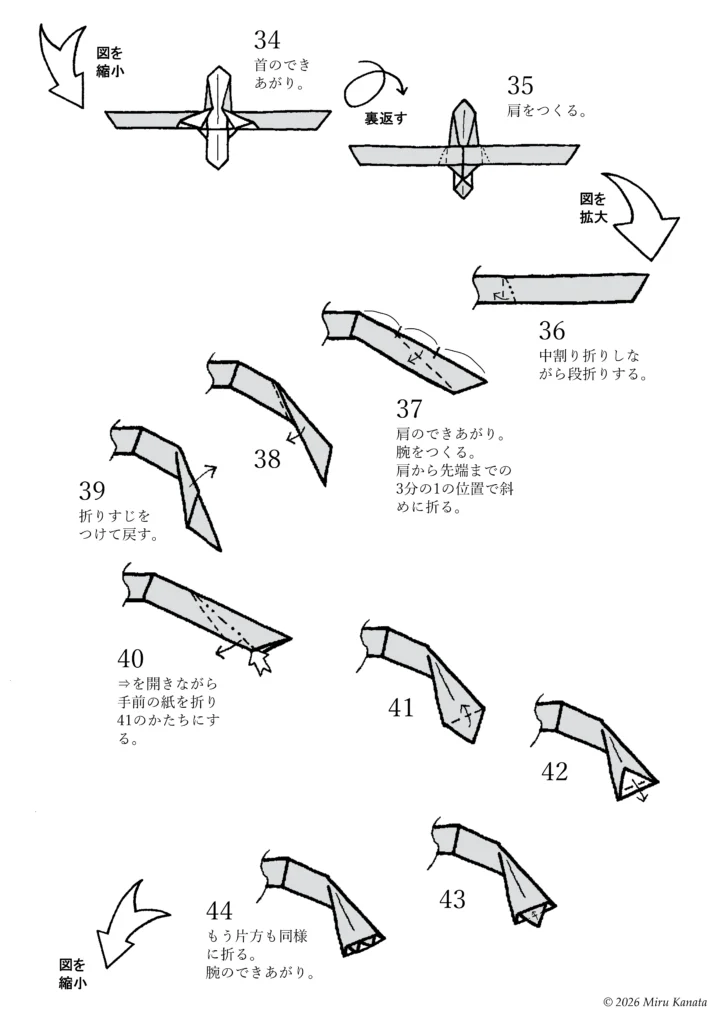
34 The neck is complete.
(Flip)
35 Make the shoulders.
(Enlarge diagram)
36 Fold in a reverse fold while making a step fold.
37 The shoulders are complete. Make the arms. Fold diagonally at the point one-third of the way from the shoulder to the tip.
38
39 Make a crease and unfold.
40 While opening the arrow, fold the paper in front to make the shape of 41.
41
42
43
44 Fold the other side in the same way. The arms are complete.
(Reduce diagram)
English Commentary
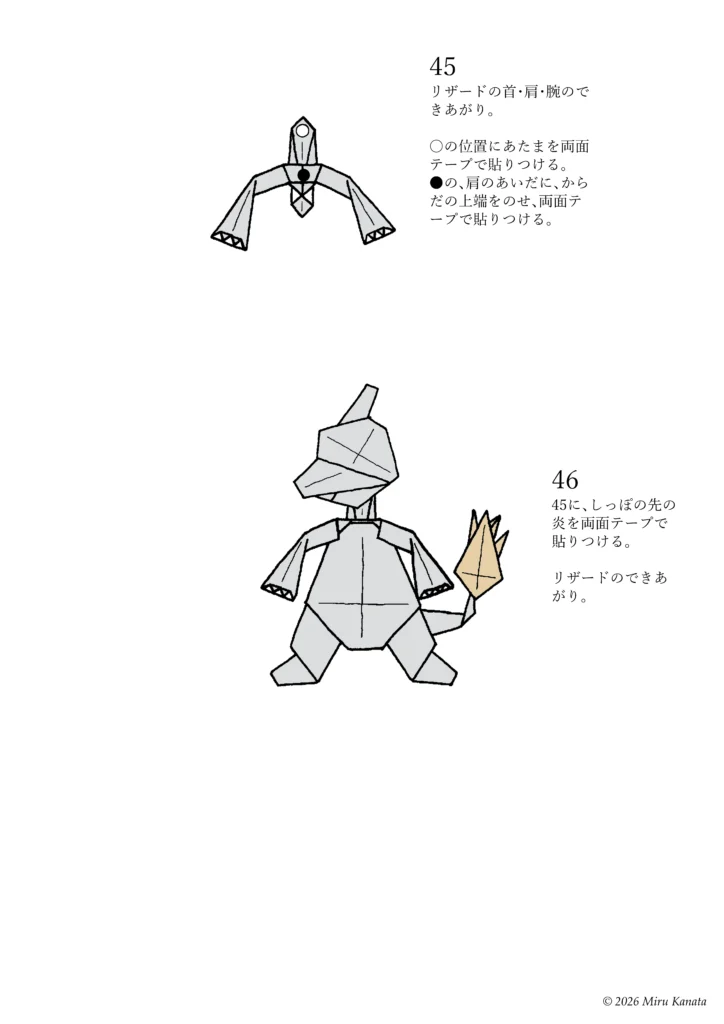
45 The Charmeleon’s neck, shoulders, and arms are complete. Insert the top edge of the body between the pieces of paper on the shoulders and attach it to ● with double-sided tape. Attach the head to the ○ position with double-sided tape.
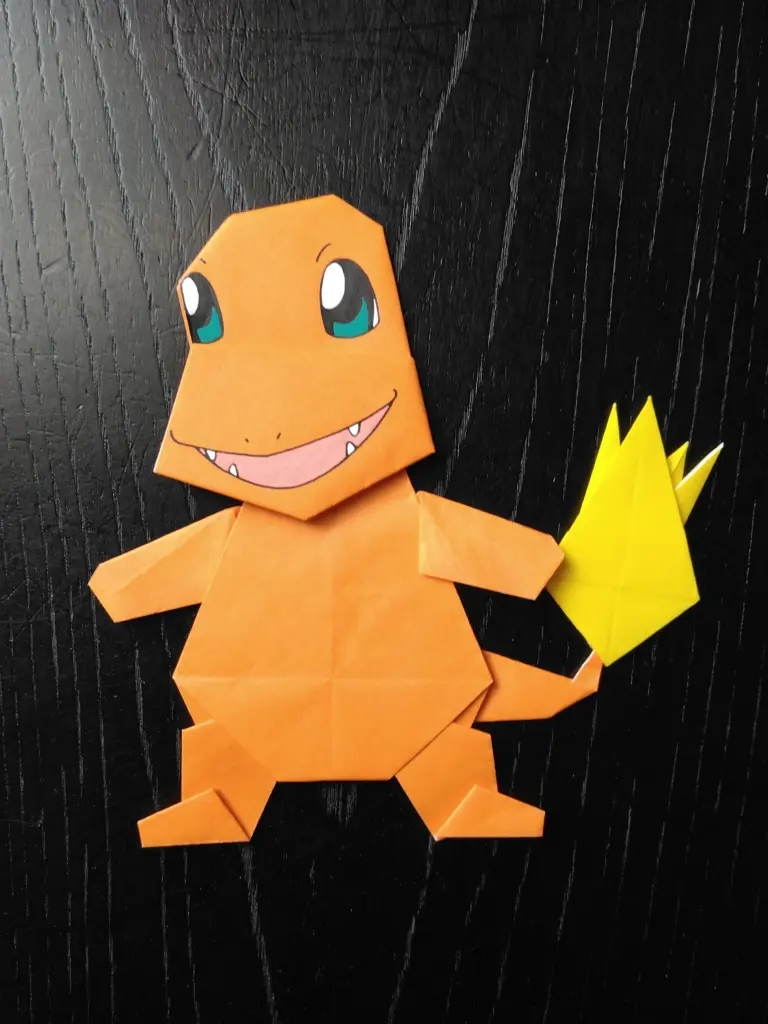
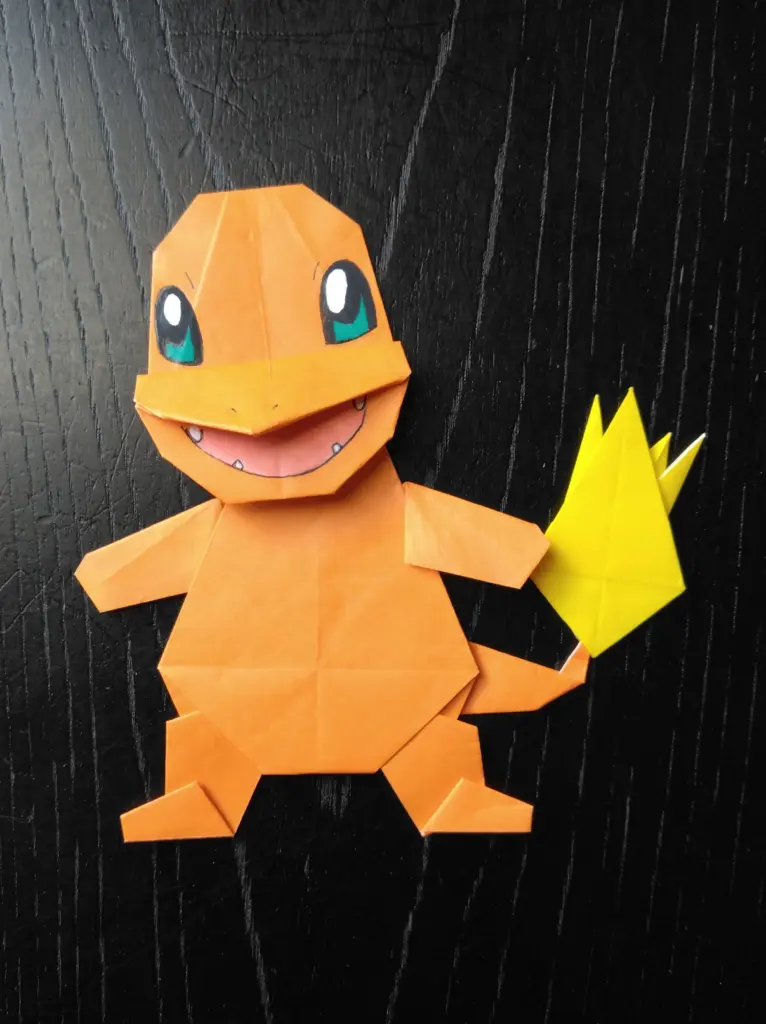
46 Attach the flame at the end of the tail to 45 with double-sided tape. The Charmeleon is complete.
English Commentary
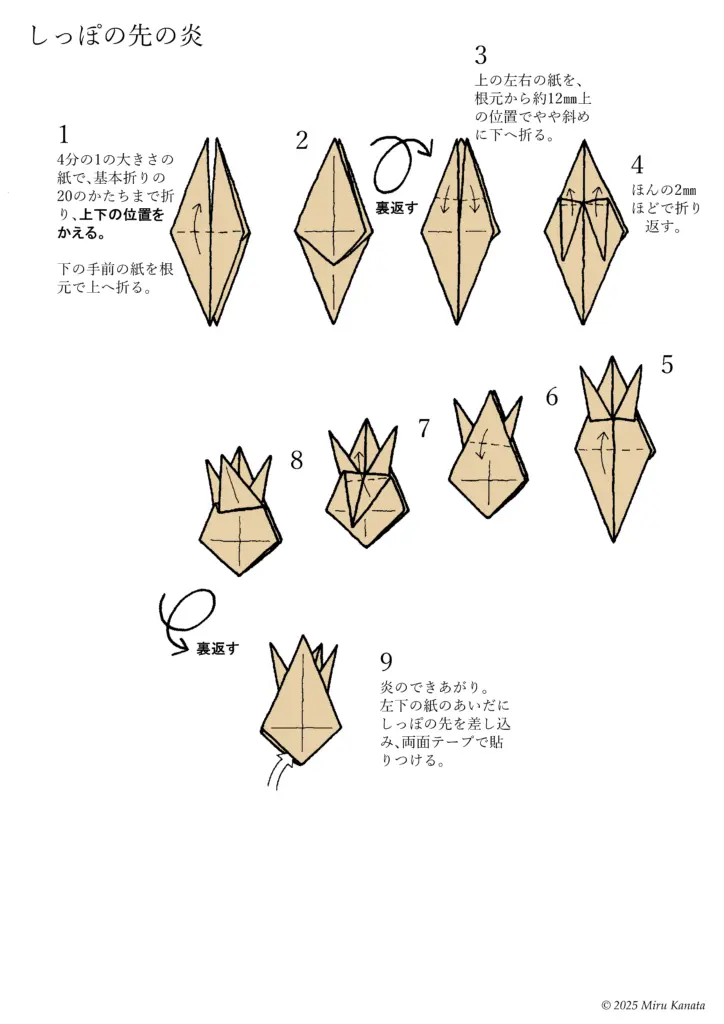
Flame on the tip of the tail
1 Fold a quarter-sized piece of paper into the basic 20 shape, then change the top and bottom positions.
Fold the bottom front piece of paper up at the base.
2
{Flip}
3 Fold the top left and right pieces of paper down at a slight diagonal, about 12 mm above the base.
4 Fold just 2 mm back.
5
6
7
8
{Flip}
9 The flame is complete. Insert the tip of the tail between the pieces of paper on the bottom left and attach with double-sided tape.
参考・2000年の本に掲載した折り図
リザードは、ゲームフリークのチェックでOKをいただいたのですが、本の誌面の制約のため、掲載することができませんでしたので、2000年の本の折り図はありません。
みるかなた本棚>『ポケットモンスターおりがみコレクション』>ポケモンおりがみ一覧表>0005リザード

◇ ◇ ◇