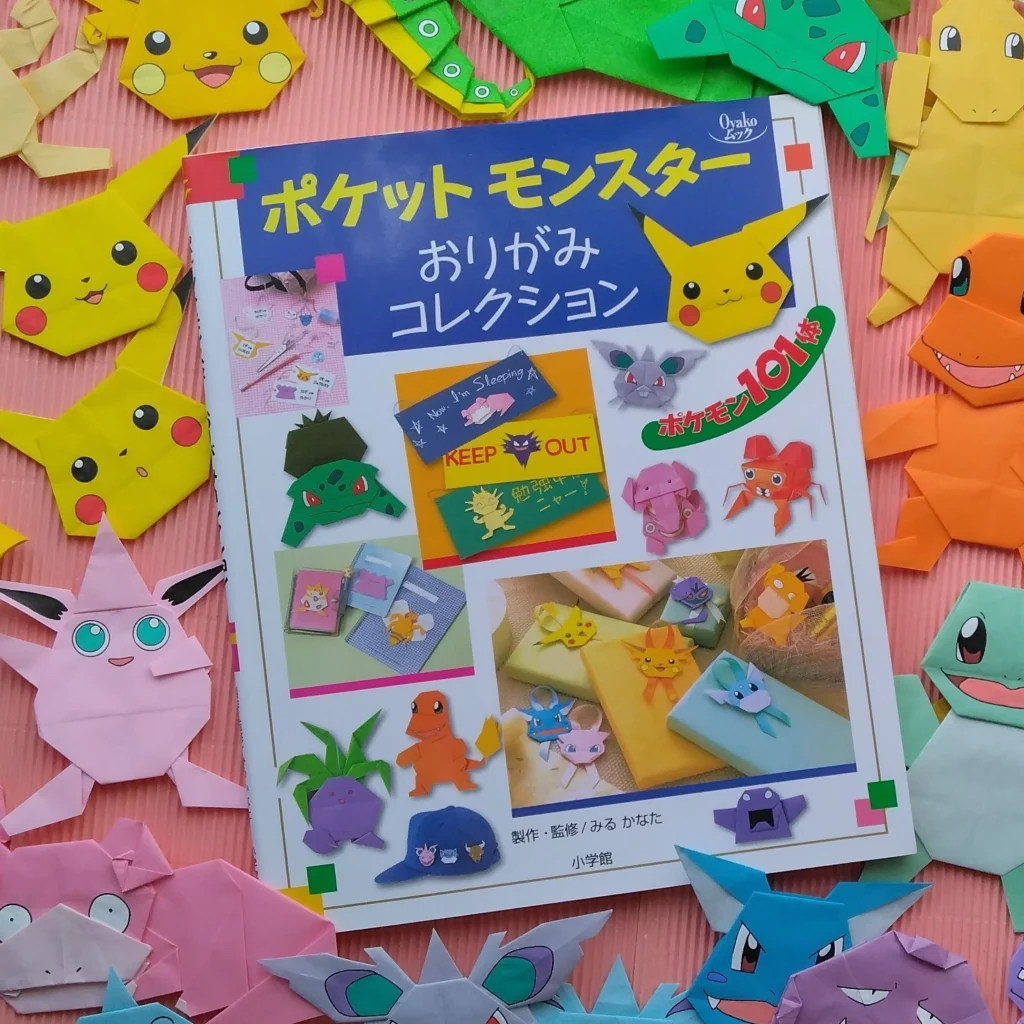
みるかなた本棚>『ポケットモンスターおりがみコレクション』>ポケモンおりがみ一覧表>0002フシギソウ
◆0001 フシギダネ◆0002 フシギソウ◆0003 フシギバナ◆
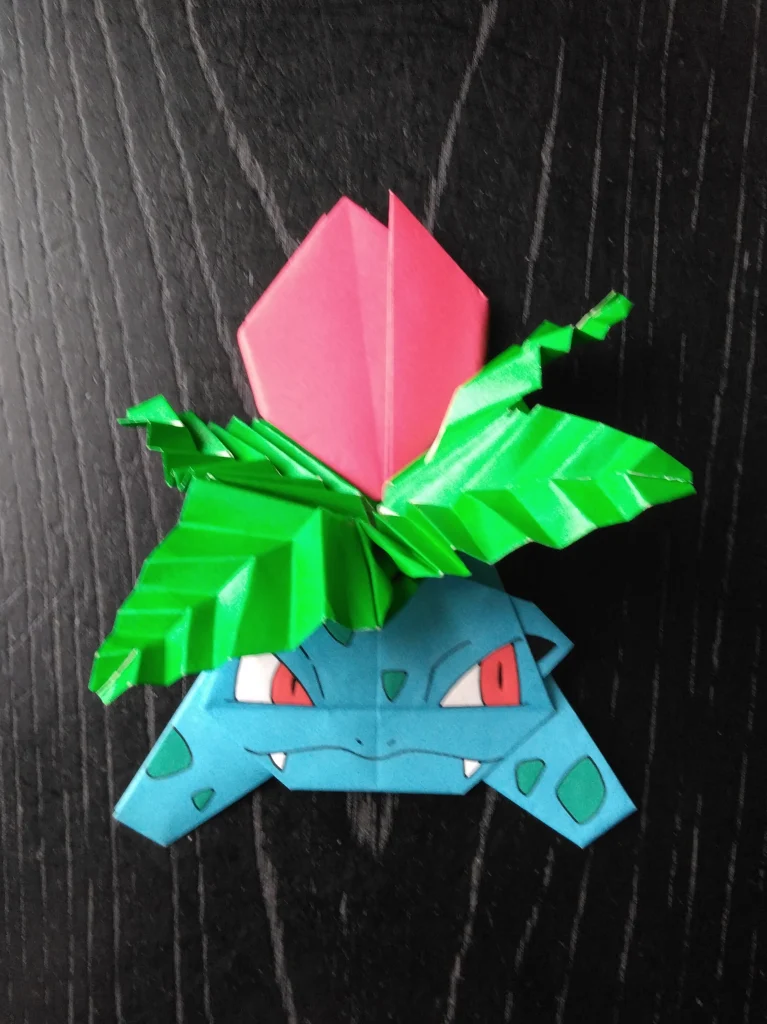
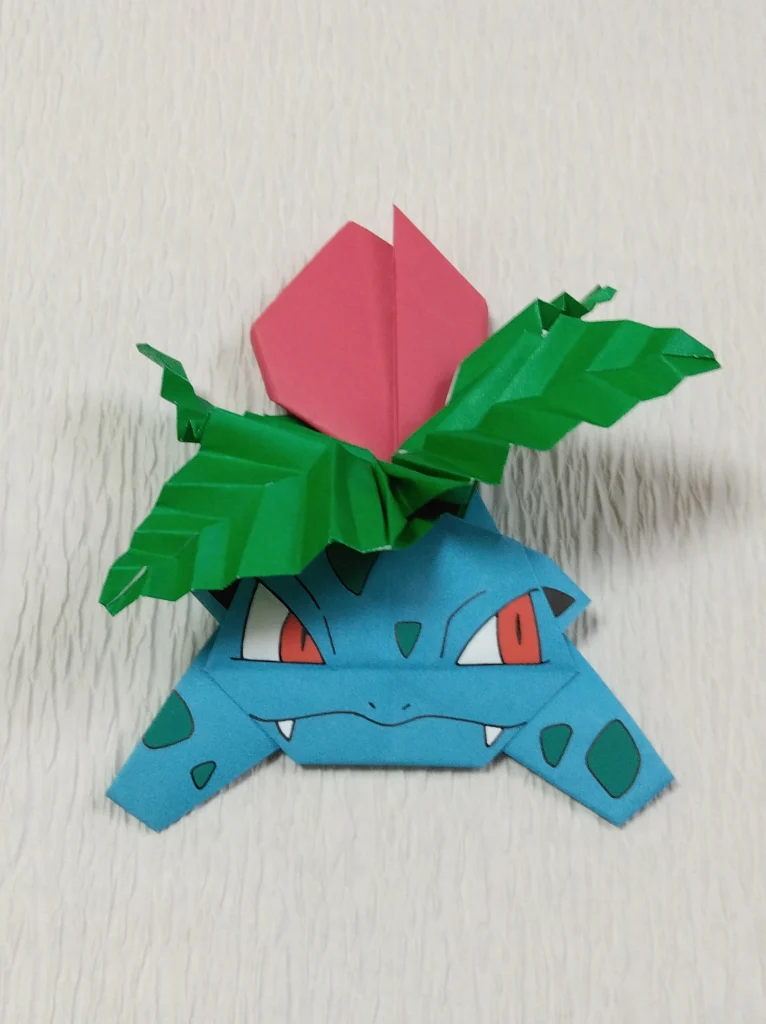
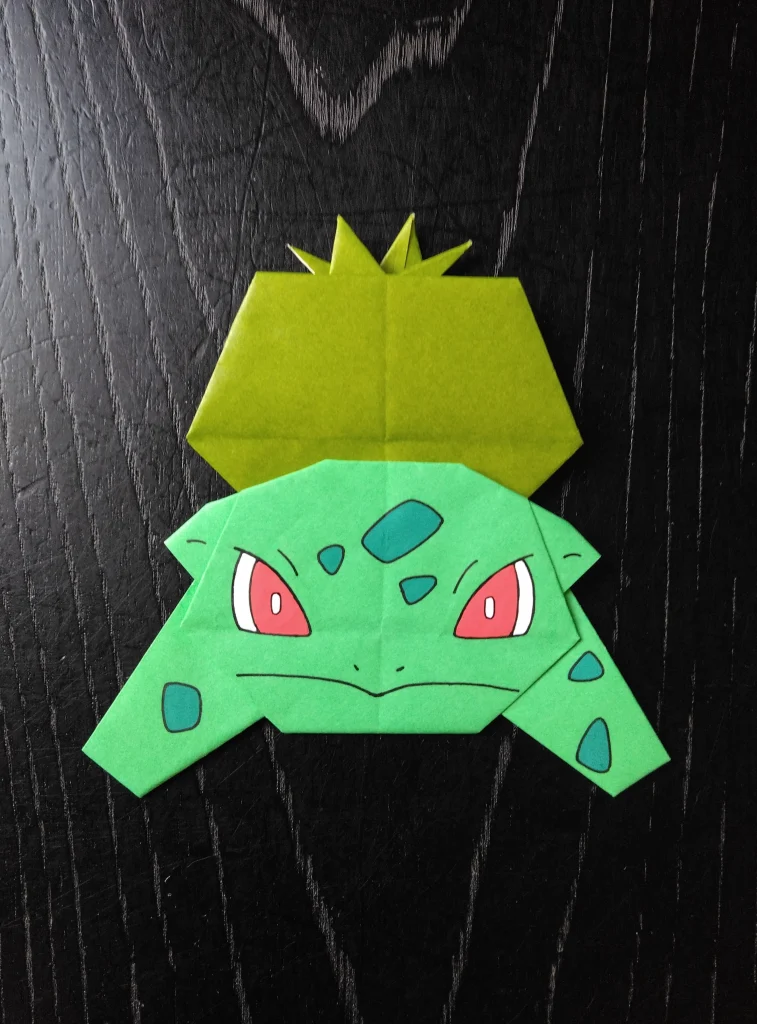
0002 フシギソウ
いろいろな角度からデッサンしてみたのですが、はっぱの部分を平面でうまく表現できるかたちが見つからず、少し厚みのある造形になりました。
立体になったはっぱは、ちょっとばかり手の込んだ折り方をします。
山を平たい面にするアイディアと、各片の独立性と自由度を確保するアイディアと、ふたつのテクニックを使用しています。
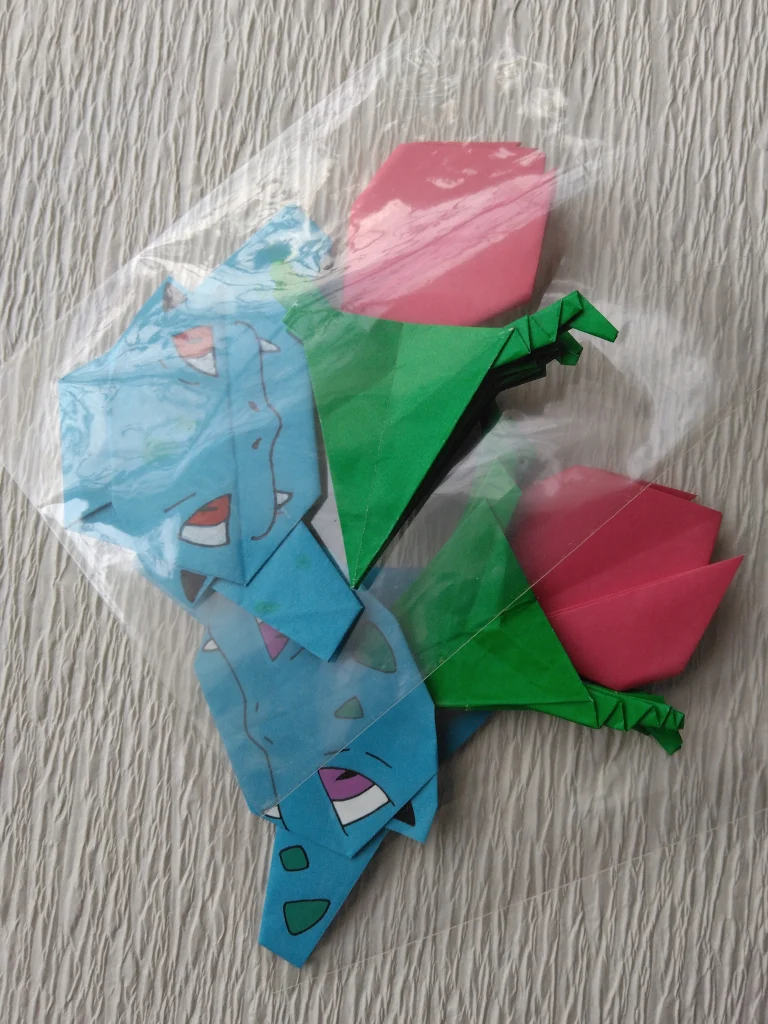
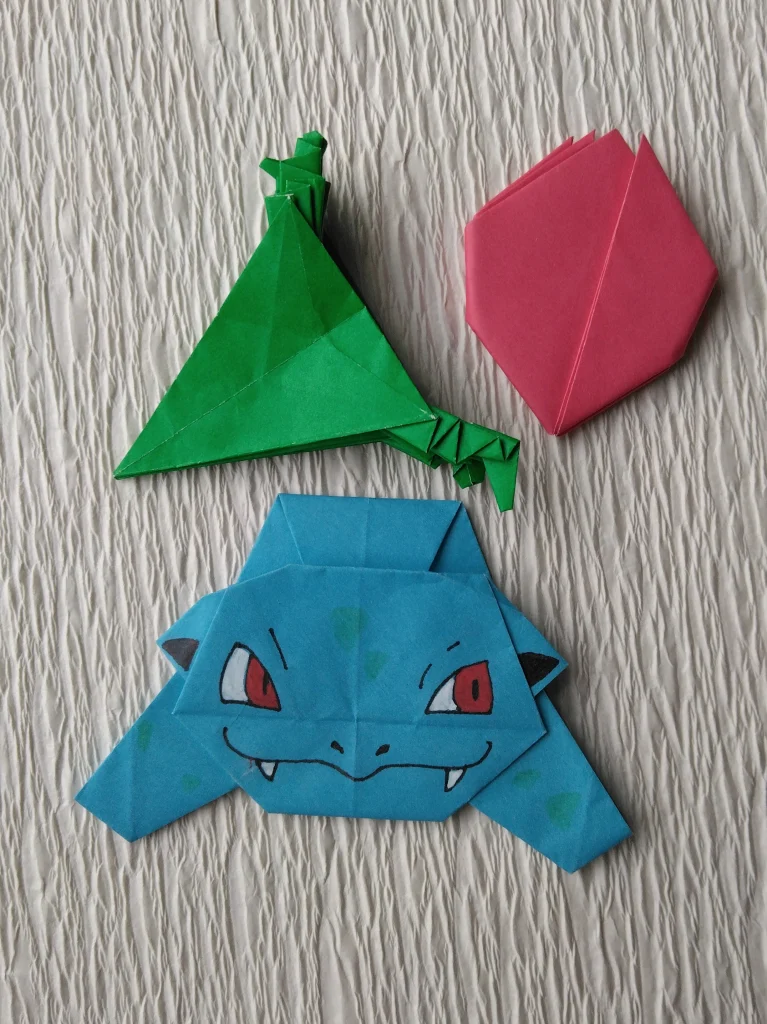
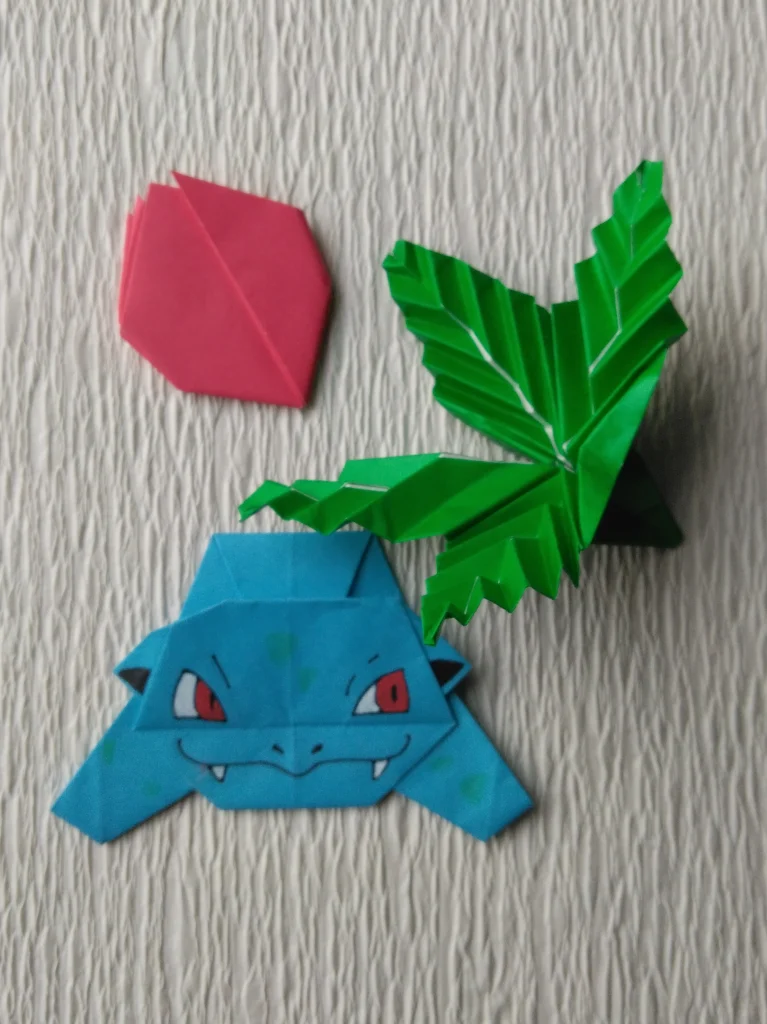
立体になると、保管に場所をとるし、また破損の機会も増えます。
ですから、飾る場合以外は、たたんで、それぞれ透明袋に入れて、おりがみ専用の箱にしまっています。
必要になったら、箱から出して組み立てます。
フシギソウのはっぱ
フシギソウのはっぱは、椰子(ヤシ)の葉や棕櫚(シュロ)の葉のように、葉の縁を取り巻いて切り込みがたくさんあります。
この切り込みを幾何的に再現するのは、とてもできません。
それで、ちょっと違うけど雰囲気は似てるかなと思って、葉の縁をぎざぎざにすることにしました。
★ゲームフリークのチェック
◆姿かたちは、最初のチェックでOKをいただきました。
◆紙の色は、からだは青色、はっぱは緑色、つぼみは紅色、それぞれこの色をご指定でした。
つくり方の折り図
今回制作した折り図
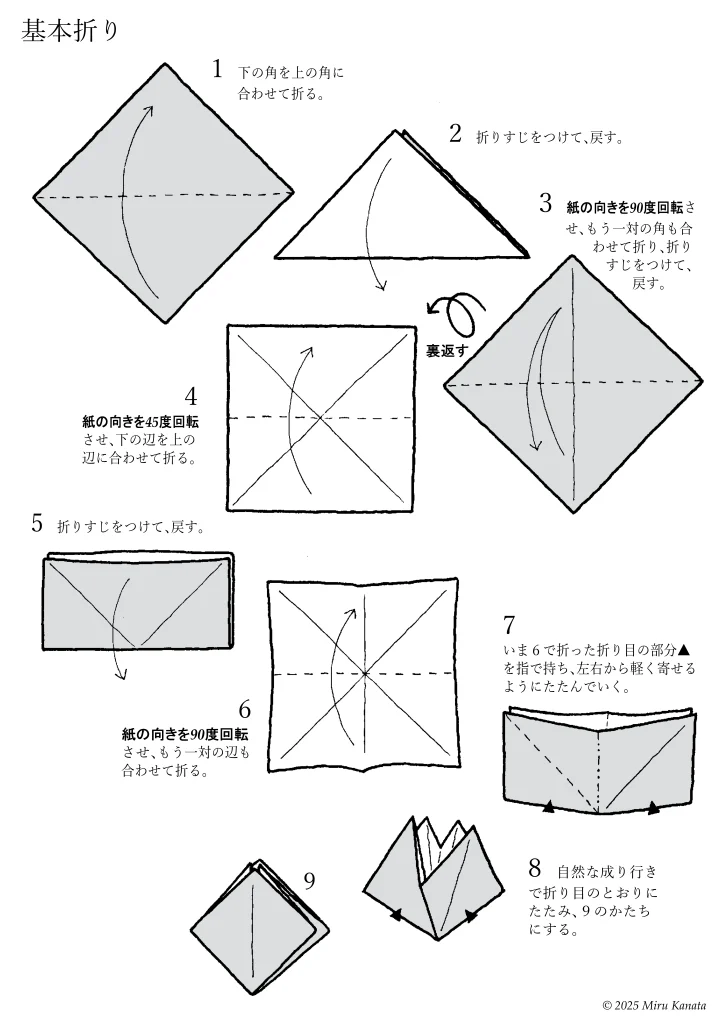
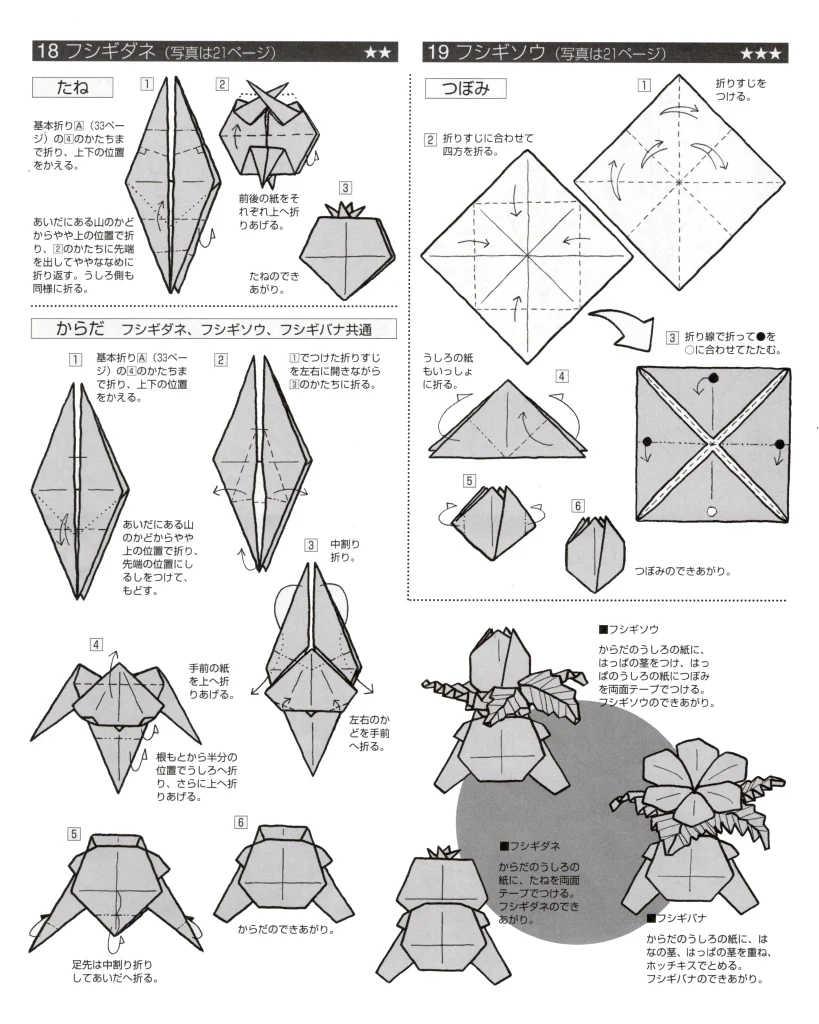
■1 フシギソウのからだは、青色の紙で、まず基本折りの図20まで折る。
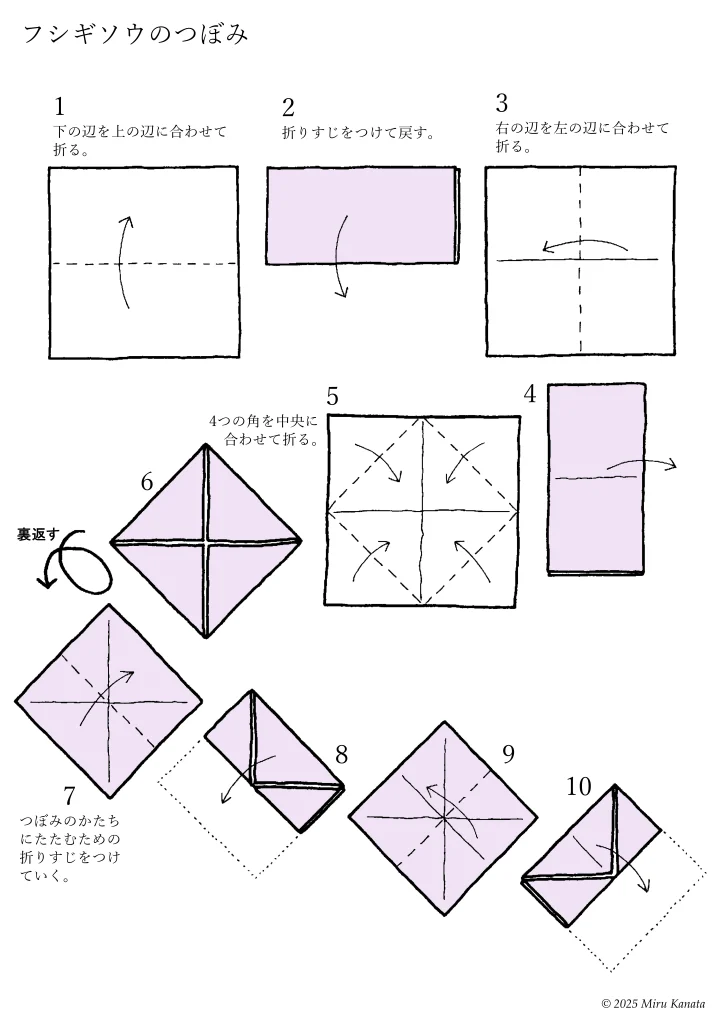
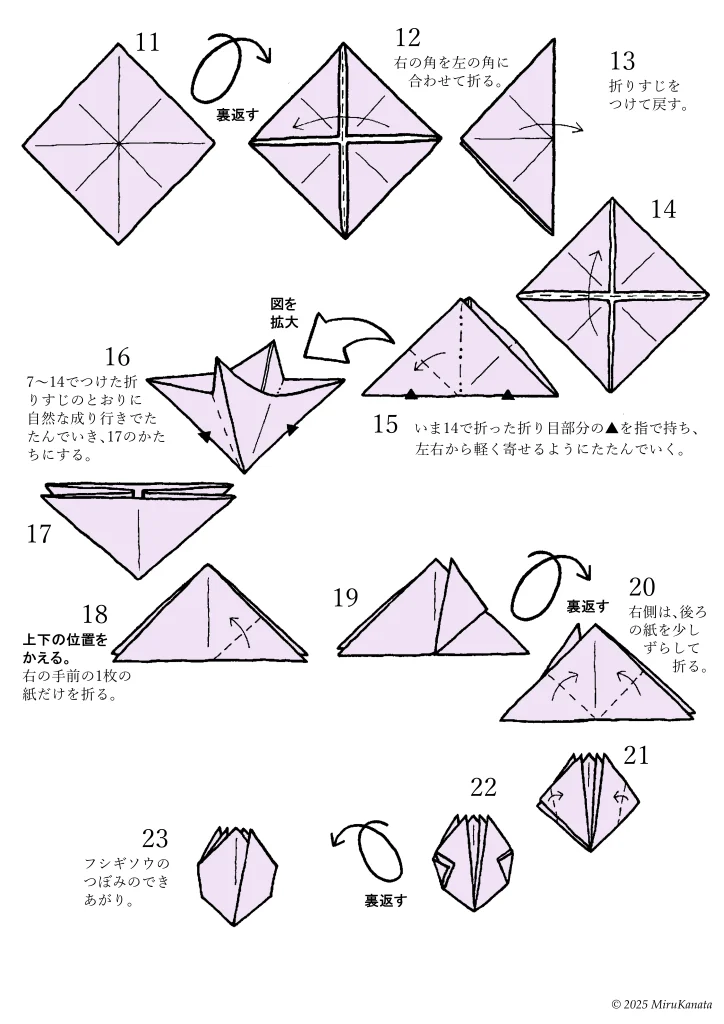
■2 フシギソウのつぼみは、紅色の紙で折る。
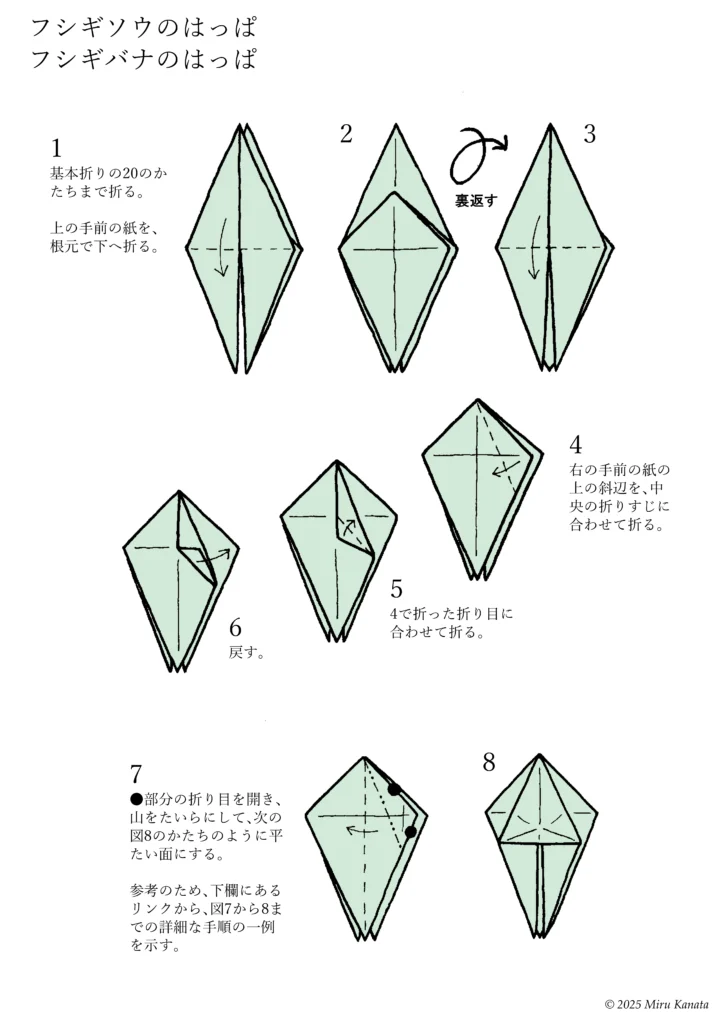
■3 フシギソウのはっぱは、緑色の紙で、こちらもまず基本折りの図20まで折る。
English Commentary
Basic Folding
1 Fold the bottom corner to meet the top corner.
2 Make a crease and return it to its original position.
3 Rotate the paper 90 degrees, fold the other pair of corners together, make a crease and return it to its original position.
{Flip}
4 Rotate the paper 45 degrees and fold the bottom edge to meet the top edge.
5 Make a crease and return it to its original position.
6 Rotate the paper 90 degrees and fold the other pair of edges together.
7 Hold the crease ▲ made in step 6 with your fingers and fold it gently from both sides.
8 Let it naturally fold along the creases to form the shape of 9.
9
English Commentary
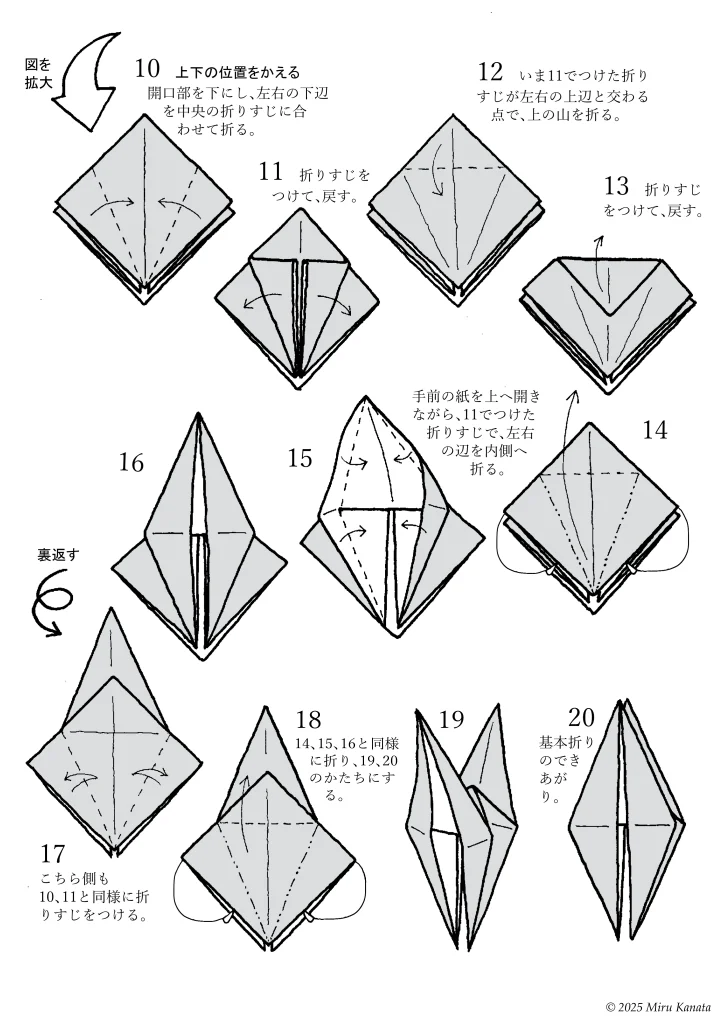
{Enlarge image}
10 Change the top and bottom positions.
With the opening facing downwards, fold the bottom left and right edges to meet the crease in the middle.
11 Make a crease and return.
12 Fold the top at the point where the crease made in 11 intersects with the top left and right edges.
13 Make a crease and return.
14 While opening the front paper upwards, fold the left and right edges inward along the crease made in 11.
15
16
{Flip}
17 Make creases on this side in the same way as 10 and 11.
18 Fold in the same way as 14, 15 and 16 to form 19 and 20.
19
20 The basic fold is complete.
English Commentary
Ivysaur’s body
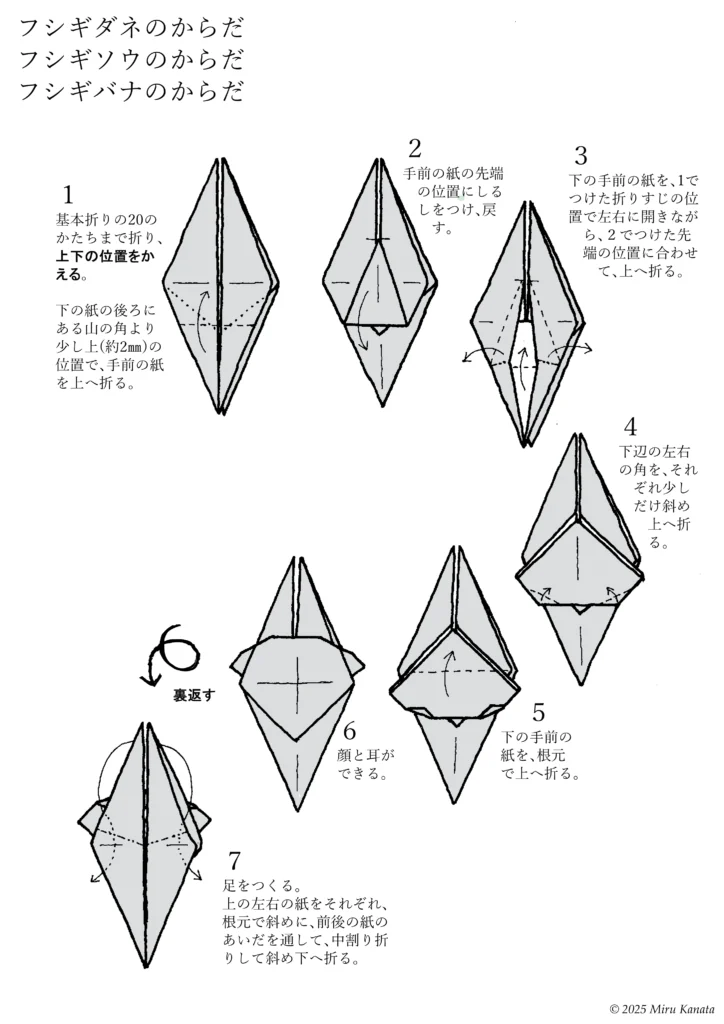
1 Fold it up to the basic 20 shape, then change the top and bottom positions.
Fold the front piece of paper up slightly (about 2 mm) above the corner of the mountain at the back of the bottom piece of paper.
2 Make a mark at the tip of the front piece of paper and return it to its original position.
3 While opening the bottom front piece of paper to the left and right at the crease made in step 1, fold it up to match the tip mark made in step 2.
4 Fold each of the left and right corners of the bottom edge slightly diagonally upwards.
5 Fold the bottom front piece of paper up at the base.
6 The face and ears are made.
7 Make the feet. Fold the top left and right pieces of paper diagonally at the base, passing them between the front and back pieces of paper, and then fold them diagonally downwards.

English Commentary
8 Fold the tip of the paper in half and fold it between the pieces of paper.
9 The legs are finished.
Fold the bottom piece of paper up halfway from the base.
10
11
12
{Flip}
13 The body is finished.
Attach a seed to the back piece of paper that is sticking out a little.
English Commentary
Ivysaur bud
1 Fold the bottom edge to meet the top edge.
2 Make a crease and return it to its original position.
3 Fold the right edge to meet the left edge.
4
5 Fold the four corners to meet the center.
6
{Turn inside out}
7 Make creases to fold it into the shape of a bud.
8
9
10
English Commentary
11
{Turn inside out}
12 Fold the right corner to meet the left corner.
13 Make a crease and turn it back.
14
15 Hold the ▲ at the crease you just made in 14 with your fingers and fold it in from the left and right.
{Enlarge image}
16 Fold naturally, following the creases you made in 7 to 14, to form the shape of 17.
17
18 Switch the top and bottom positions. Fold only the front piece of paper on the right.
19
{Turn inside out}
20 On the right side, shift the back piece of paper slightly and fold it back.
21
22
{Turn inside out}
23 The Ivysaur bud is complete.
English Commentary
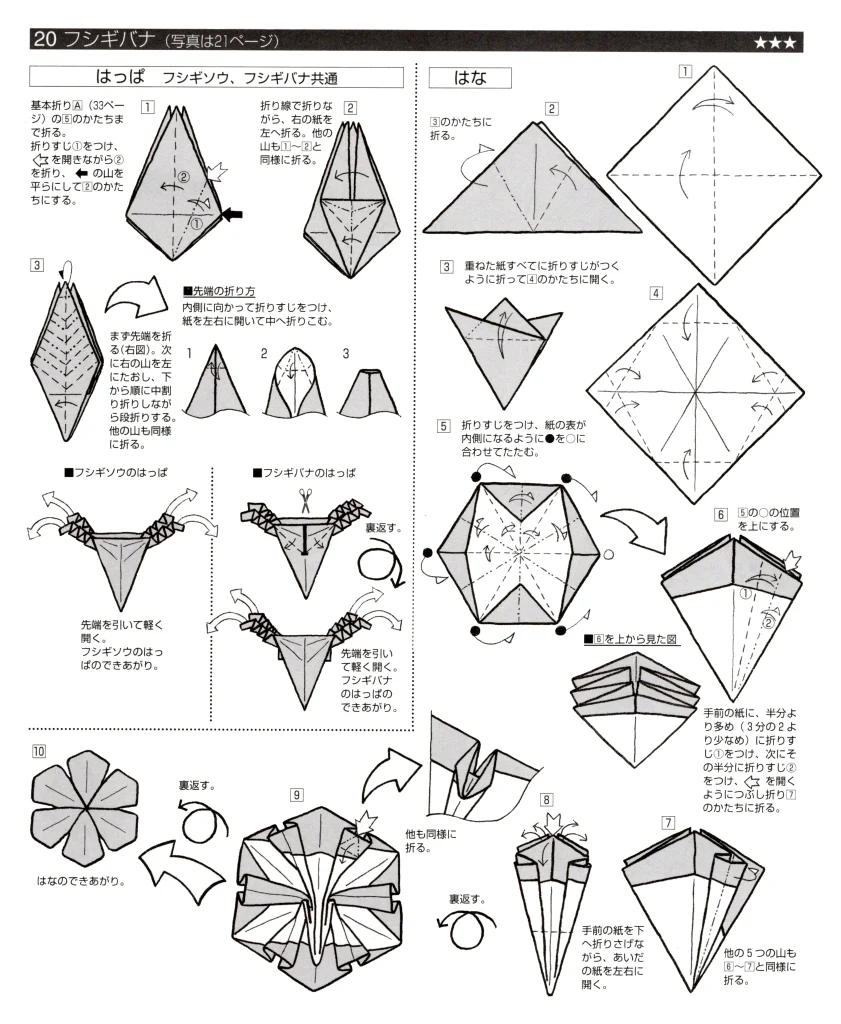
Ivysaur Leaf
1 Fold up to the basic fold shape of 20.
Fold the top front piece of paper down at the base.
2
{Flip}
3
4 Fold the top diagonal side of the right front piece of paper to match the crease in the center.
5 Fold it to match the crease made in 4.
6 Turn it back.
7 Open the creases in the ● part and flatten the peaks to create a flat surface as shown in Figure 8 below.
ページを行ったり来たりするのは煩雑なので、次に掲載する。

English Commentary
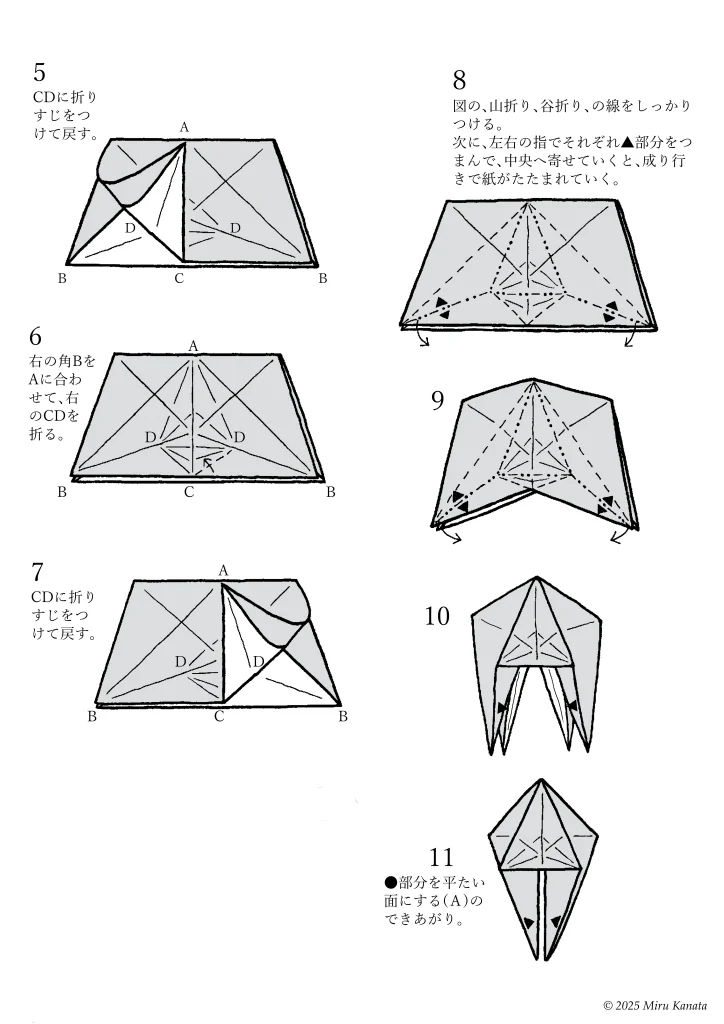
Make the ● part flat (A)
Open the folds marked with ● in the left image, flatten the folds, and create a flat surface like the one in the right image.
An example of the specific steps is shown in the following image.
1 Stand the front right piece of paper up in the center.
2 Hold the two folded edges of the paper with your fingers, overlapping each other, at the ▲ part on each side, and slowly pull the paper left and right to open it.
3
4 Once the paper is fully opened, align the left corner B with A and fold the left CD.
English Commentary
5 Make a crease in the CD and return it to its original position.
6 Fold the right side of the CD, aligning the right corner B with A.
7 Make a crease in the CD and return it to its original position.
8 Make sure to fold along the mountain and valley fold lines in the diagram.
Next, pinch the ▲ parts with your fingers on both sides and move them towards the center, and the paper will fold itself in as it goes along.
9
10
11 Make the ● part flat (A) is complete.
English Commentary
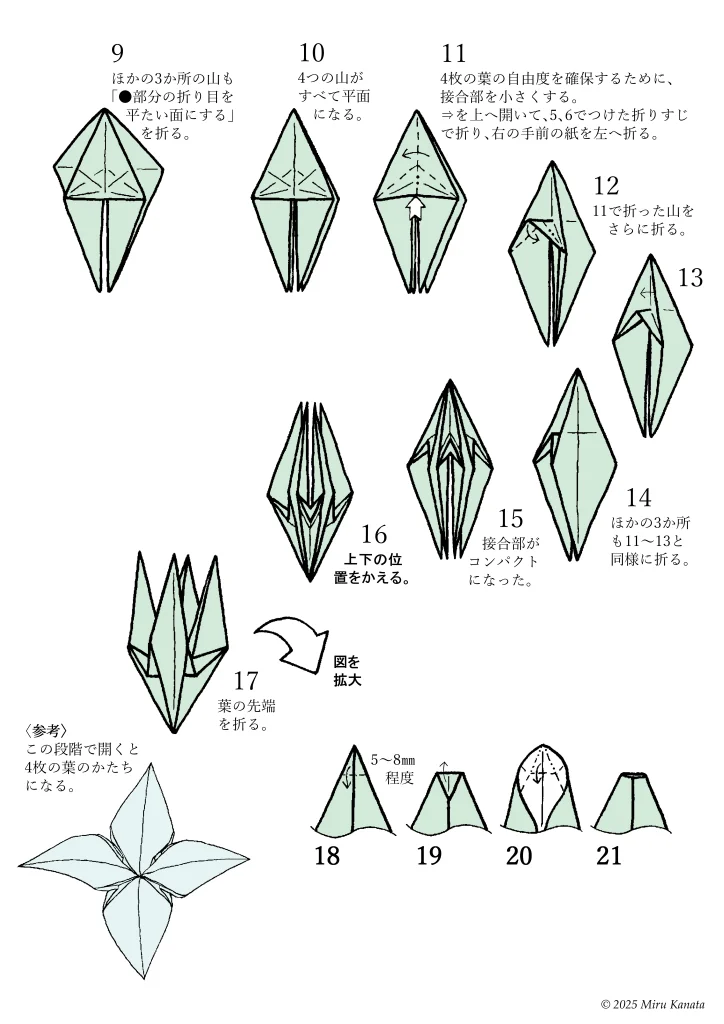
9 Fold the other three piles as well, making the creases at the ● parts flat.
10 All four piles will be flat.
11 Make the joints smaller to ensure the freedom of movement of the four leaves.
Open ⇒ upwards, fold along the creases made in steps 5 and 6, and fold the front right piece of paper to the left.
12 Fold the pile folded in step 11 again.
13
14 Fold the other three places in the same way as steps 11 to 13.
15 The joints are now compact.
16 Change the top and bottom positions.
17 Fold the tip of the leaf.
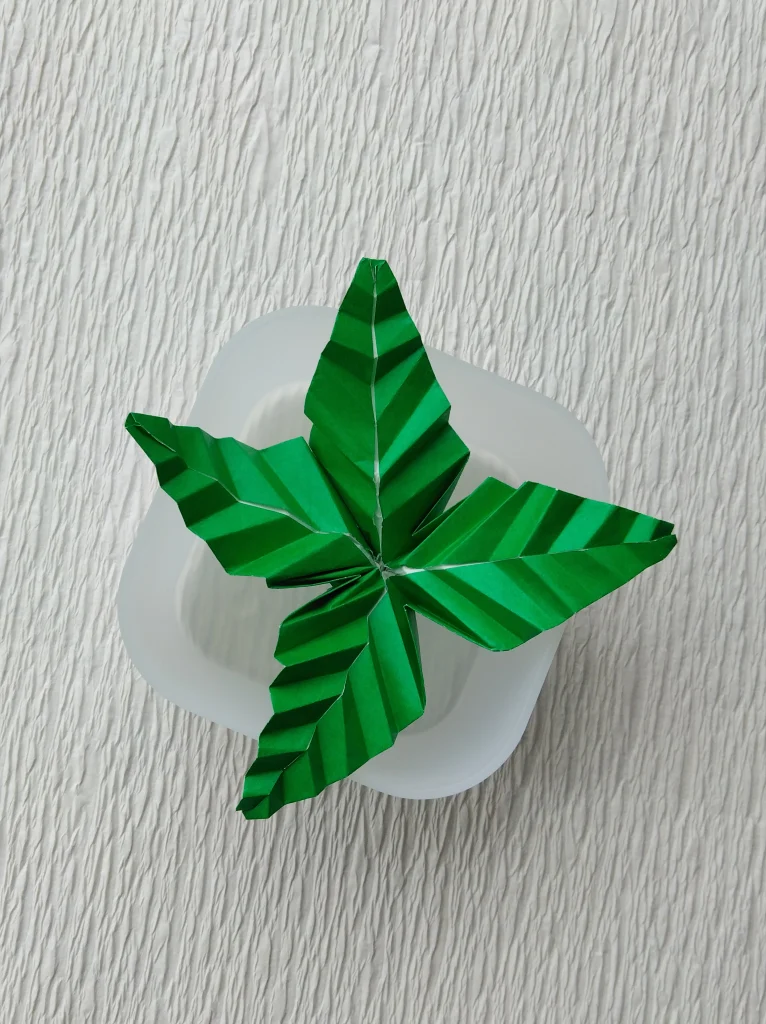
{Reference} If you open it at this stage, it will have the shape of four leaves.
{Enlarge the diagram}
18
19
20
21
English Commentary
22 Fold the tip of the leaf in all four places.
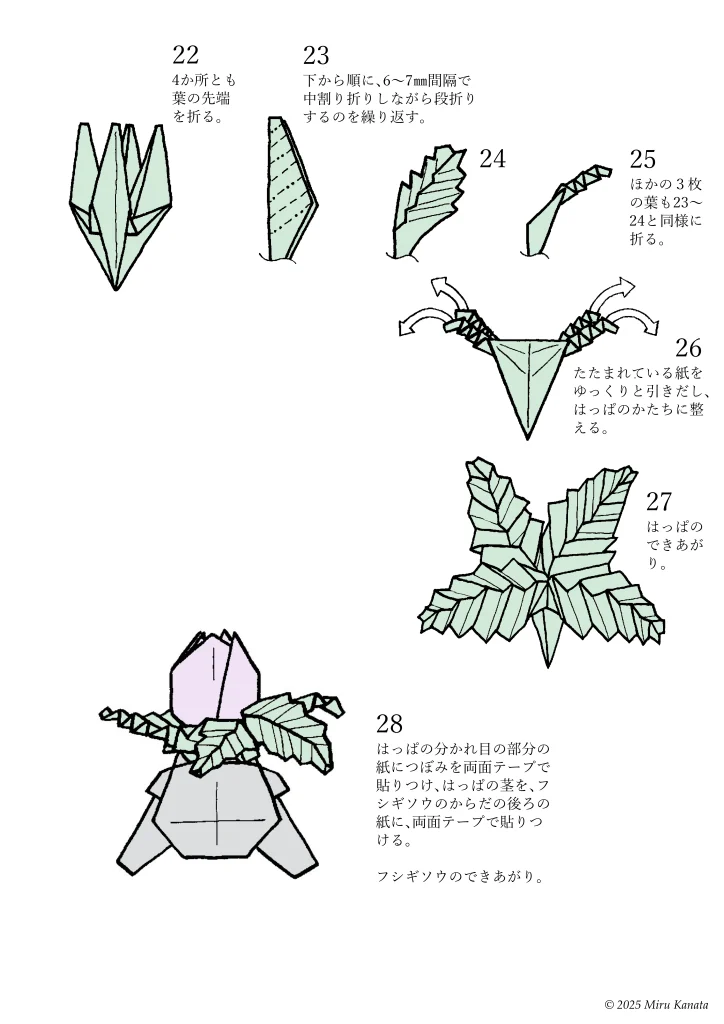
23 Starting from the bottom, repeat the process of folding in half at 6-7 mm intervals.
24
25 Fold the other three places in the same way as steps 23-24.
26 Slowly pull out the folded paper and arrange the leaf shape.
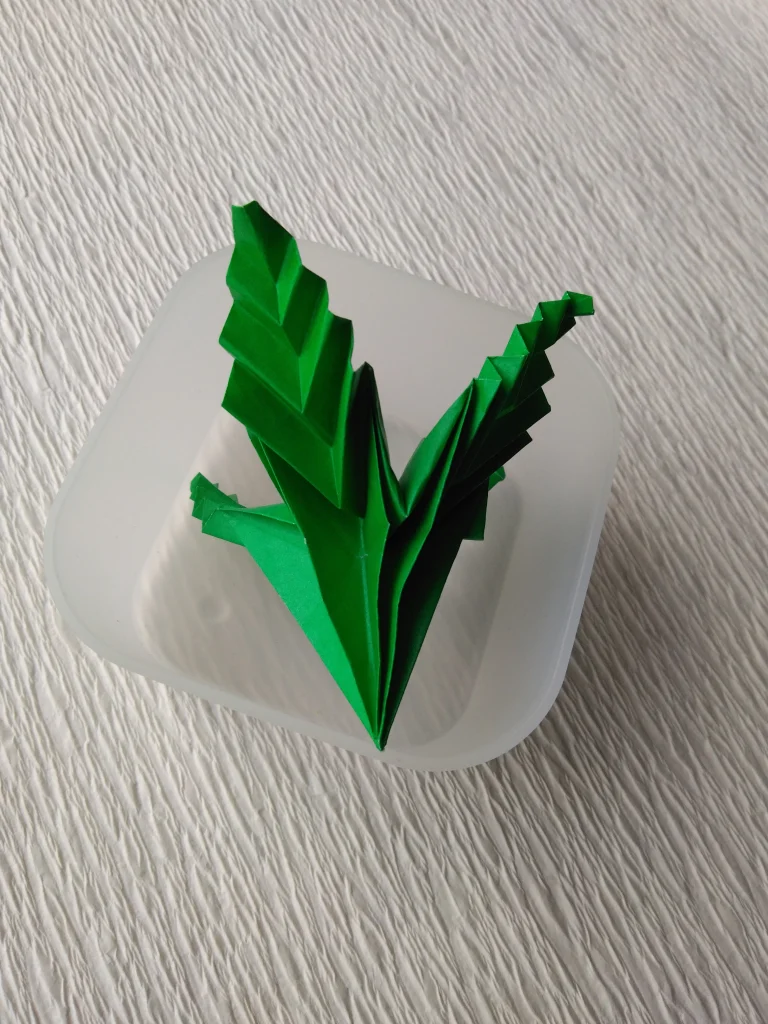
27 The leaf is finished.
28 Use double-sided tape to attach the bud to the paper where the leaf splits. Then, use double-sided tape to attach the leaf stem to the paper behind the Ivysaur’s body.
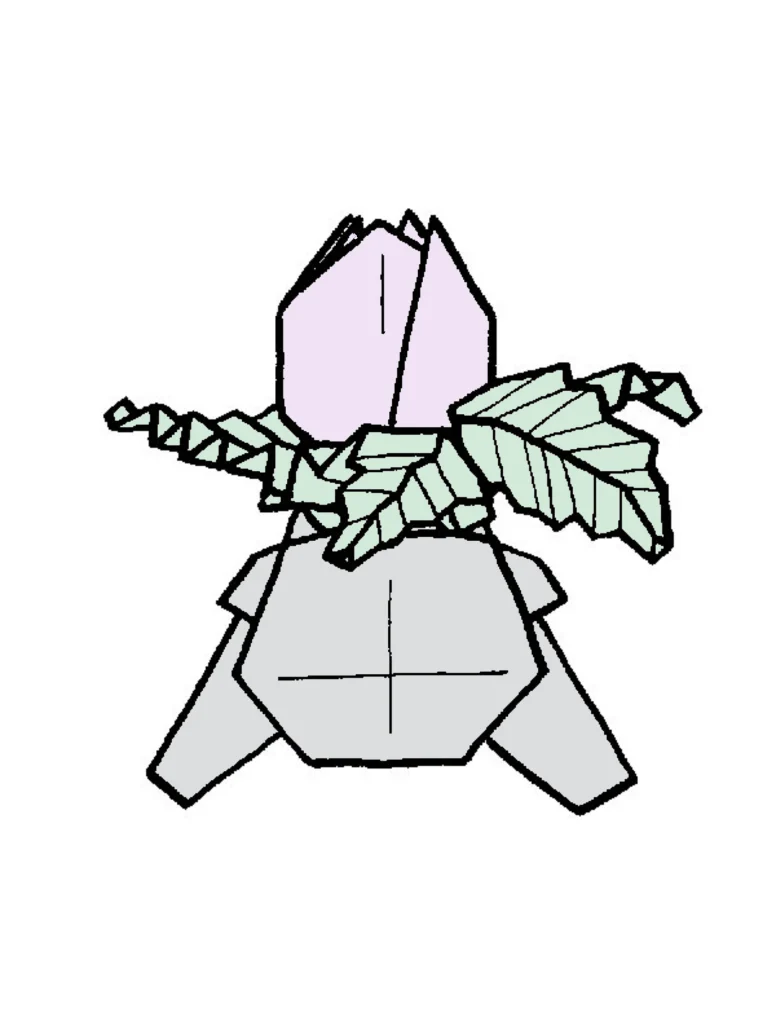
Your Ivysaur is complete.
参考・2000年の本に掲載した折り図
みるかなた本棚>『ポケットモンスターおりがみコレクション』>ポケモンおりがみ一覧表>0002フシギソウ
◇ ◇ ◇