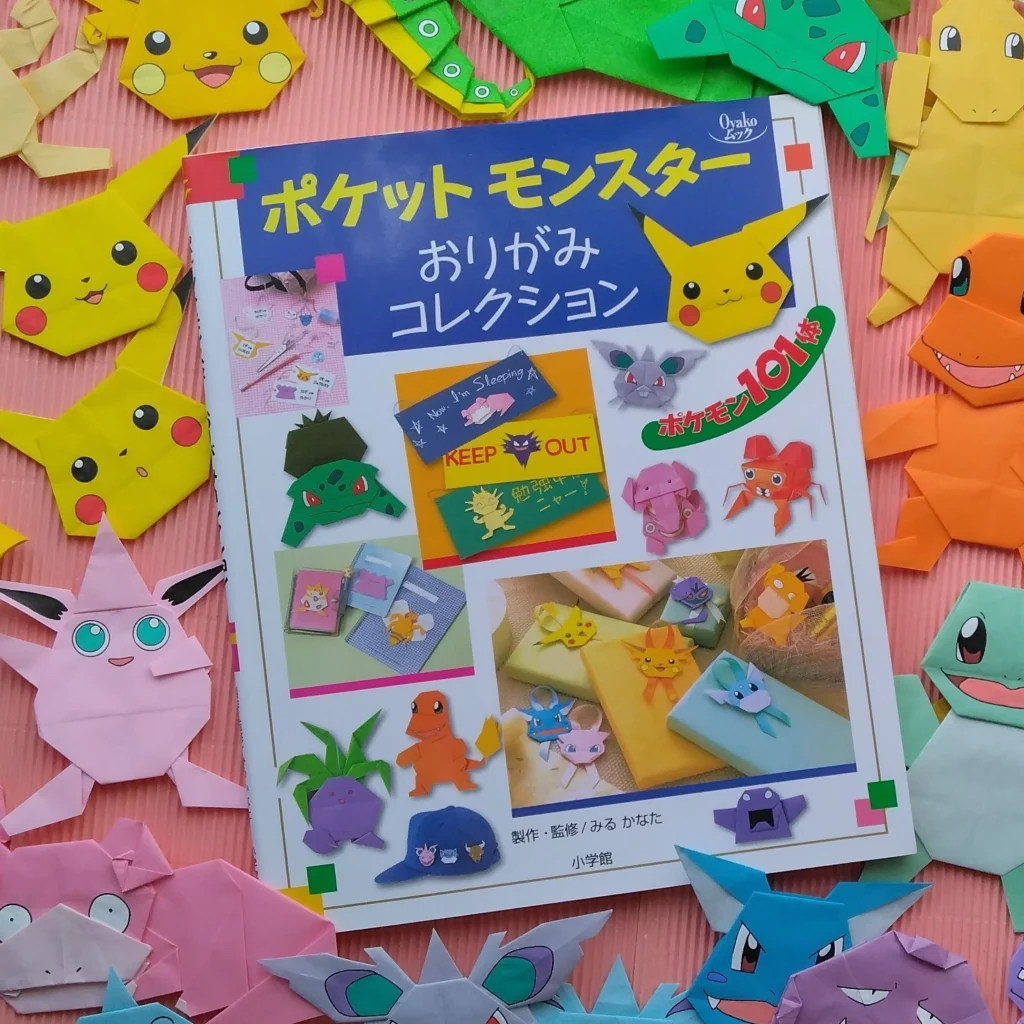
みるかなた本棚>『ポケットモンスターおりがみコレクション』>ポケモンおりがみ一覧表>0001 フシギダネ
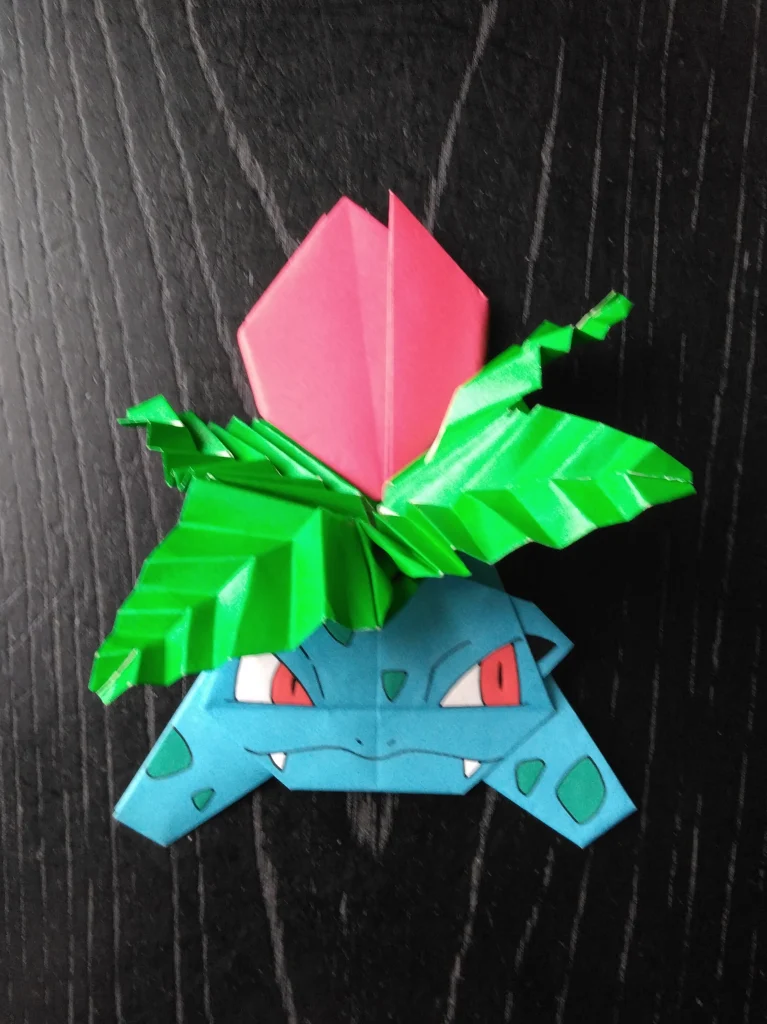
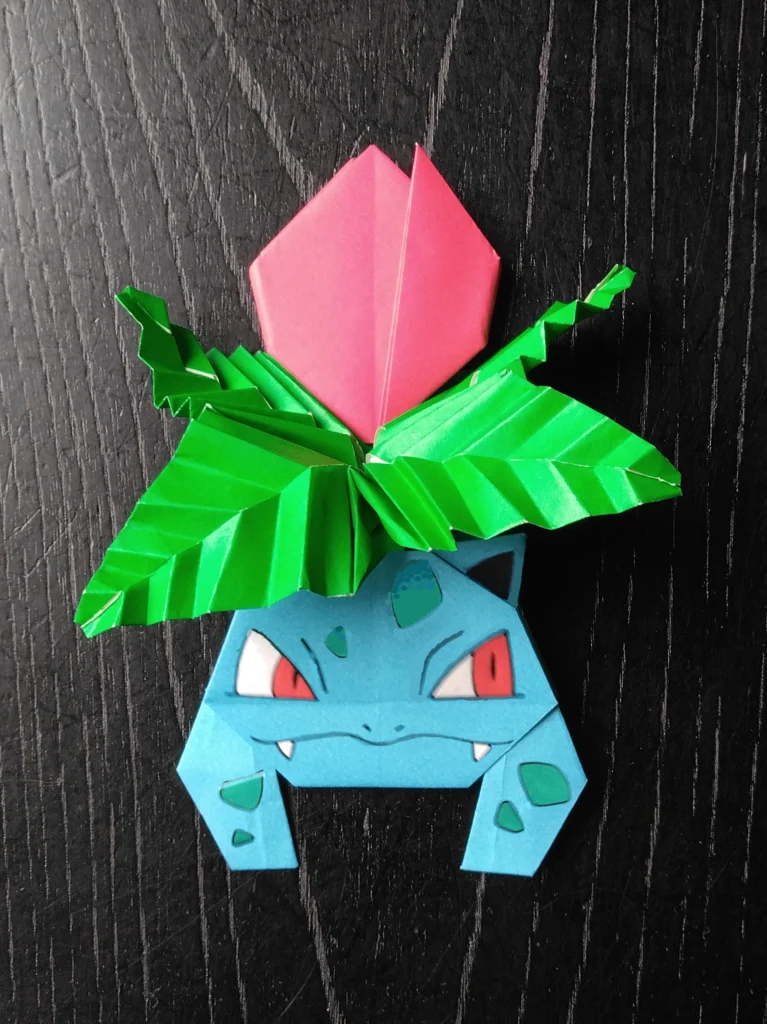
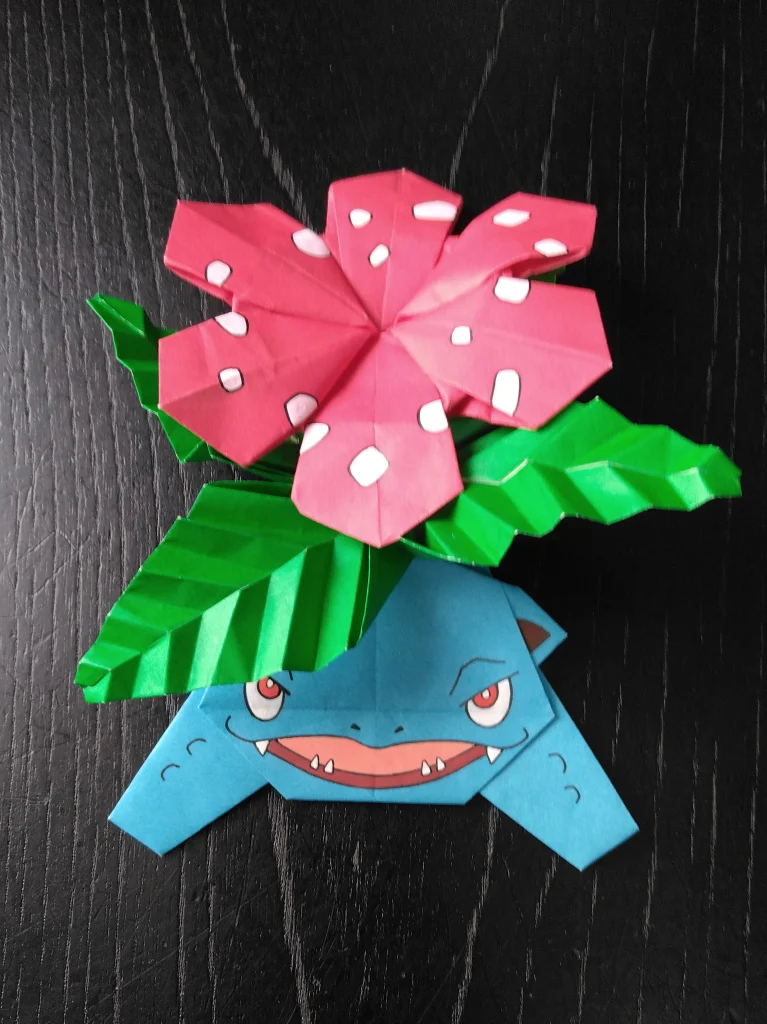
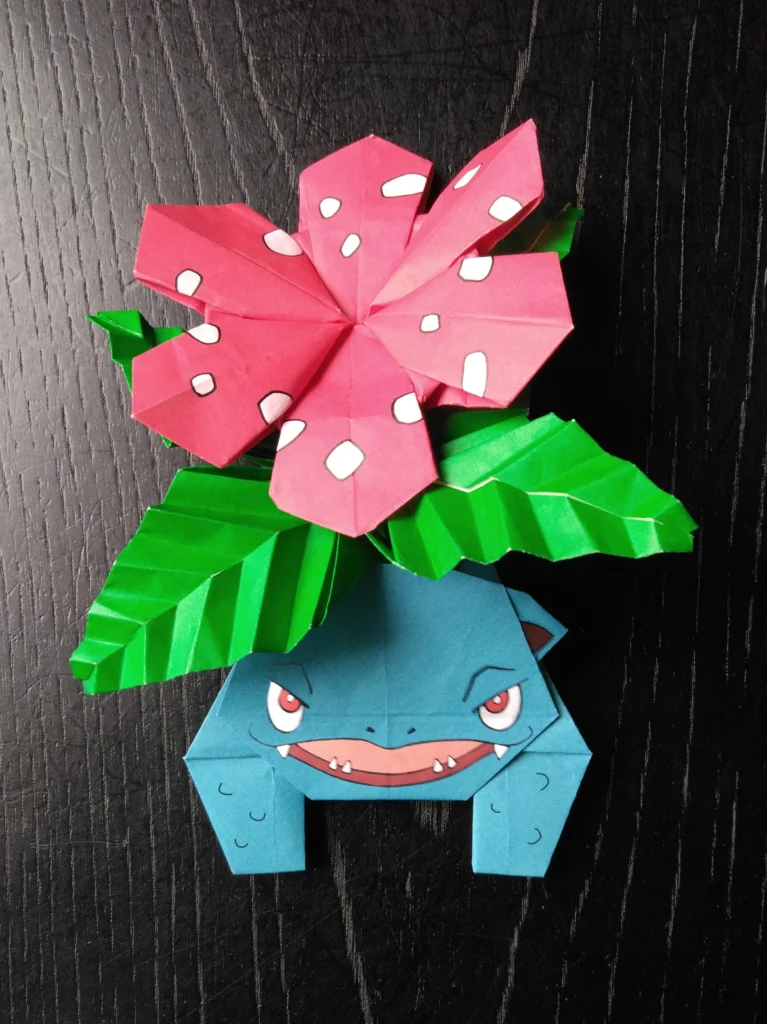
◆0001 フシギダネ◆0002 フシギソウ◆0003 フシギバナ◆
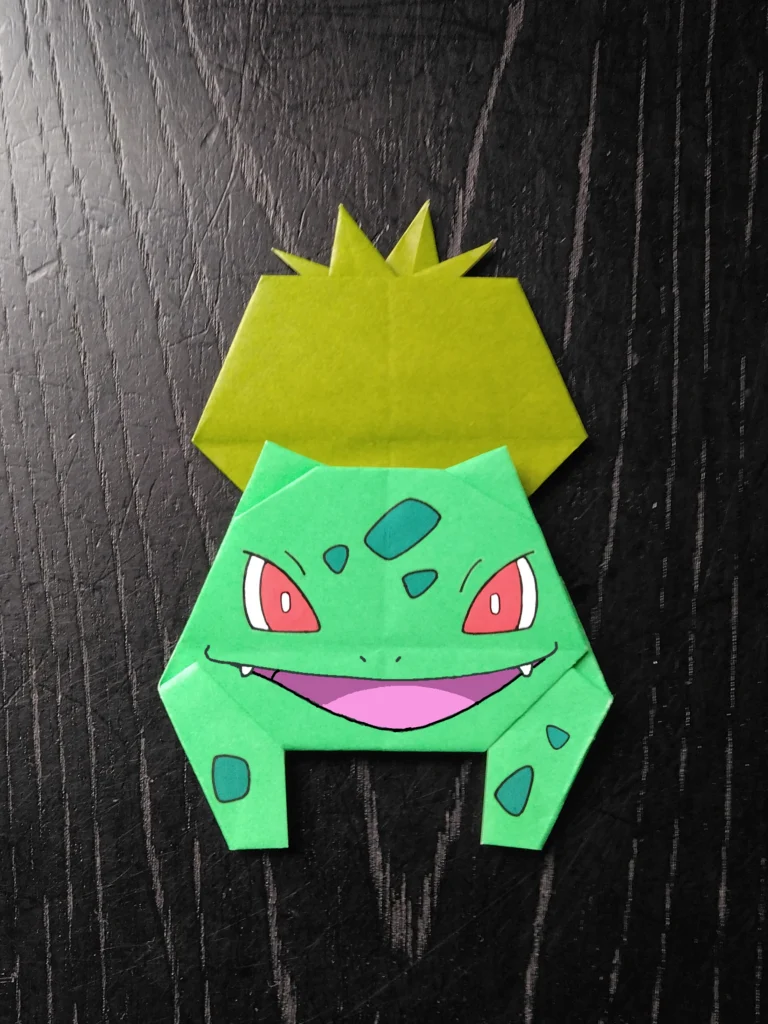
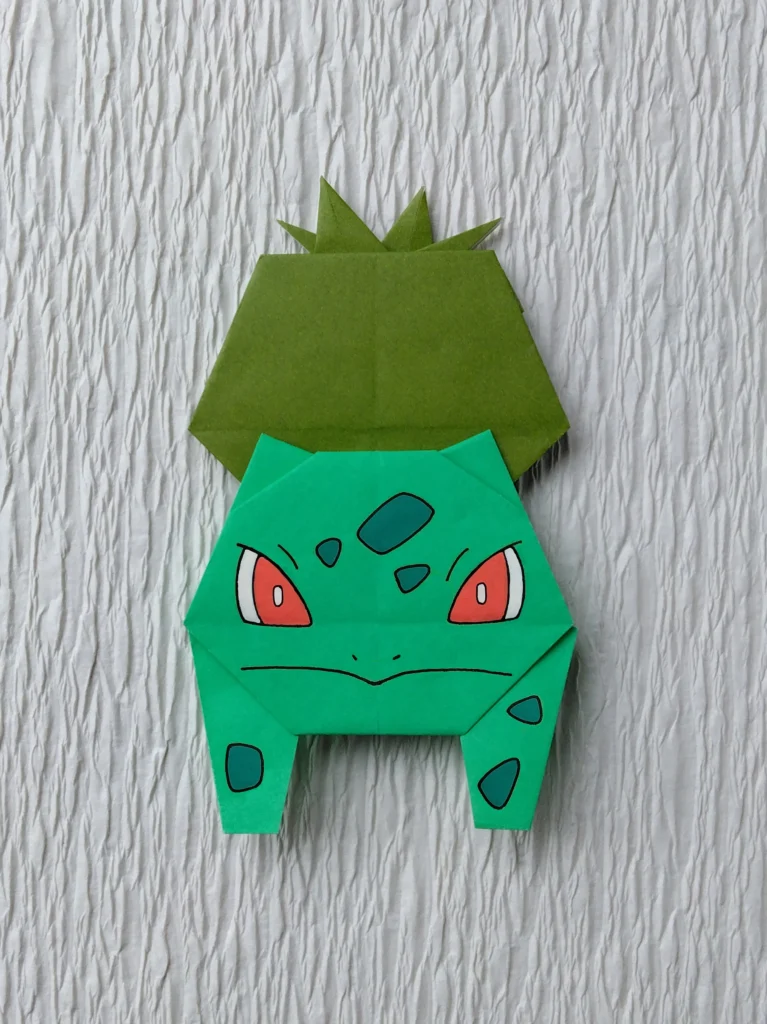
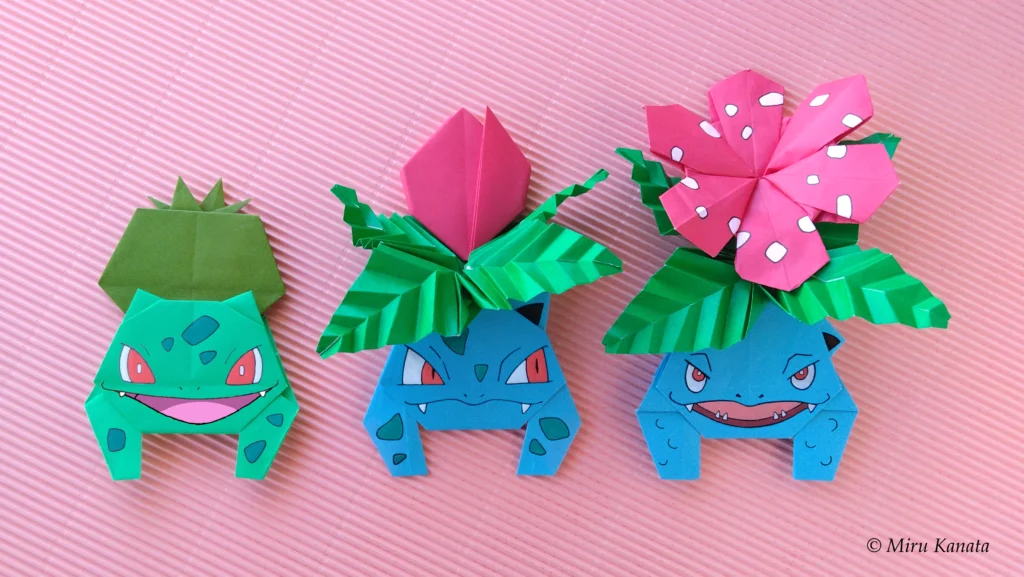
0001 フシギダネ 3号改訂版
今回、2026年3月、新たに制作したものです。
以前公表したものから、耳のかたちと位置をかえ、前足を揃えて、子どもっぽい感じの、フシギダネらしいかわいらしいフォルムに近づけました。
耳もそうですが、前足を、ねらった位置と角度につくるには、少しばかりこつが要ります。
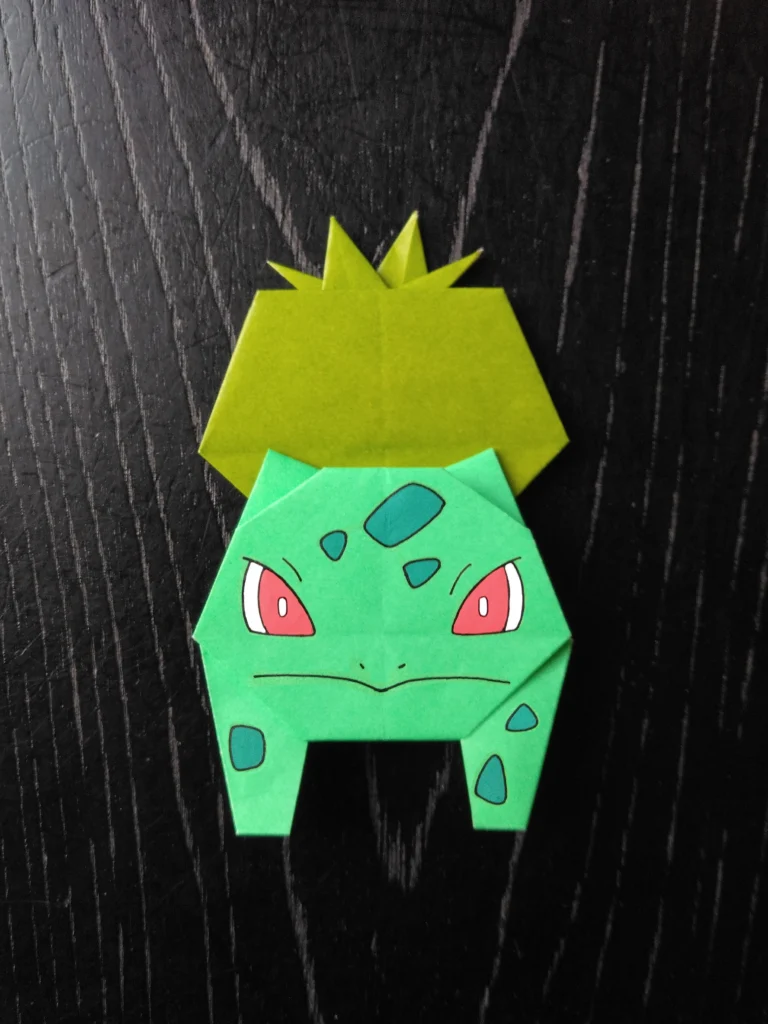
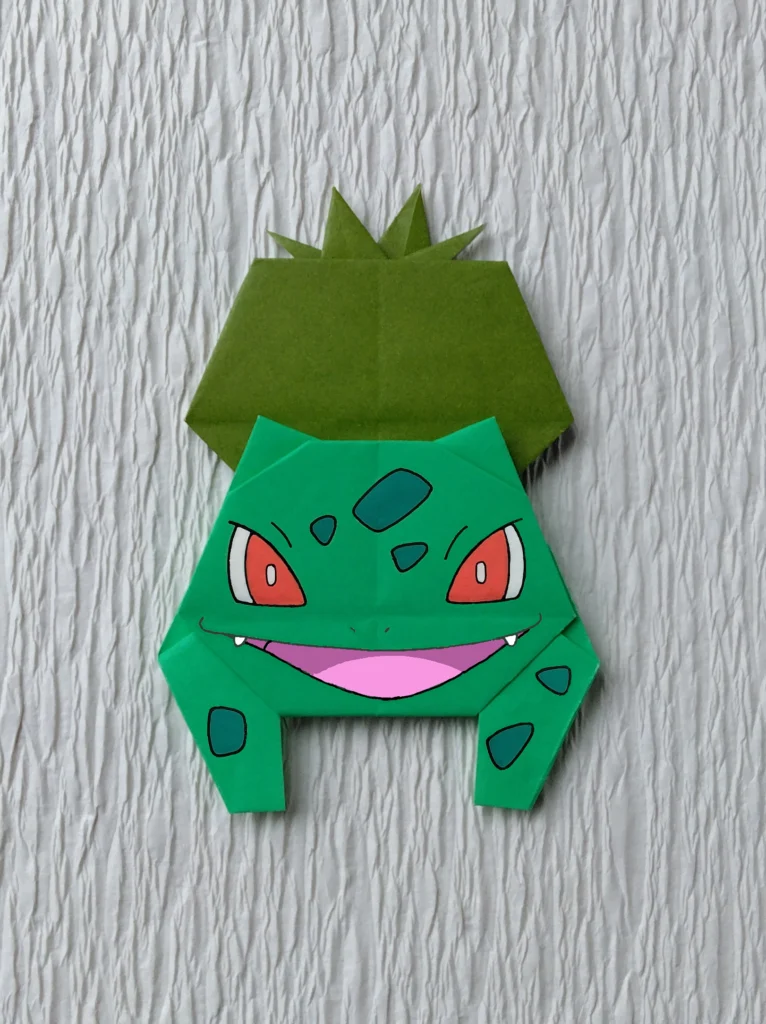
0001 フシギダネ 2号改訂版
こちらも2026年3月、今回新たに制作したものです。
3号よりもう少し幼い感じです。
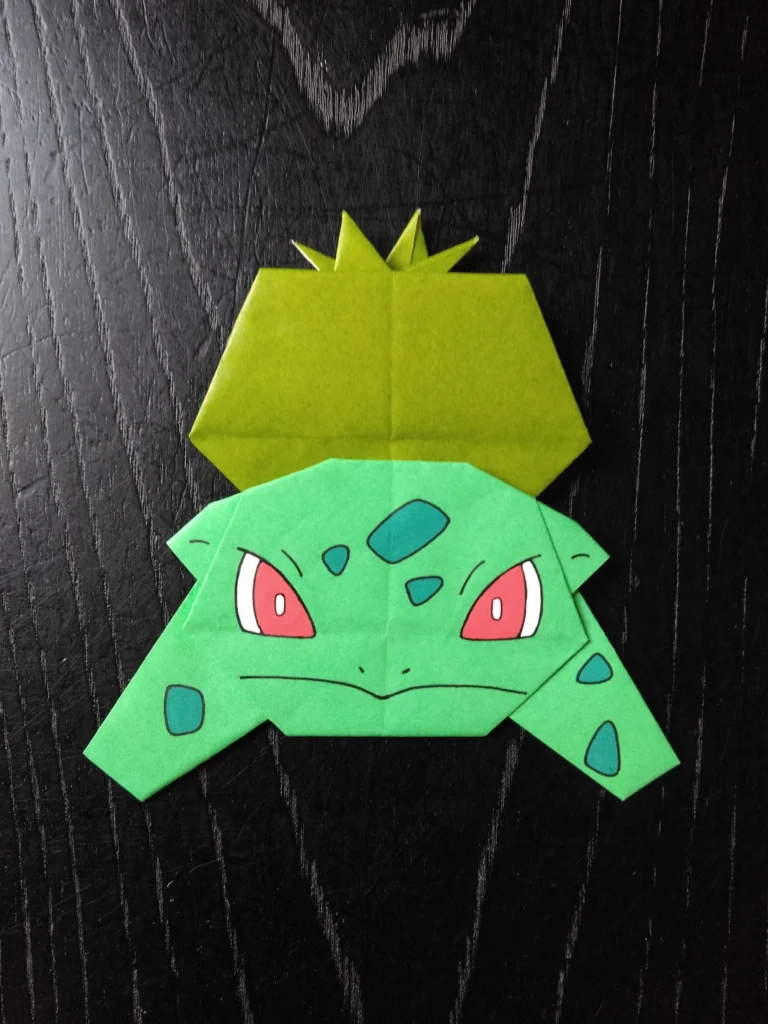
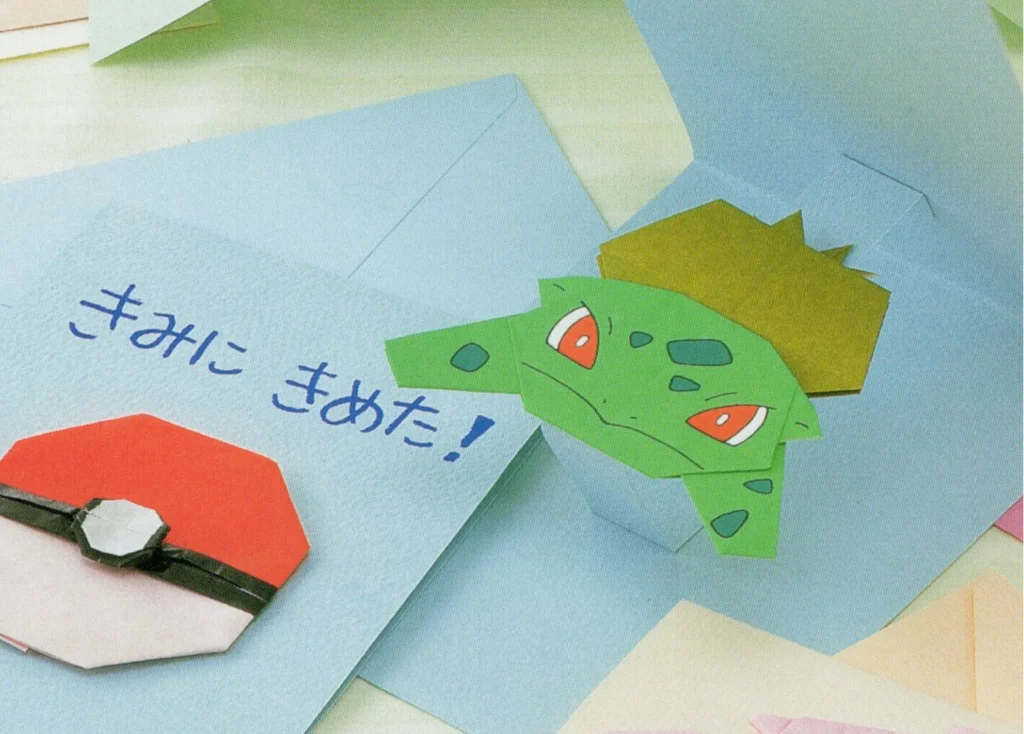
0001 フシギダネ 初号
2000年の本に掲載した、最初のかたちです。
いろいろな角度からデッサンしてみましたが、いちばんフシギダネらしく思えたのは、シンプルに正面からのデザインでした。
初号のボディは、フシギダネ、フシギソウ、フシギバナ、の3種類とも同じ、図式的なかたちでした。
それは、折り方が複雑にならないようにしていたためで、子どもたちにストレスをかけないようにと思ったからでした。
やはり子どもたちに教えながらつくっていると、どうしても簡略化したものにならざるを得ないのです。
今回、表現に比重を置いて、3種類それぞれに、耳のかたち、足のかたちを、それらしくつくってみました。
★ゲームフリークのチェック
◆姿かたちは、最初のチェックでOKをいただきました。
◆紙の色は、からだは青緑色、たねはオリーブ色、それぞれこの色をご指定でした。
Evolution
つくり方
動画制作予定
つくり方の折り図
今回制作した折り図
◇折り図は、フシギダネ初号を先に、次にフシギダネ2号改訂版、そして3号改訂版、の順に掲載しています。
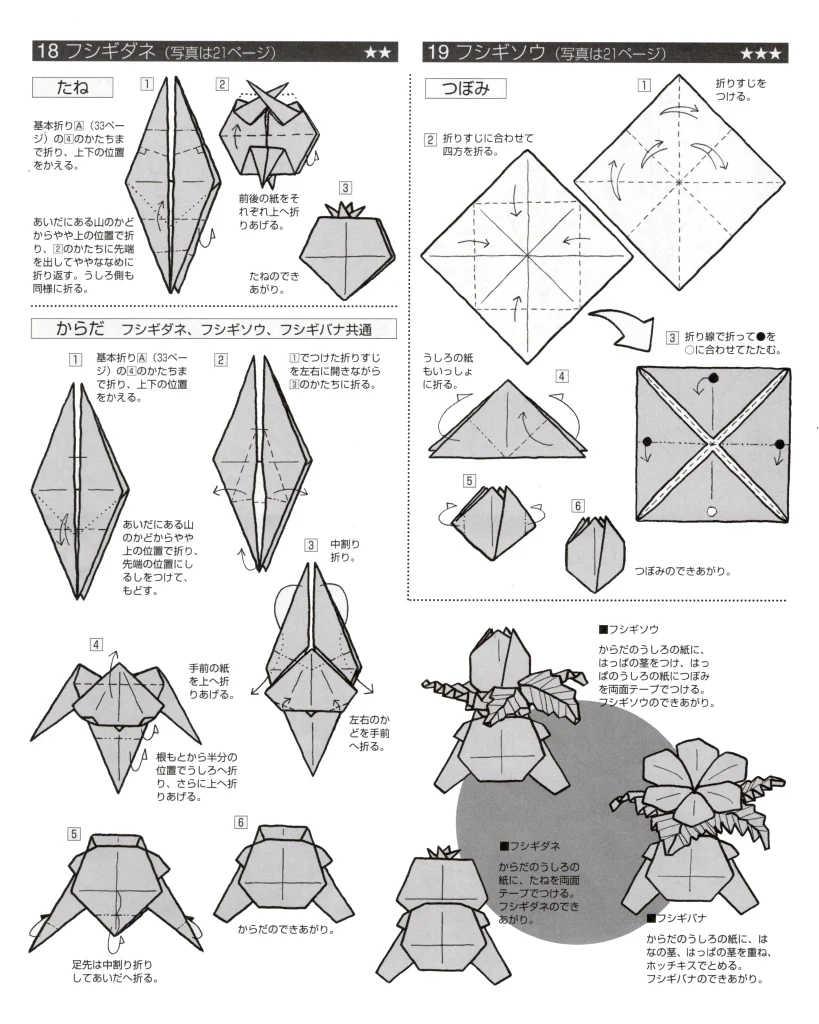
■1 フシギダネのからだは、青緑色の紙で、まず基本折りの図20まで折る。
■2 フシギダネのたねは、オリーブ色の紙で、こちらも基本折りの図20まで折る。
English Commentary
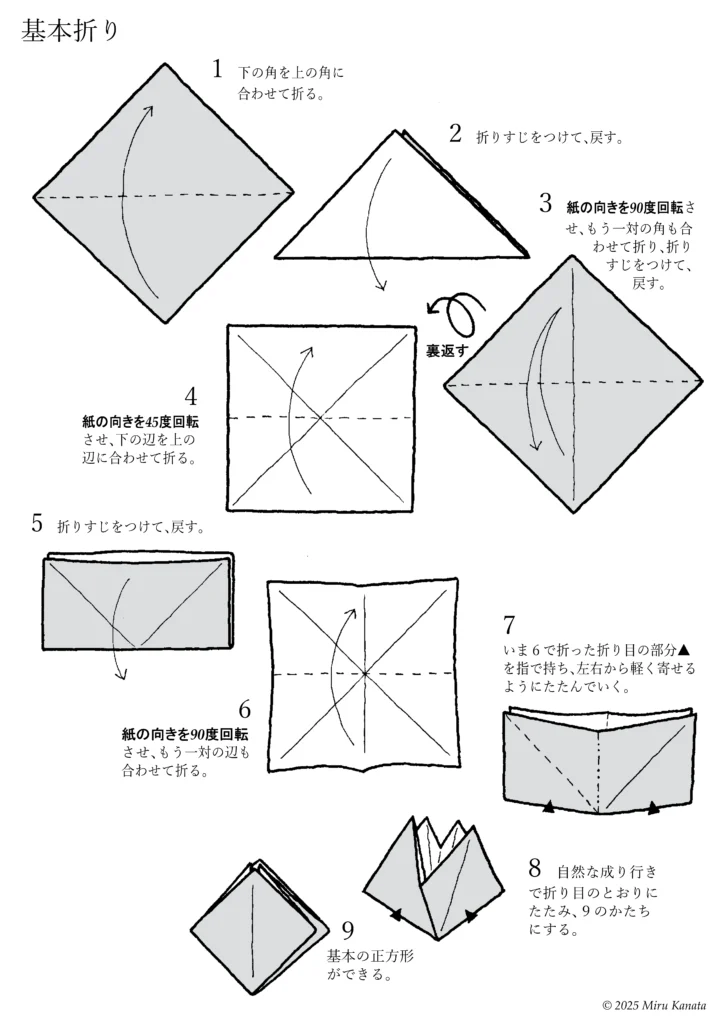
Basic Folding
1 Fold the bottom corner to meet the top corner.
2 Make a crease and return it to its original position.
3 Rotate the paper 90 degrees, fold the other pair of corners together, make a crease and return it to its original position.
{Flip}
4 Rotate the paper 45 degrees and fold the bottom edge to line up with the top edge.
5 Make a crease and return it to its original position.
6 Rotate the paper 90 degrees and fold the other pair of edges together.
7 Hold the crease ▲ made in step 6 with your fingers and fold gently from both sides together.
8 Let the paper naturally fold along the creases to form the shape of 9.
9 A basic square is created.
English Commentary
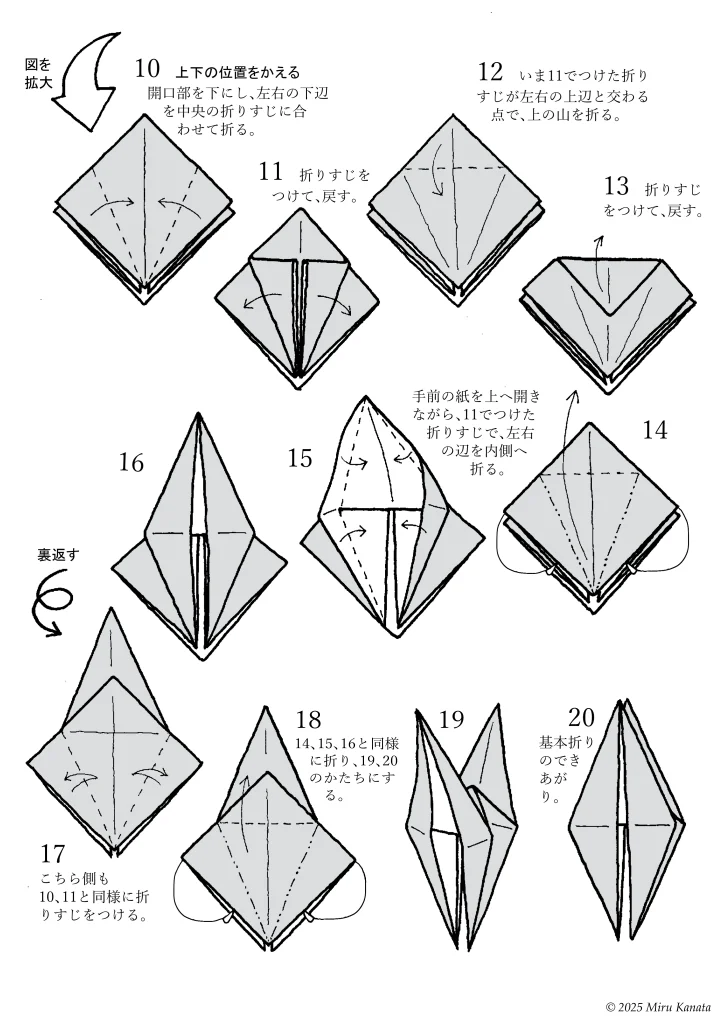
{Enlarge image}
10 Change the top and bottom positions.
With the opening facing downwards, fold the bottom left and right edges to meet the crease in the middle.
11 Make a crease and return.
12 Fold the top at the point where the crease made in 11 intersects with the top left and right edges.
13 Make a crease and return.
14 While opening the front paper upwards, fold the left and right edges inward along the crease made in 11.
15
16
{Flip}
17 Make creases on this side in the same way as 10 and 11.
18 Fold in the same way as 14, 15 and 16 to form 19 and 20.
19
20 The basic fold is complete.
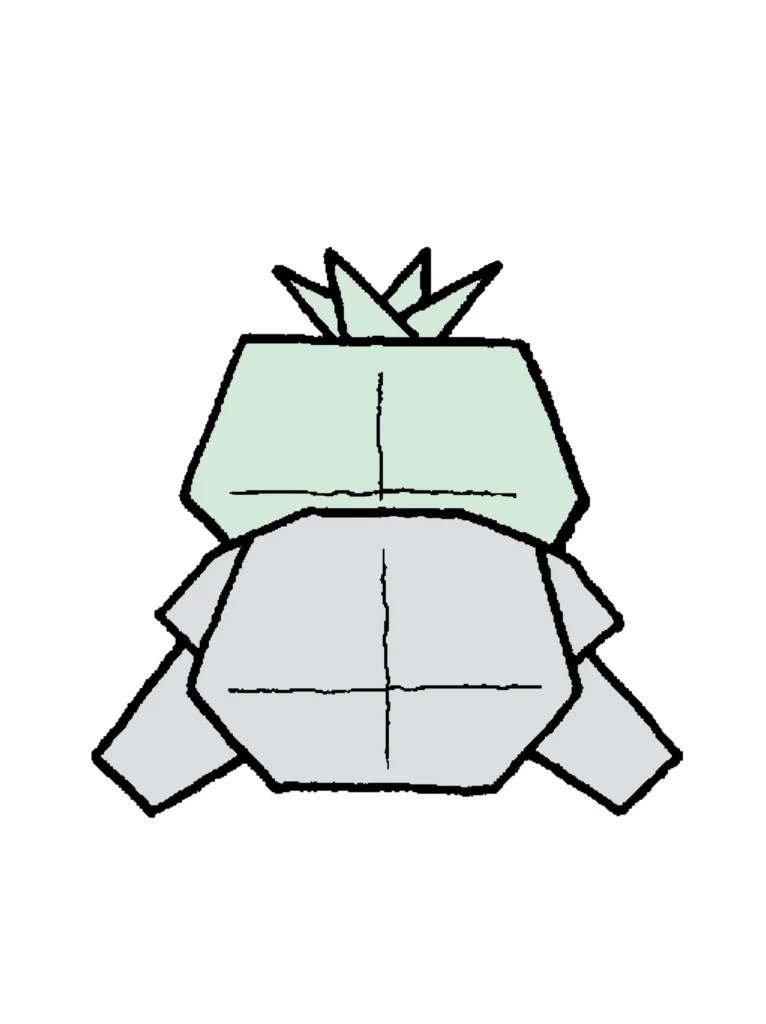
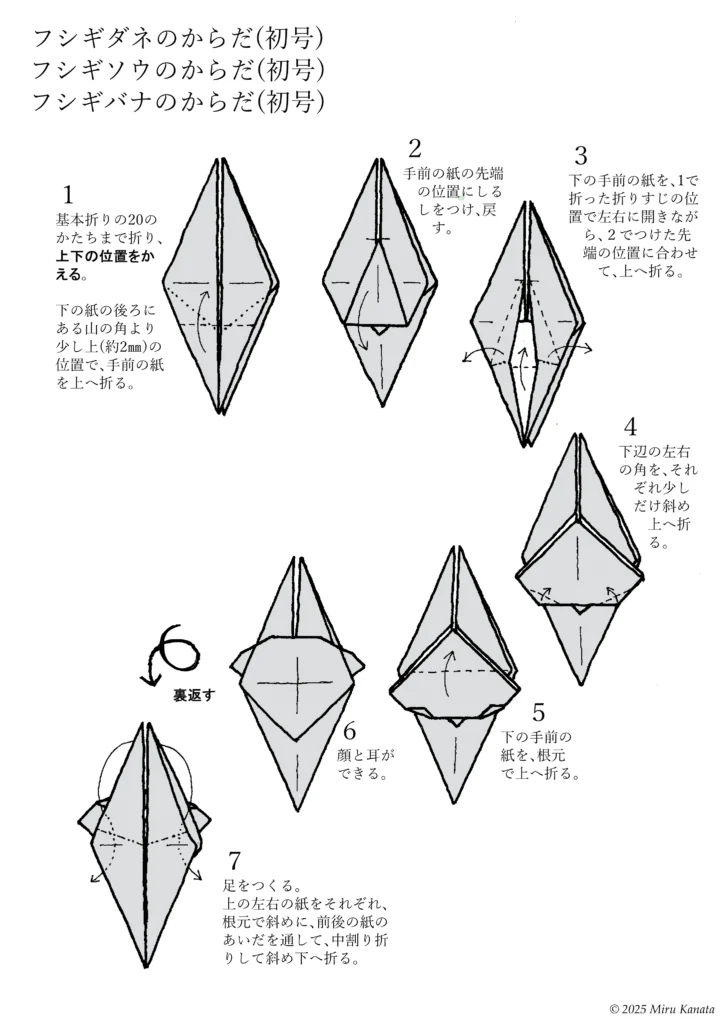
フシギダネ 初号
English Commentary
Bulbasaur’s Body First Edition
1 Fold it up to the basic 20 shape, then change the top and bottom positions.
Fold the front piece of paper up slightly (about 2 mm) above the corner of the mountain at the back of the bottom piece of paper.
2 Make a mark at the tip of the front piece of paper and return it to its original position.
3 While opening the bottom front piece of paper to the left and right at the crease made in step 1, fold it up to match the tip mark made in step 2.
4 Fold each of the left and right corners of the bottom edge slightly diagonally upwards.
5 Fold the bottom front piece of paper up at the base.
6 The face and ears are made.
7 Make the feet. Fold the top left and right pieces of paper diagonally at the base, passing them between the front and back pieces of paper, and then fold them diagonally downwards.

English Commentary
8 Fold the tip of the paper in half and fold it between the pieces of paper.
9 The legs are finished.
Fold the bottom piece of paper up halfway from the base.
10
11
12
{Flip}
13 The body is finished.
Attach a seed to the back piece of paper that is sticking out a little.
English Commentary
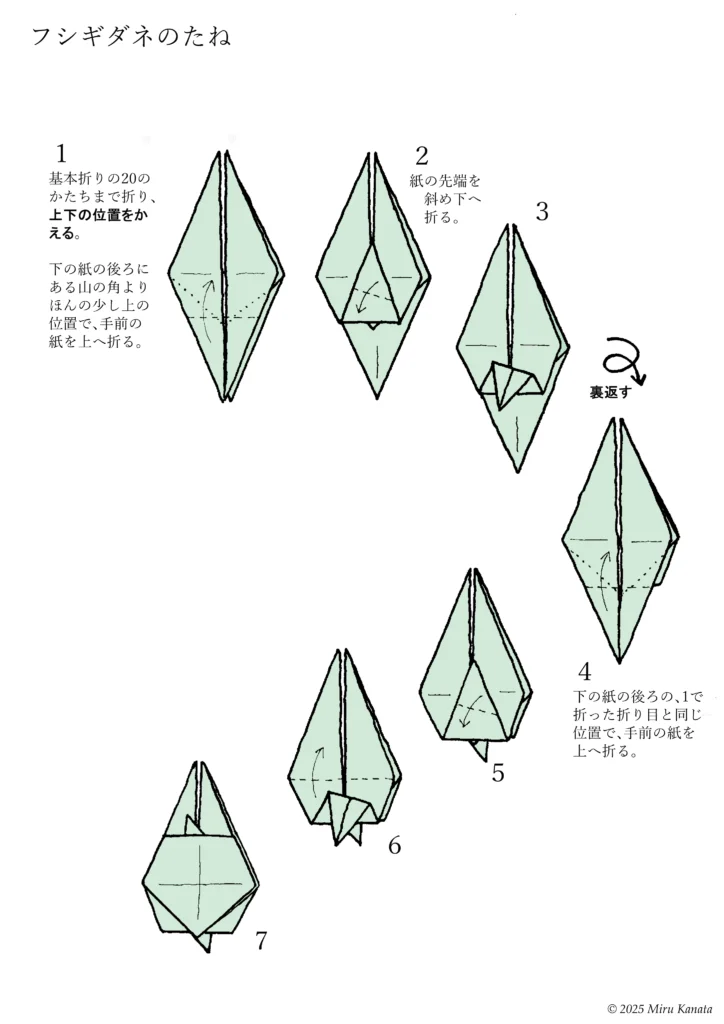
Bulbasaur Seed
1 Fold it up to the 20th basic fold and change the top and bottom positions.
Fold the front piece of paper up just above the corner of the mountain at the back of the bottom piece of paper.
2 Fold the tip of the paper diagonally downwards.
3
{Flip}
4 Fold the front piece of paper up just above the corner of the mountain at the back of the bottom piece of paper.
5
6
7
English Commentary
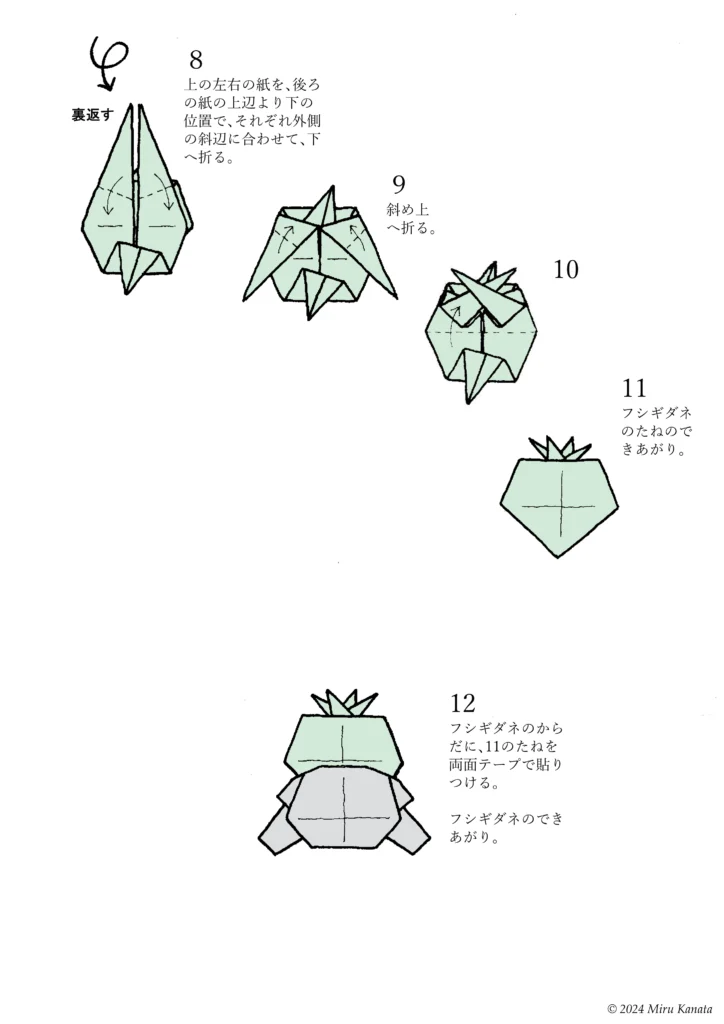
{Flip}
8 Fold the top left and right pieces of paper down, lining up with the outer diagonal edges below the top edge of the back piece of paper.
9 Fold diagonally upwards.
10
11 The Bulbasaur seed is complete.
12 Attach seed 11 to the Bulbasaur’s body with double-sided tape.
The Bulbasaur is complete.
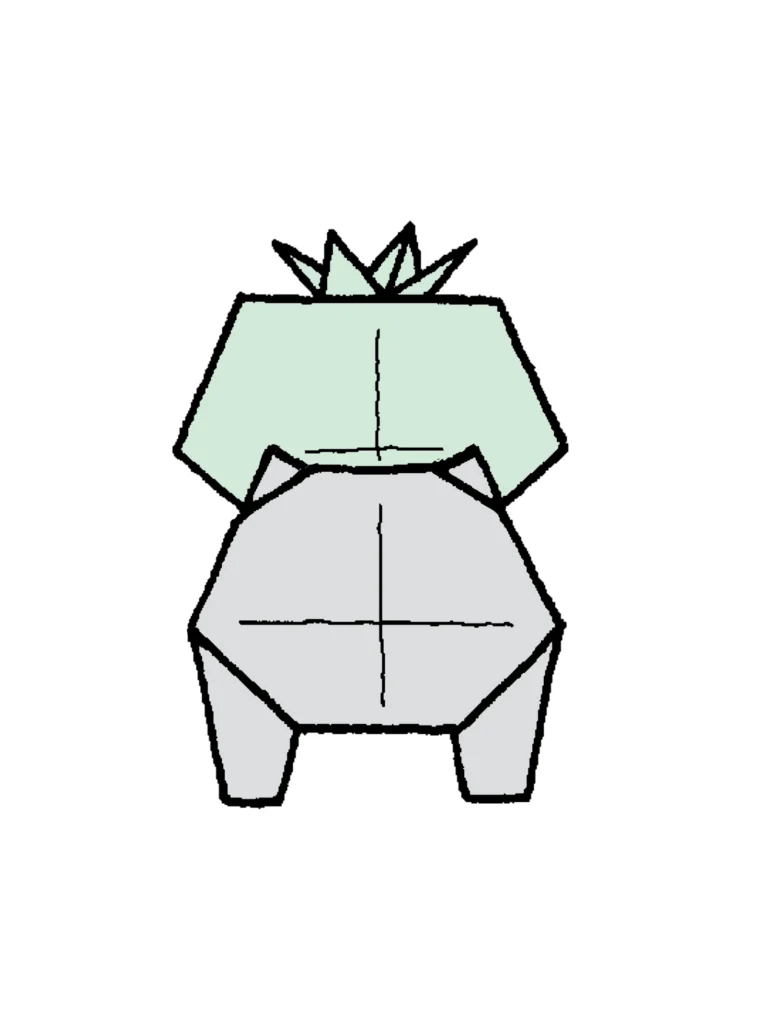
フシギダネ 2号改訂版
English Commentary
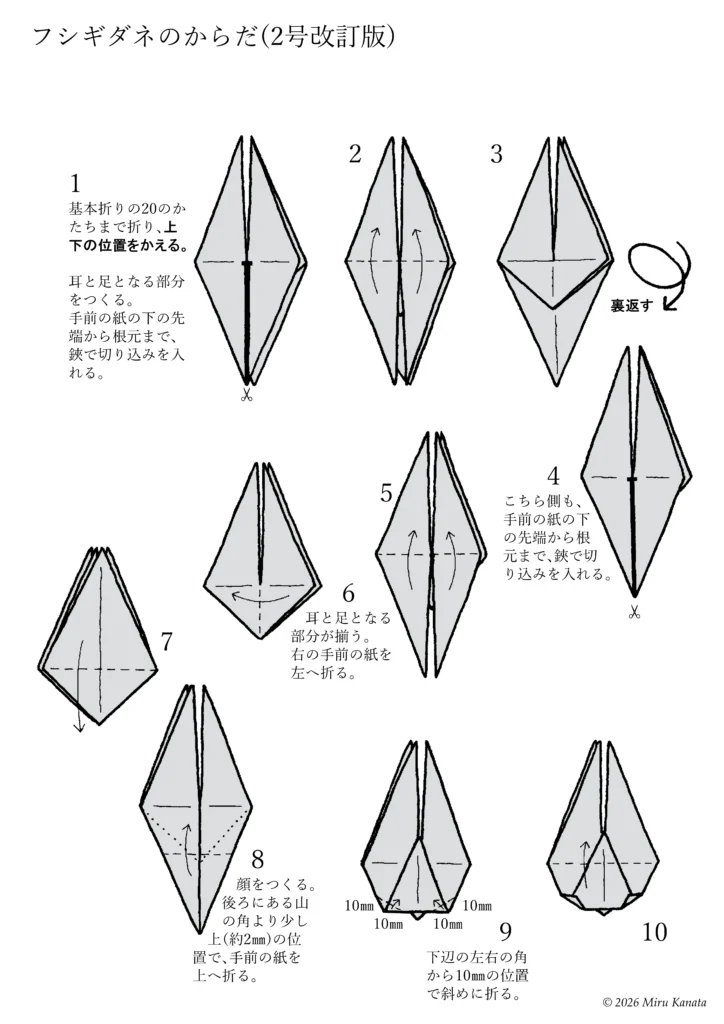
Bulbasaur’s (Revised Edition No. 2) body
1 Fold to the shape of the 20th basic fold, then change the top and bottom positions. Create the parts that will become the ears and feet. Make a cut with scissors from the bottom tip to the base of the front paper.
2
3
{Flip}
4 On this side as well, make a cut with scissors from the bottom tip to the base of the front paper.
5
6 The parts that will become the ears and feet are now complete. Fold the front right paper to the left.
7
8 Create the face. Fold the front paper upwards at a position slightly above (about 2 mm) the corner of the mountain at the back.
9 Fold diagonally at a position 10 mm from the left and right corners of the bottom edge.
10
English Commentary
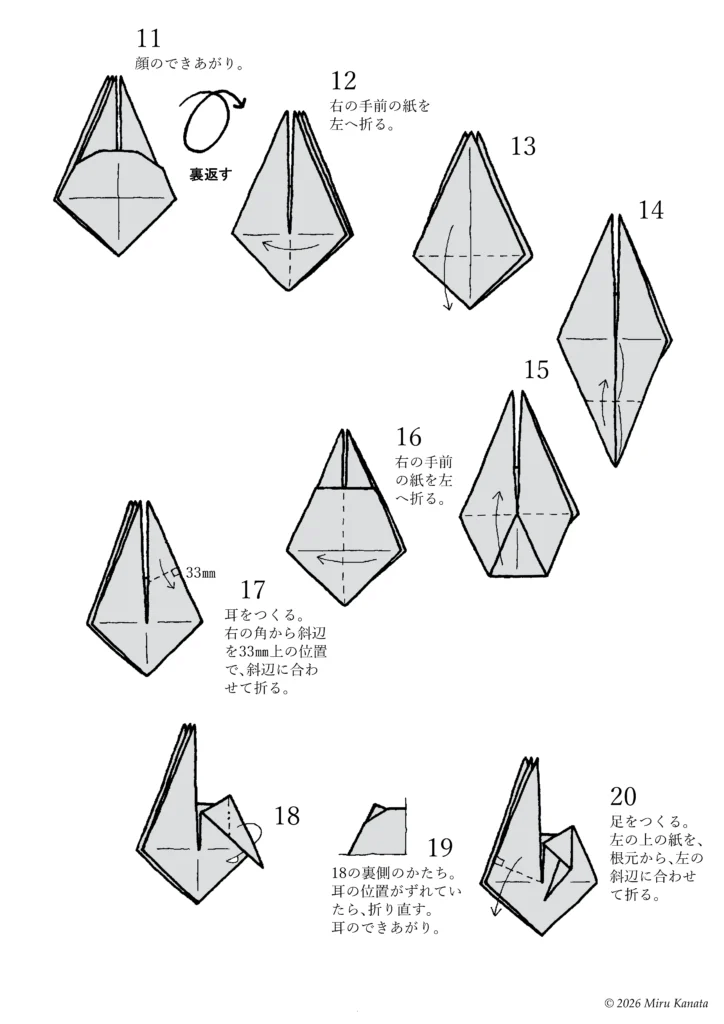
11 The face is finished.
{Flip}
12 Fold the front right piece of paper to the left.
13
14
15
16 Fold the front right piece of paper to the left.
17 Make the ears. Fold the diagonal edge 33 mm above the right corner to align with the diagonal edge.
18
19 The shape of the reverse side of 18. If the ears are misaligned, refold them. The ears are complete.
20 Make the legs. Fold the top left piece of paper from the base to align with the left diagonal edge.
English Commentary
Bulbasaur’s (Revised Edition No. 2) Body – Continued
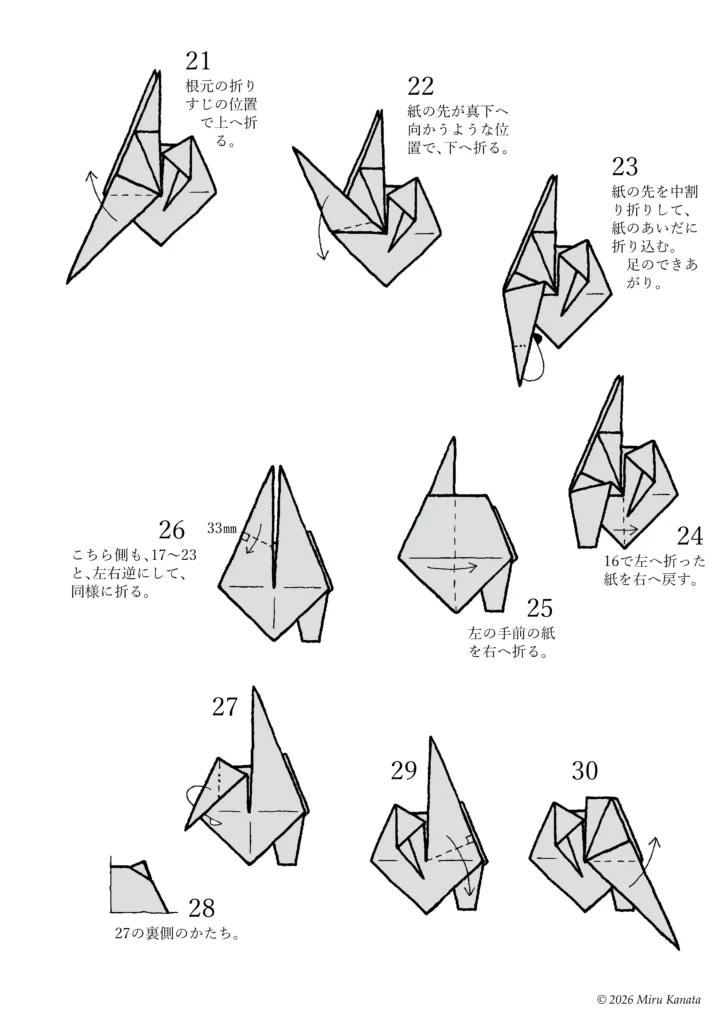
21 Fold upwards at the crease at the base.
22 Fold downwards so that the tip of the paper points straight down.
23 Fold the tip of the paper inwards and tuck it between the layers of paper. The leg is complete.
24 Return the paper that was folded to the left in step 16 to the right.
25 Fold the front left piece of paper to the right.
26 On this side, fold in the same way as steps 17-23, but with the left and right reversed.
27
28 The shape of the reverse side of step 27.
29
30
English Commentary
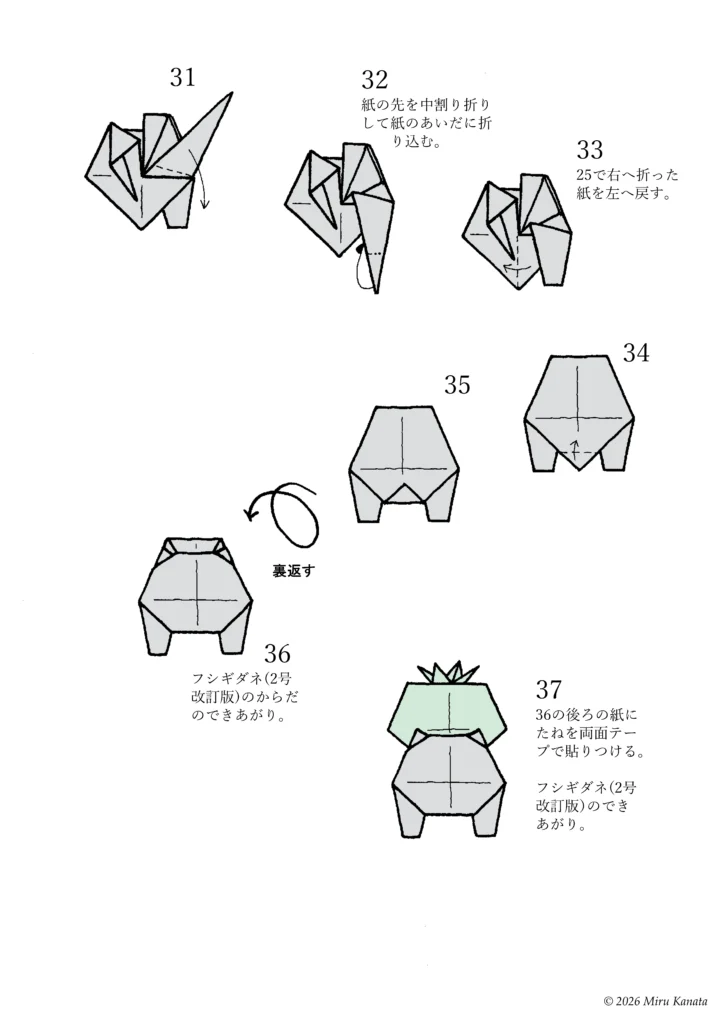
31
32 Fold the tip of the paper in a reverse fold and tuck it into the gap between the papers.
33 Return the paper that was folded to the right in step 25 to the left.
34
35
{Flip}
36 The body of Bulbasaur (Revised Edition No. 2) is complete.
37 Attach the seed to the back of the paper from step 36 with double-sided tape. Bulbasaur (Revised Edition No. 2) is complete.
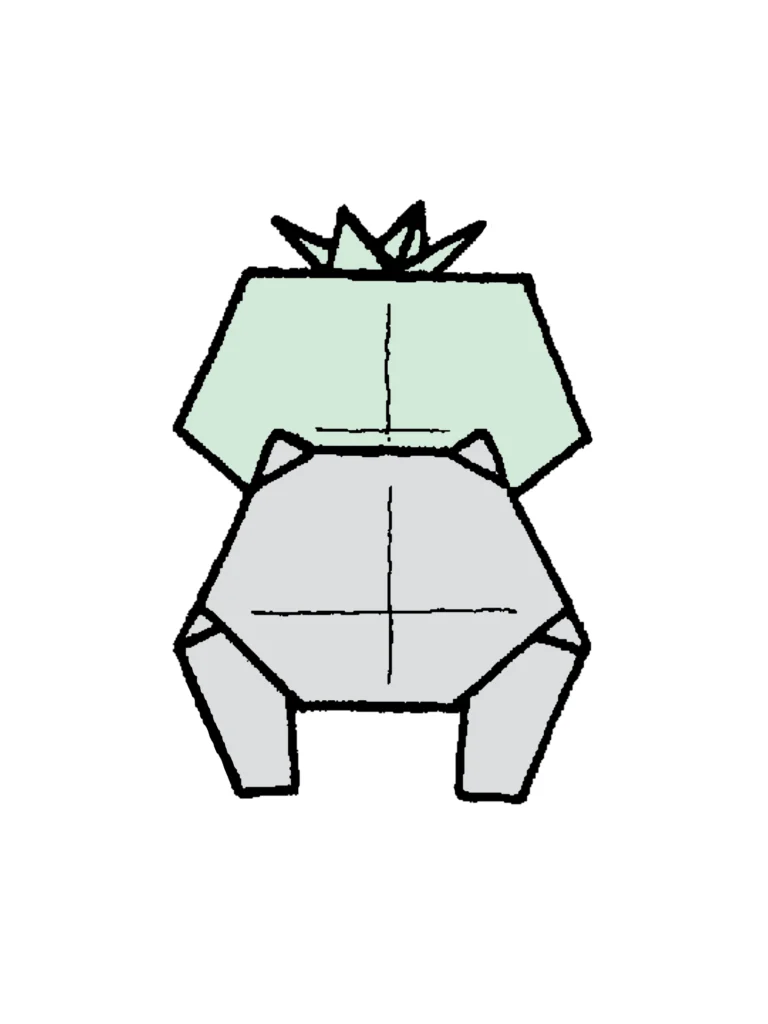
フシギダネ 3号改訂版
English Commentary
Bulbasaur’s (Revised Edition No. 3) body
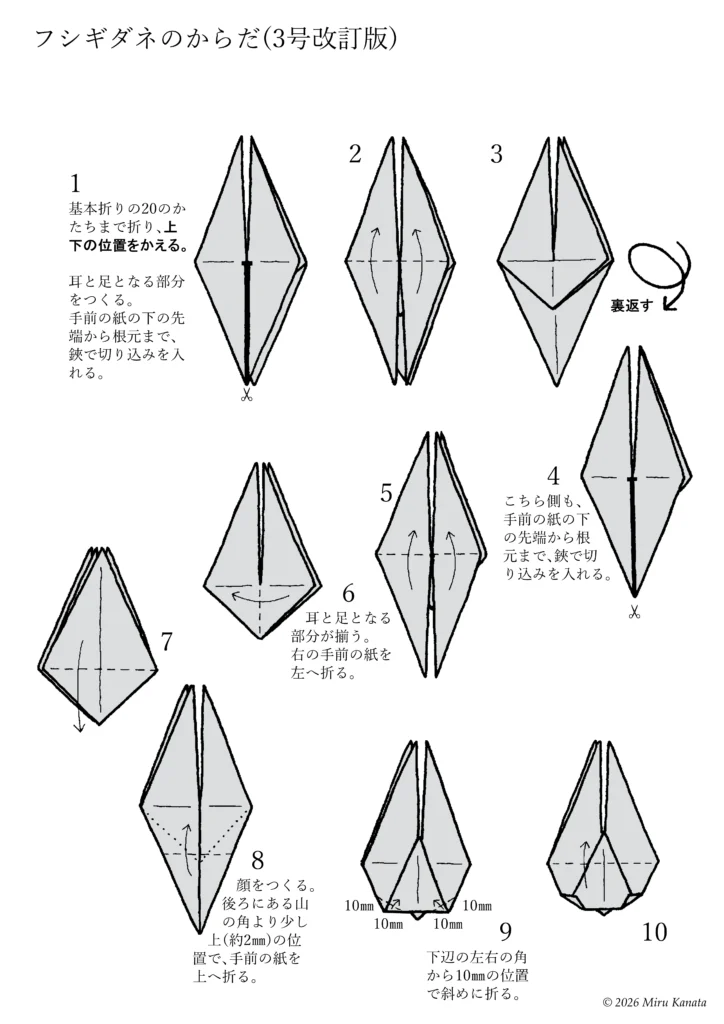
1 Fold to the shape of the 20th basic fold, then change the top and bottom positions. Create the parts that will become the ears and feet. Make a cut with scissors from the bottom tip to the base of the front paper.
2
3
{Flip}
4 On this side as well, make a cut with scissors from the bottom tip to the base of the front paper.
5
6 The parts that will become the ears and feet are now complete. Fold the front right paper to the left.
7
8 Create the face. Fold the front paper upwards at a position slightly above (about 2 mm) the corner of the mountain at the back.
9 Fold diagonally at a position 10 mm from the left and right corners of the bottom edge.
10
English Commentary
11
{Flip}
12 Fold the front right piece of paper to the left.
13
14
15
16 Fold the front right piece of paper to the left.
17 Make the ears. Fold the diagonal edge 33 mm above the right corner to align with the diagonal edge.
18
19 The shape of the reverse side of 18. If the ears are misaligned, refold them. The ears are complete.
20 Make the legs. Fold the top left piece of paper from the base to align with the left diagonal edge.
English Commentary
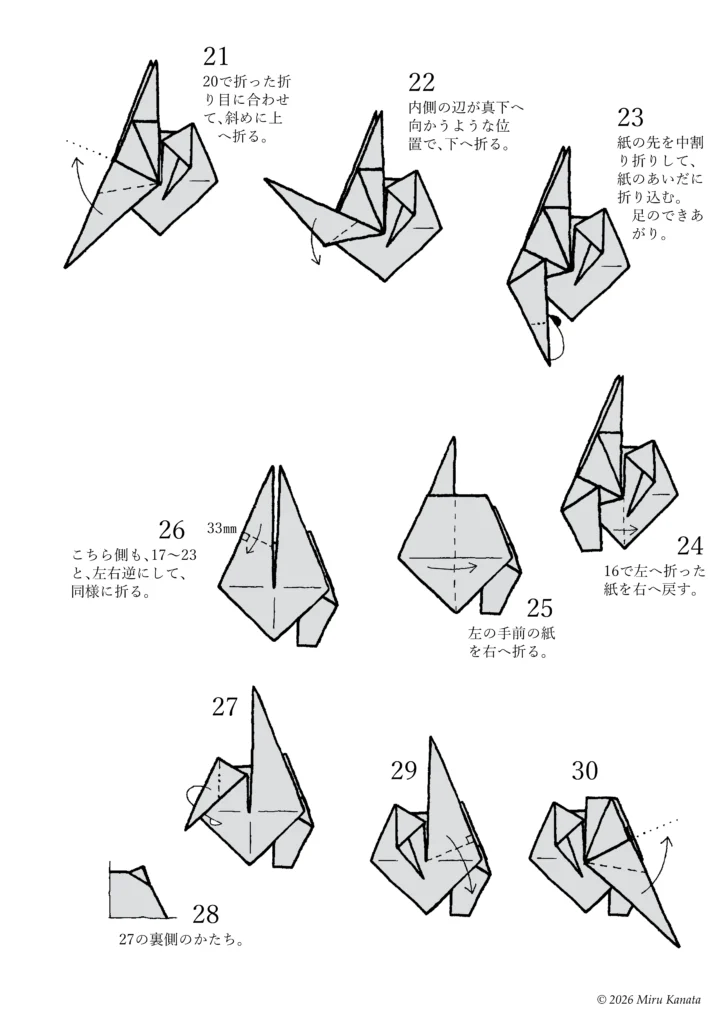
21 Fold diagonally upwards, aligning with the crease made in step 20.
22 Fold downwards so that the inner edge points straight down.
23 Fold the tip of the paper inwards using an inside reverse fold and tuck it between the layers of paper. The leg is complete.
24 Return the paper that was folded to the left in step 16 to the right.
25 Fold the front left piece of paper to the right.
26 On this side, fold in the same way as in steps 17-23, but with the left and right reversed.
27
28 This is the shape of the reverse side of step 27.
29
30

English Commentary
31
32 Fold the tip of the paper in half and tuck it into the gap.
33 Return the paper that was folded to the right in step 25 to the left.
34
35
{Flip}
36 The body of Bulbasaur (Revised Edition No. 3) is complete.
37 Attach the seed to the back of the paper from step 36 with double-sided tape. Bulbasaur (Revised Edition No. 3) is complete.
参考・2000年の本に掲載した折り図
みるかなた本棚>『ポケットモンスターおりがみコレクション』>ポケモンおりがみ一覧表>0001フシギダネ
◇ ◇ ◇