
みるかなた本棚>Nice Origami素敵折紙>p001フシギダネ
◆p001フシギダネ◆p002フシギソウ◆p003フシギバナ◆
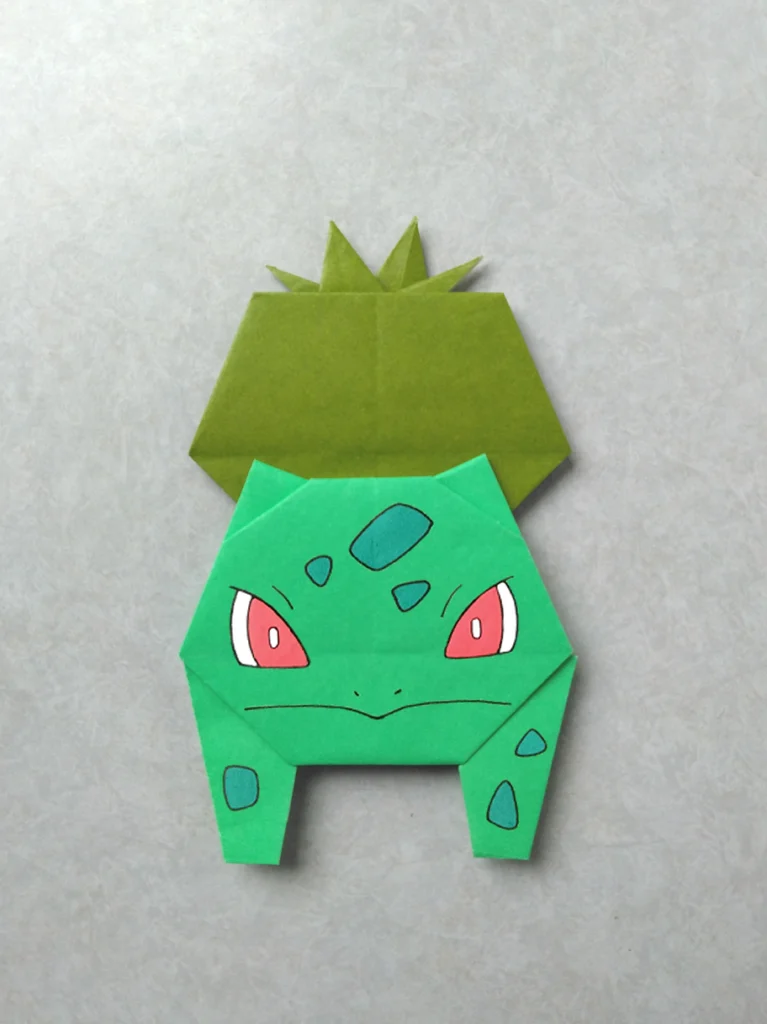
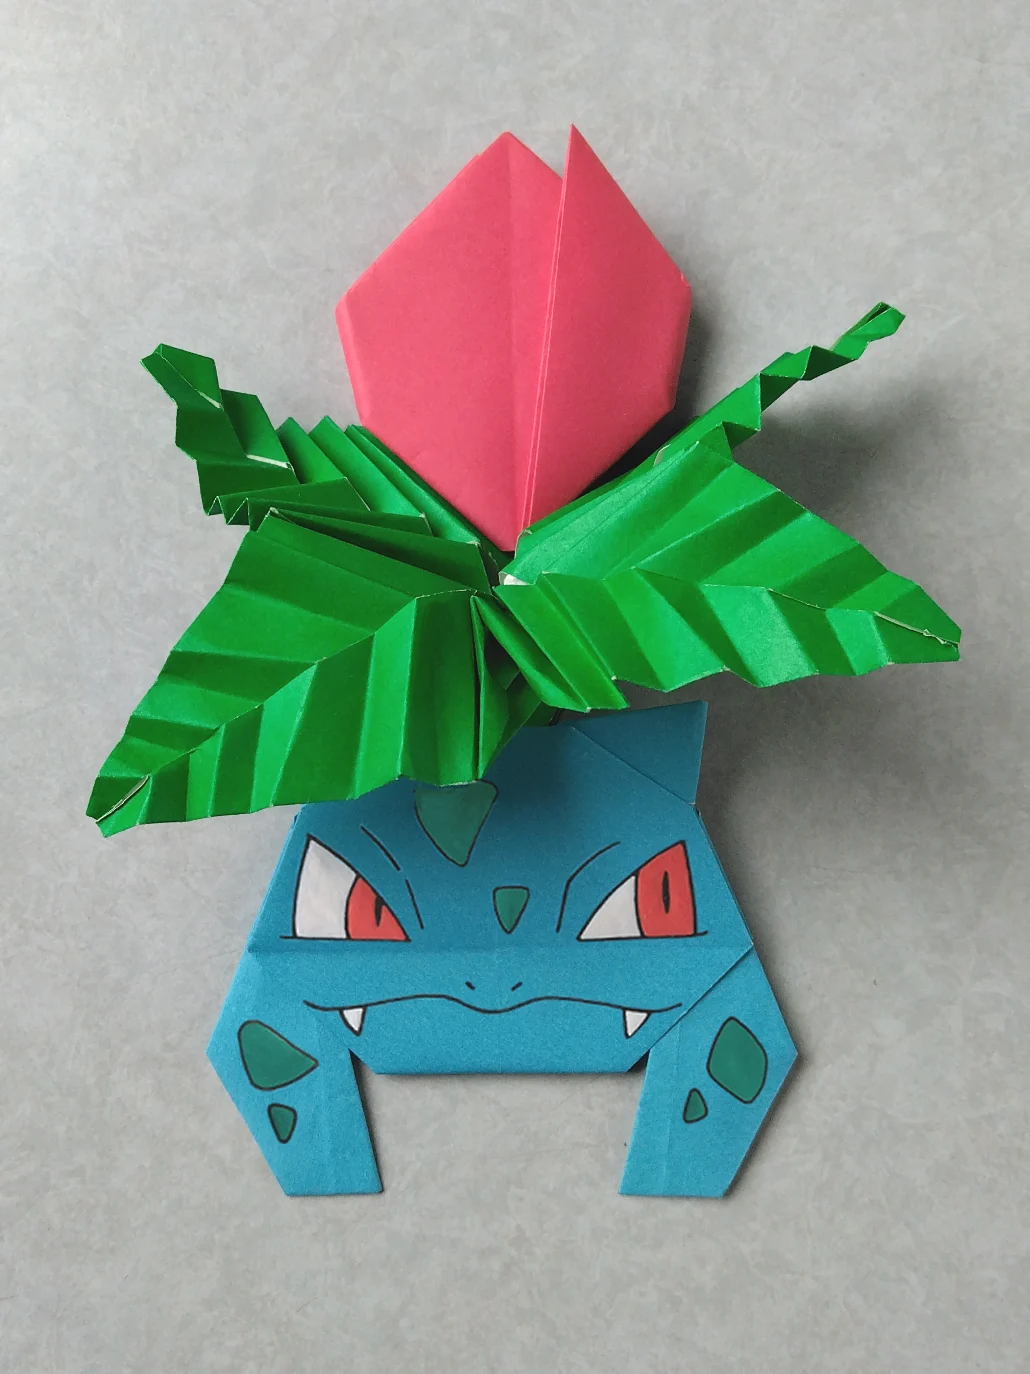
p001 フシギダネ 2号
2026年3月に制作したものです。
以前のものから、耳のかたちと位置をかえ、前足を揃えて、幼い感じの、フシギダネらしいかわいらしいフォルムに近づけました。
耳もそうですが、前足を、ねらった位置と角度につくるには、少しばかりこつが要ります。
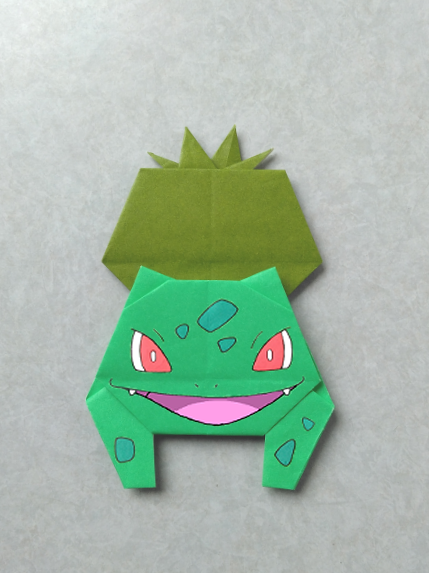
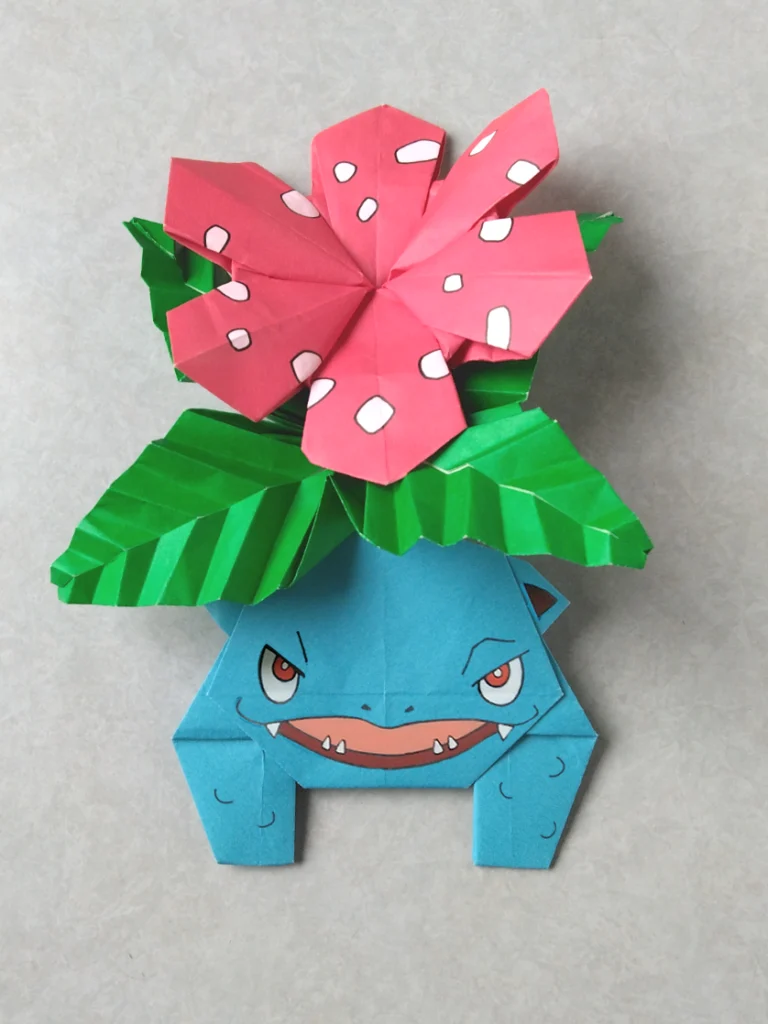
p001 フシギダネ 3号
こちらも2026年3月に制作したものです。
2号よりもう少し活発な子どもらしい感じです。
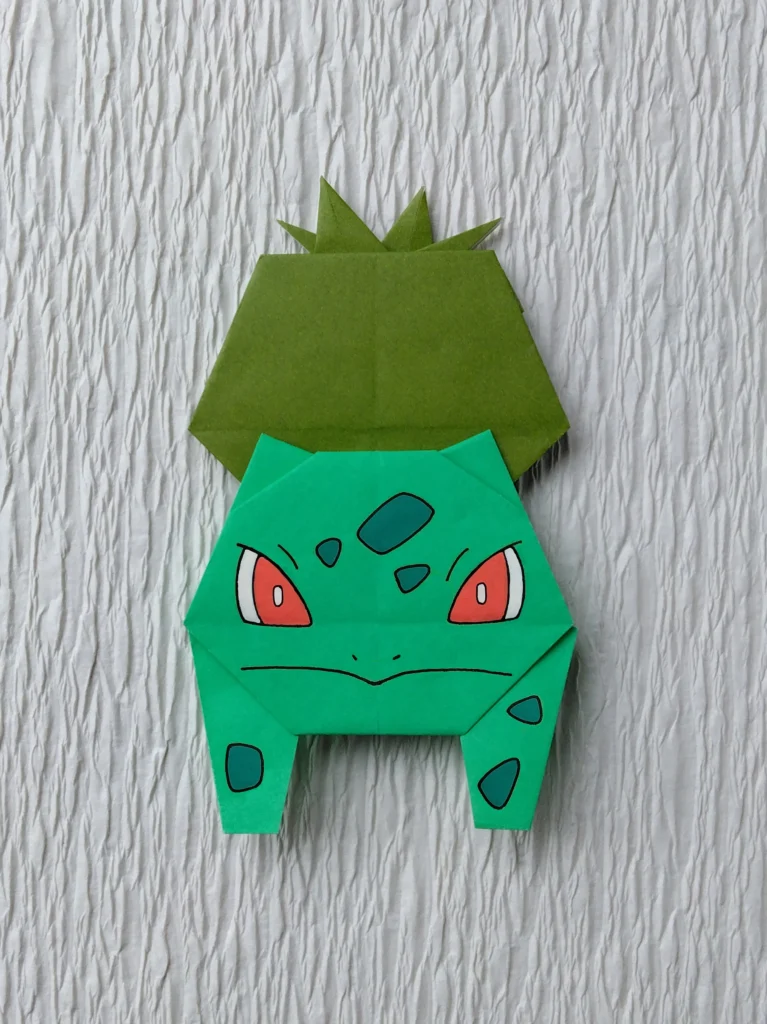
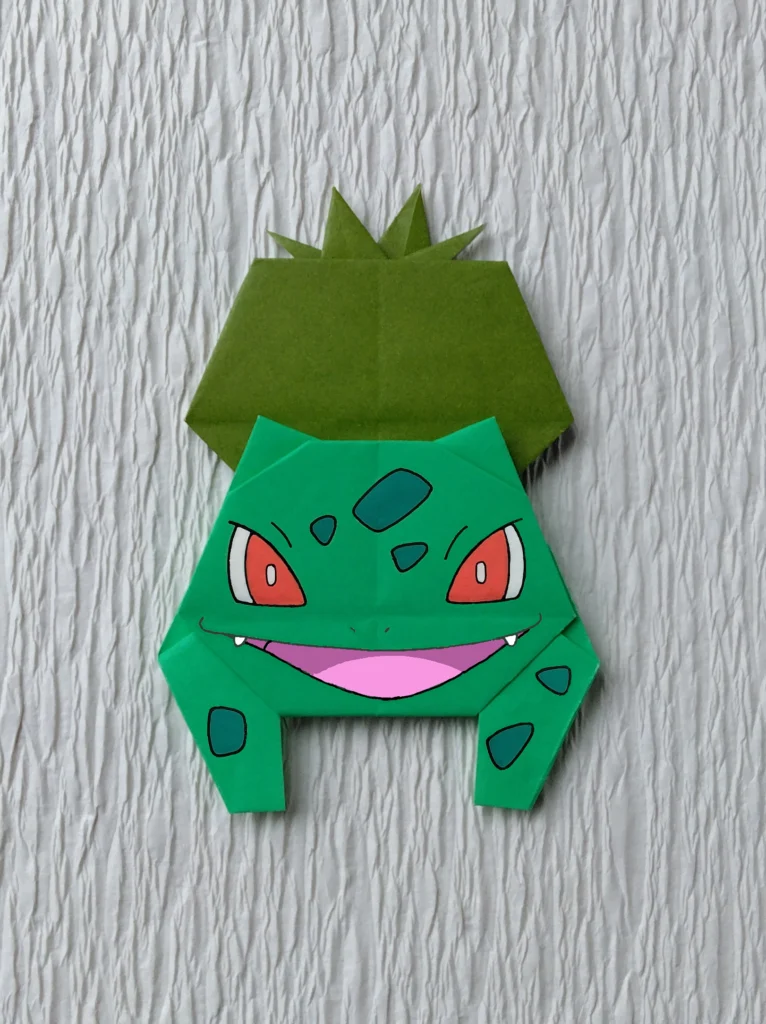
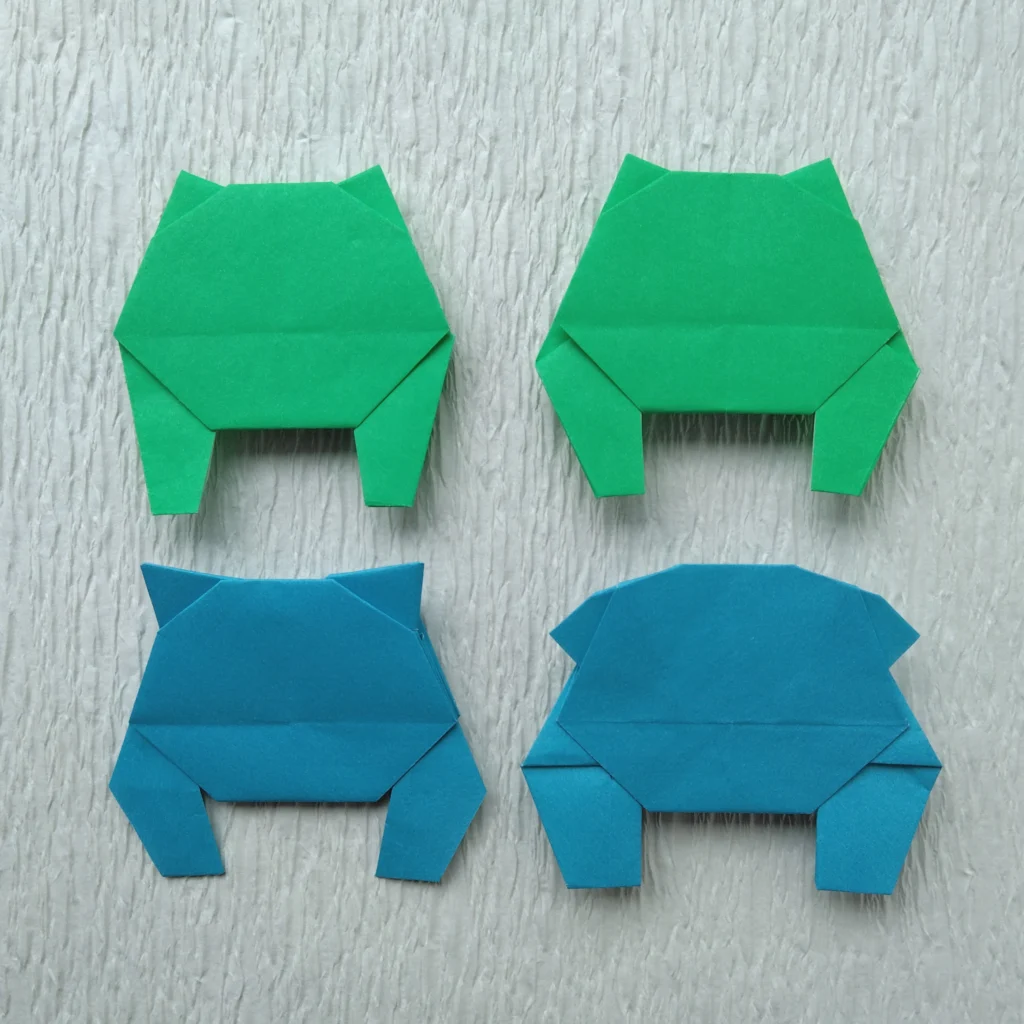
今回、表現に比重を置いて、フシギダネ、フシギソウ、フシギバナ、3種類それぞれに、耳のかたち、足のかたちを、それらしくつくってみました。
Evolution
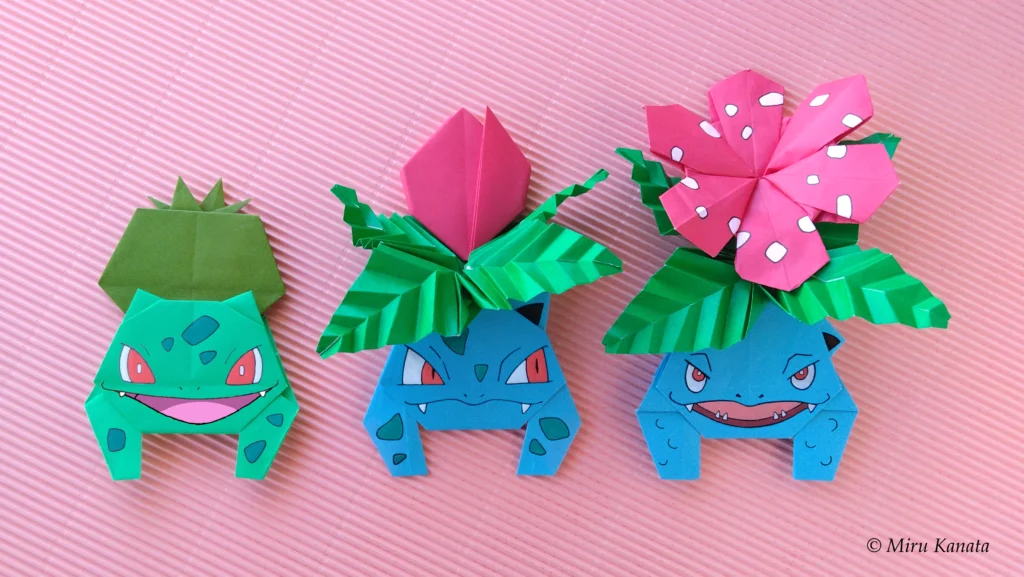
つくり方の折り図
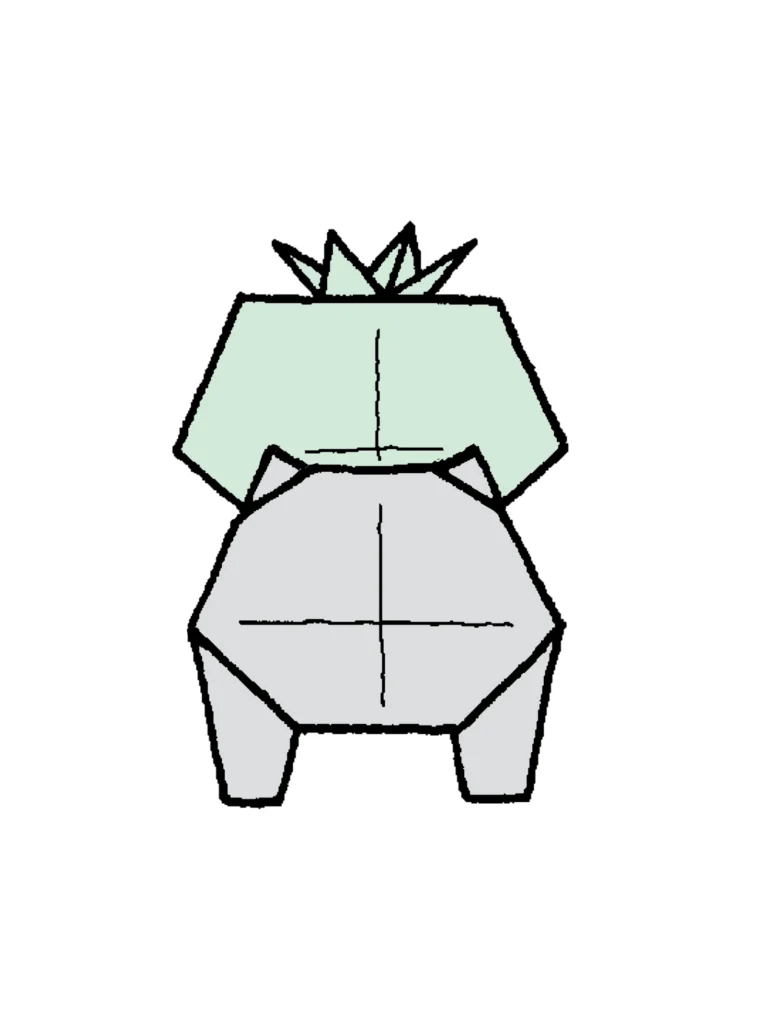
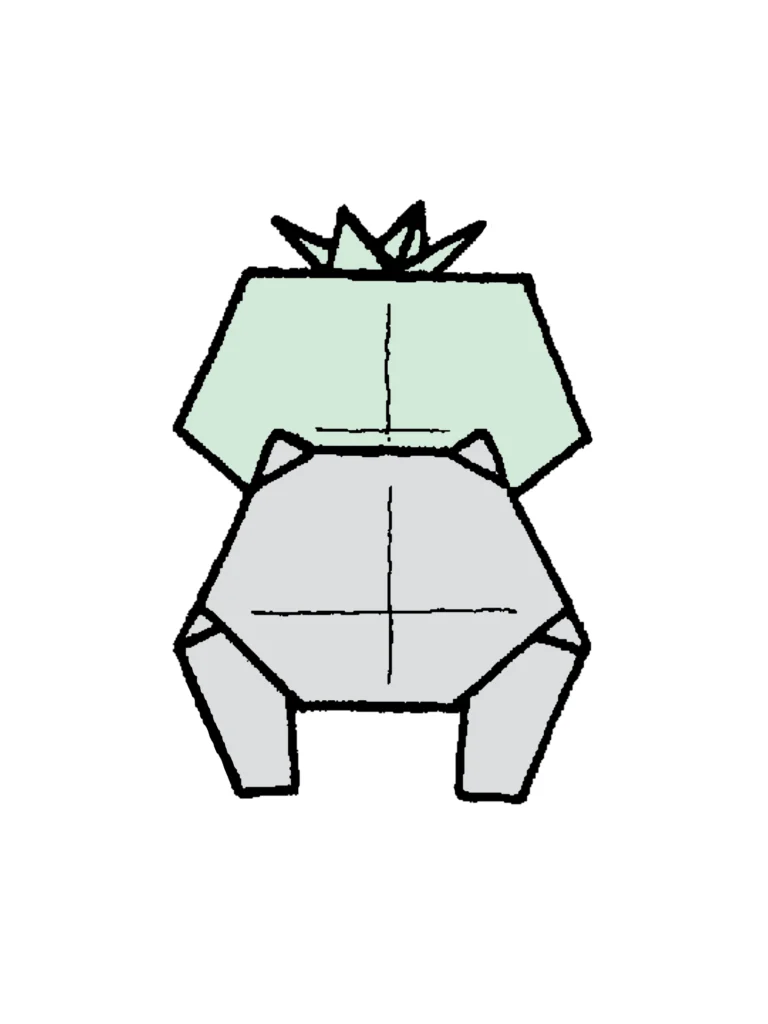
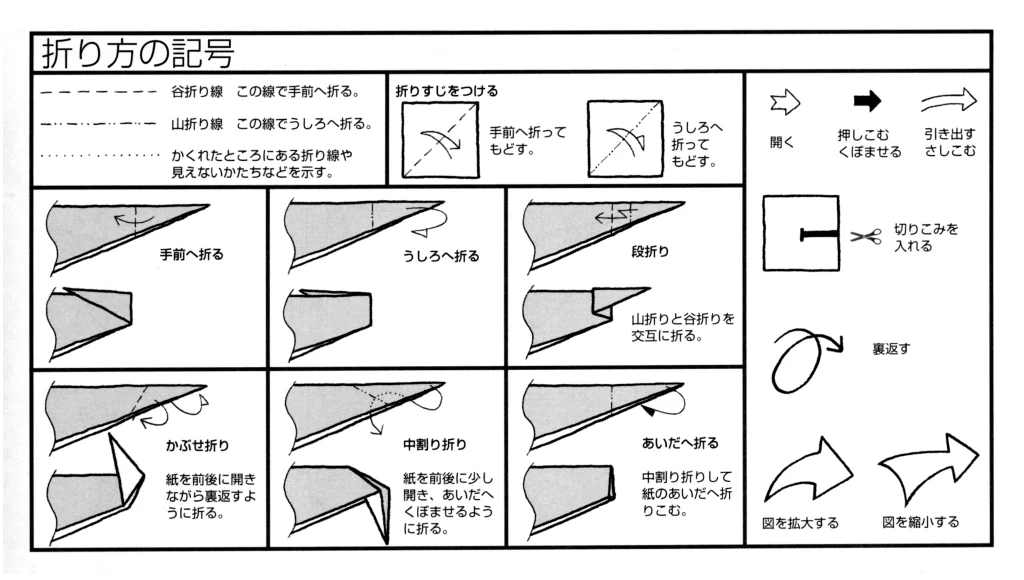
今回制作した折り図
◇折り図
1 基本折り
2 フシギダネのたね
3 フシギダネのからだ 2号
4 フシギダネのからだ 3号
■1 フシギダネのたねは、オリーブ色の紙で、こちらも基本折りの図20まで折る。
■2 フシギダネのからだは、青緑色の紙で、まず基本折りの図20まで折る。
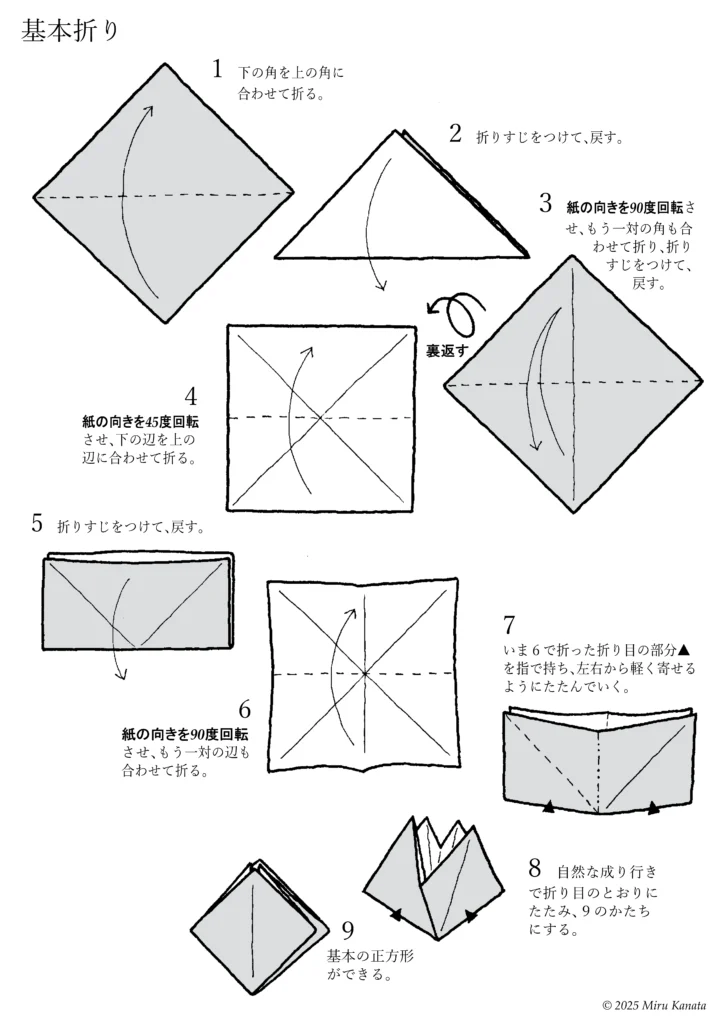
1 基本折り
English Commentary
Basic Folding
1 Fold the bottom corner to meet the top corner.
2 Make a crease and return it to its original position.
3 Rotate the paper 90 degrees, fold the other pair of corners together, make a crease and return it to its original position.
{Flip}
4 Rotate the paper 45 degrees and fold the bottom edge to line up with the top edge.
5 Make a crease and return it to its original position.
6 Rotate the paper 90 degrees and fold the other pair of edges together.
7 Hold the crease ▲ made in step 6 with your fingers and fold gently from both sides together.
8 Let the paper naturally fold along the creases to form the shape of 9.
9 A basic square is created.
English Commentary
{Enlarge image}
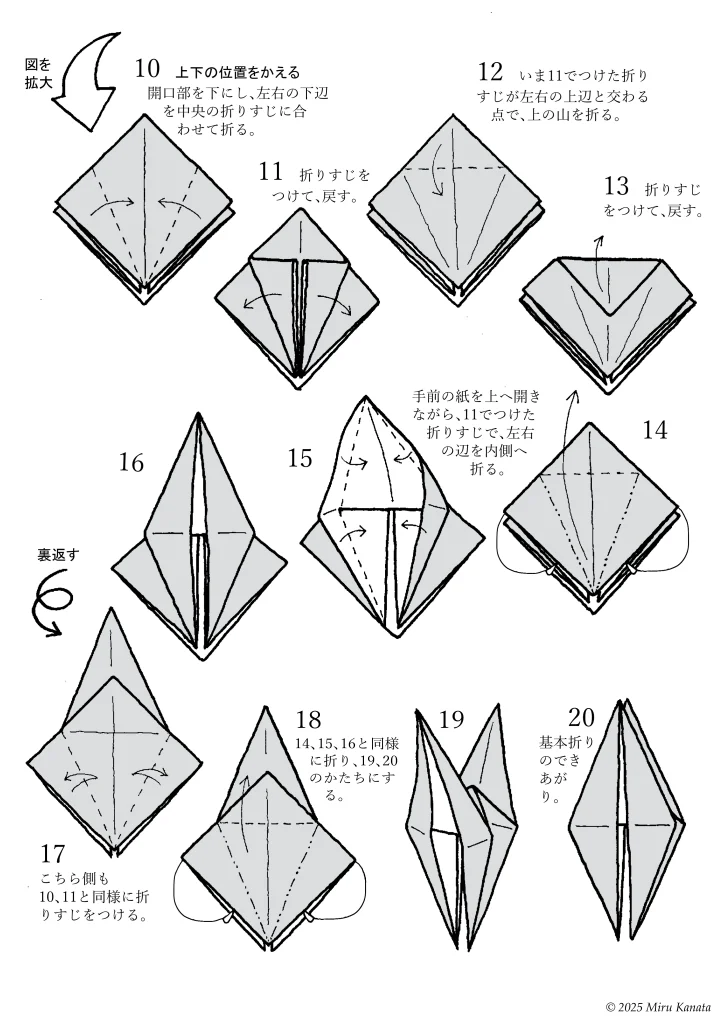
10 Change the top and bottom positions.
With the opening facing downwards, fold the bottom left and right edges to meet the crease in the middle.
11 Make a crease and return.
12 Fold the top at the point where the crease made in 11 intersects with the top left and right edges.
13 Make a crease and return.
14 While opening the front paper upwards, fold the left and right edges inward along the crease made in 11.
15
16
{Flip}
17 Make creases on this side in the same way as 10 and 11.
18 Fold in the same way as 14, 15 and 16 to form 19 and 20.
19
20 The basic fold is complete.
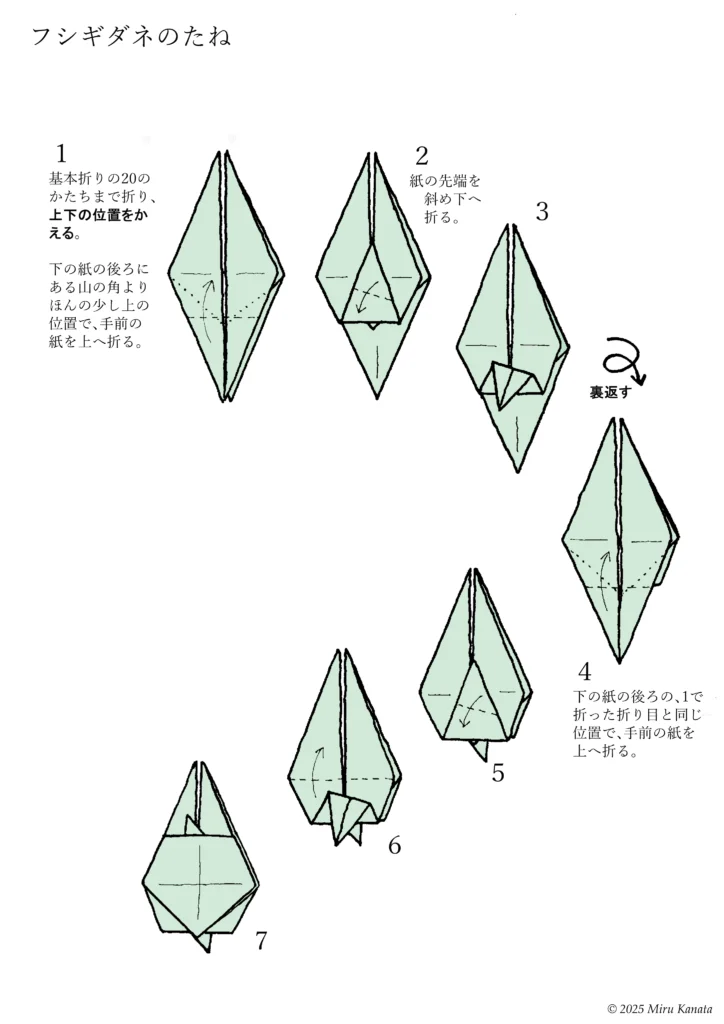
2 フシギダネのたね
English Commentary
Bulbasaur Seed
1 Fold it up to the 20th basic fold and change the top and bottom positions.
Fold the front piece of paper up just above the corner of the mountain at the back of the bottom piece of paper.
2 Fold the tip of the paper diagonally downwards.
3
{Flip}
4 Fold the front piece of paper up just above the corner of the mountain at the back of the bottom piece of paper.
5
6
7
English Commentary
{Flip}
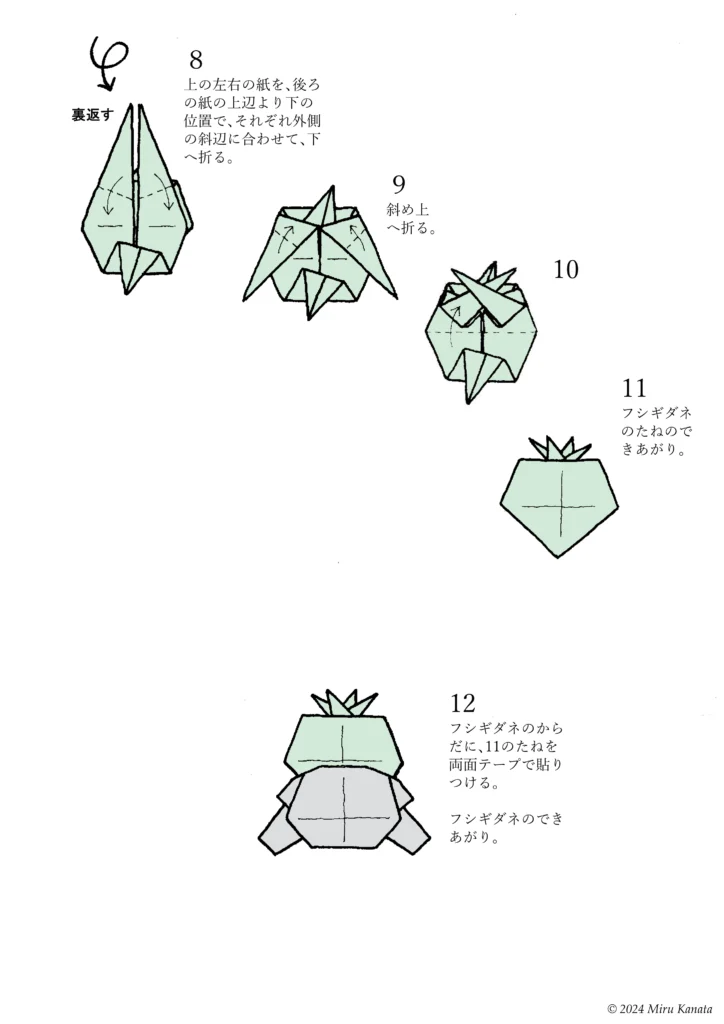
8 Fold the top left and right pieces of paper down, lining up with the outer diagonal edges below the top edge of the back piece of paper.
9 Fold diagonally upwards.
10
11 The Bulbasaur seed is complete.
12 Attach seed 11 to the Bulbasaur’s body with double-sided tape.
The Bulbasaur is complete.
3 フシギダネのからだ 2号
English Commentary
Bulbasaur’s (No. 2) body
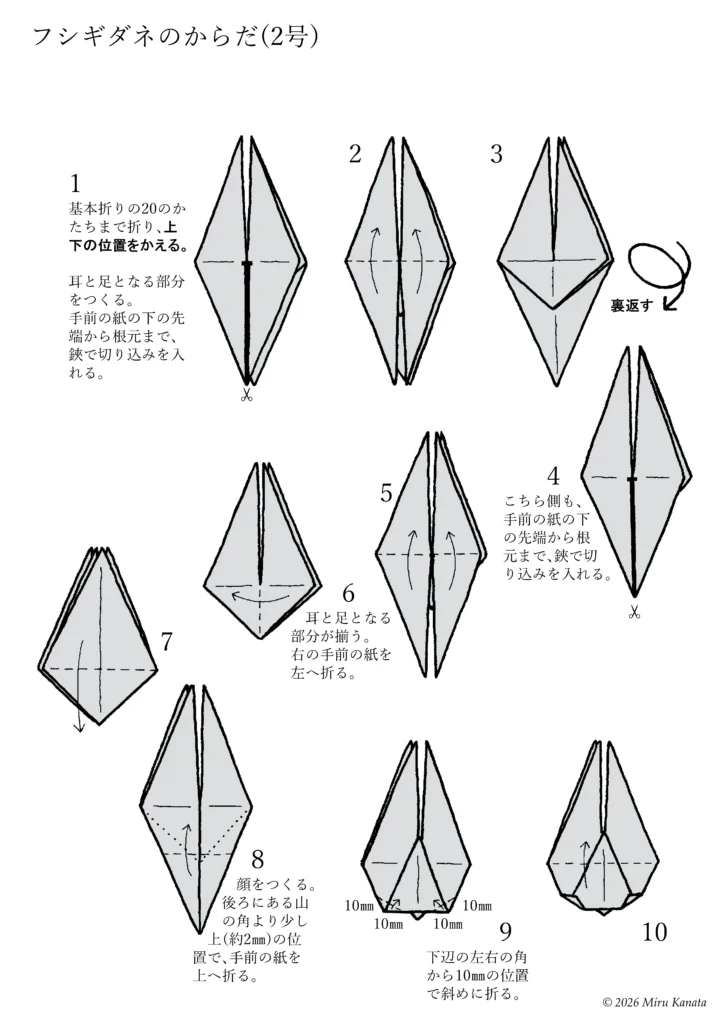
1 Fold to the shape of the 20th basic fold, then change the top and bottom positions. Create the parts that will become the ears and feet. Make a cut with scissors from the bottom tip to the base of the front paper.
2
3
{Flip}
4 On this side as well, make a cut with scissors from the bottom tip to the base of the front paper.
5
6 The parts that will become the ears and feet are now complete. Fold the front right paper to the left.
7
8 Create the face. Fold the front paper upwards at a position slightly above (about 2 mm) the corner of the mountain at the back.
9 Fold diagonally at a position 10 mm from the left and right corners of the bottom edge.
10
English Commentary
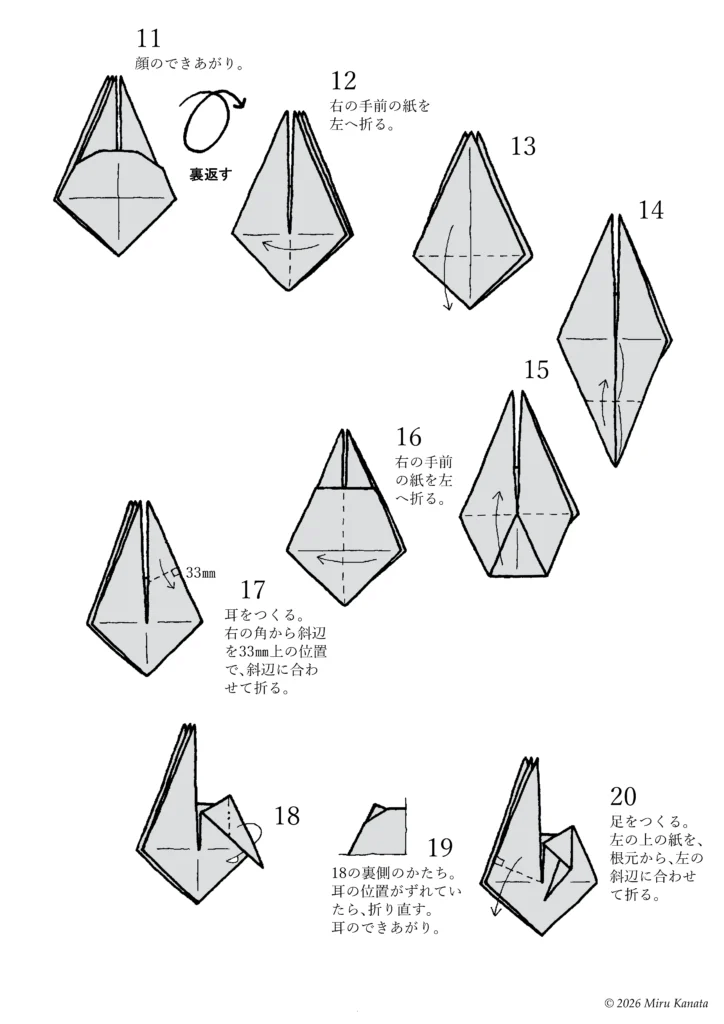
11 The face is finished.
{Flip}
12 Fold the front right piece of paper to the left.
13
14
15
16 Fold the front right piece of paper to the left.
17 Make the ears. Fold the diagonal edge 33 mm above the right corner to align with the diagonal edge.
18
19 The shape of the reverse side of 18. If the ears are misaligned, refold them. The ears are complete.
20 Make the legs. Fold the top left piece of paper from the base to align with the left diagonal edge.
English Commentary
Bulbasaur’s (Revised Edition No. 2) Body – Continued
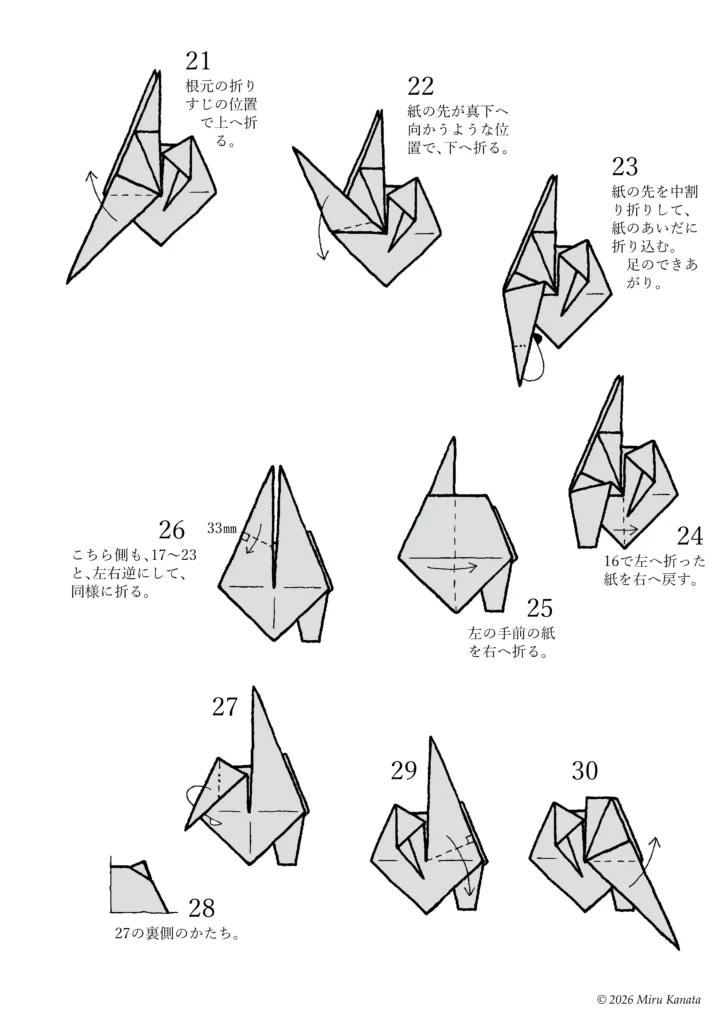
21 Fold upwards at the crease at the base.
22 Fold downwards so that the tip of the paper points straight down.
23 Fold the tip of the paper inwards and tuck it between the layers of paper. The leg is complete.
24 Return the paper that was folded to the left in step 16 to the right.
25 Fold the front left piece of paper to the right.
26 On this side, fold in the same way as steps 17-23, but with the left and right reversed.
27
28 The shape of the reverse side of step 27.
29
30
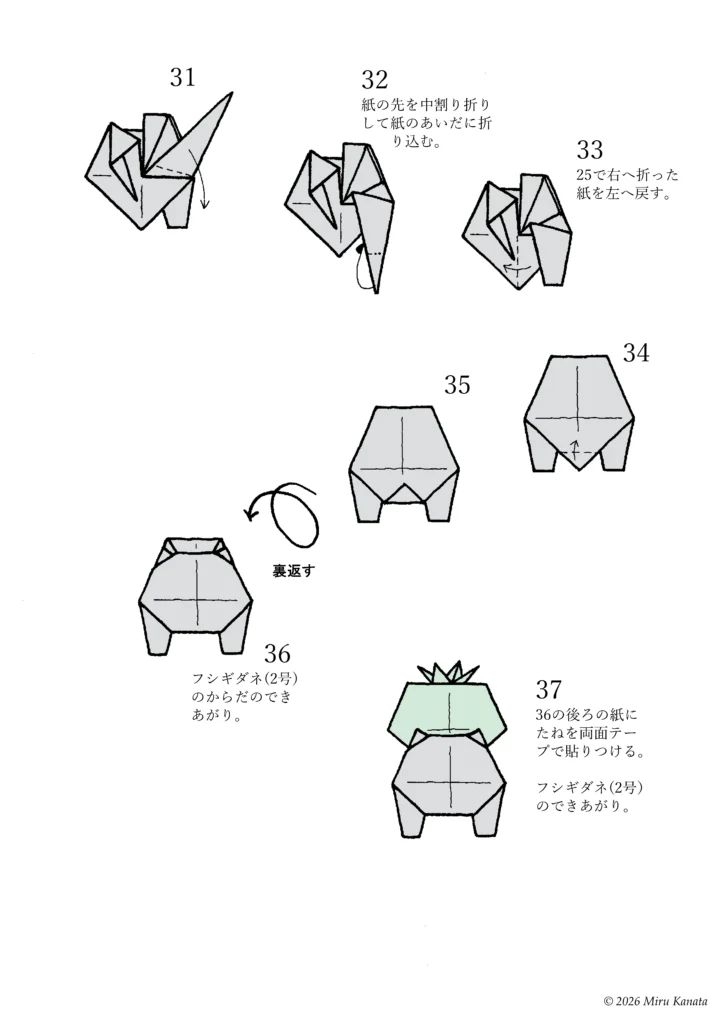
English Commentary
31
32 Fold the tip of the paper in a reverse fold and tuck it into the gap between the papers.
33 Return the paper that was folded to the right in step 25 to the left.
34
35
{Flip}
36 The body of Bulbasaur (No. 2) is complete.
37 Attach the seed to the back of the paper from step 36 with double-sided tape. Bulbasaur (No. 2) is complete.
4 フシギダネのからだ 3号
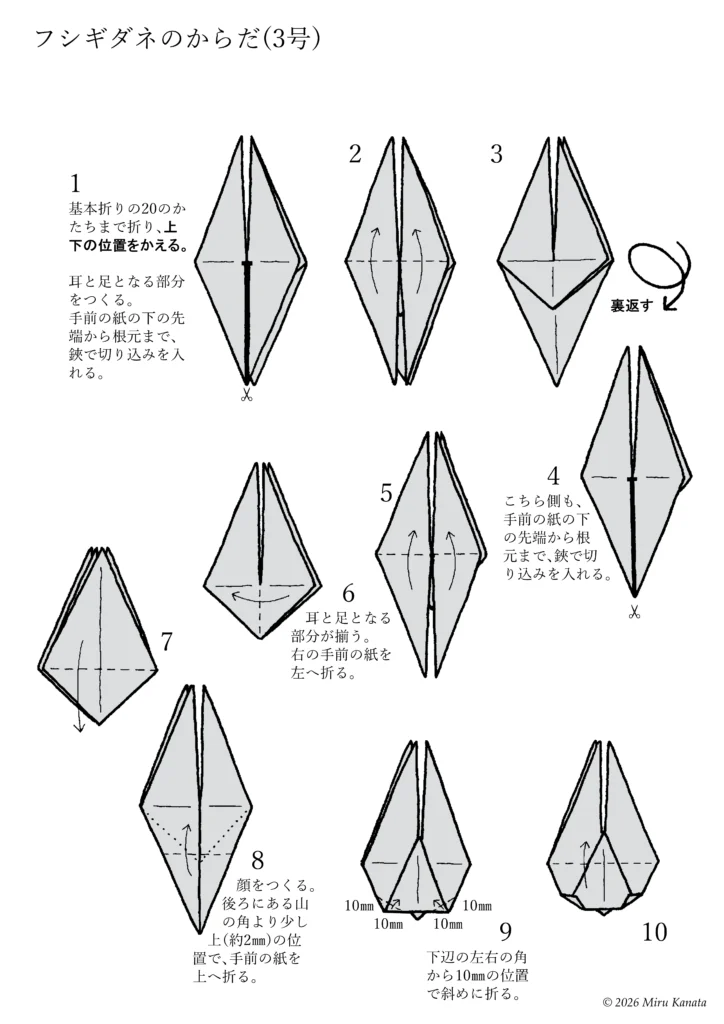
English Commentary
Bulbasaur’s (No. 3) body
1 Fold to the shape of the 20th basic fold, then change the top and bottom positions. Create the parts that will become the ears and feet. Make a cut with scissors from the bottom tip to the base of the front paper.
2
3
{Flip}
4 On this side as well, make a cut with scissors from the bottom tip to the base of the front paper.
5
6 The parts that will become the ears and feet are now complete. Fold the front right paper to the left.
7
8 Create the face. Fold the front paper upwards at a position slightly above (about 2 mm) the corner of the mountain at the back.
9 Fold diagonally at a position 10 mm from the left and right corners of the bottom edge.
10
English Commentary
11
{Flip}
12 Fold the front right piece of paper to the left.
13
14
15
16 Fold the front right piece of paper to the left.
17 Make the ears. Fold the diagonal edge 33 mm above the right corner to align with the diagonal edge.
18
19 The shape of the reverse side of 18. If the ears are misaligned, refold them. The ears are complete.
20 Make the legs. Fold the top left piece of paper from the base to align with the left diagonal edge.
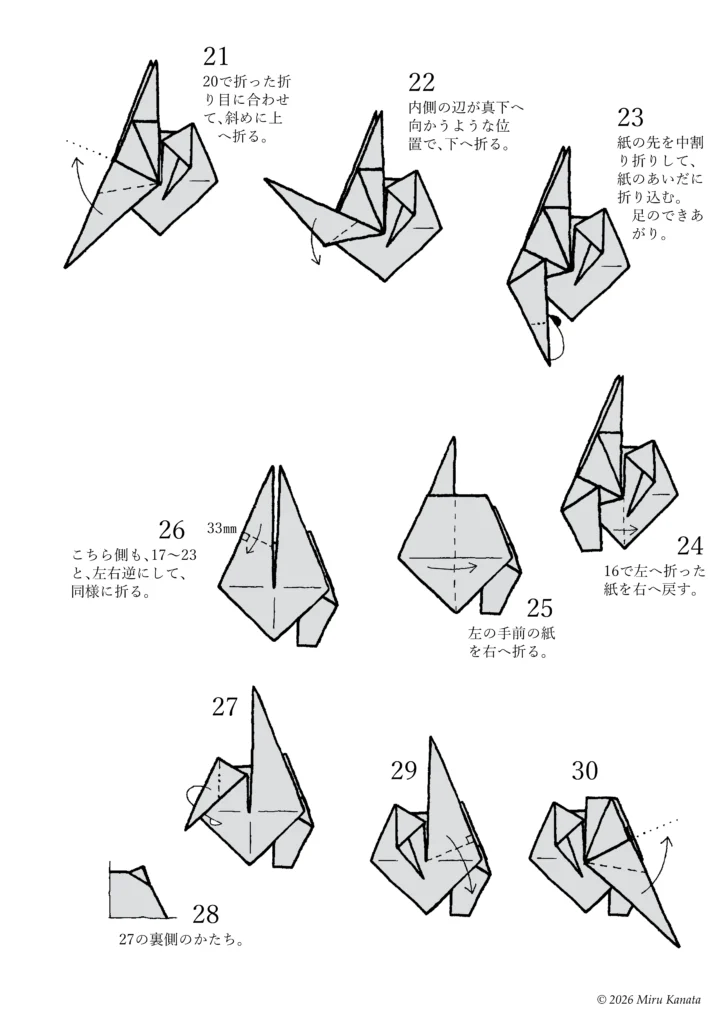
English Commentary
21 Fold diagonally upwards, aligning with the crease made in step 20.
22 Fold downwards so that the inner edge points straight down.
23 Fold the tip of the paper inwards using an inside reverse fold and tuck it between the layers of paper. The leg is complete.
24 Return the paper that was folded to the left in step 16 to the right.
25 Fold the front left piece of paper to the right.
26 On this side, fold in the same way as in steps 17-23, but with the left and right reversed.
27
28 This is the shape of the reverse side of step 27.
29
30
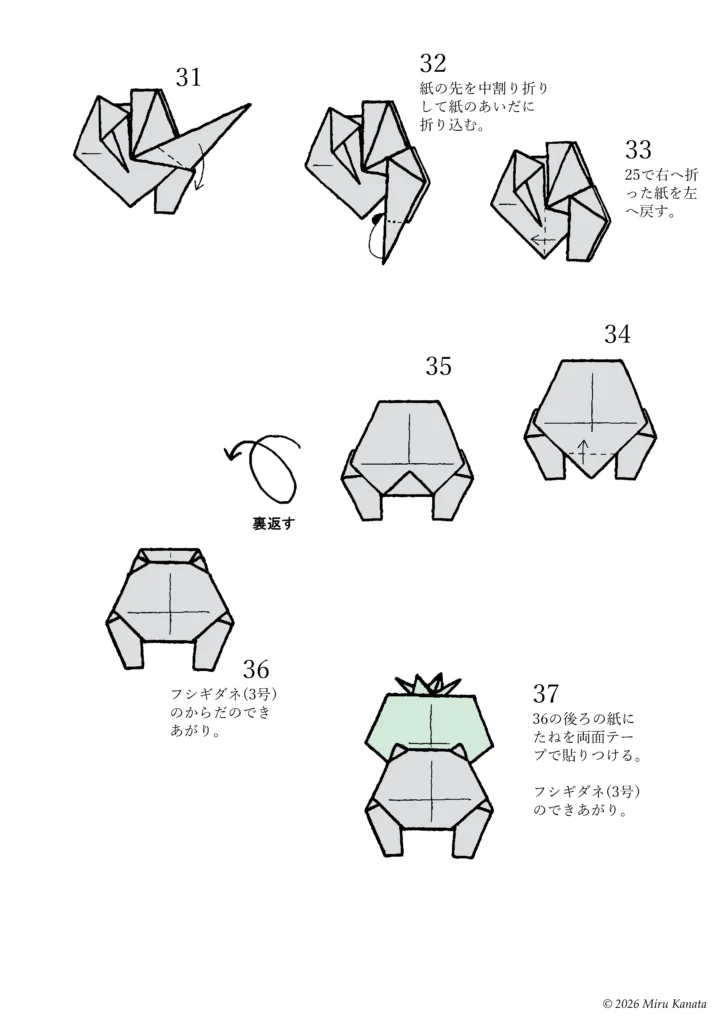
English Commentary
31
32 Fold the tip of the paper in half and tuck it into the gap.
33 Return the paper that was folded to the right in step 25 to the left.
34
35
{Flip}
36 The body of Bulbasaur (No. 3) is complete.
37 Attach the seed to the back of the paper from step 36 with double-sided tape. Bulbasaur (No. 3) is complete.
みるかなた本棚>Nice Origami素敵折紙>p001フシギダネ
◇ ◇ ◇