
みるかなた本棚>Nice Origami素敵折紙>p138オムナイト02
◆0138オムナイト02◆0138オムナイト03◆
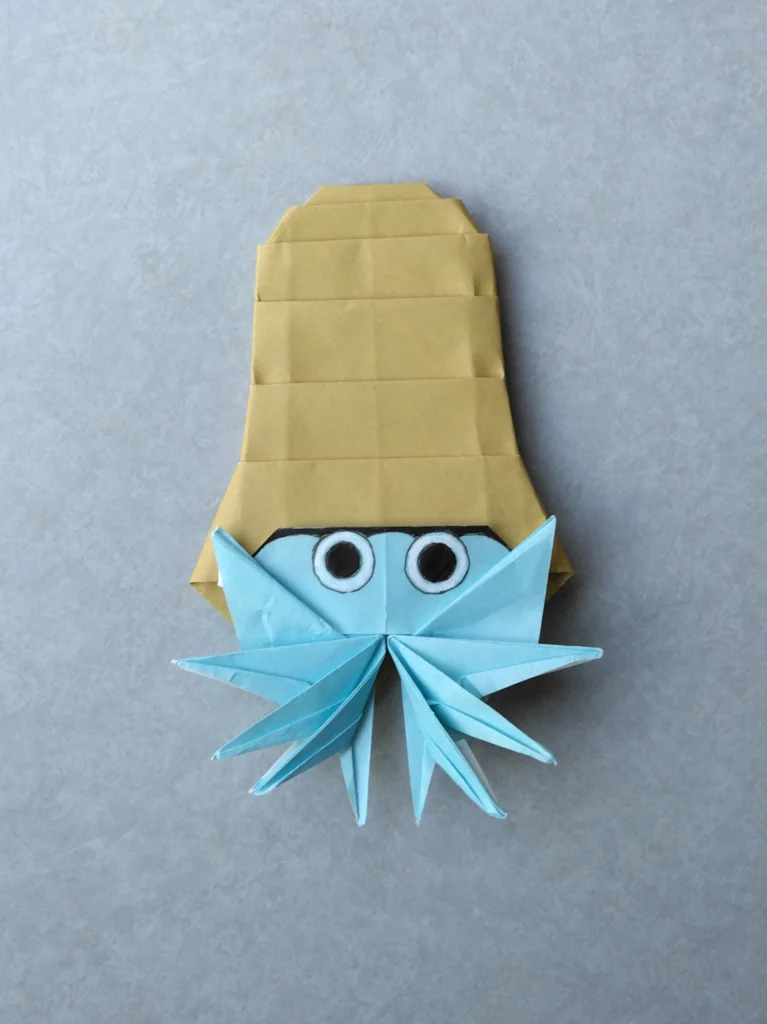
0138 オムナイト 2号
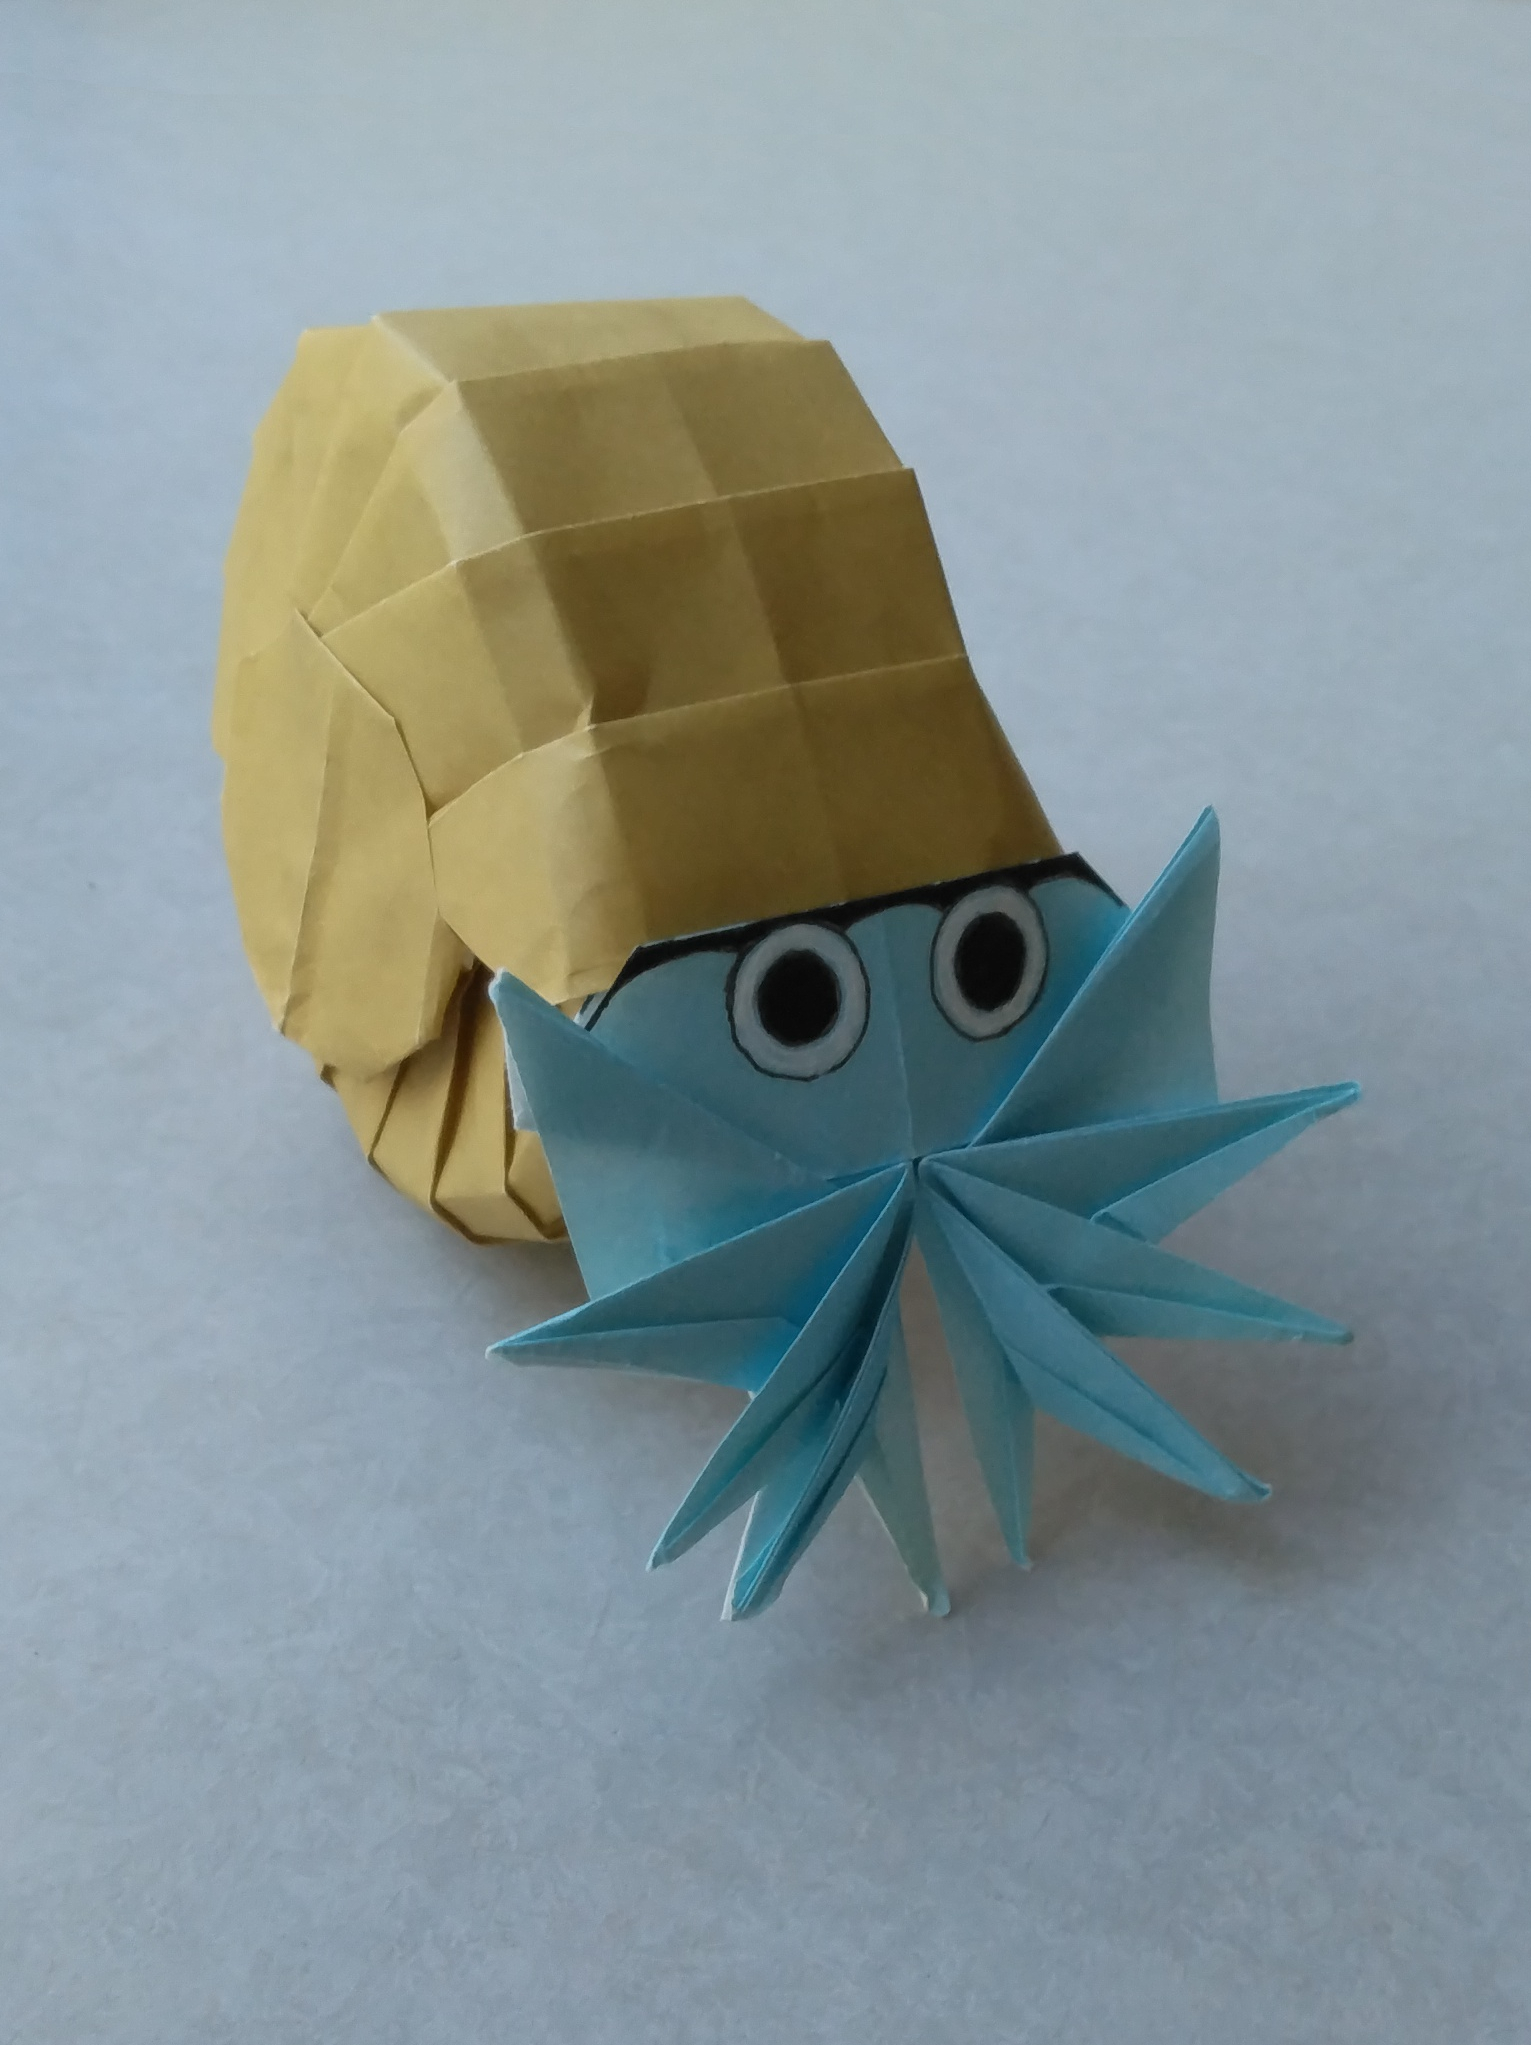
2000年の本に掲載した貝殻のかたちは不安定で、再現性に疑問がありましたので、今回、2026年3月、安定したかたちのものをつくりました。
ところが、これが、サイズ感が難しくて、何度つくってもなかなかいいバランスにならなくて、ほんと苦労しました。
上下の長さがもうちょと短くてもよかったと、まだ迷いが消えません。
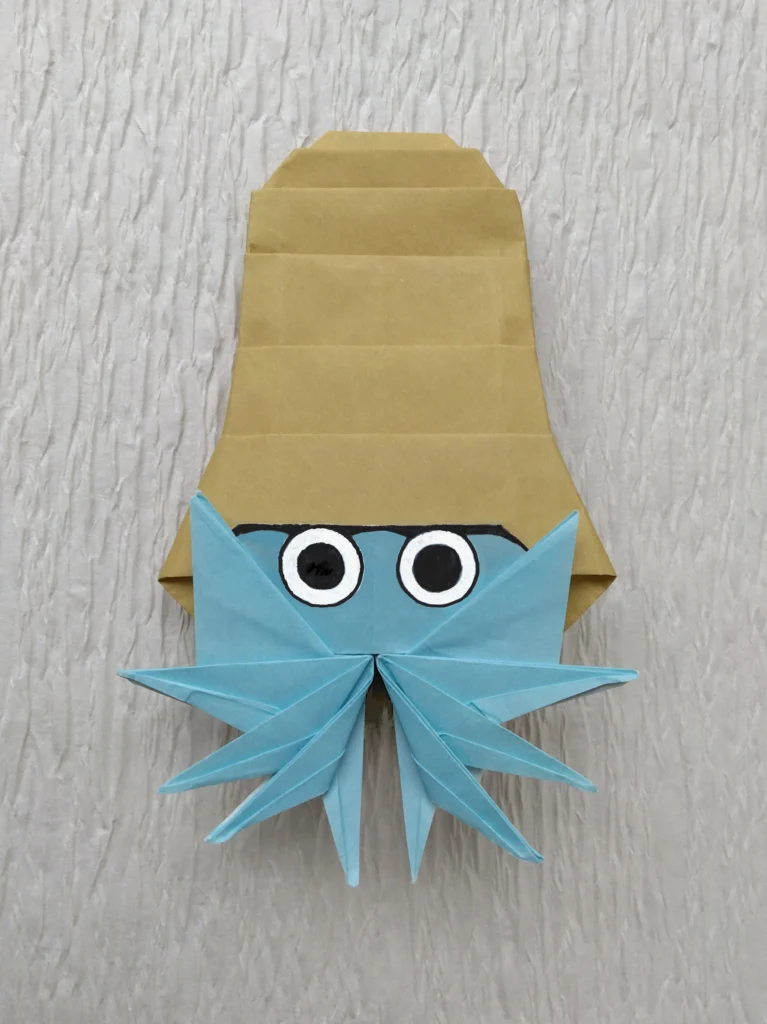
攻略本にあるオムナイトの絵には、触腕が10本描かれています。
10本は、1998年制作の初号で実現していますが、触腕の後ろに紙の裏の白い部分が見えていました。
それで、それらを折り込み、10本、すっきりと折りだしました。
さてさて。
この2号改訂版はほぼ平面なので、ファイルに挟んで持ち歩いたり、本のカバーのあいだに入れたり、カードにして封筒で送ったり、日常の中でいろいろ楽しむことができます。
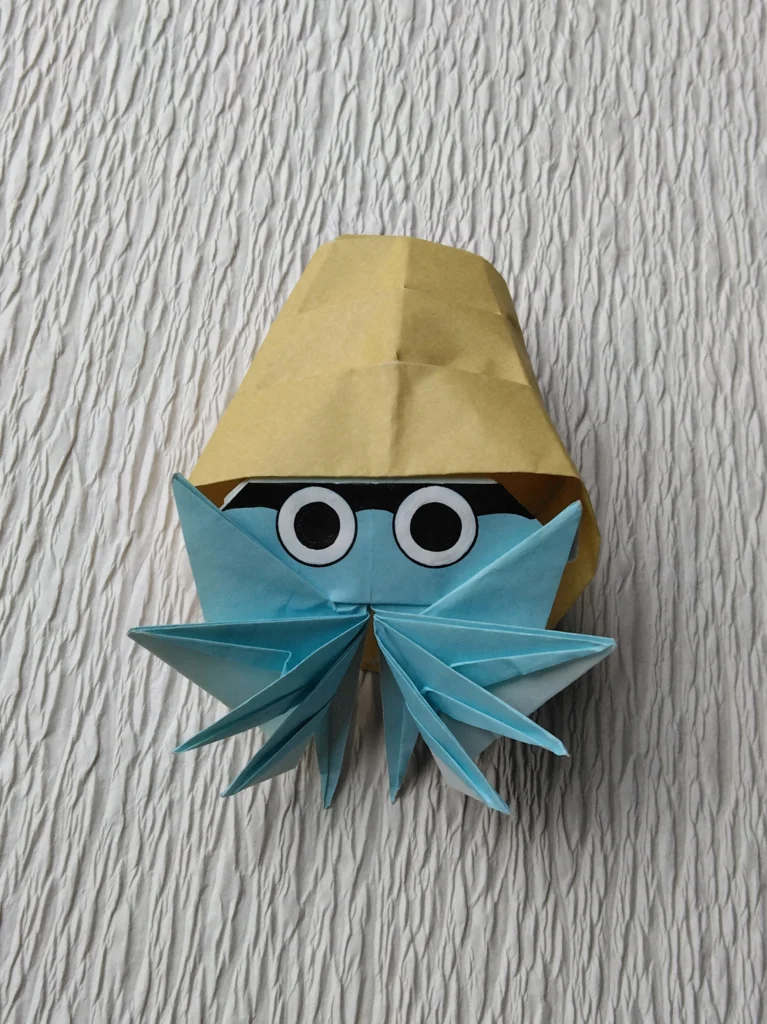
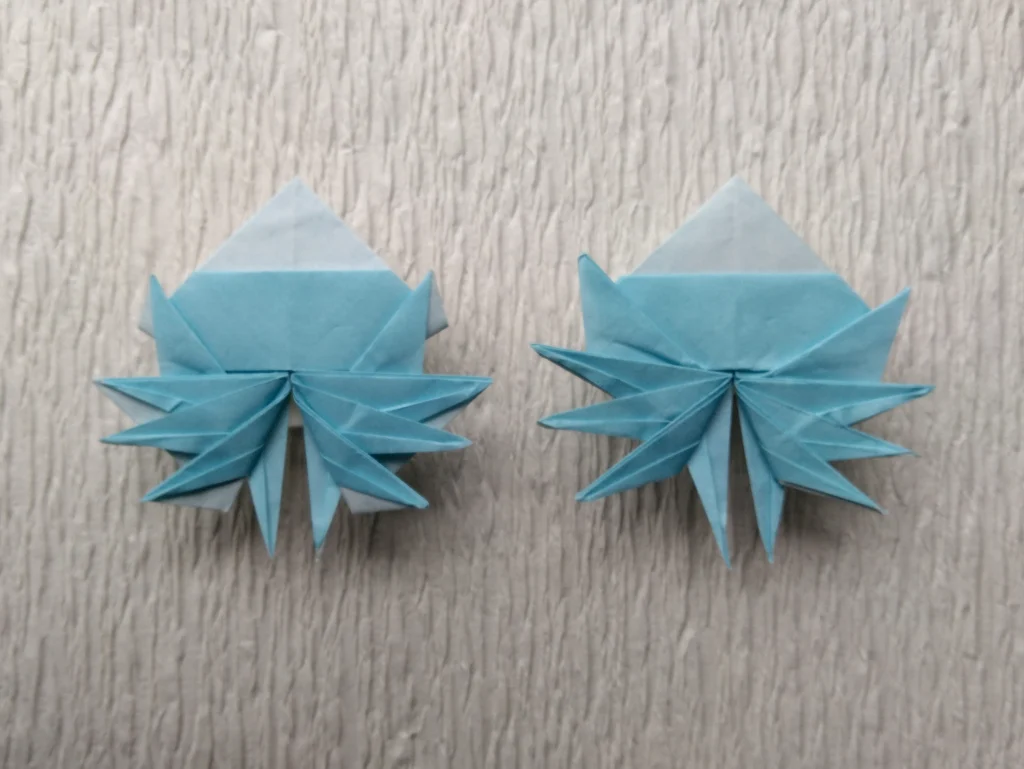
左は初号で、触腕の下に紙の白い部分が見えています。
本に掲載するとき、折り図が煩雑になりすぎて収録できないと思い、そのままにしました。
今回、その処理の折り図を制作して、紙の白い部分が見えないようにつくりました。
つくり方の折り図
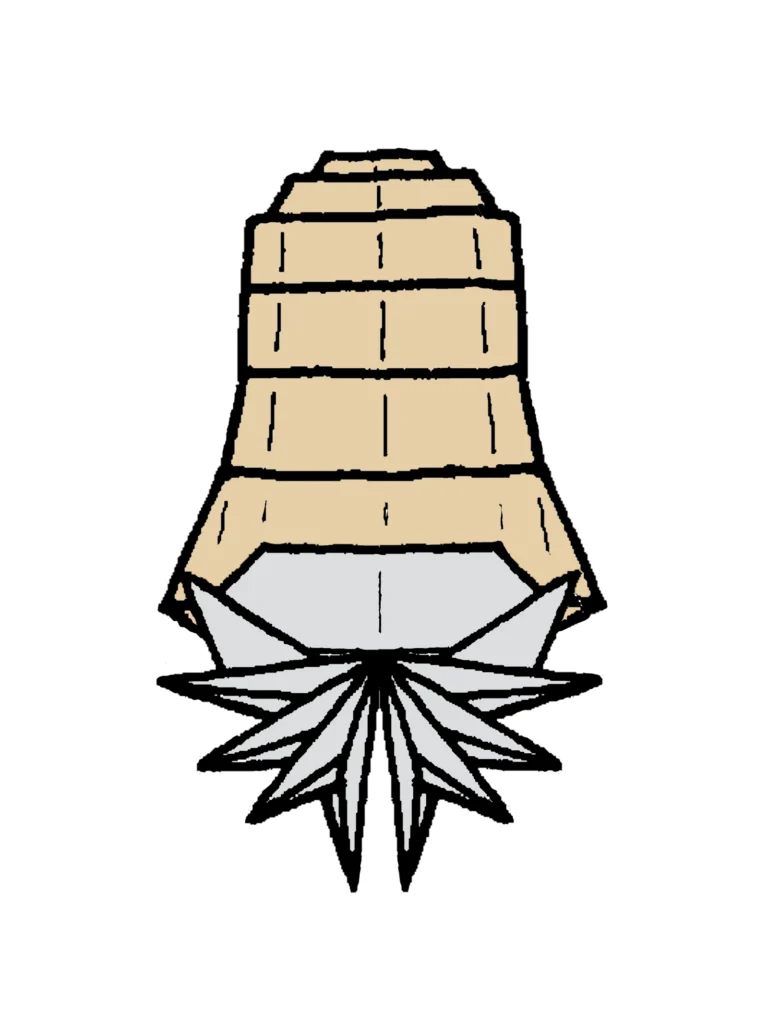
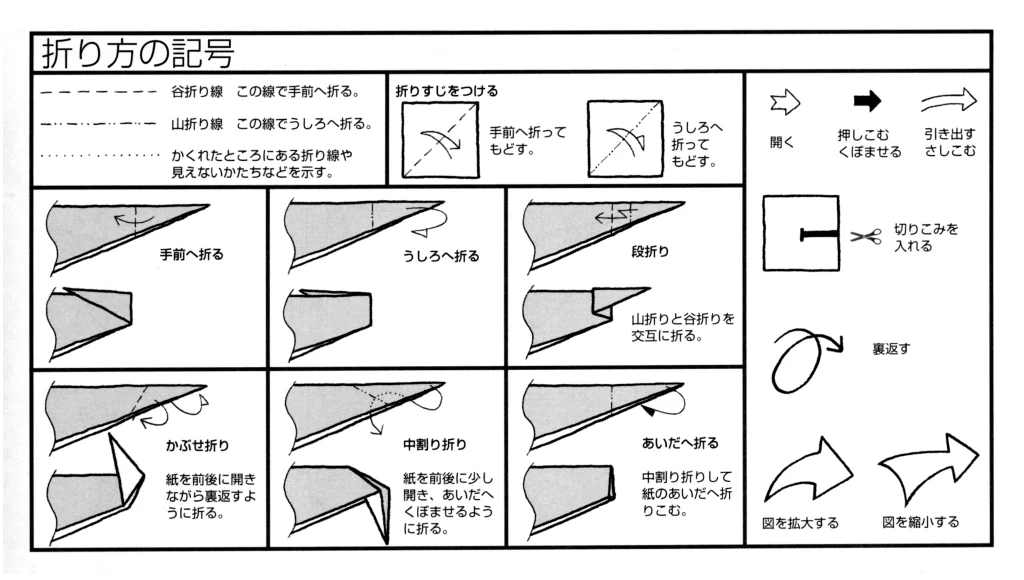
今回制作した折り図
◇折り図
1 オムナイトのからだ
2 オムナイトの貝殻 2号
■オムナイトのからだは、水色の紙で折る。
■オムナイトの貝殻は、アイボリー色の紙で折る。
1 オムナイトのからだ
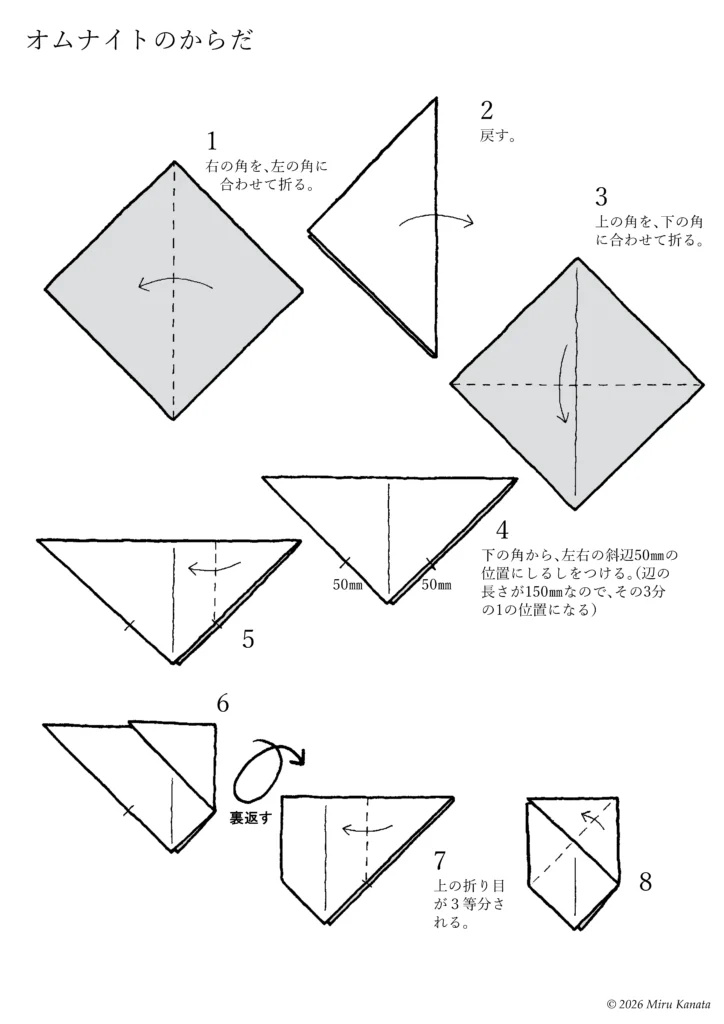
English Commentary
Omanyte’s Body
1 Fold the right corner to meet the left corner.
2 Turn it back.
3 Fold the top corner to meet the bottom corner.
4 Mark the left and right diagonal sides 50 mm from the bottom corner. Since the length of the sides is 150 mm, it will be one-third of that.
5
6
{Flip}
7 The top fold is divided into thirds.
8
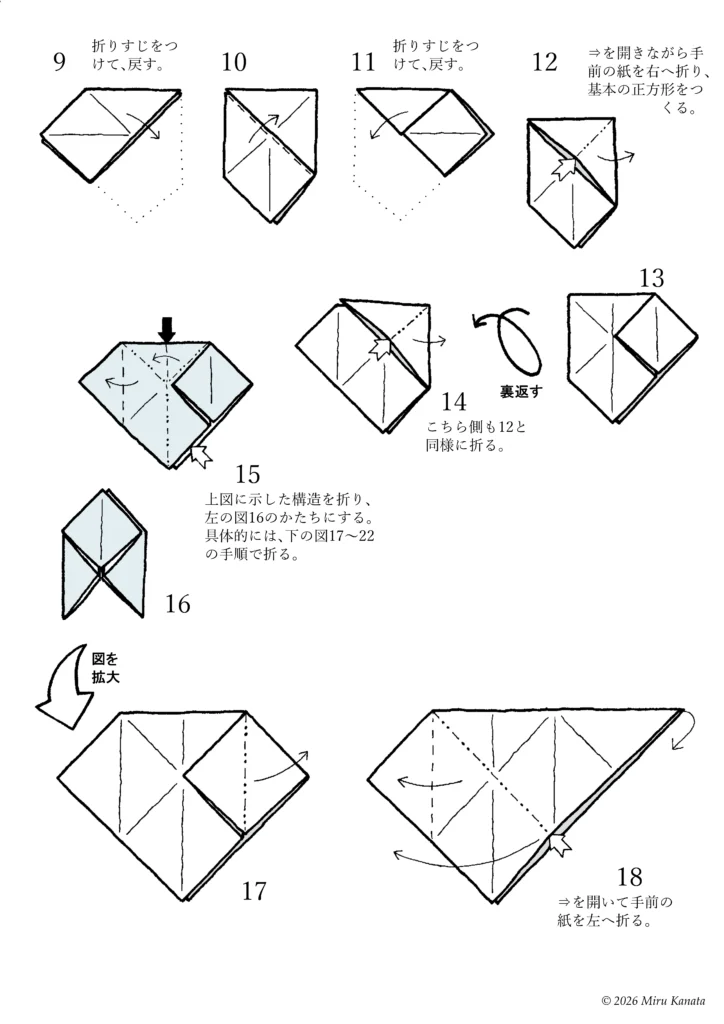
English Commentary
9 Make a crease and return it to its original position.
10
11 Make a crease and return it to its original position.
12 Open the arrow and fold the paper in front to the right to create a basic square.
13
{Flip}
14 Fold this side in the same way as step 12.
15 Fold the structure shown in the diagram above to form the shape shown in Figure 16 on the left. Specifically, fold it in the steps shown in Figures 17 to 22 below.
{Enlarge diagram}
17
18 Open the arrow and fold the paper in front to the left.
English Commentary
19
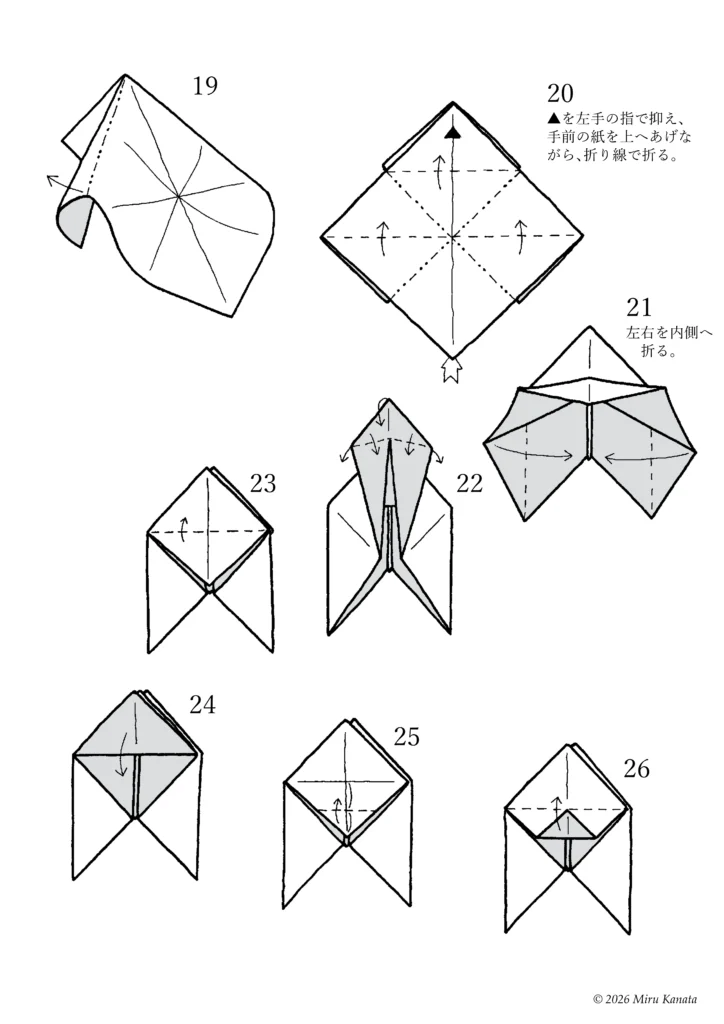
20 Hold the ▲ with the fingers of your left hand, lift the paper in front of you, and fold it along the crease.
21 Fold the left and right sides inward.
22
23
24
25
26
English Commentary
27
28
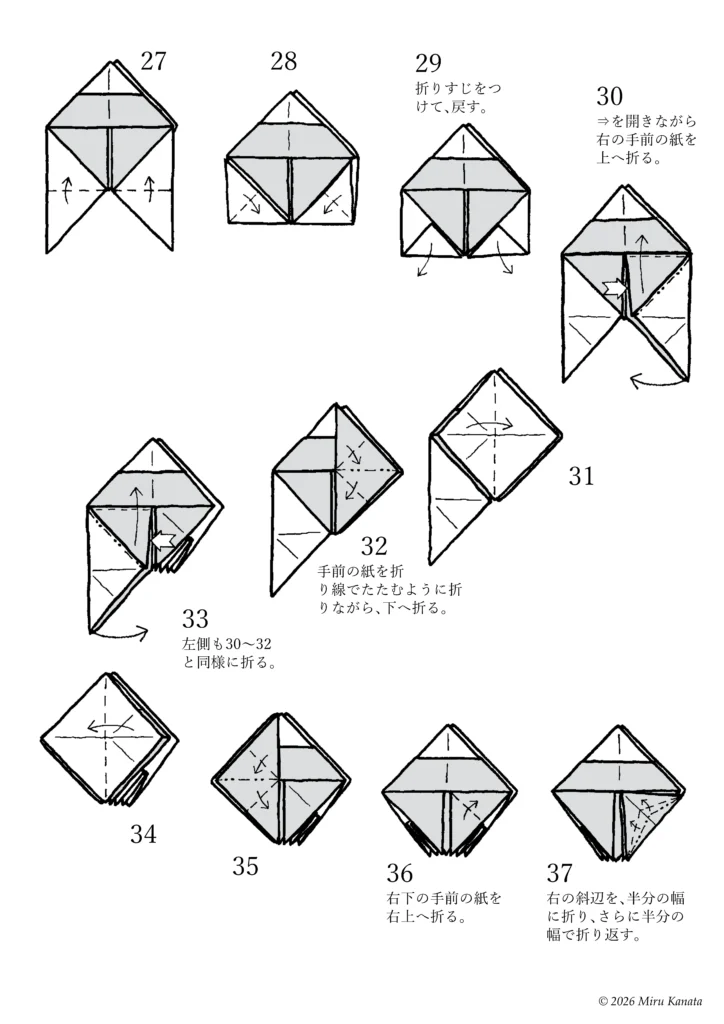
29 Make a crease and return it to its original position.
30 While opening the arrow, fold the paper in front of you on the right upwards.
31
32 Fold the paper in front along the crease and fold it downwards.
33 Repeat steps 30-32 for the left side.
34
35
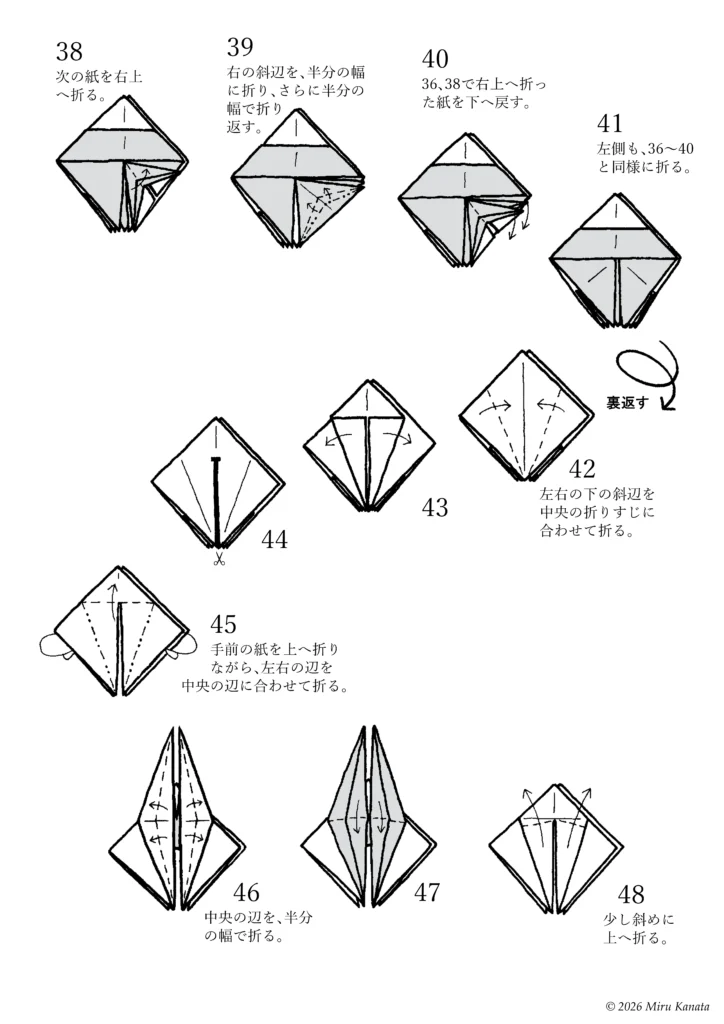
36 Fold the paper in front of you on the bottom right towards the top right.
37 Fold the right diagonal side in half, and then fold it in half again.
English Commentary
38 Fold the next piece of paper to the top right.
39 Fold the right diagonal edge in half, and fold it back in half again.
40 Turn the paper folded to the top right in 36 and 38 back down.
41 Fold the left side in the same way as 36 to 40.
{Flip}
42 Fold the bottom diagonal edges on both sides to align with the center crease.
43
44
45 While folding the paper in front up, fold the left and right edges to align with the center edge.
46 Fold the center edge in half.
47
48 Fold it slightly diagonally up.
English Commentary
49 Fold it down, then fold it again so that there is a small gap in the center.
50
{Flip}
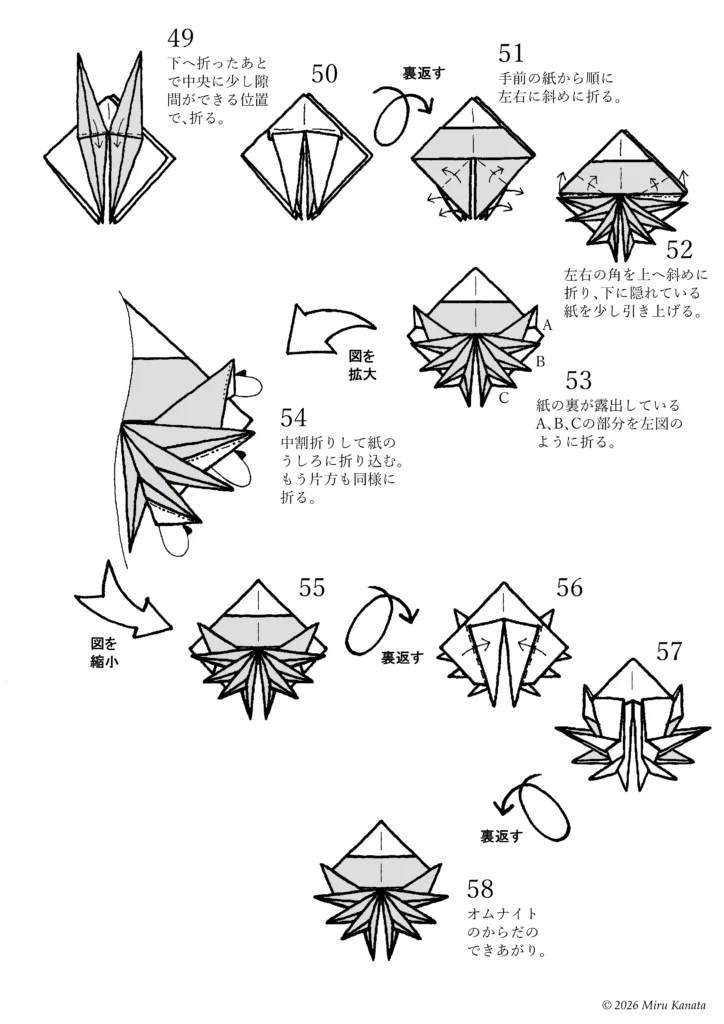
51 Fold the paper diagonally to the left and right, starting from the paper closest to you.
52 Fold the left and right corners diagonally upwards, and pull up the paper that is hidden underneath slightly.
53 Fold parts A, B, and C where the back of the paper is exposed as shown in the diagram on the left.
{Enlarge diagram}
54 Fold the inside in a reverse fold and tuck it behind the paper. Fold the other side in the same way.
{Reduce diagram}
55
{Flip}
56
57
{Flip}
58 Omanyte’s body is complete.
2 オムナイトの貝殻 2号
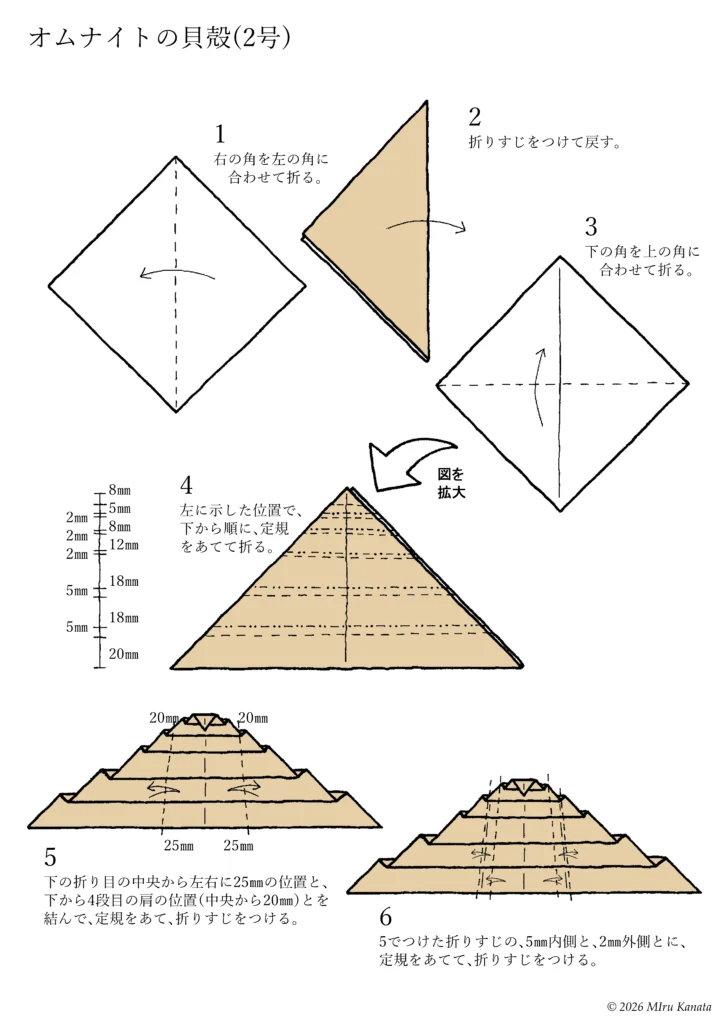
English Commentary
Omanyte Shell (2nd edition)
1 Fold the right corner to meet the left corner.
2 Make a crease and return.
3 Fold the bottom corner to meet the top corner.
(See enlarged image)
4 Using a ruler, fold from the bottom in the positions shown in the image.
5 Place a ruler between a position 25 mm to the left and right from the center of the bottom fold and the shoulder position of the fourth row from the bottom (20 mm from the center), and make a crease.
6 Place a ruler 5 mm inward and 2 mm outward from the crease made in step 5, and make a crease.
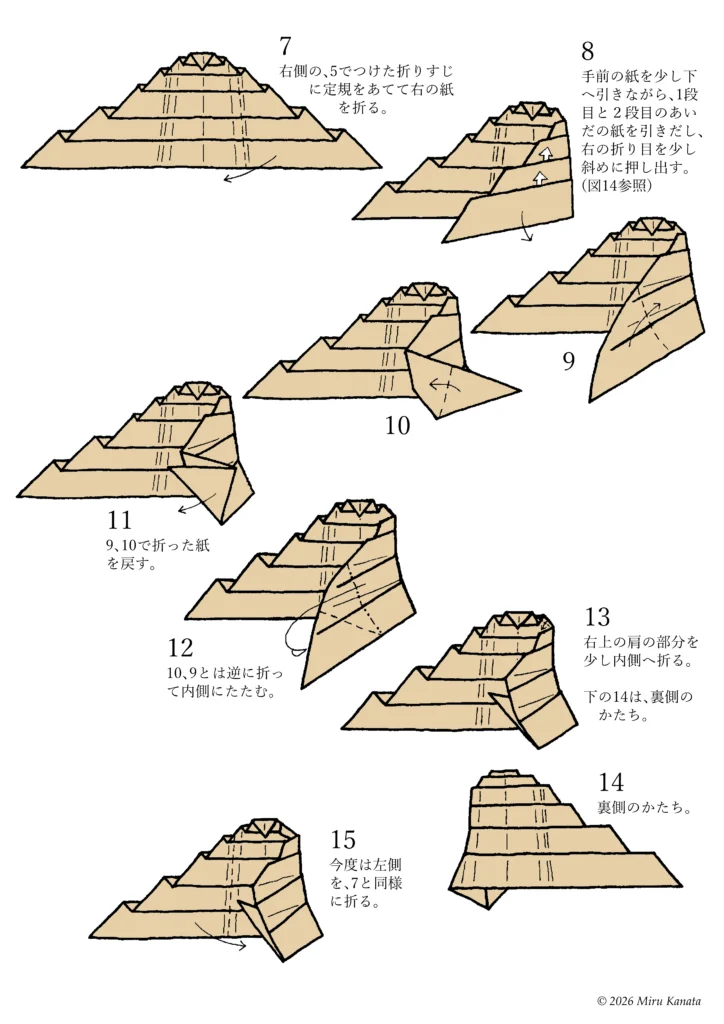
English Commentary
7 Place a ruler on the crease made in step 5 on the right side and fold the paper on the right.
8 While pulling the paper in front slightly downward, pull out the paper between the first and second rows and push the fold on the right at a slight angle. (See Figure 14)
9
10
11 Return the paper folded in steps 9 and 10.
12 Fold in the opposite direction to steps 10 and 9, folding inward.
13 Fold the top right shoulder part slightly inward. 14 below is the shape of the back side.
14 The shape of the back side.
15 Now fold the left side in the same way as step 7.
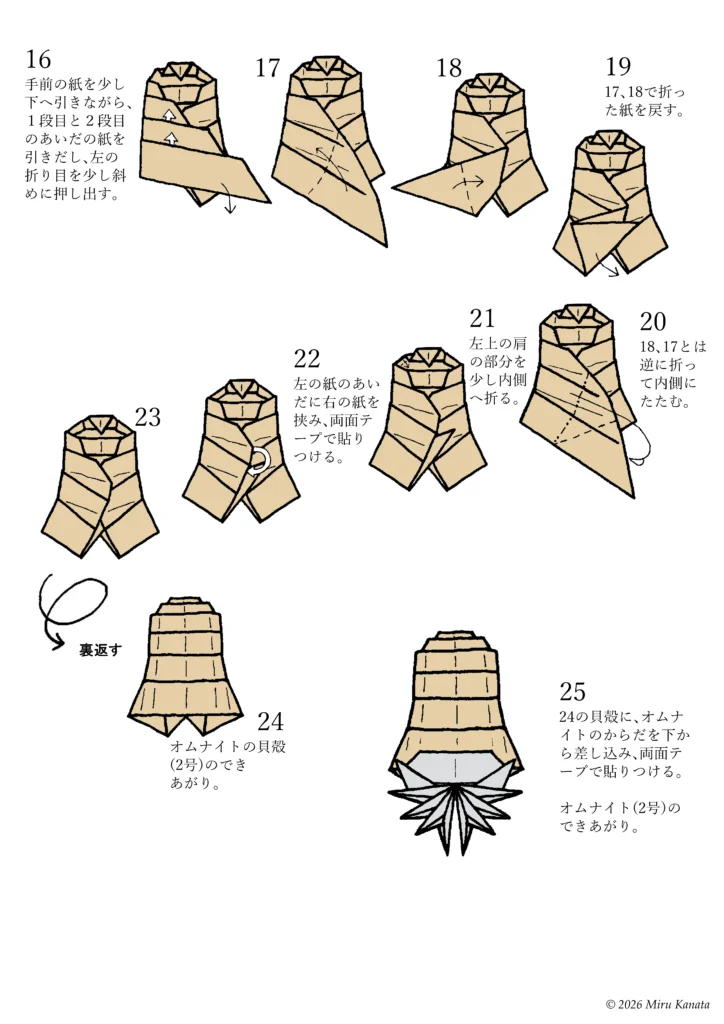
English Commentary
16 While pulling the paper in front slightly downwards, pull out the paper between the first and second rows and push the left fold out at a slight angle.
17
18
19 Fold the paper folded in steps 17 and 18 back.
20 Fold steps 18 and 17 in the opposite direction and fold inwards.
21 Fold the upper left shoulder part slightly inwards.
22 Place the right paper between the left pieces of paper and adhere with double-sided tape.
23
{Flip}
24 Omanyte’s shell (version 2) is complete.
25 Insert Omanyte’s body into the shell in step 24 from the bottom and adhere with double-sided tape. Omanyte (version 2) is complete.
ORIGAMI Topics
■折る途中で登場する「基本の正方形をつくる」は、おりがみでは最も基本のテーマのひとつです。
いろいろなケースで使われますので、それらのサイズや構造のヴァリエーションをまとめました。
次のリンクから、正方形の多彩な姿をお楽しみください。
みるかなた本棚>Nice Origami素敵折紙>p038オムナイト2
◇ ◇ ◇