
みるかなた本棚>Nice Origami素敵折紙>p003フシギバナ
◆p001フシギダネ◆p002フシギソウ◆p003フシギバナ◆
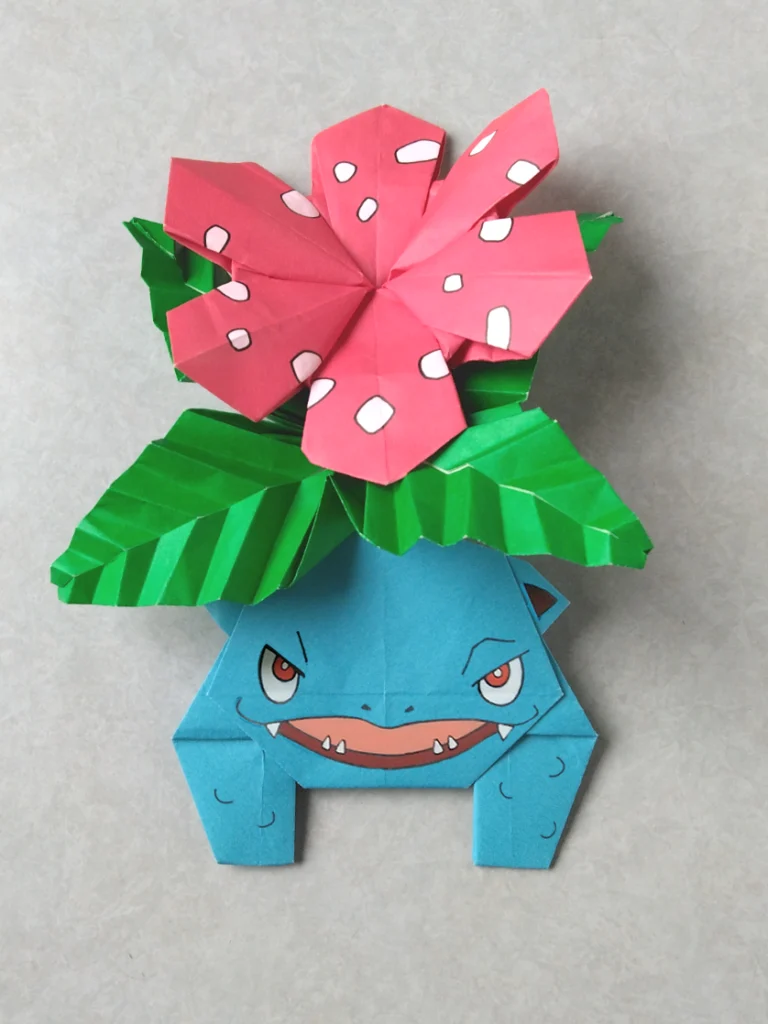
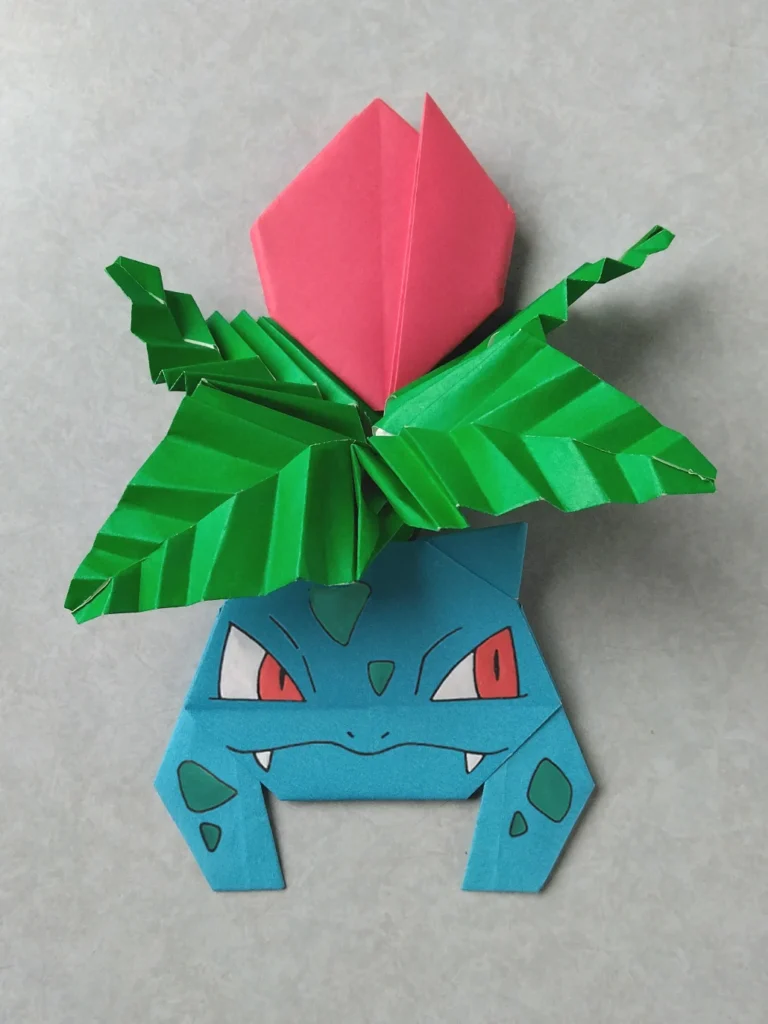
p003 フシギバナ 2号
2026年4月に制作したものです。
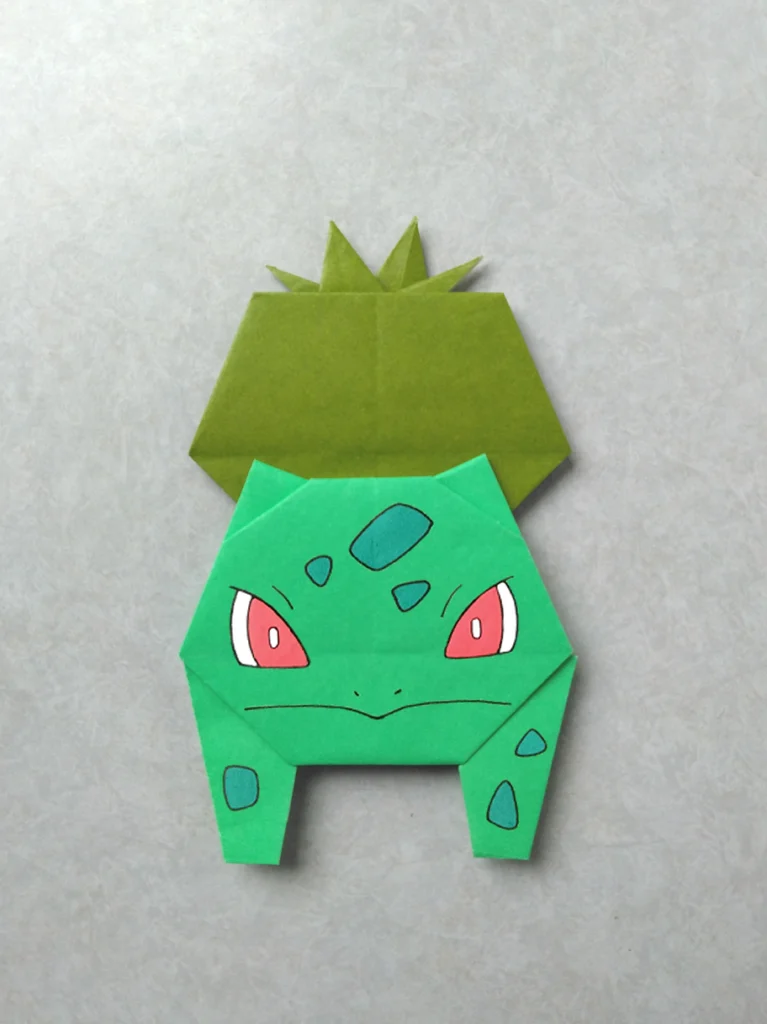
以前のものから、前足のかたちと位置をかえ、フシギバナらしいフォルムに少し近づけました。
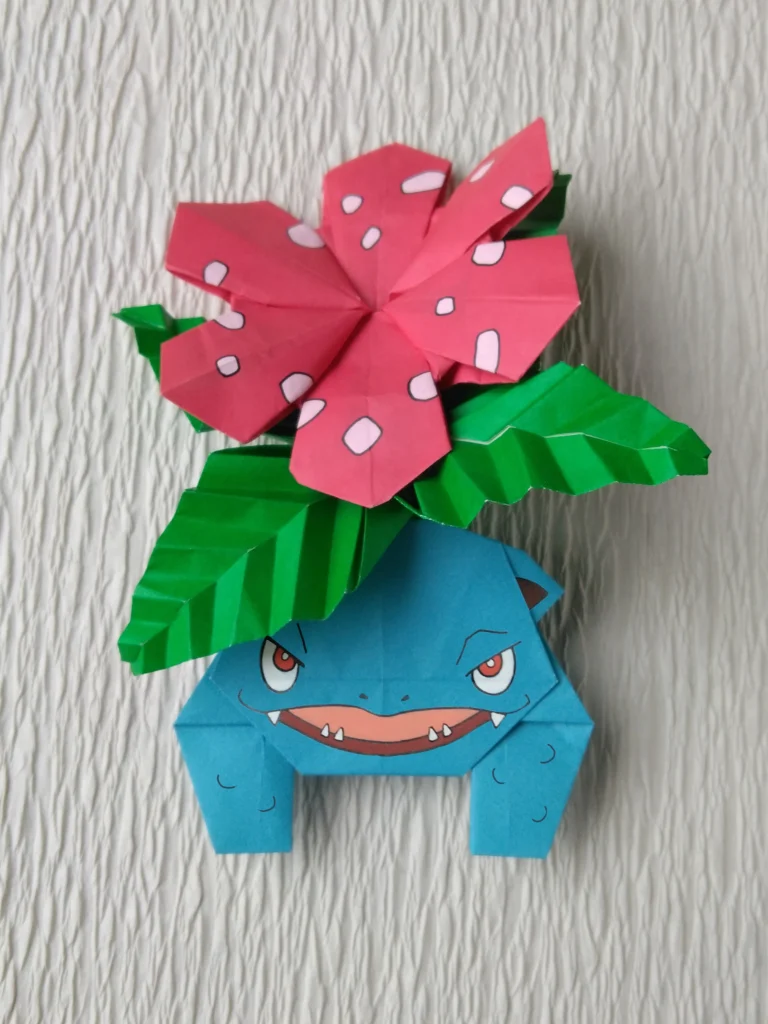
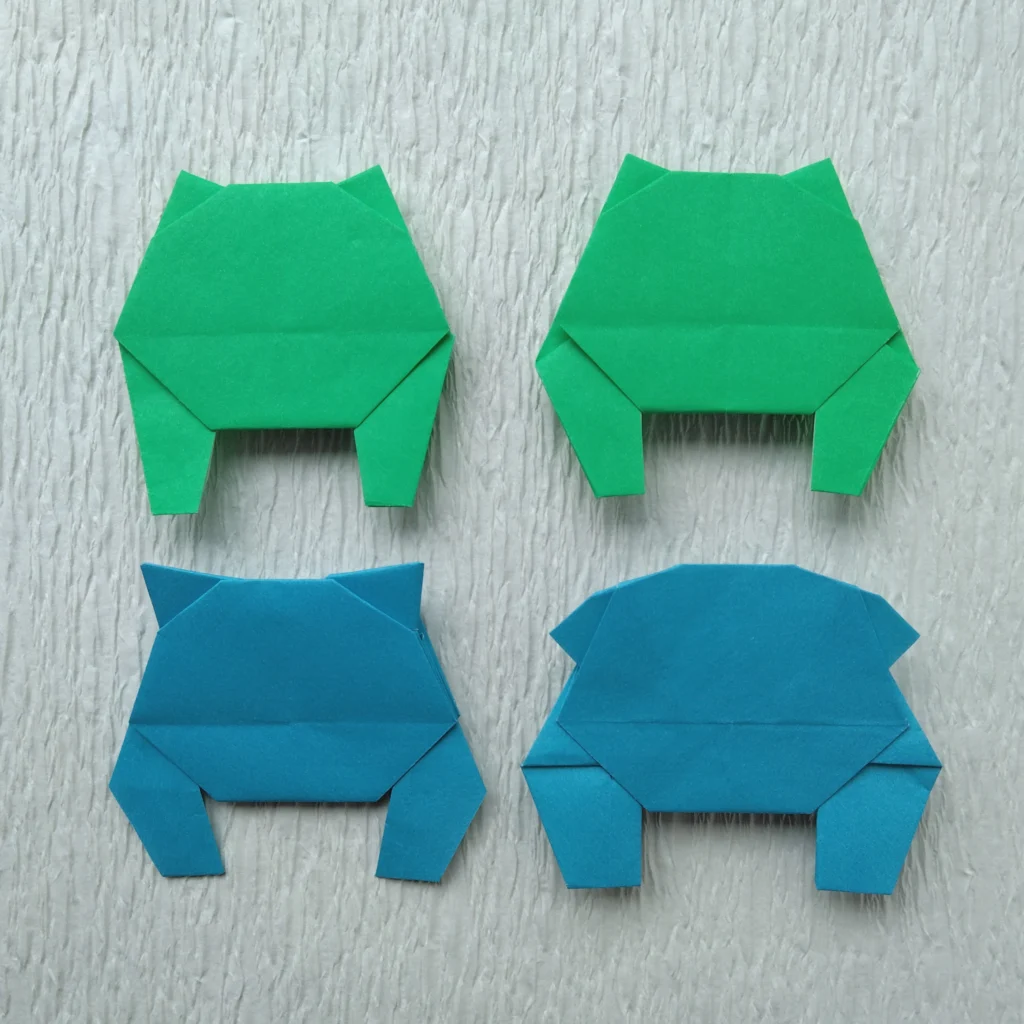
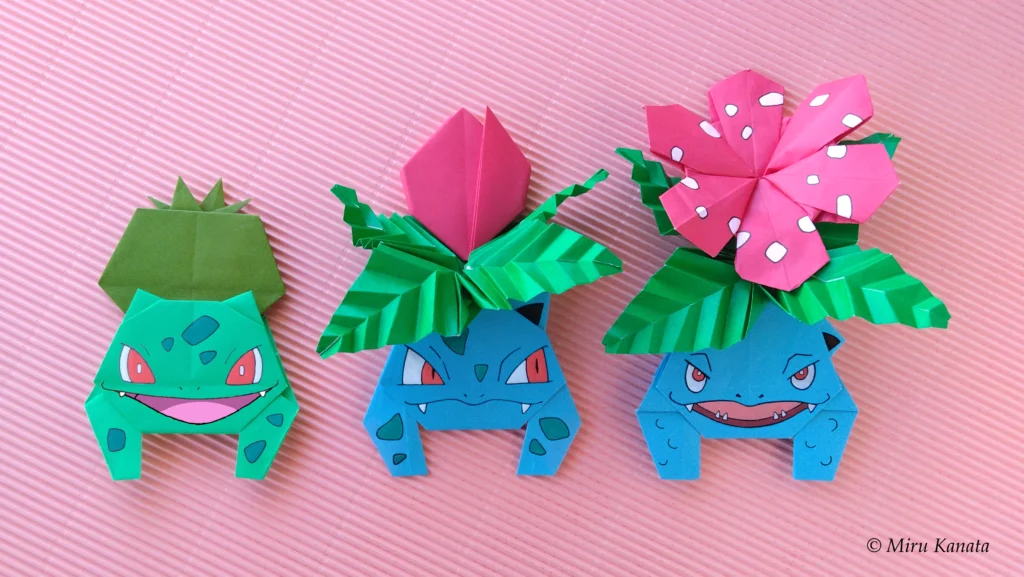
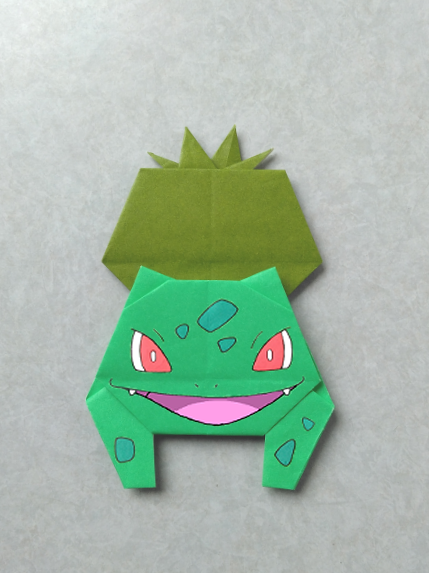
今回、表現に比重を置いて、フシギダネ、フシギソウ、フシギバナ、3種類それぞれに、耳のかたち、足のかたちを、それらしくつくってみました。
Evolution
つくり方の折り図
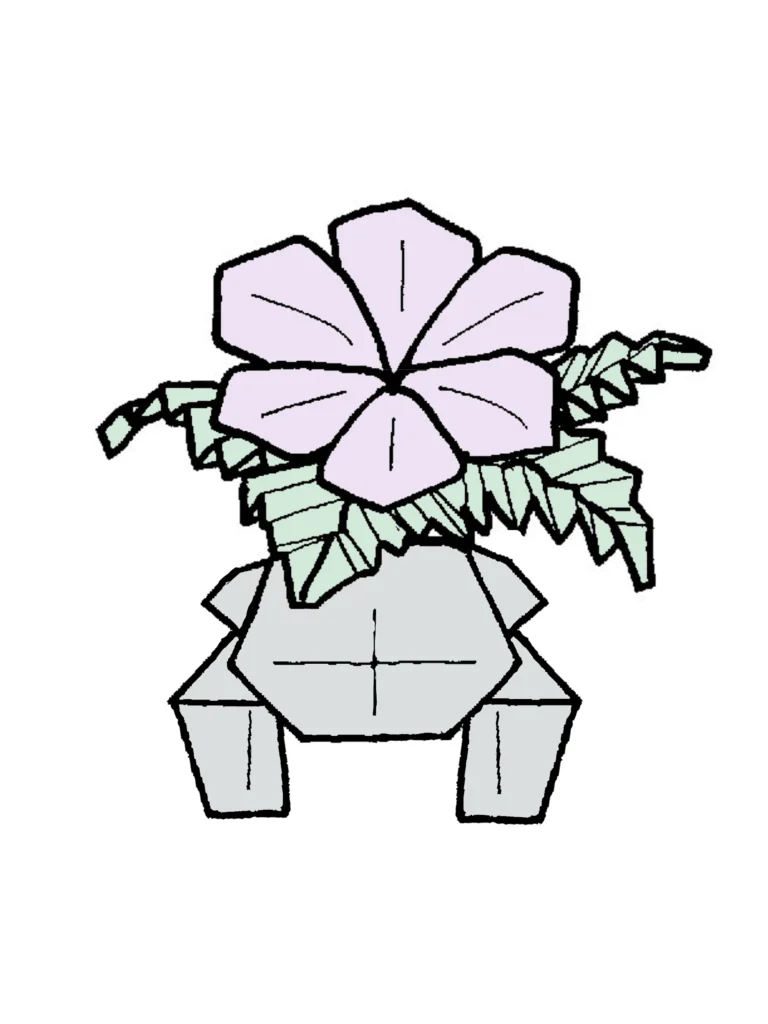
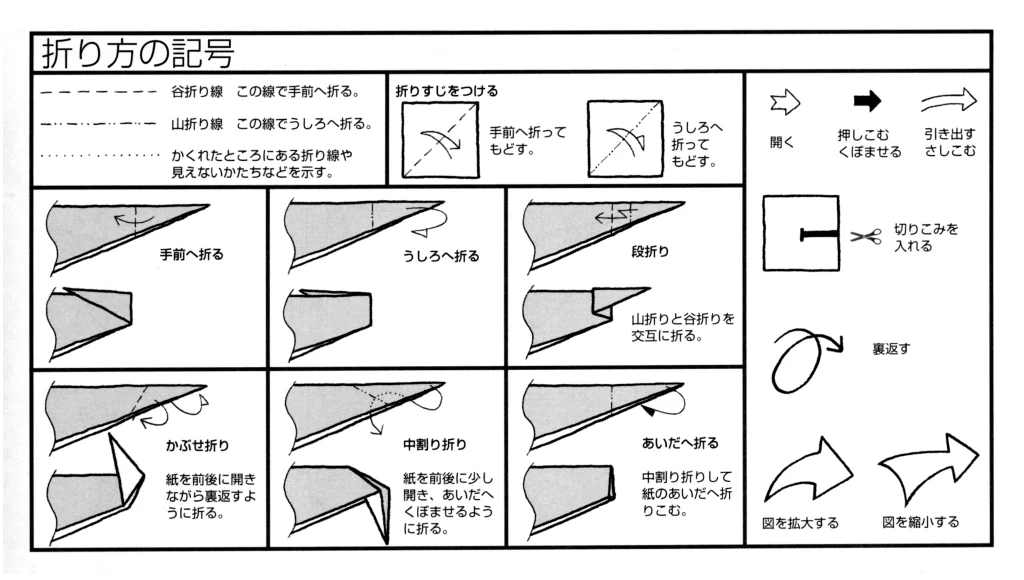
今回制作した折り図
◇折り図
1 基本折り
2 フシギバナのからだ 2号
3 フシギバナのはな
4 フシギバナのはっぱ
■1 フシギバナのからだは、青色の紙で、まず基本折りの図20まで折る。
■2 フシギバナのはなは、紅色の紙で折る。
■3 フシギバナのはっぱは、緑色の紙で、こちらもまず基本折りの図20まで折る。
1 基本折り
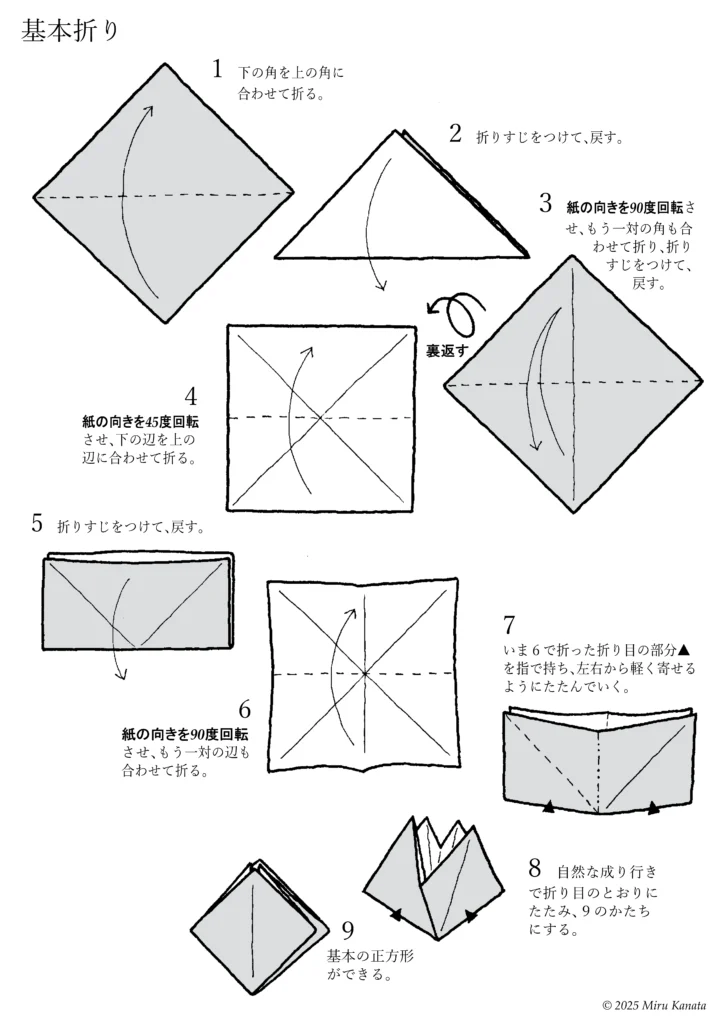
English Commentary
Basic Folding
1 Fold the bottom corner to meet the top corner.
2 Make a crease and return it to its original position.
3 Rotate the paper 90 degrees, fold the other pair of corners together, make a crease and return it to its original position.
{Flip}
4 Rotate the paper 45 degrees and fold the bottom edge to line up with the top edge.
5 Make a crease and return it to its original position.
6 Rotate the paper 90 degrees and fold the other pair of edges together.
7 Hold the crease ▲ made in step 6 with your fingers and fold gently from both sides together.
8 Let the paper naturally fold along the creases to form the shape of 9.
9 A basic square is created.
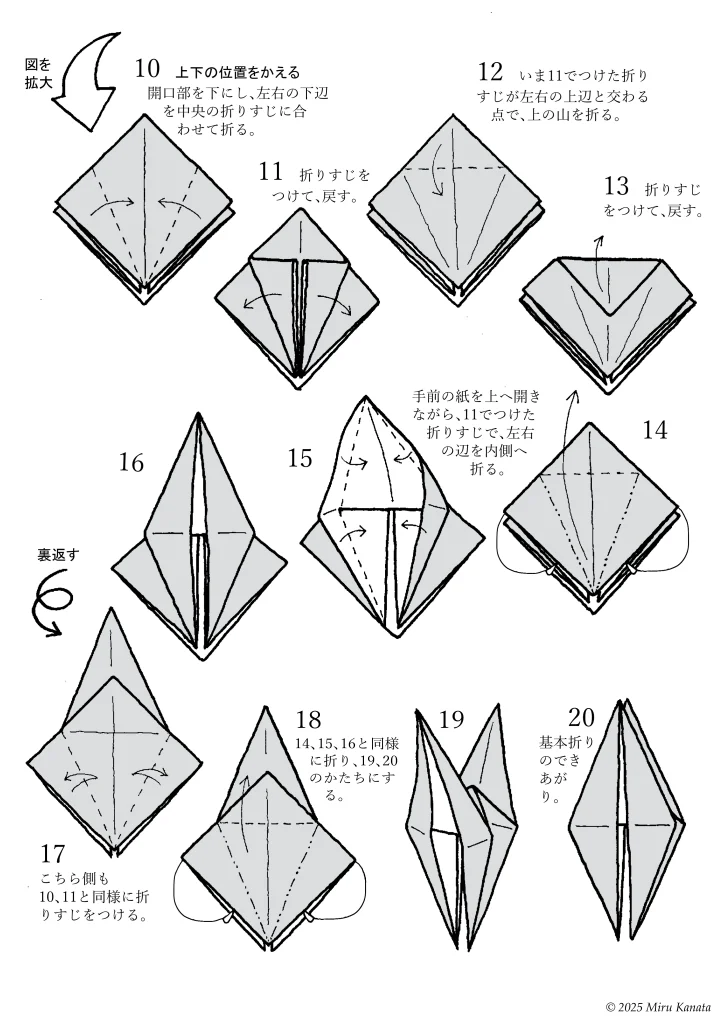
English Commentary
{Enlarge image}
10 Change the top and bottom positions.
With the opening facing downwards, fold the bottom left and right edges to meet the crease in the middle.
11 Make a crease and return.
12 Fold the top at the point where the crease made in 11 intersects with the top left and right edges.
13 Make a crease and return.
14 While opening the front paper upwards, fold the left and right edges inward along the crease made in 11.
15
16
{Flip}
17 Make creases on this side in the same way as 10 and 11.
18 Fold in the same way as 14, 15 and 16 to form 19 and 20.
19
20 The basic fold is complete.
2 フシギバナのからだ 2号
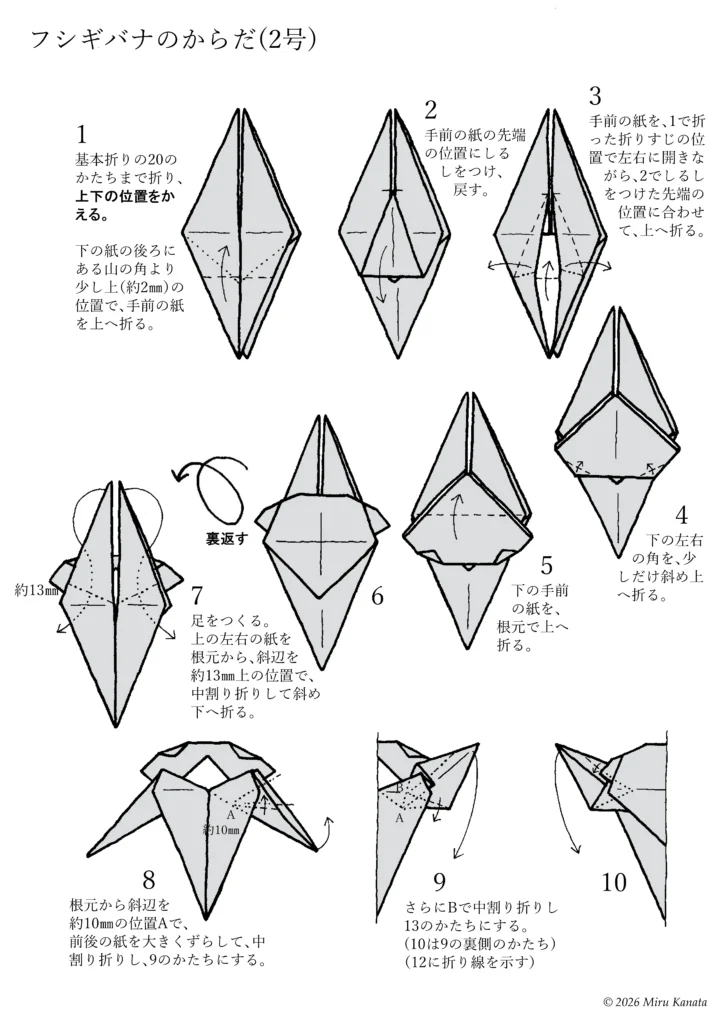
English Commentary
Venusaur’s (No. 2) body
1. Fold up to the basic fold shape 20, then change the top and bottom positions. Fold the front paper upwards at a position slightly above (about 2 mm) the corner of the mountain at the back of the bottom paper.
2. Mark the position of the tip of the front paper and unfold.
3. Open the front paper to the left and right at the crease made in step 1, and fold it upwards to align with the tip marked in step 2.
4. Fold the bottom left and right corners slightly diagonally upwards.
5. Fold the bottom front paper upwards at the base.
6.
{Flip}
7. Make the legs. Fold the top left and right papers diagonally downwards from the base, using an inside reverse fold, about 13 mm above the base.
8. Starting from the base, make a large inside reverse fold at position A, approximately 10 mm from the base along the hypotenuse, shifting the front and back pieces of paper significantly to create the shape shown in 9.
9. Make another inside reverse fold to create the shape shown in 13. (10 is the shape of the reverse side of 9) *Fold lines are shown in 12.
10
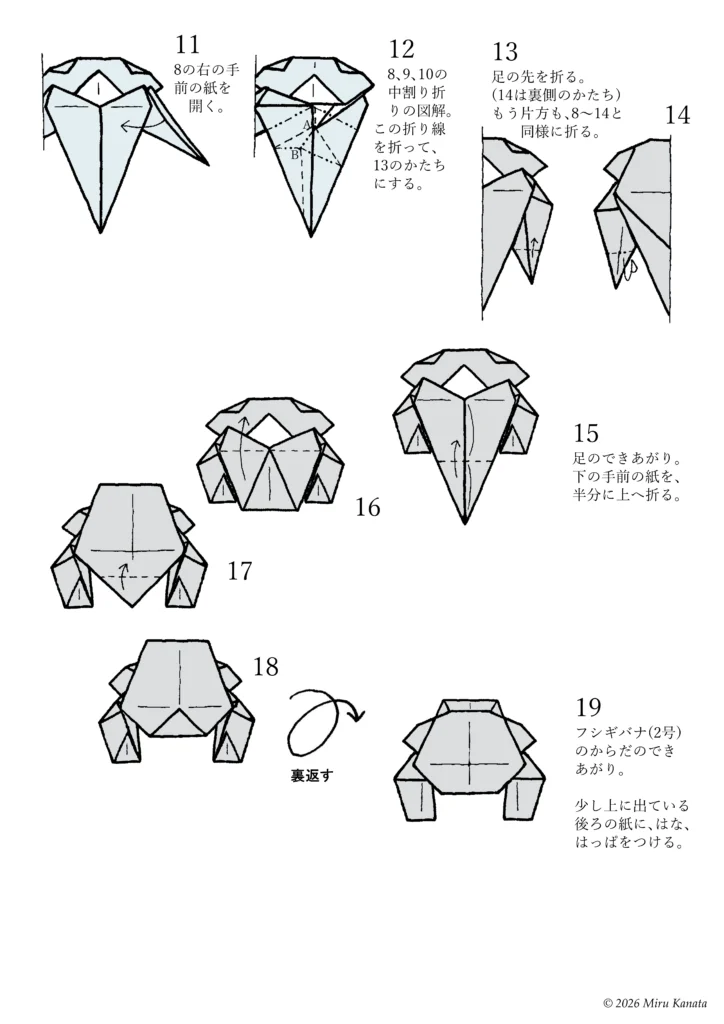
English Commentary
11 Open the paper in the front right of 8.
12 Diagram of the inside reverse fold of 8, 9, and 10. Follow this fold line to make the shape of 13.
13 Fold the tips of the feet. (14 is the shape of the reverse side) Fold the other foot in the same way as 8-14.
14
15
16
17
18
{Flip}
19 The body of Venusaur (No. 2) is complete.
Attach the flower and leaves to the back paper that is sticking out a little.
3 フシギバナのはな
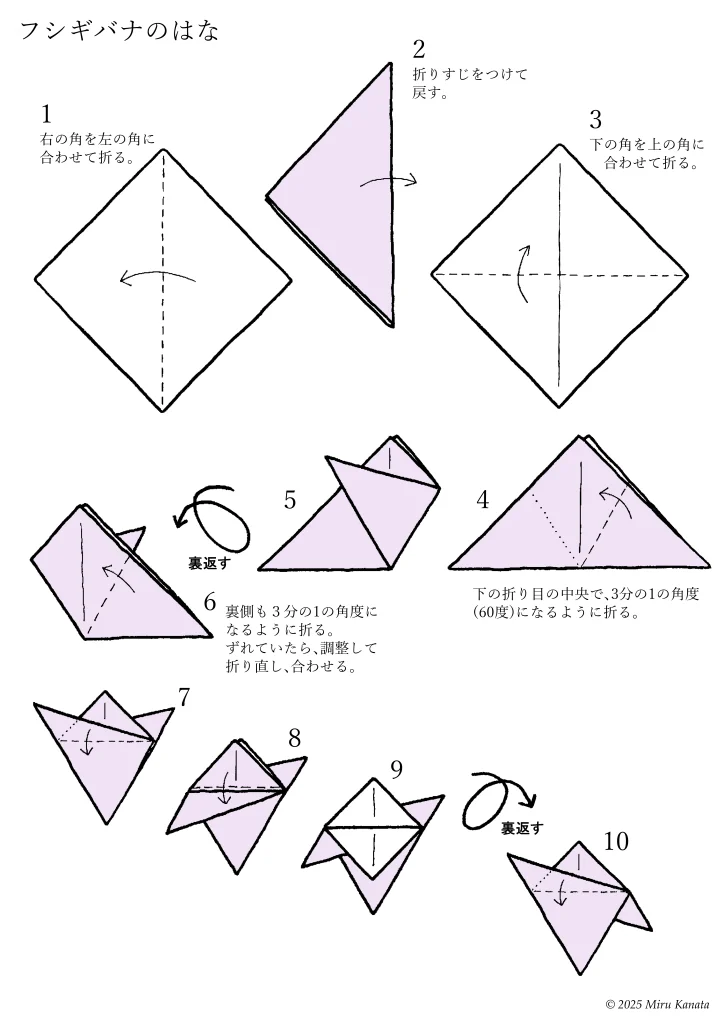
English Commentary
Venusaur Flower
1 Fold the right corner to meet the left corner.
2 Make a crease and return it to its original position.
3 Fold the bottom corner to meet the top corner.
4 Fold the center of the bottom crease so that it forms a one-third angle (60 degrees).
5
{Flip}
6 Fold the back side so that it also forms a one-third angle. If it is not aligned properly, adjust it and fold it again to align.
7
8
9
{Flip}
10
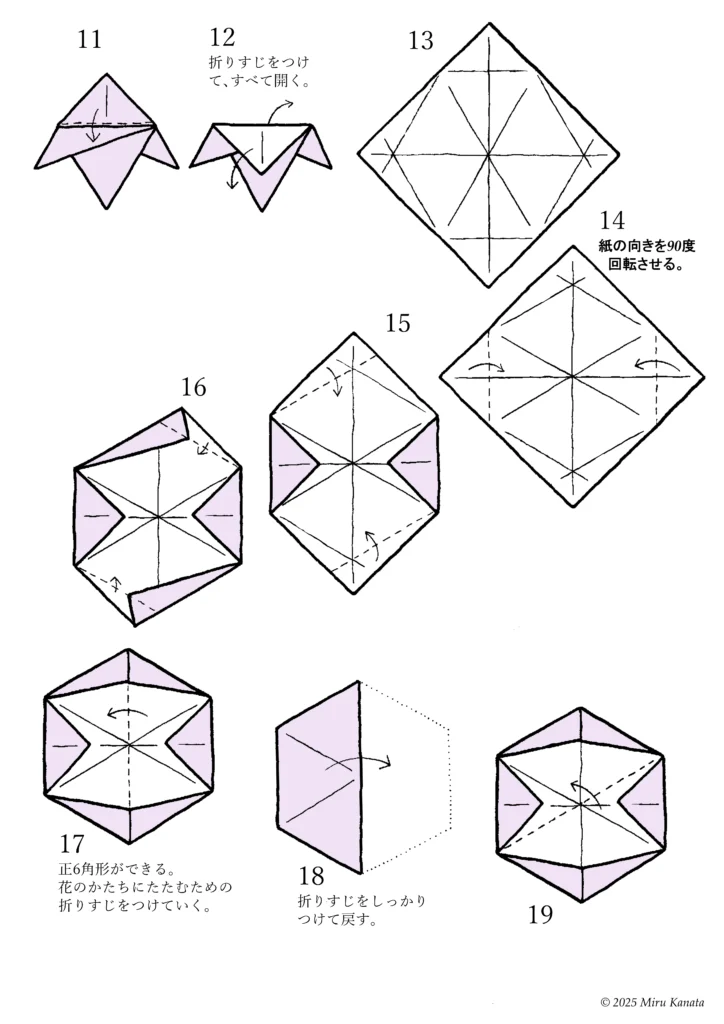
English Commentary
11
12 Make creases and open it all up.
13
14 Rotate the paper 90 degrees.
15
16
17 A regular hexagon is created.
Make creases to fold it into a flower shape.
18 Make creases firmly and return it to its original position.
19
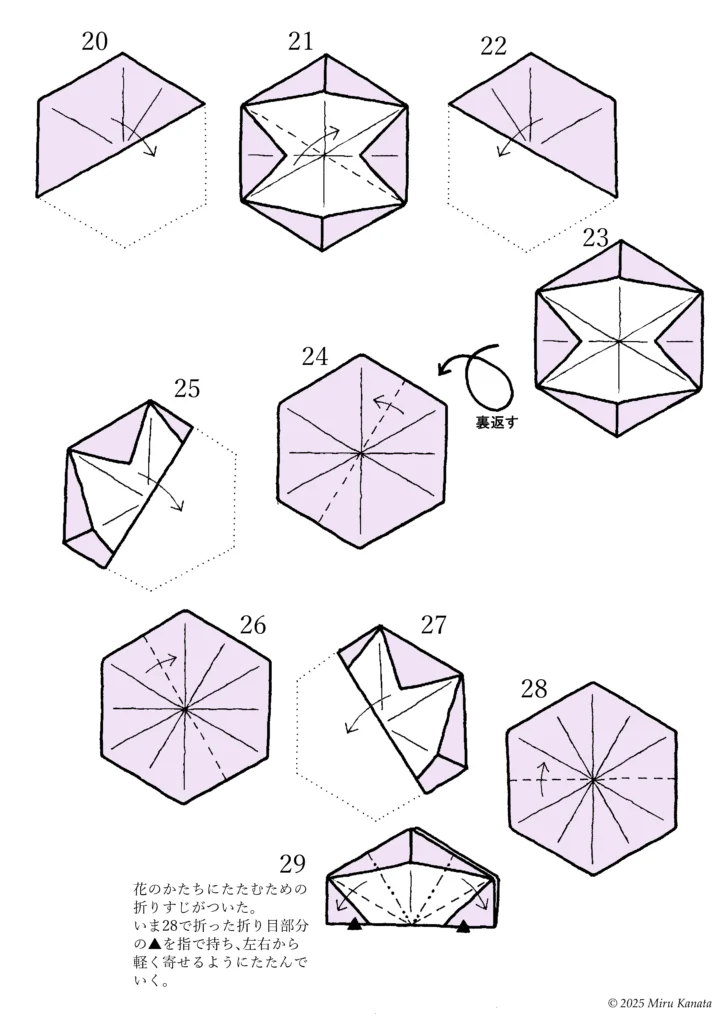
English Commentary
20
21
22
23
{Flip}
24
25
26
27
28
29 Now there are folds to fold into a flower shape. Hold the ▲ at the fold you just made in step 28 with your fingers and gently fold the left and right sides together.
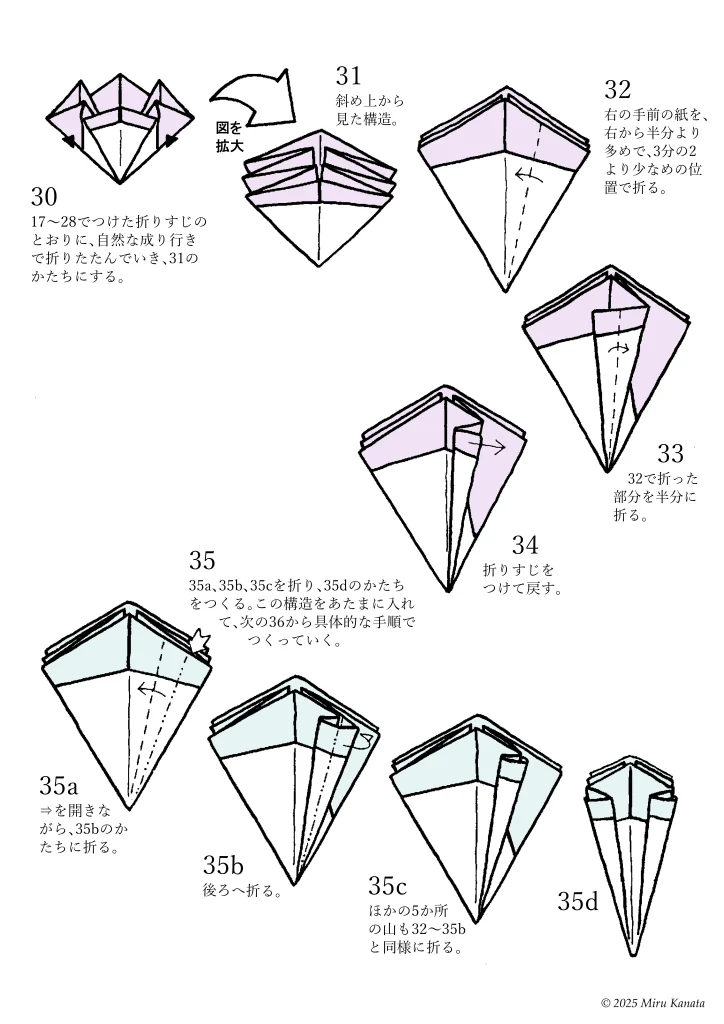
English Commentary
30 Fold naturally along the creases made in steps 17 to 28 to form the shape 31.
(Enlarge image)
31 Structure seen from above at an angle.
32 Fold the paper in the front right, more than halfway from the right, but less than two-thirds of the way.
33 Fold the part folded in 32 in half.
34 Add a crease and return it to its original position.
35 Fold 35a, 35b, and 35c to form the shape of 35d.
Keeping this structure in mind, follow the specific steps from 36 onwards.
35a Open ⇒ and fold it into the shape of 35b.
35b Fold backwards.
35c Fold the other five peaks in the same way as 32 to 35b.
35d
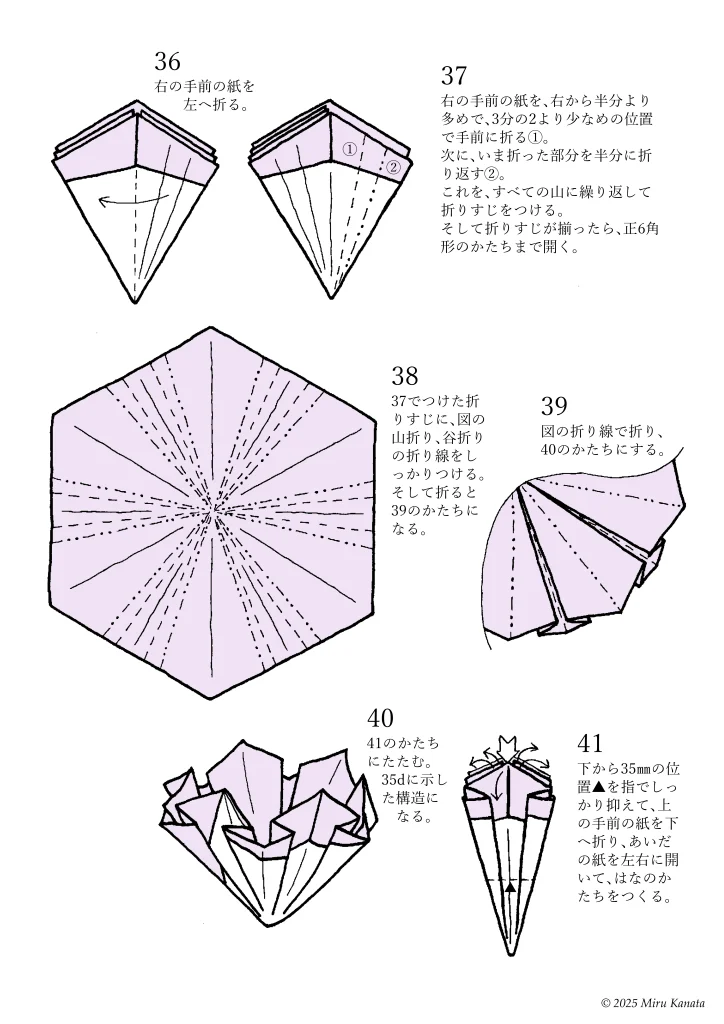
English Commentary
36 Fold the right-front paper to the left.
37 Fold the right-front paper toward you, more than halfway but less than two-thirds from the right (①).
Next, fold the part you just folded in half (②).
Repeat this for all the mountain folds to create creases.
Once the creases are aligned, unfold it until it forms a regular hexagon.
38 Firmly mark the mountain fold and valley fold lines in the diagram on the creases made in 37. When you have finished folding, it will form the shape of 39.
39 Fold along the fold lines in the diagram to form the shape of 40.
40 Fold it into the shape of 41. You will end up with the structure shown in 35d.
41 Firmly hold down the position ▲ 35 mm from the bottom with your fingers, fold the top front paper downwards, and open the paper in between to the left and right to form the shape of a flower.
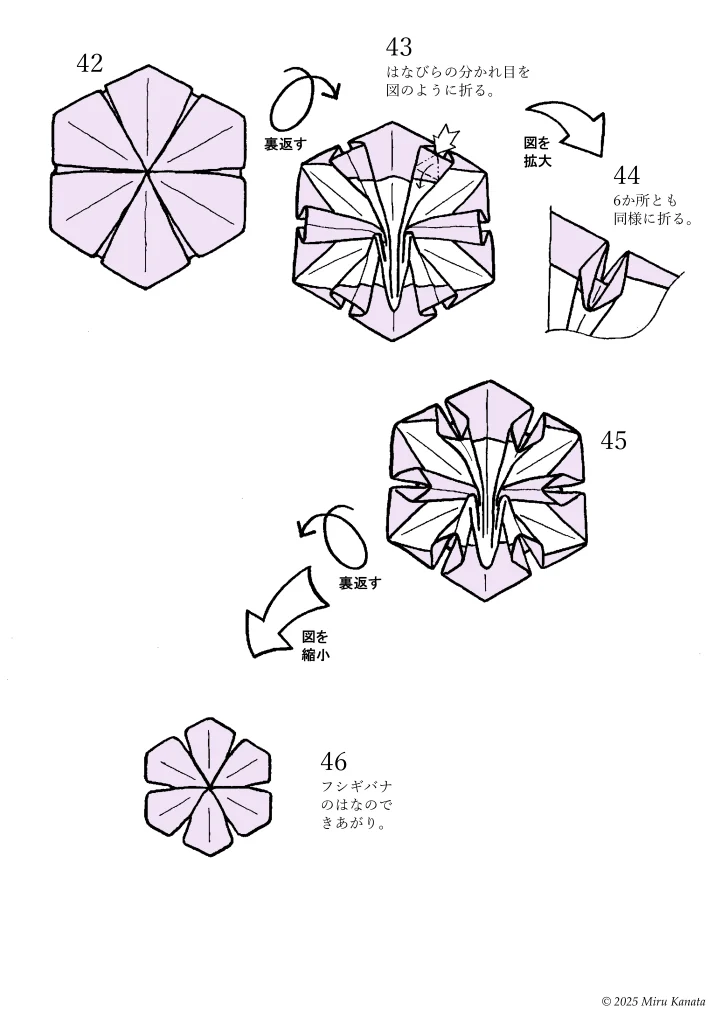
English Commentary
42
{Flip}
43 Fold the petal where it separates as shown in the diagram.
{Enlarge diagram}
44 Fold in the same way at all six places.
45
{Flip}
{Reduced diagram}
46 Your Venusaur flower is complete.
4 フシギバナのはっぱ
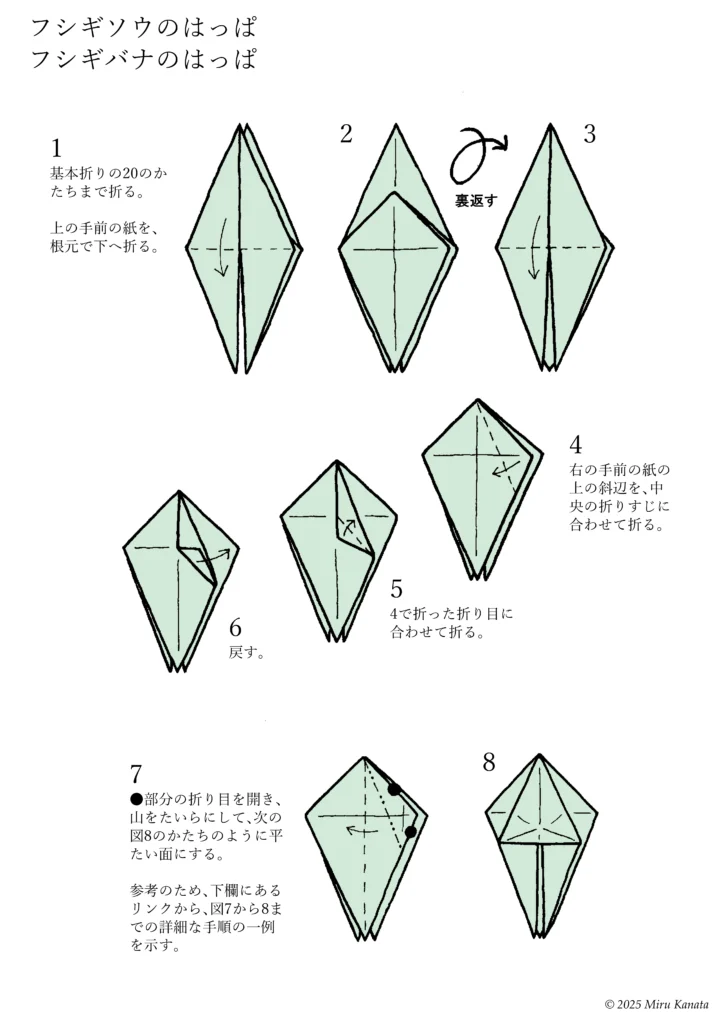
English Commentary
Venusaur Leaf
1 Fold up to the basic fold shape of 20.
Fold the top front piece of paper down at the base.
2
{Flip}
3
4 Fold the top diagonal side of the right front piece of paper to match the crease in the center.
5 Fold it to match the crease made in 4.
6 Turn it back.
7 Open the creases in the ● part and flatten the peaks to create a flat surface as shown in Figure 8 below.
ページを行ったり来たりするのは煩雑なので、次に掲載する。
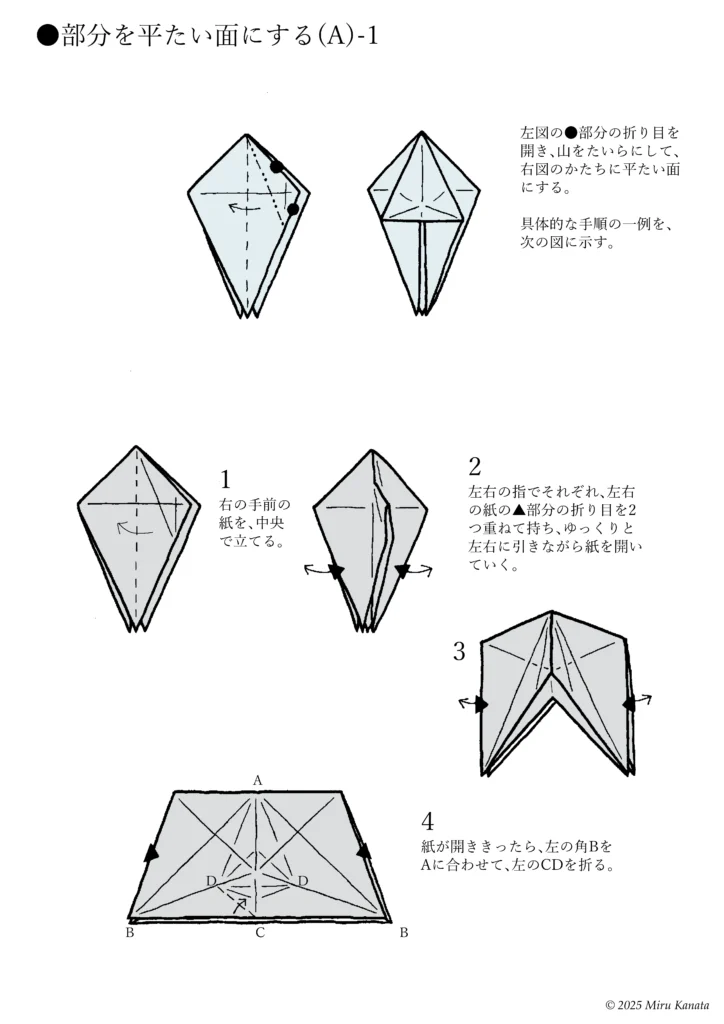
English Commentary
Make the ● part flat (A)-1
Open the folds marked with ● in the left image, flatten the folds, and create a flat surface like the one in the right image.
An example of the specific steps is shown in the following image.
1 Stand the front right piece of paper up in the center.
2 Hold the two folded edges of the paper with your fingers, overlapping each other, at the ▲ part on each side, and slowly pull the paper left and right to open it.
3
4 Once the paper is fully opened, align the left corner B with A and fold the left CD.
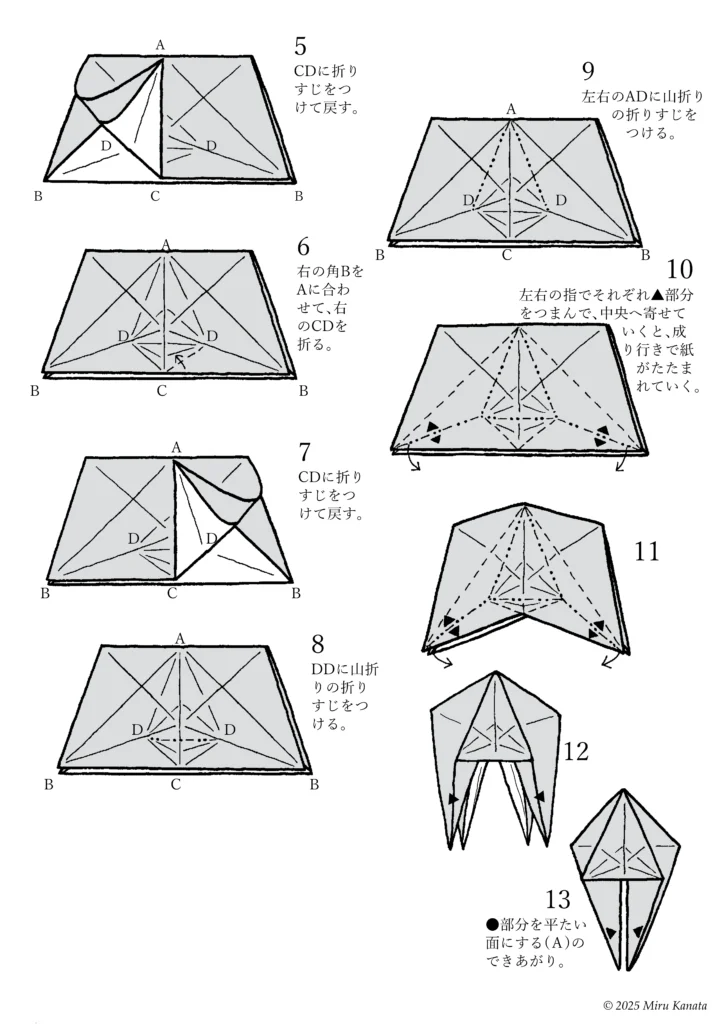
English Commentary
5 Make a crease in the CD and return it to its original position.
6 Fold the right side of the CD, aligning the right corner B with A.
7 Make a crease in the CD and return it to its original position.
8 Make a mountain fold crease at DD.
9 Make mountain fold creases at AD on both the left and right sides.
10 Pinch the ▲ parts with your fingers on both sides and move them towards the center, and the paper will fold naturally.
11
12
13 Make the ● part flat (A) is complete.
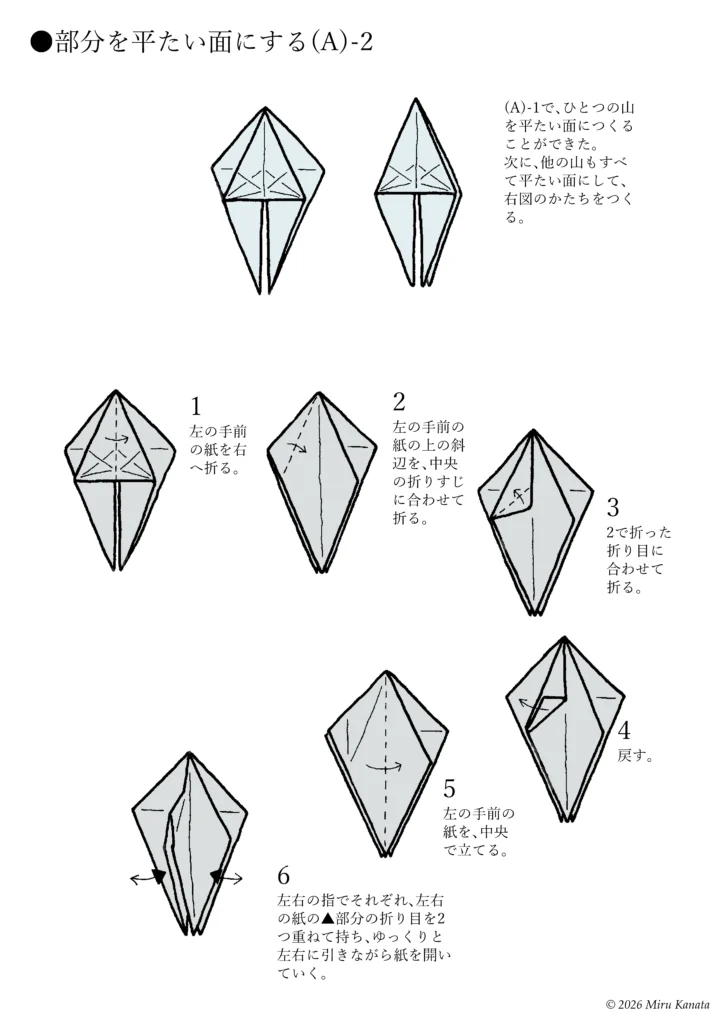
English Commentary
● Flatten the area (A)-2
In (A)-1, we were able to create one mountain with a flat surface. Next, we flatten all the other mountains as well to create the shape shown in the right diagram.
1. Fold the front left piece of paper to the right.
2. Fold the top diagonal edge of the front left piece of paper to meet the center crease.
3. Fold along the crease made in step 2.
4. Unfold.
5. Stand the front left piece of paper upright in the center.
6. Using your left and right fingers, hold the two folds at the ▲ sections of the left and right pieces of paper, overlapping them, and slowly pull them to the left and right to open the paper.
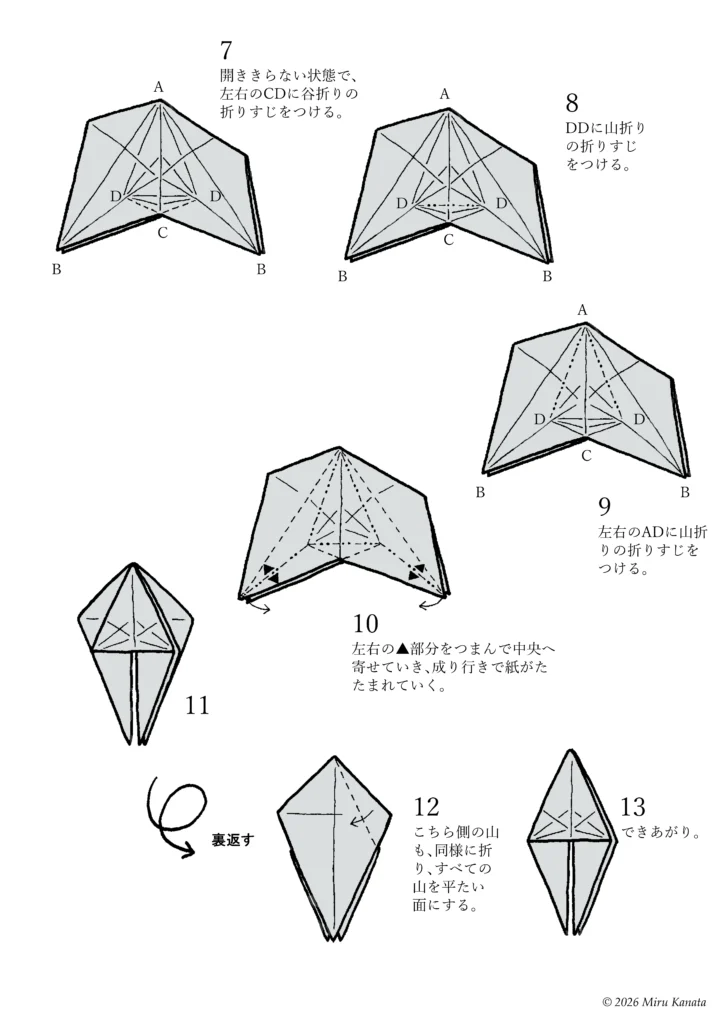
English Commentary
7 With the paper not fully open, make valley folds on the left and right CDs.
8 Make mountain folds on DD.
9 Make mountain folds on the left and right ADs.
10 Pinch the ▲ parts on the left and right and bring them towards the center, and the paper will fold naturally.
11
{Flip}
12 Fold the mountain on this side in the same way, making all the mountain sides flat.
13 Finished.
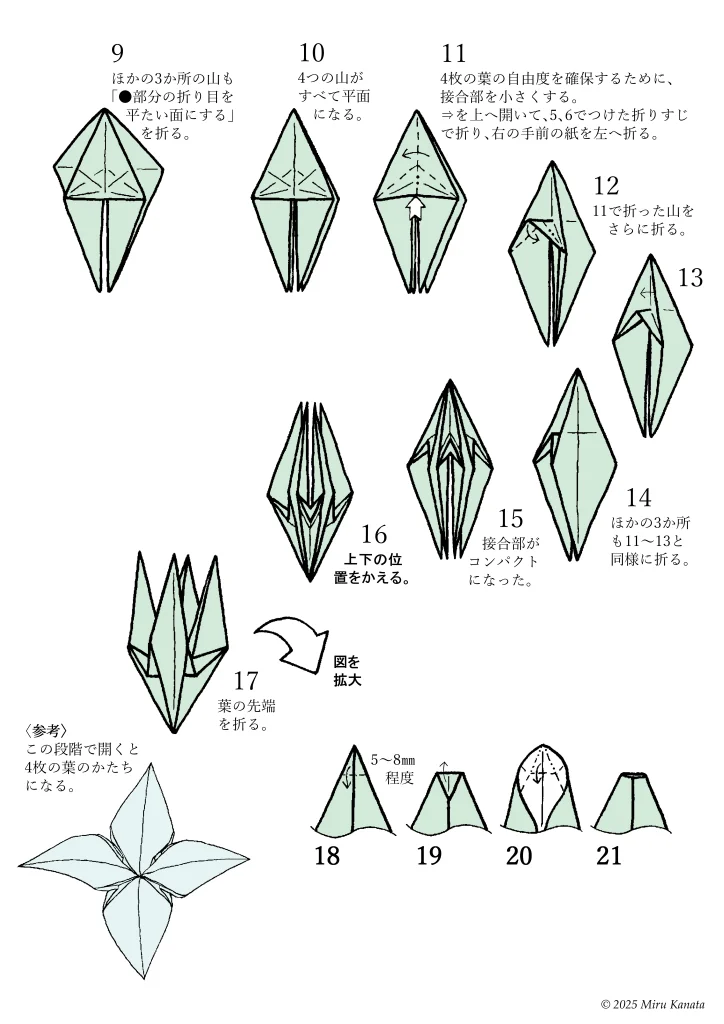
English Commentary
9 Fold the other three piles as well, making the creases at the ● parts flat.
10 All four piles will be flat.
11 Make the joints smaller to ensure the freedom of movement of the four leaves.
Open ⇒ upwards, fold along the creases made in steps 5 and 6, and fold the front right piece of paper to the left.
12 Fold the pile folded in step 11 again.
13
14 Fold the other three places in the same way as steps 11 to 13.
15 The joints are now compact.
16 Change the top and bottom positions.
17 Fold the tip of the leaf.
{Reference} If you open it at this stage, it will have the shape of four leaves.
{Enlarge the diagram}
18
19
20
21
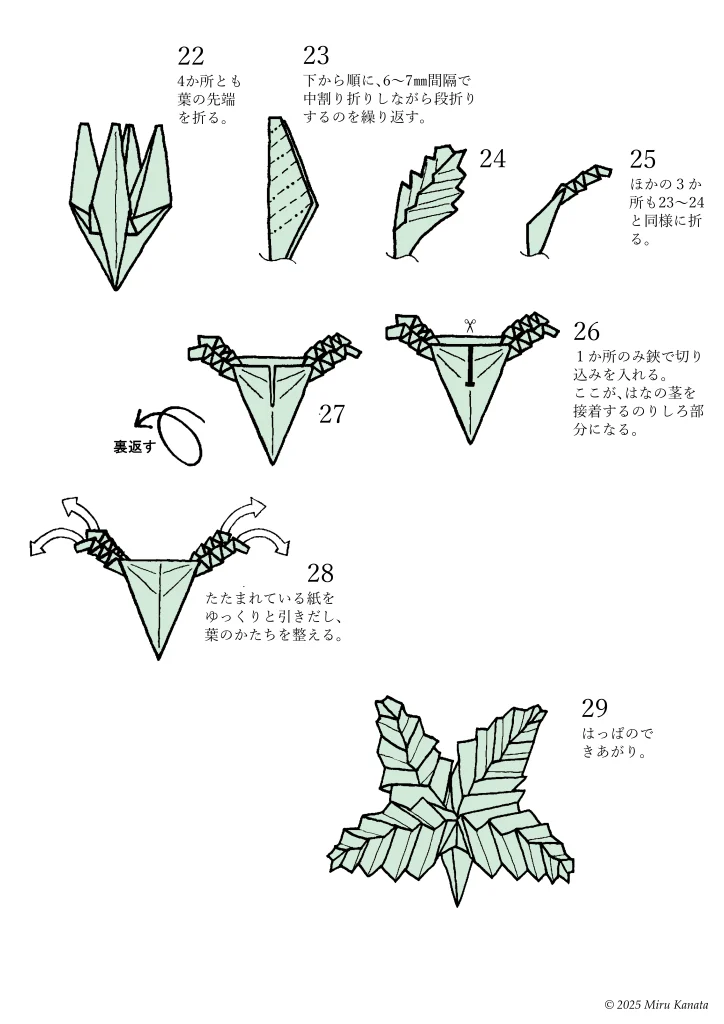
English Commentary
22 Fold the tip of the leaf in all four places.
23 Starting from the bottom, repeat the process of folding in half at 6-7 mm intervals.
24
25 Fold the other three places in the same way as steps 23-24.
26 Make a slit with scissors in only one place. This will be the adhesive tab where the flower stem will be glued.
27
{Flip}
28 Slowly pull out the folded paper and arrange the leaf shape.
29 The leaf is finished.
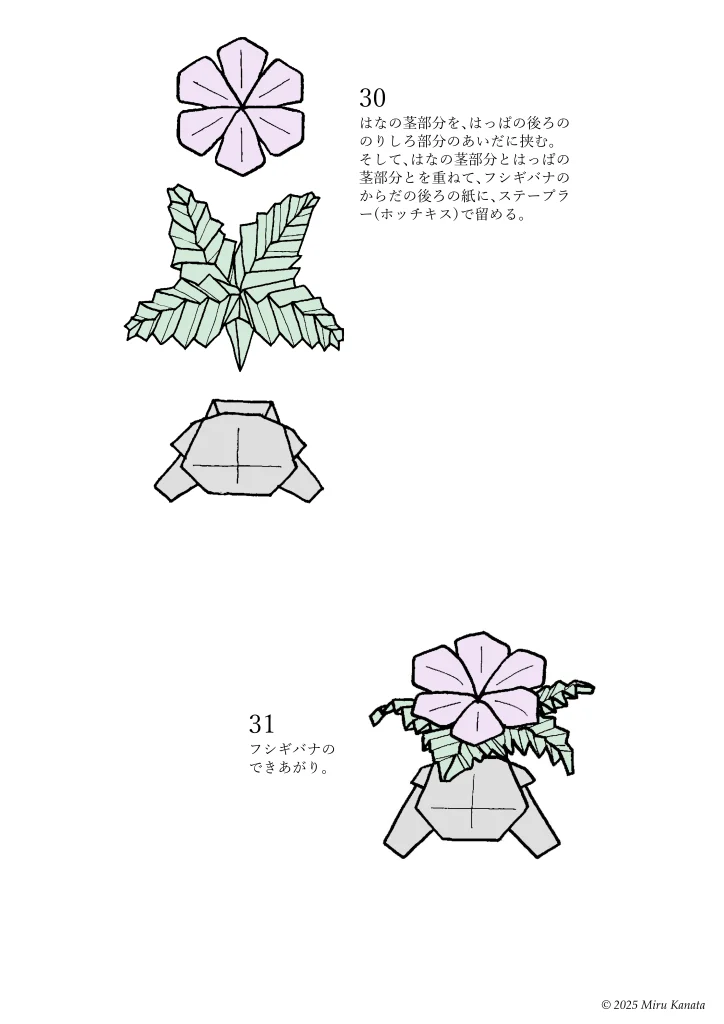
English Commentary
30 Place the flower stem between the tabs at the back of the leaf. Then, overlap the flower stem and leaf stem and use a stapler to attach them to the paper at the back of Venusaur’s body.
31 Venusaur is finished.
みるかなた本棚>Nice Origami素敵折紙>p003フシギバナ
◇ ◇ ◇v