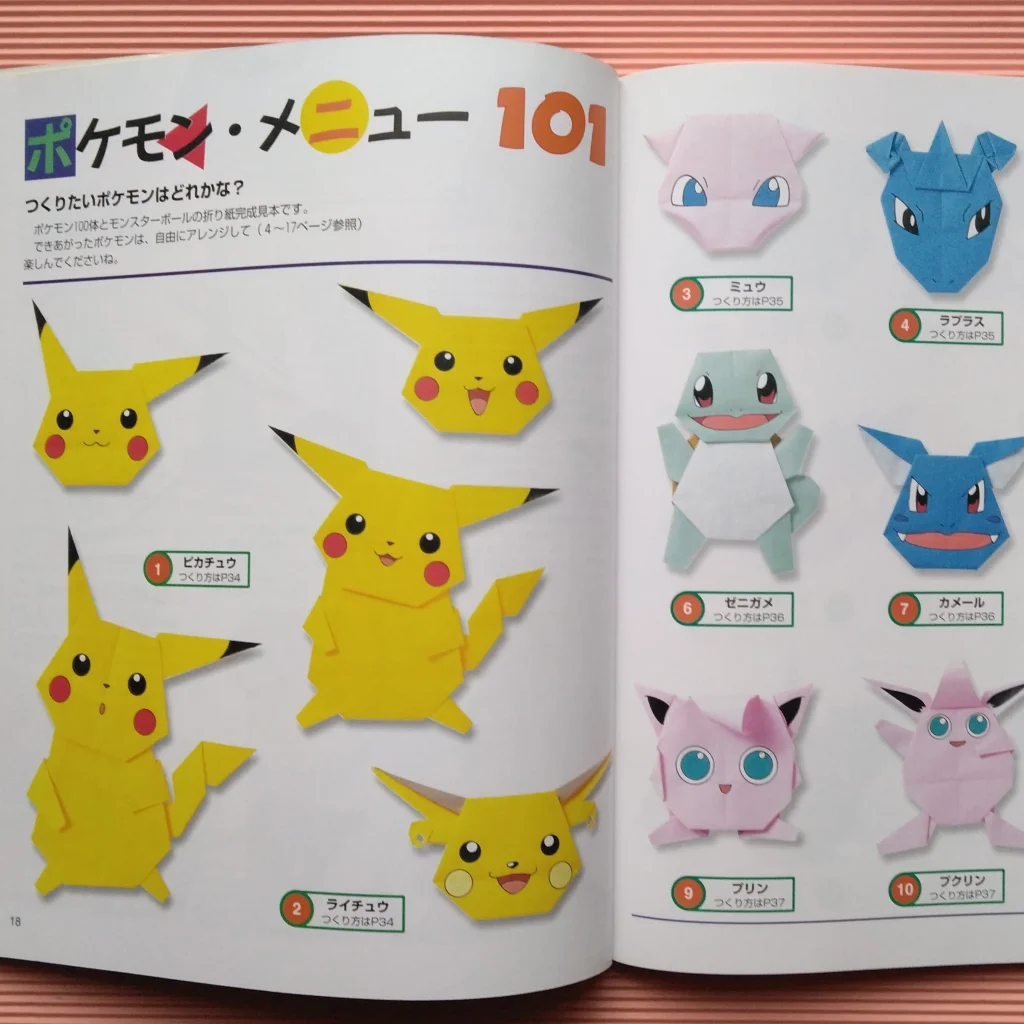
みるかなた本棚>『ポケットモンスターおりがみコレクション』>ポケモンおりがみ一覧表>0055 ゴルダック
◆0054 コダック◆0055 ゴルダック◆
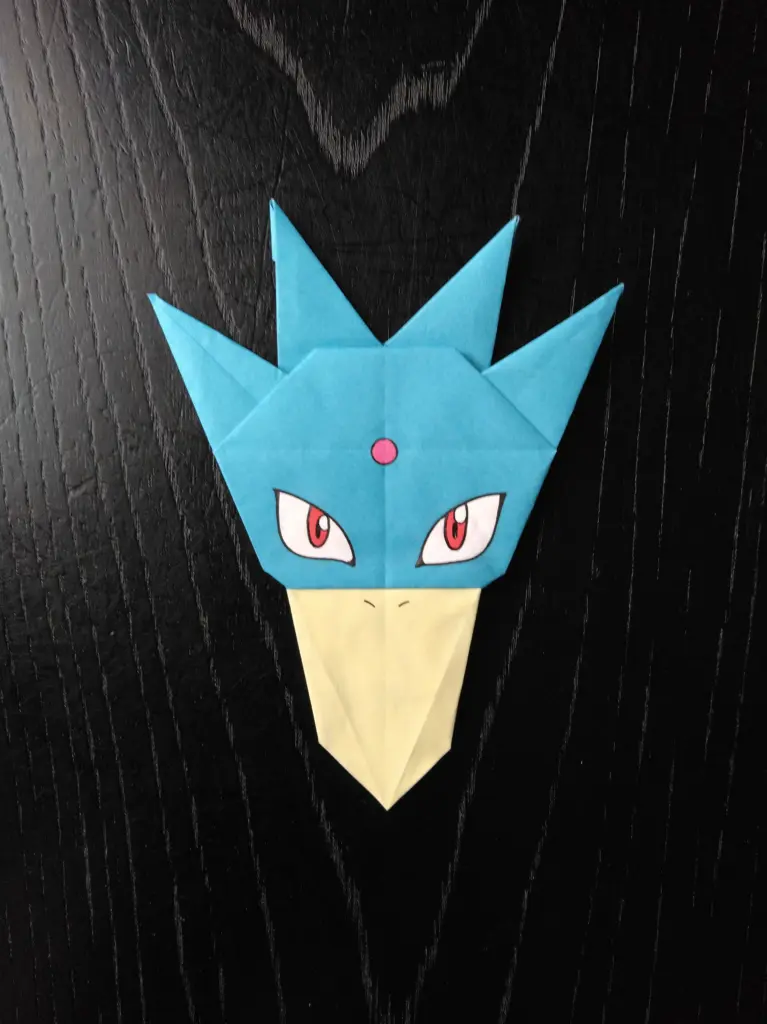
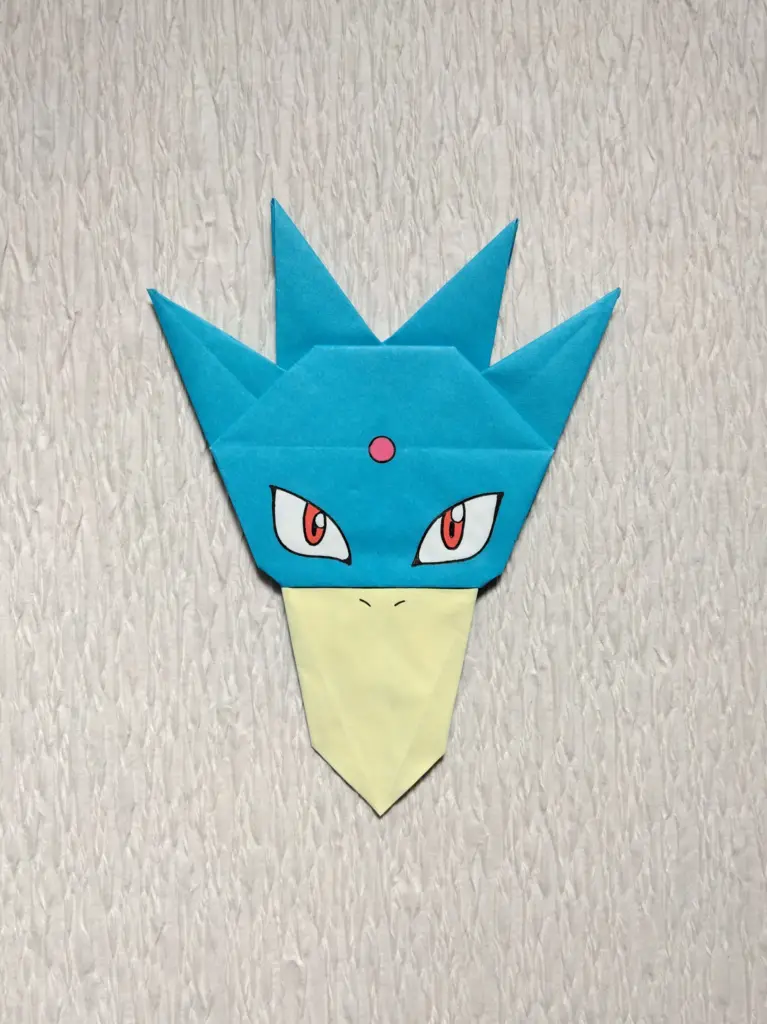
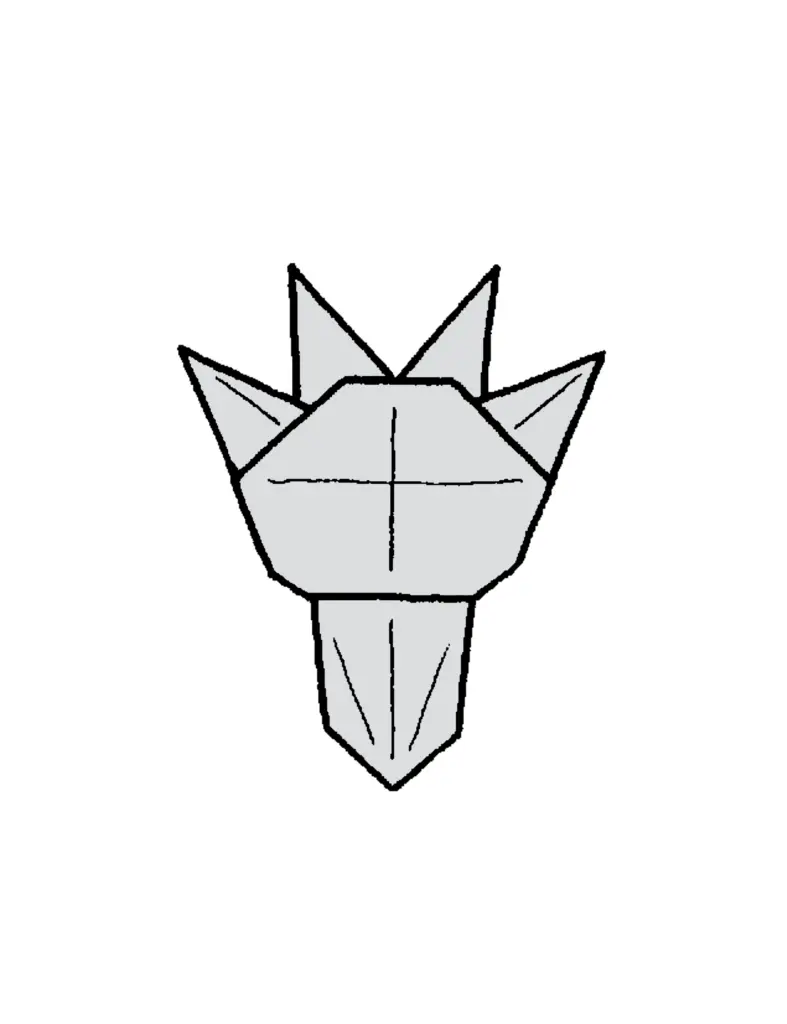
0055 ゴルダック 初号
あたまの上の4つの突起は、太さも、尖り具合も、注意深い調整が必要です。
またバランスよく配置するために、折る角度にも神経を使います。
力強く鋭敏な感じを表現しました。
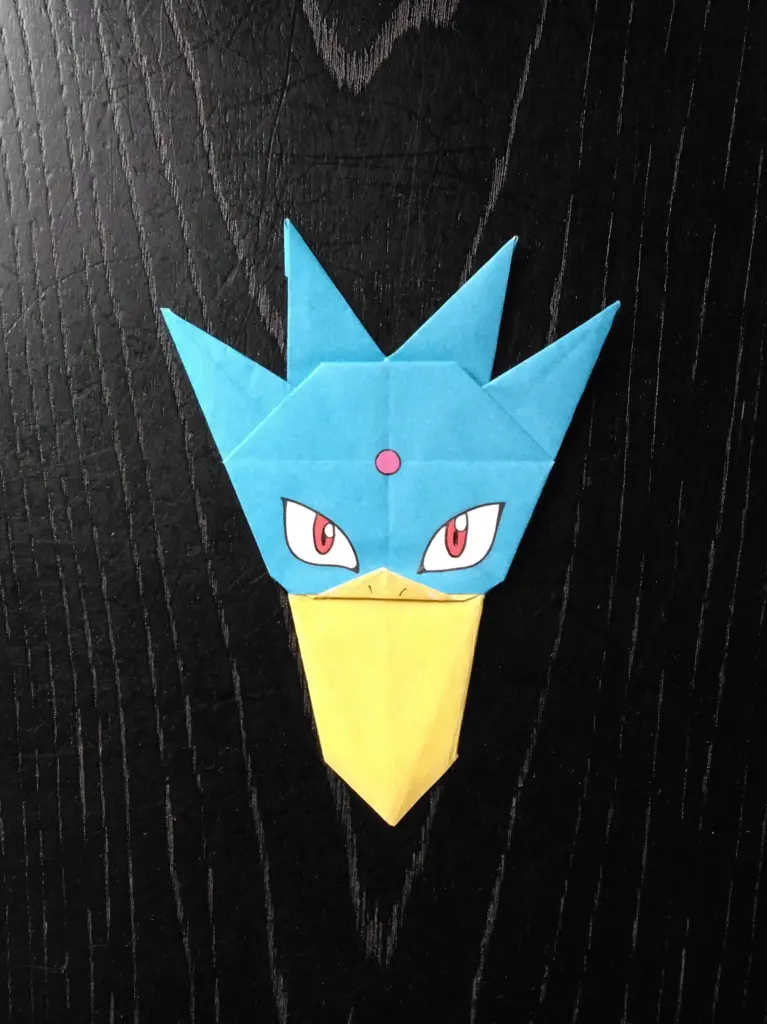
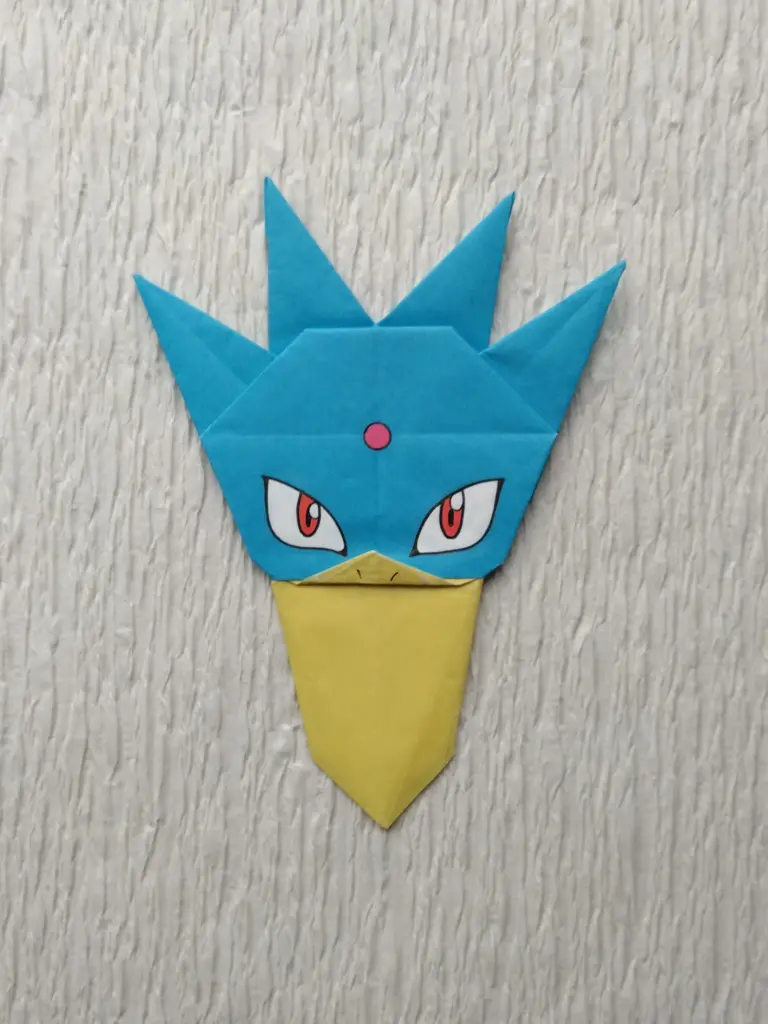
0055 ゴルダック 2号改訂版
初号のくちばしは絵の具で色を塗っていますが、今回別色の紙片を差し加えて折るかたちで、色替えをしました。
★ゲームフリークのチェック
◆最初のチェックでOKをいただきました。
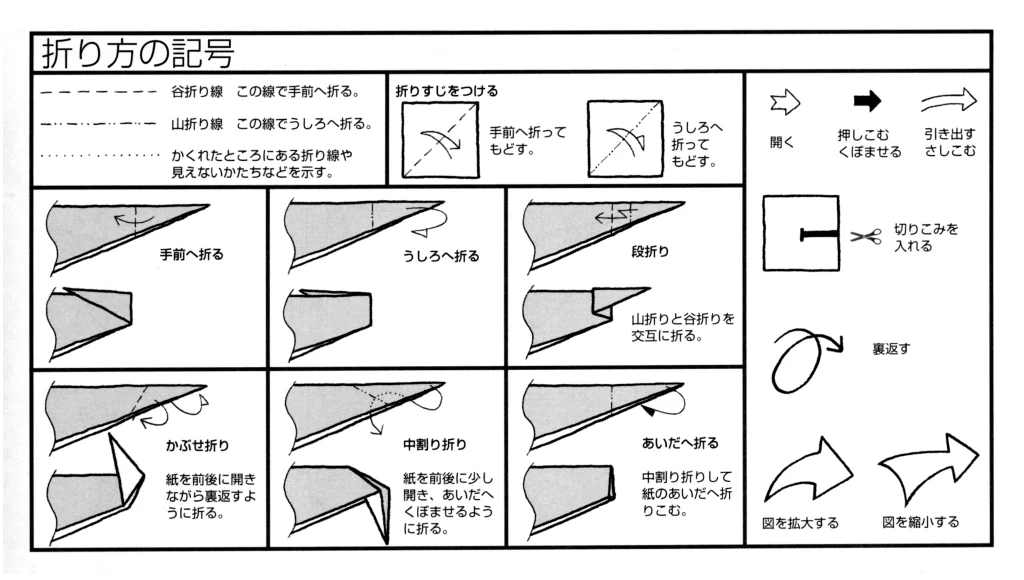
つくり方の折り図
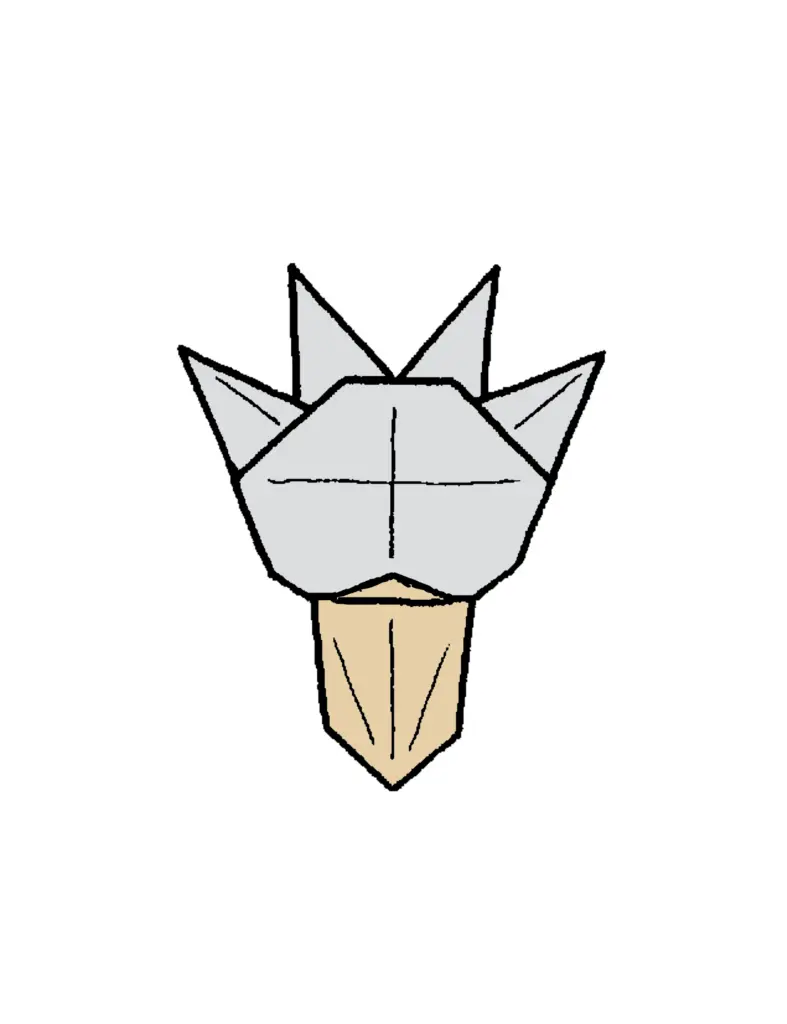
ゴルダックのあたまは、初号も2号改訂版も構造は同じで、2号改訂版は別色の紙を差し加えて折ります。
まずはじめに初号ゴルダックを一通り折って、構造を理解してから、2号改訂版に臨むとうまくいきます。
今回制作した折り図
◇ゴルダックのあたまは、初号の折り図を先に掲載し、その次に2号改訂版の折り図を掲載しています。
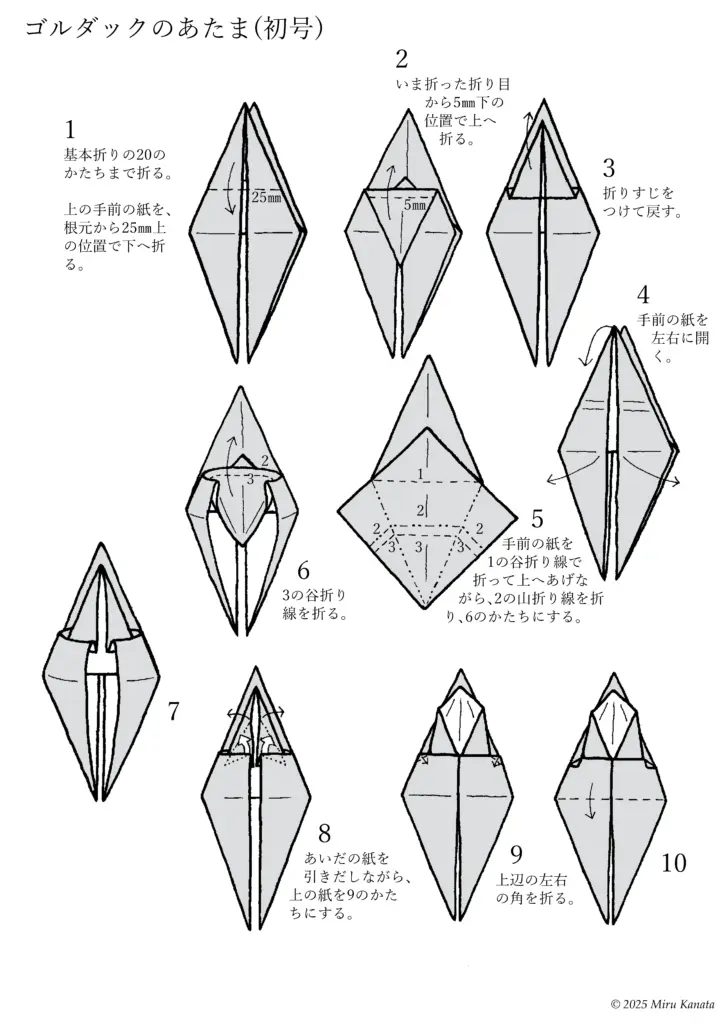
ゴルダックのあたま 初号
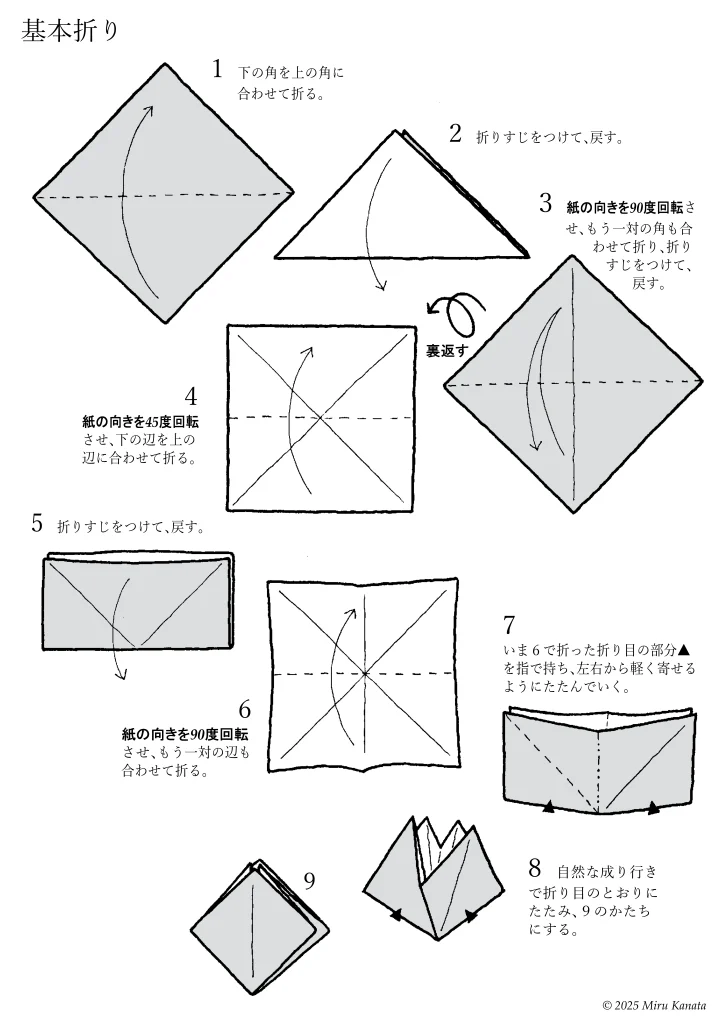
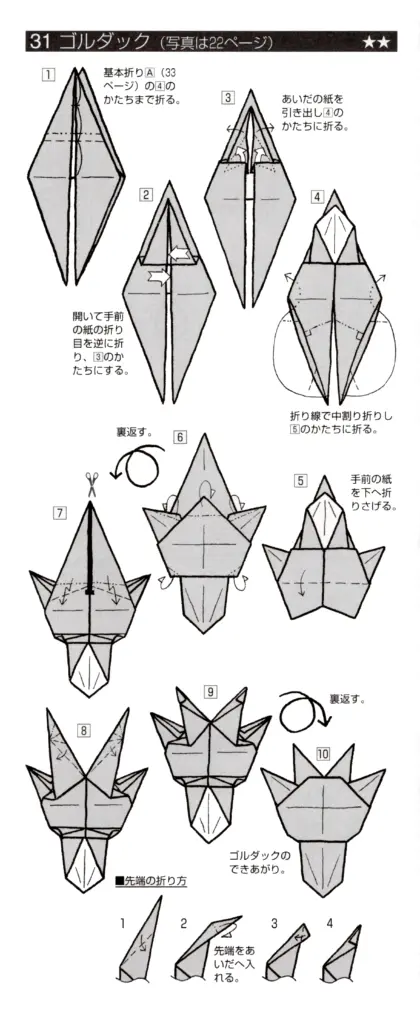
■ゴルダックのあたまは、青色の紙で、まず基本折りの図20まで折る。
English Commentary
Basic Folding
1 Fold the bottom corner to meet the top corner.
2 Make a crease and return it to its original position.
3 Rotate the paper 90 degrees, fold the other pair of corners together, make a crease and return it to its original position.
{Flip}
4 Rotate the paper 45 degrees and fold the bottom edge to meet the top edge.
5 Make a crease and return it to its original position.
6 Rotate the paper 90 degrees and fold the other pair of edges together.
7 Hold the crease ▲ made in step 6 with your fingers and fold it gently from both sides.
8 Let it naturally fold along the creases to form the shape of 9.
9
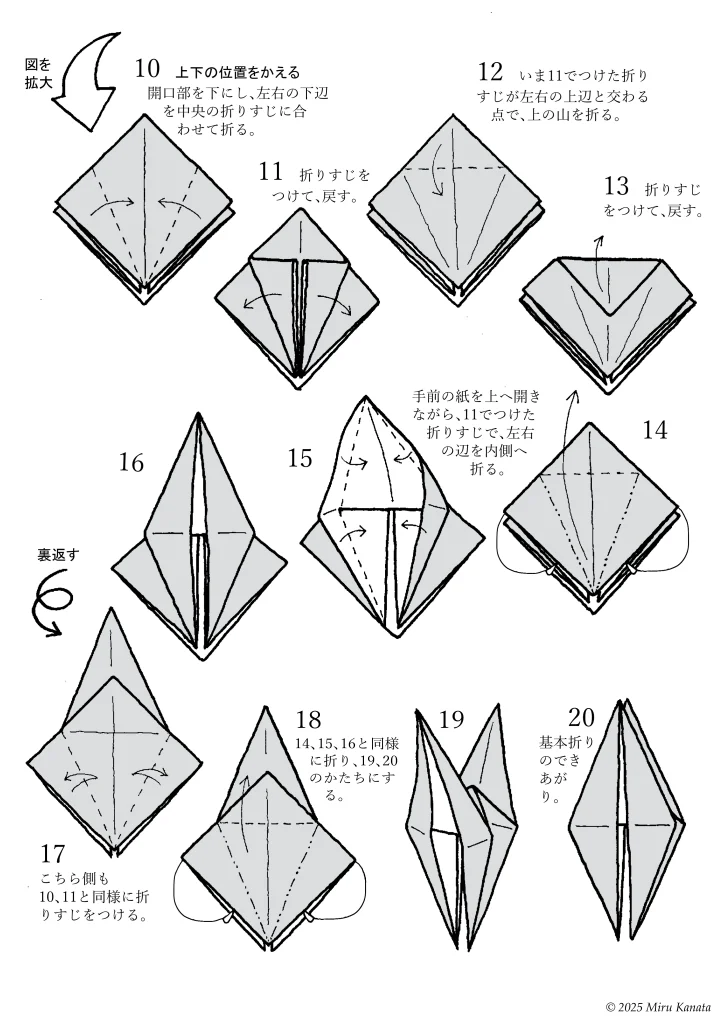
English Commentary
{Enlarge image}
10 Change the top and bottom positions.
With the opening facing downwards, fold the bottom left and right edges to meet the crease in the middle.
11 Make a crease and return.
12 Fold the top at the point where the crease made in 11 intersects with the top left and right edges.
13 Make a crease and return.
14 While opening the front paper upwards, fold the left and right edges inward along the crease made in 11.
15
16
{Flip}
17 Make creases on this side in the same way as 10 and 11.
18 Fold in the same way as 14, 15 and 16 to form 19 and 20.
19
20 The basic fold is complete.
English Commentary
Golduck’s Head First Edition
1 Fold to the basic fold shape of 20. Fold the top front paper down 25mm above the base.
2 Fold it up 5mm below the crease you just made.
3 Make a crease and return it to its original shape.
4 Open the front paper to the left and right.
5 Fold the front paper along the valley fold line 1 and while lifting it up, fold along the mountain fold line 2 to form the shape of 6.
6 Fold along the valley fold line 3.
7
8 Pulling out the paper in between, make the top paper into the shape of 9.
9 Fold the left and right corners of the top edge.
10
English Commentary
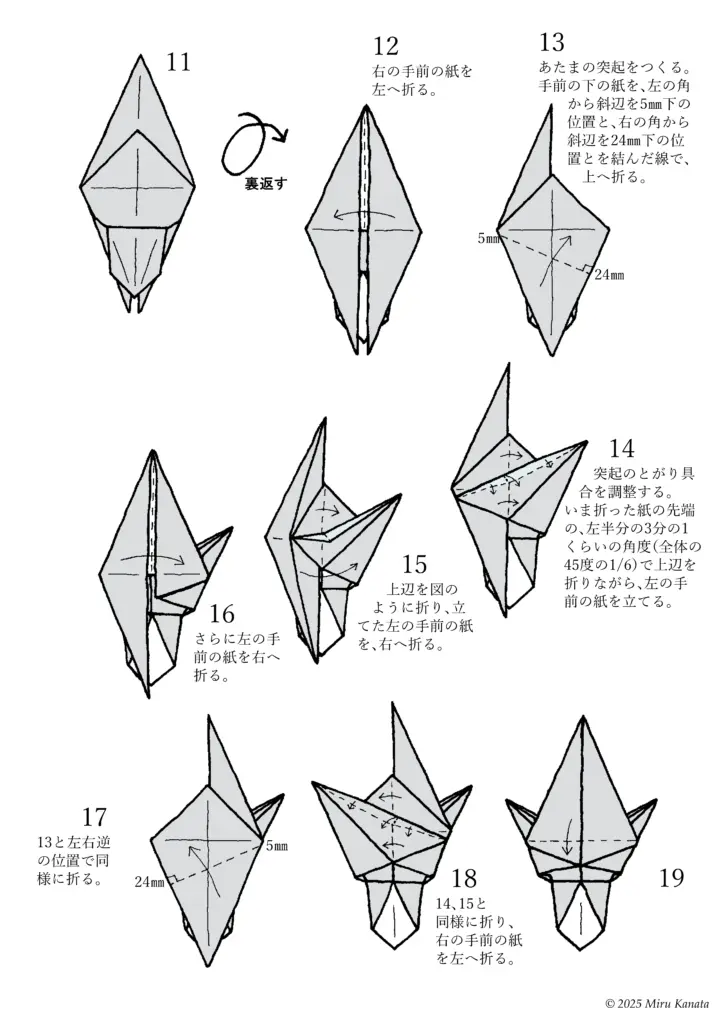
11
{Flip}
12 Fold the right front piece of paper to the left.
13 Make the top protrusion. Fold the bottom front piece of paper up along the line connecting the left corner to a position 5mm below the diagonal, and the right corner to a position 24mm below the diagonal.
14 Adjust the sharpness of the protrusion. Stand the left front piece of paper up while folding the top edge at an angle about one-third of the left half of the tip of the paper you just folded (1/6 of the total 45 degrees).
15 Fold the top edge as shown in the diagram, and fold the left front piece of paper that you just stood up to the right.
16 Fold the left front piece of paper again to the right.
17 Fold in the same way, but in the opposite position to 13.
18 Fold in the same way as 14 and 15, and fold the right front piece of paper to the left.
19
English Commentary
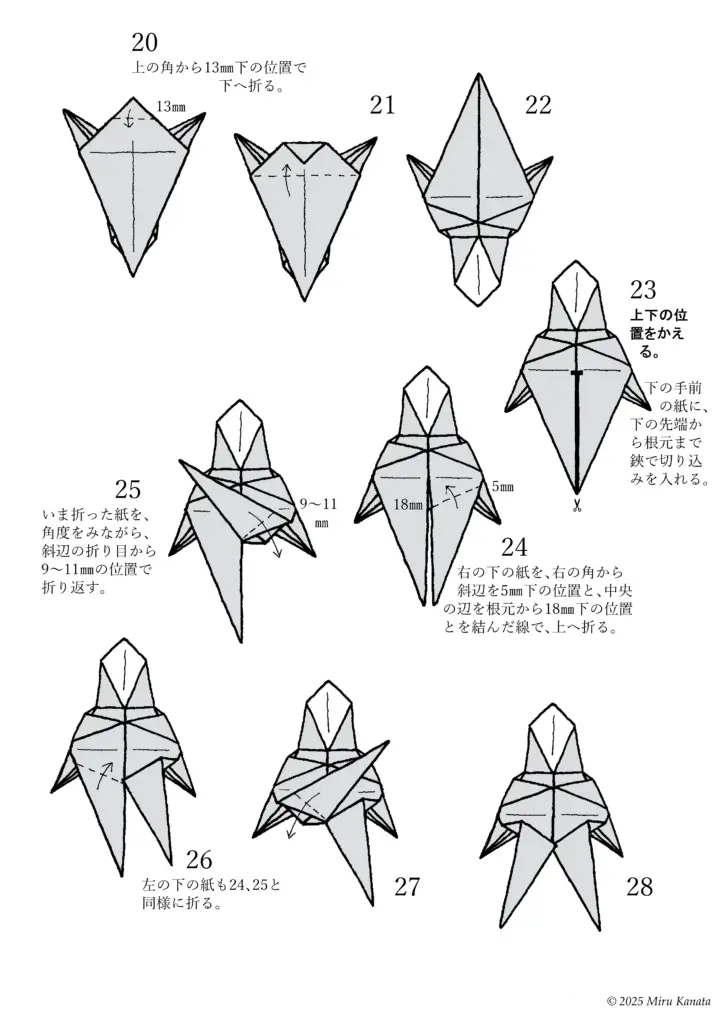
20 Fold it down at a position 13 mm below the top corner.
21
22
23 Switch the top and bottom positions. Make a cut with scissors on the bottom front piece of paper from the bottom tip to the base.
24 Fold the bottom right piece of paper up along the line connecting the right corner, 5 mm below the diagonal, and the center edge, 18 mm below the base.
25 While checking the angle, fold the paper you just folded back at a position 9 to 11 mm from the crease on the diagonal.
26 Fold the bottom left piece of paper in the same way as 24 and 25.
27
28
English Commentary
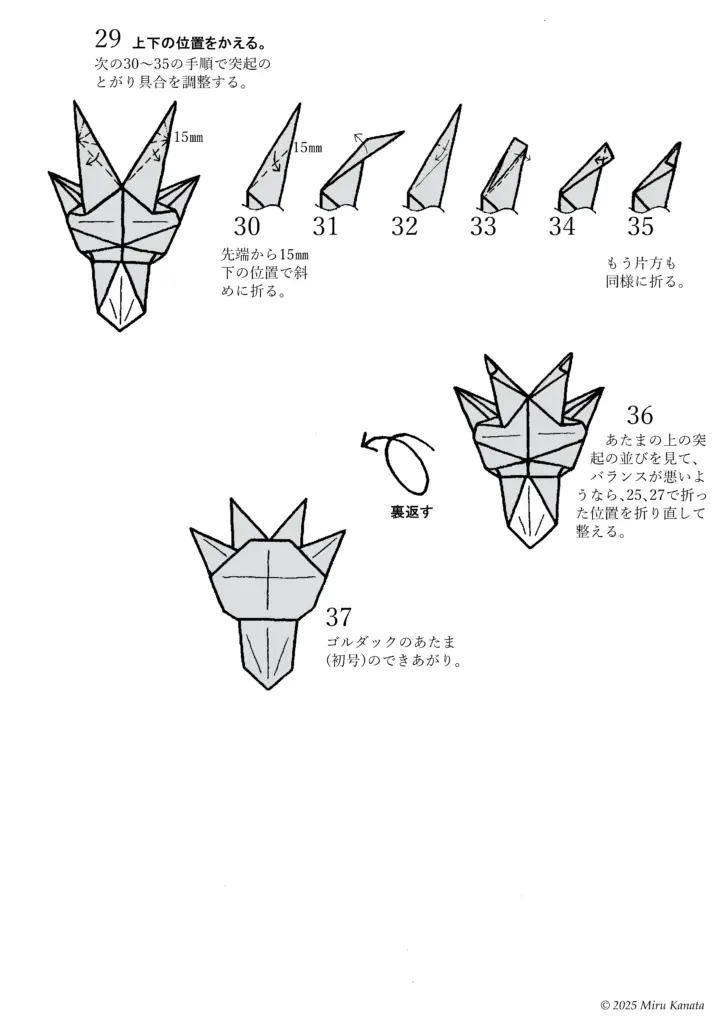
29 Change the top and bottom positions. Adjust the sharpness of the protrusions using steps 30 to 35.
30 Fold diagonally 15 mm below the tip.
31
32
33
34
35 Do the same on the other side.
36 Check the arrangement of the protrusions on the head, and if it looks unbalanced, refold the positions you folded in steps 25 and 27 to align it.
{Flip}
37 Golduck’s head (first edition) is complete.
ゴルダックのあたま 2号改訂版
■ゴルダックのあたま 2号改訂版 は、ゴルダックのあたま 初号 を、青色の紙で、まず基本折りの20のかたちまで折り、途中で、9分の1のサイズに切った薄いクリーム色の紙を加えて折る。
English Commentary
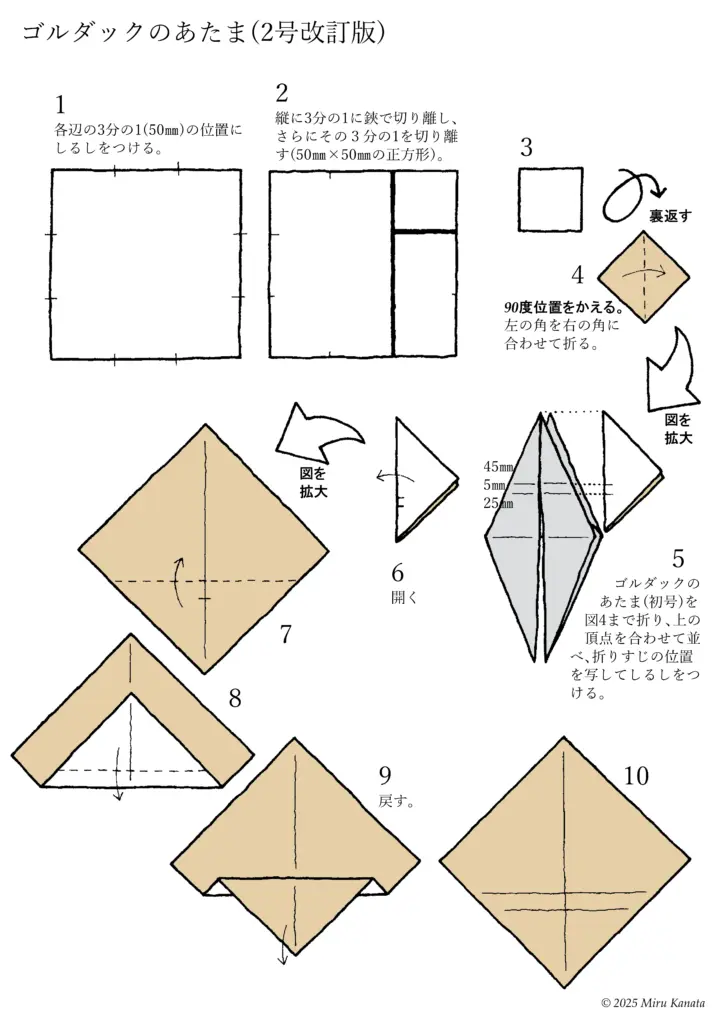
Golduck’s Head (revised version 2)
1 Make a mark on the light cream colored paper at one-third (50mm) of the way down each side.
2 Cut it into one-third vertically with scissors, then cut out a square (50mm x 50mm) of that length.
3
{Turn it over}
4 Change the position by 90 degrees. Fold the left corner to meet the right corner.
{Enlarge image}
5 Fold Golduck’s head (first edition) up to Figure 4, line up the top corners, trace the position of the crease and make a mark.
6 Open it up.
{Enlarge image}
7
8
9 Turn it back.
10
English Commentary
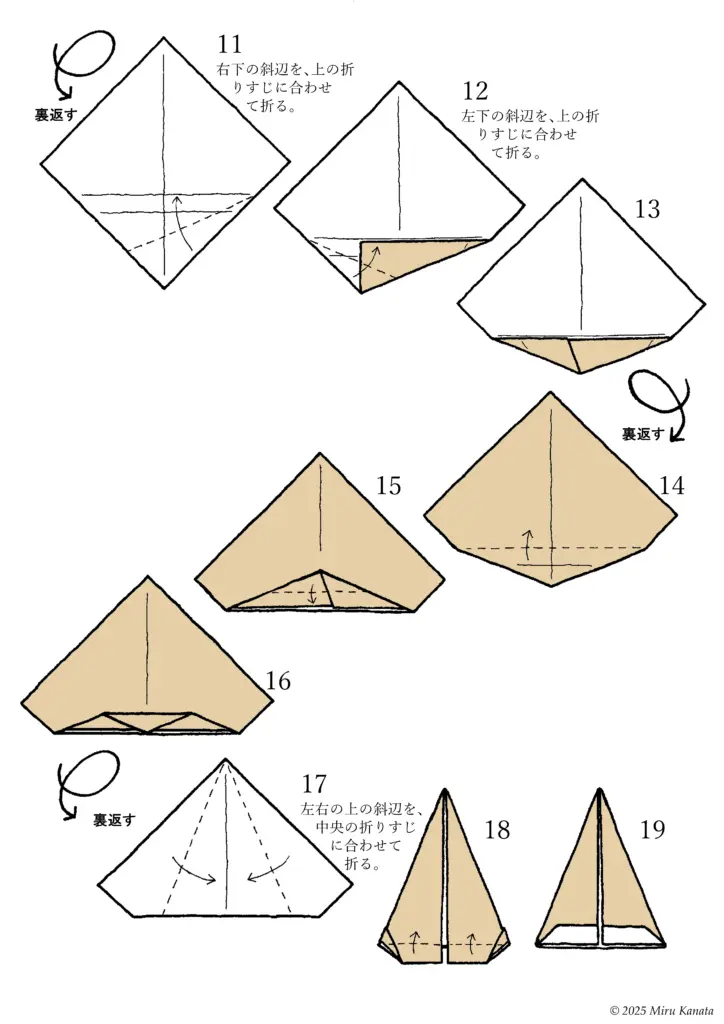
11 Fold the bottom right diagonal side to align with the top crease.
12 Fold the bottom left diagonal side to align with the top crease.
13
{Flip}
14
15
16
{Flip}
17 Fold the top left and right diagonal sides to align with the center crease.
18
19
English Commentary
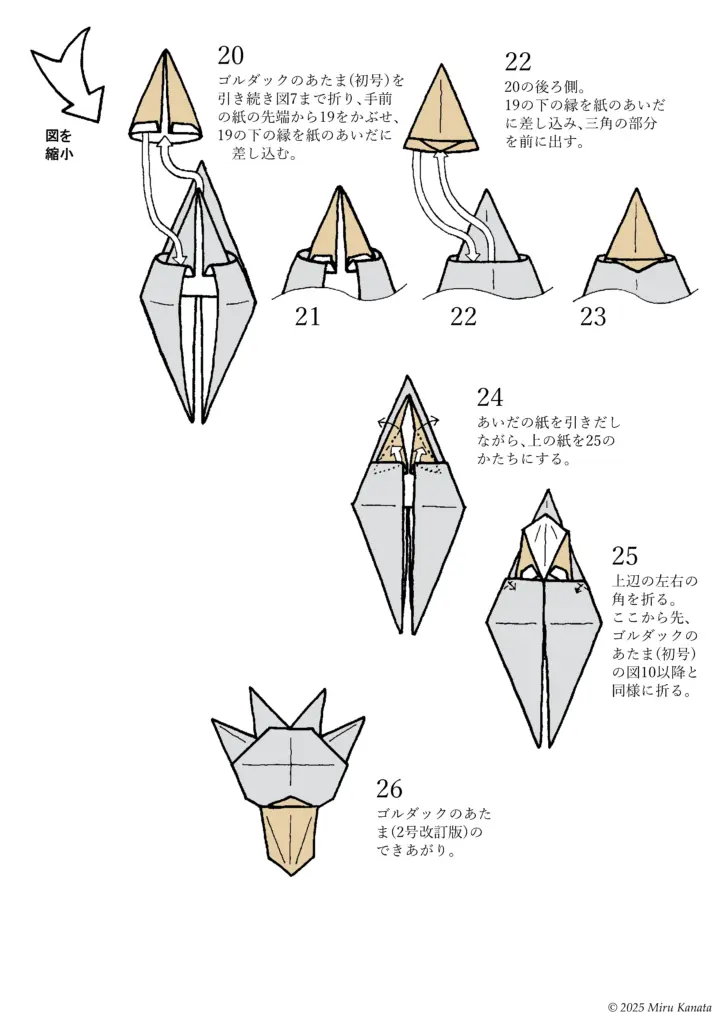
{Reducing the diagram}
20 Continue folding Golduck’s Head (first edition) up to Figure 7, placing 19 over the tip of the paper in front and inserting the bottom edge of 19 between the pieces of paper.
21
22 The back of 20. Insert the bottom edge of 19 between the pieces of paper and bring the triangular part forward.
23
24 Pulling out the paper in between, turn the top paper into the shape of 25.
25 Fold the left and right corners of the top edge. From this point on, fold in the same way as from Figure 10 onwards for Golduck’s Head (first edition).
26 Golduck’s Head (revised edition, second edition) is finished.
参考・2000年の本に掲載した折り図
みるかなた本棚>『ポケットモンスターおりがみコレクション』>ポケモンおりがみ一覧表>0055 ゴルダック

◇ ◇ ◇