
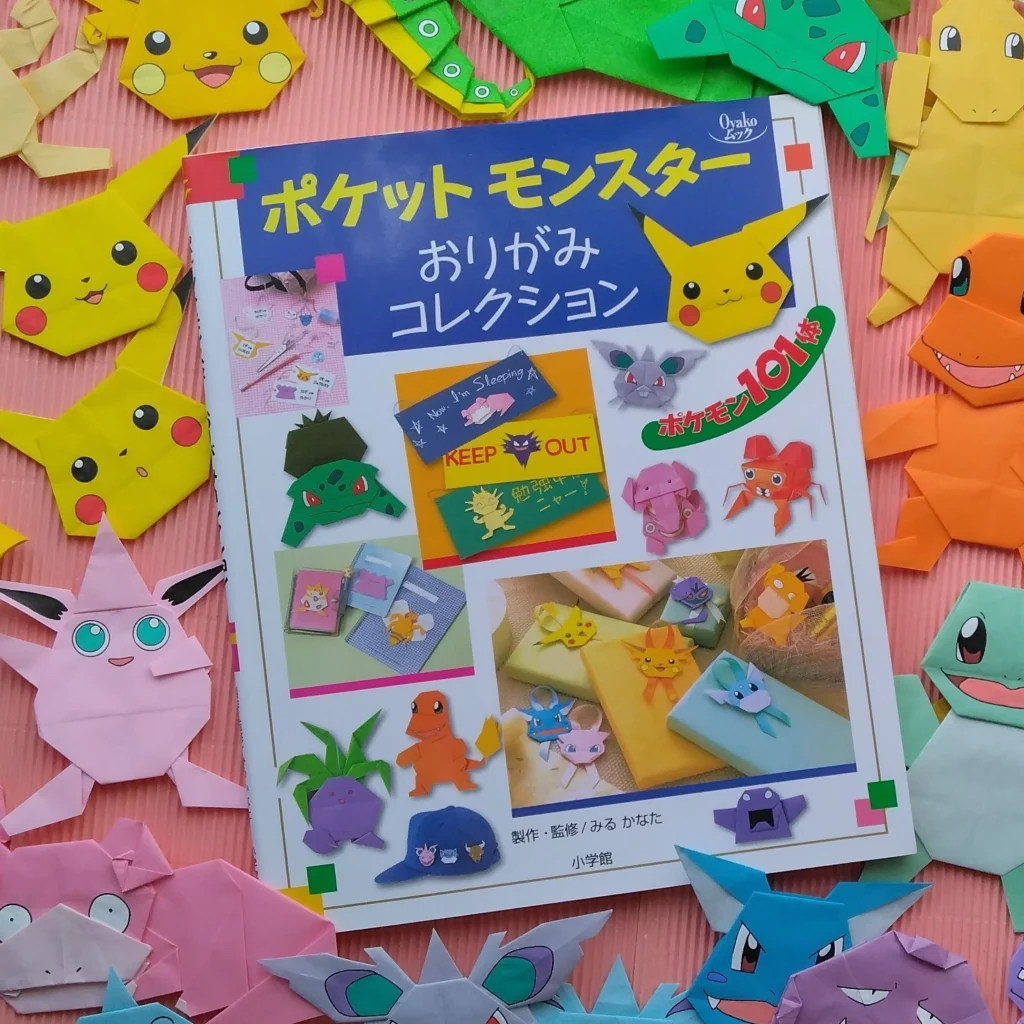
みるかなた本棚>『ポケットモンスターおりがみコレクション』>ポケモンおりがみ一覧表>0054コダック
◆0054コダック◆0055ゴルダック◆
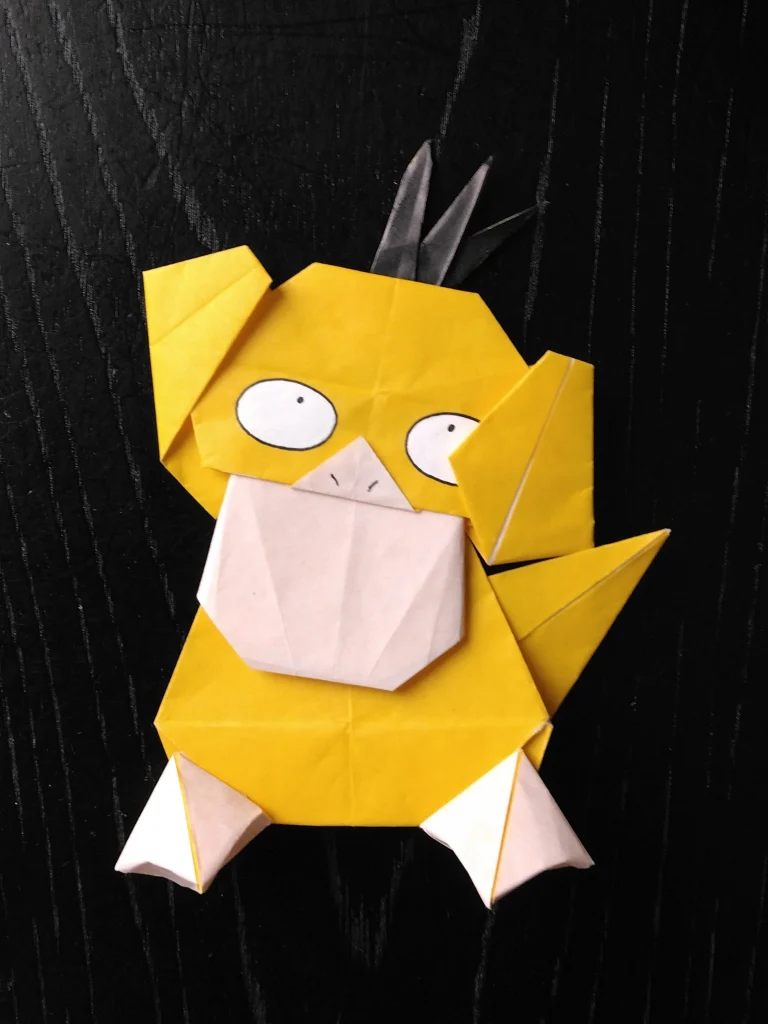
0054 コダック
いつも頭痛に悩まされていて、激しくなると不思議な力を発揮する、というコダック。
この不安定な感じが気になって、なんか、放っておけません。
ほんとに、いつも頭痛に悩まされているなんて、辛すぎですね。
せめておいしい紅茶で、癒しのひとときを過ごしてほしいと、願っております。
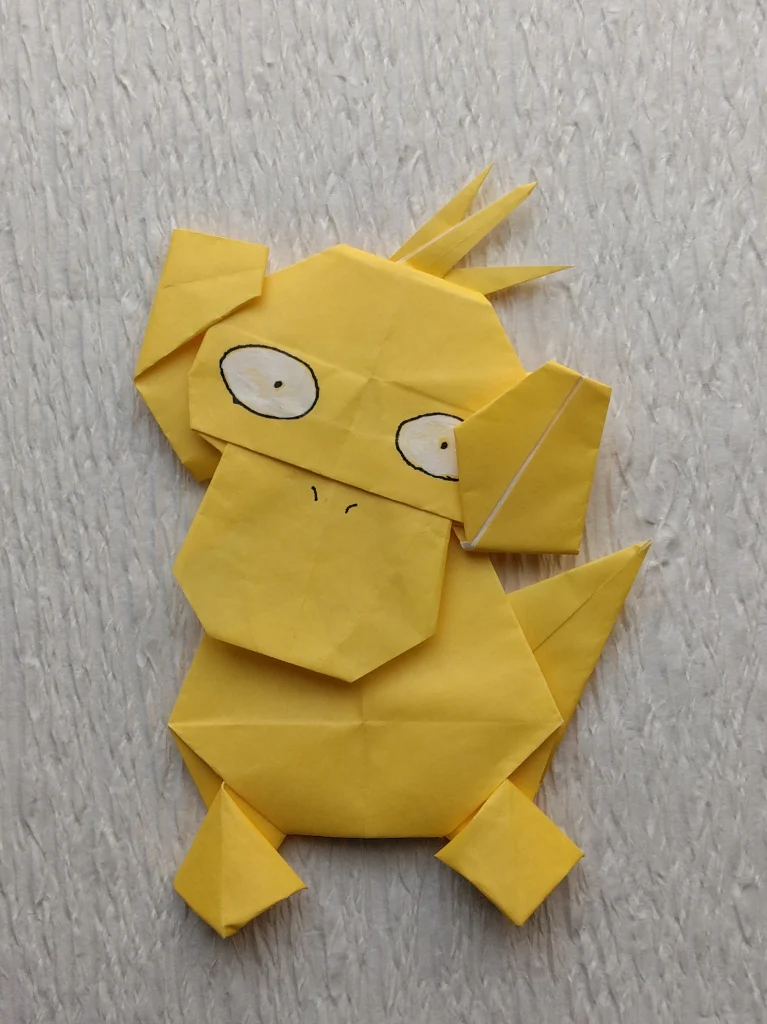
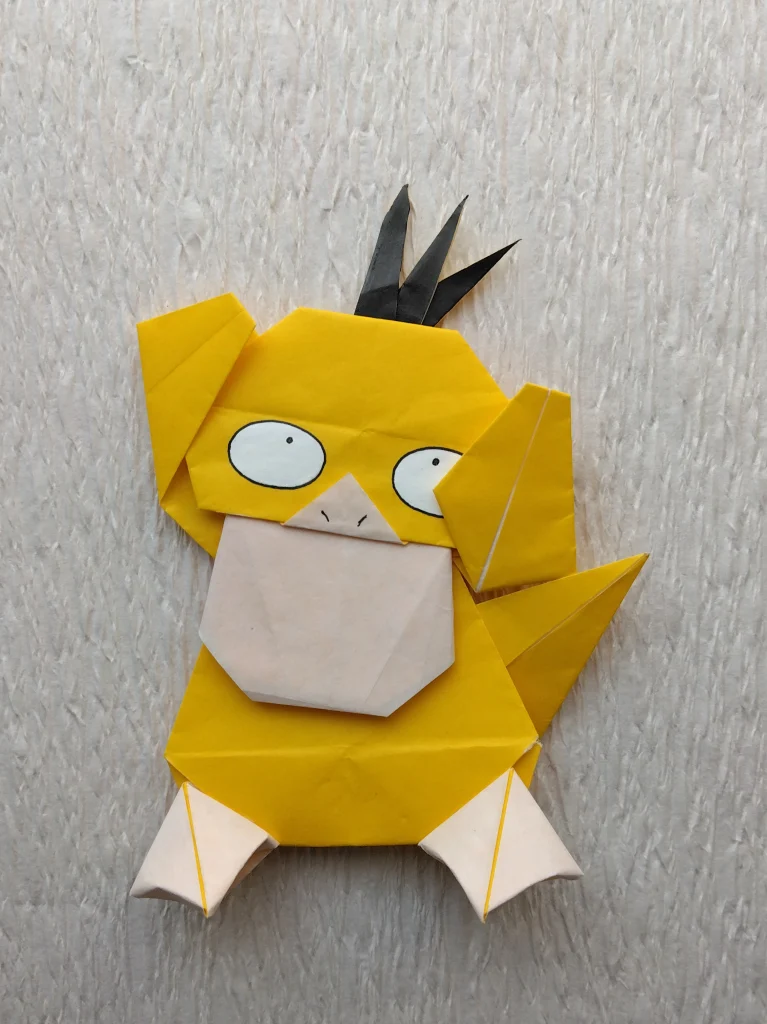
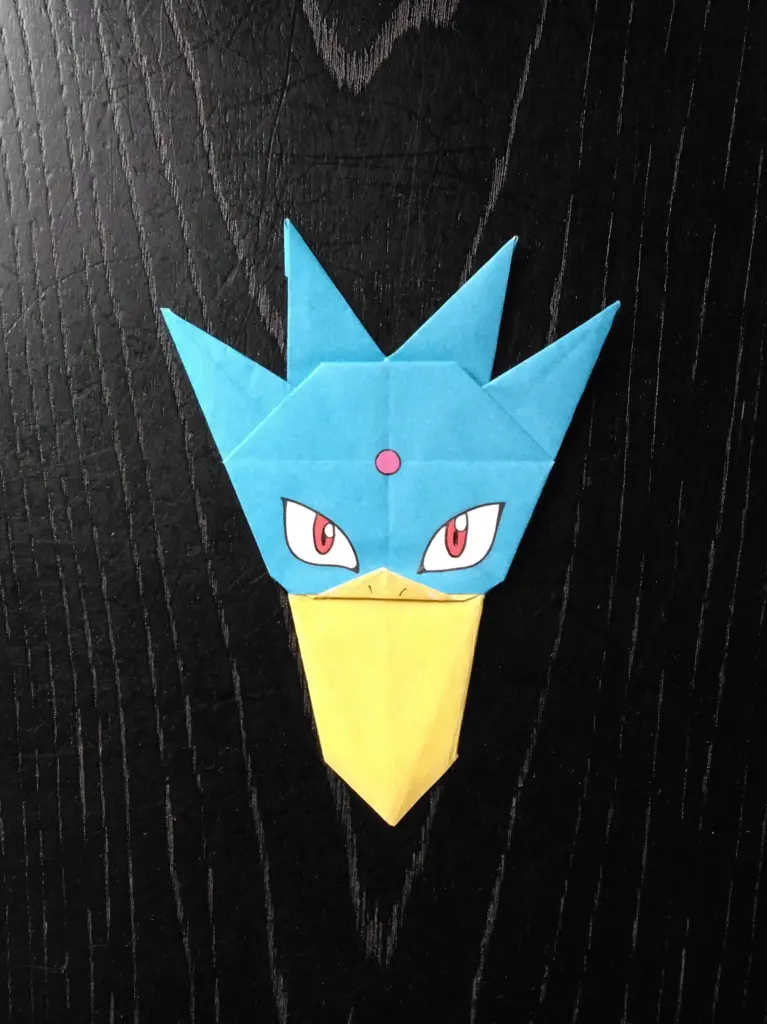
ゲームフリークのチェックでOKをいただいたコダックのゼロ号試作は、くちばしを根元から先へ向かってやや広がるかたちにつくりました。
しかし、本に掲載するとき誌面の制約により、つくり方の説明の図にくちばしの細かな折り方を描き入れることができませんでした。
それでやむなく長方形のずんどうなかたちのくちばしで発表しました。
今回、くちばしを本来のかたちに直し、折り方も描きました。
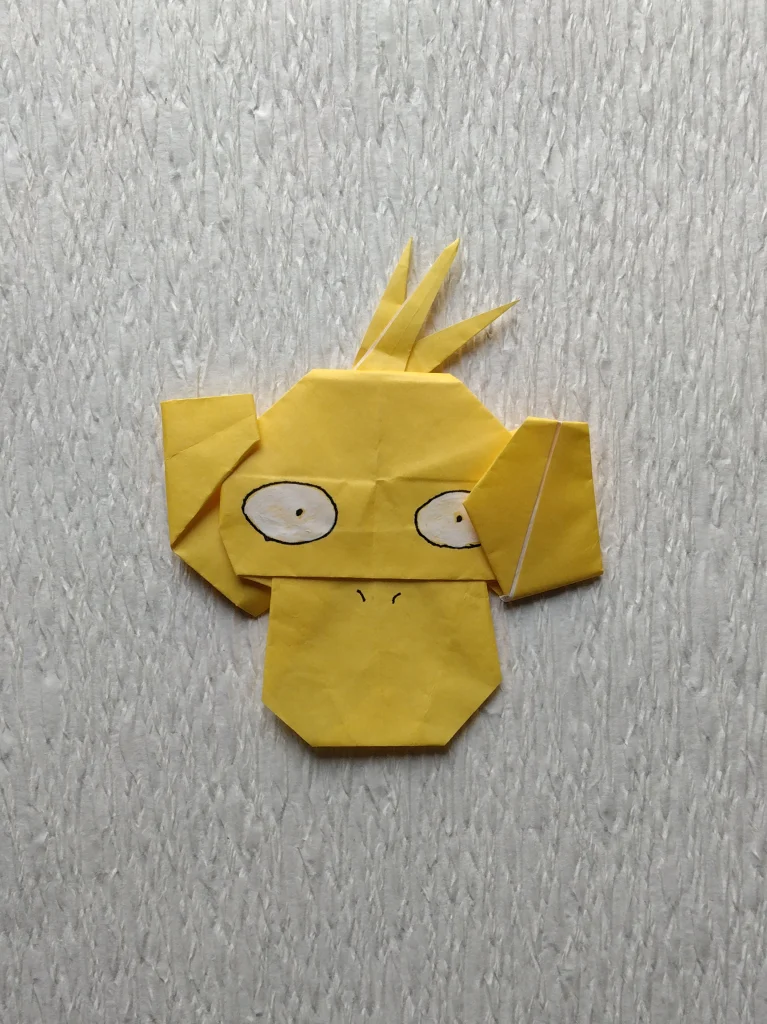
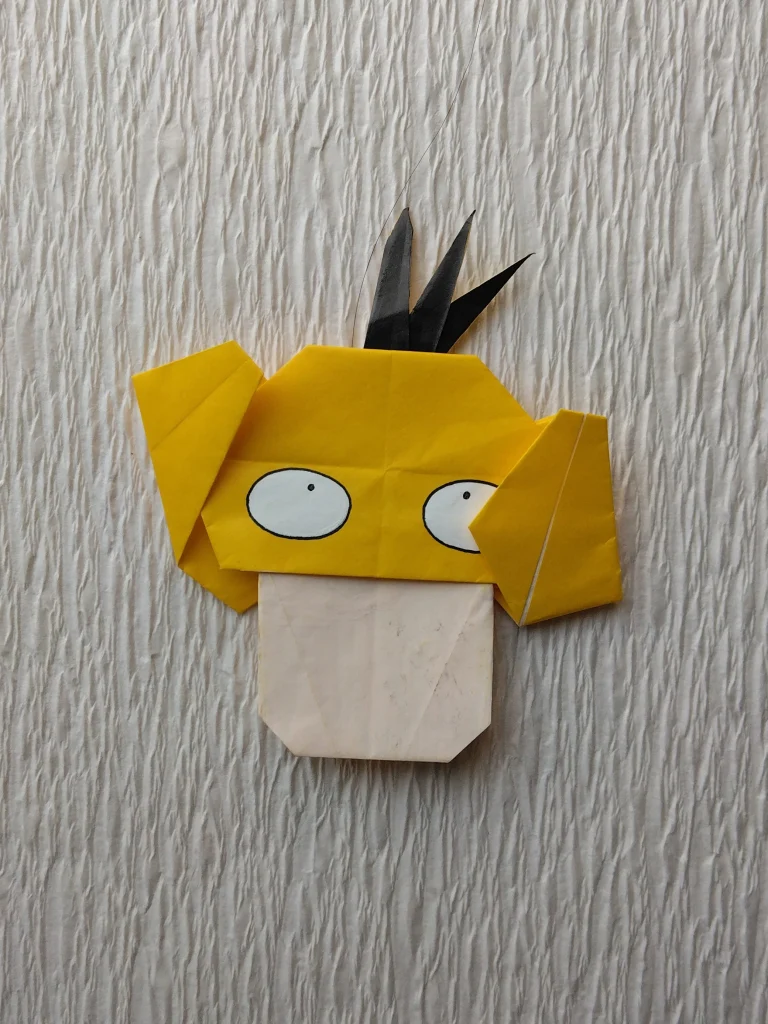
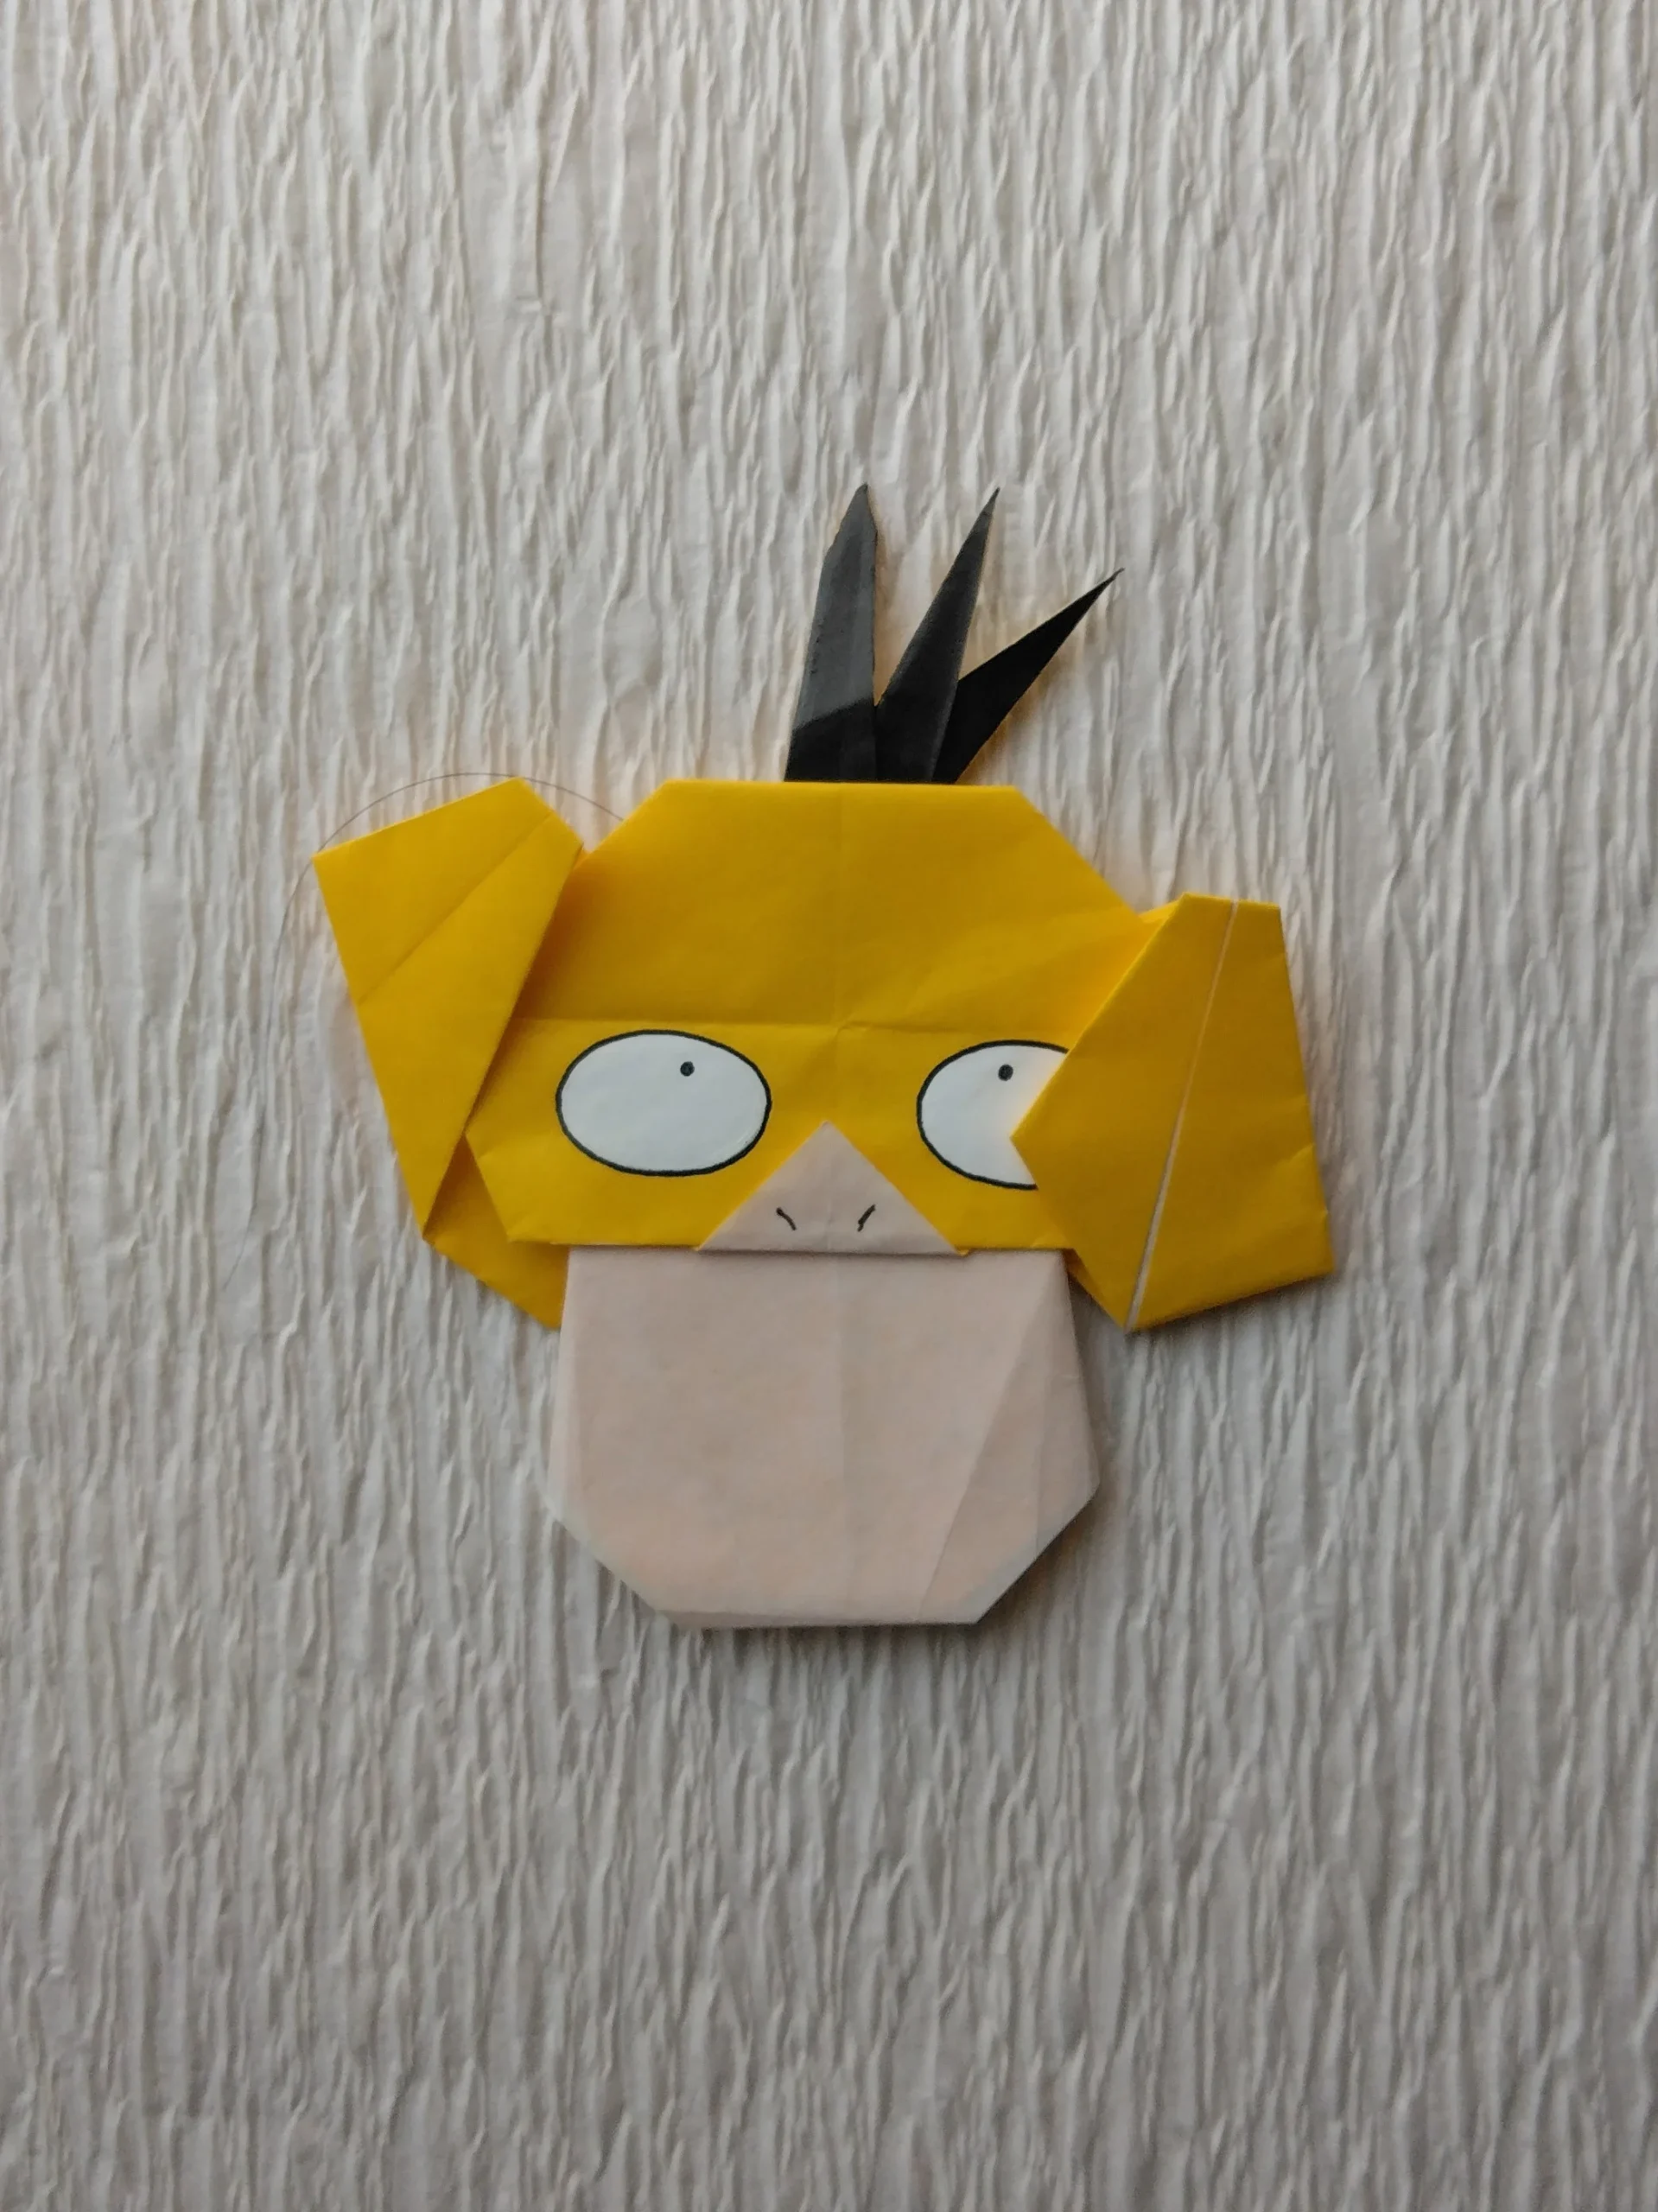
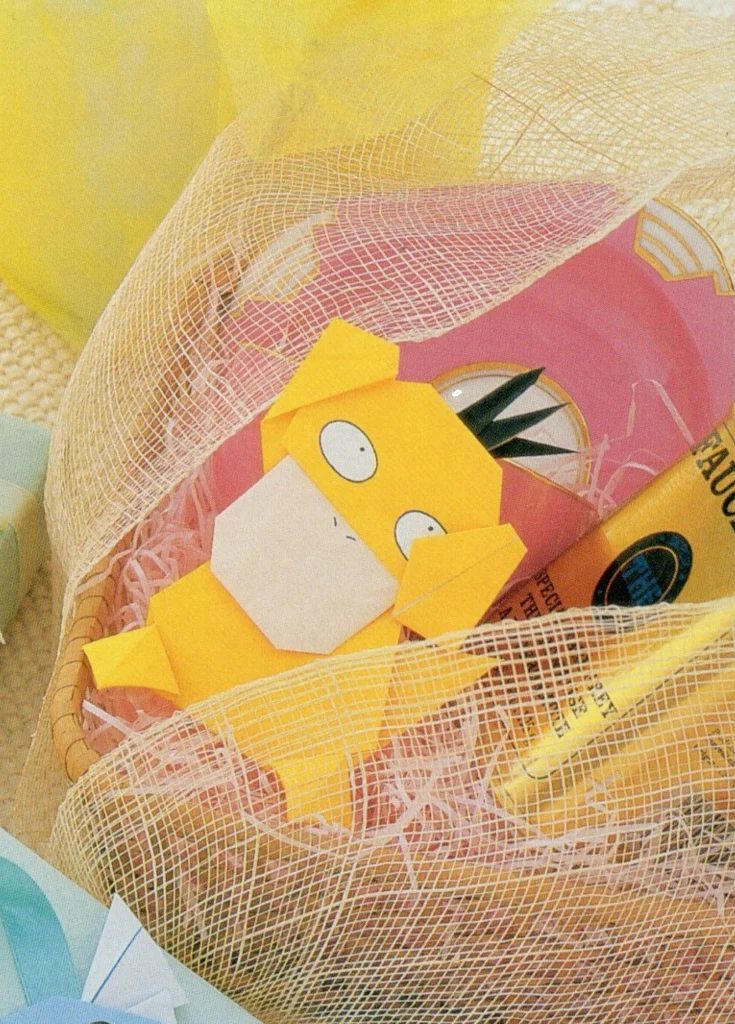
この作品は1999年に著作権者の監修を受け正式に許諾を得たものです。
★ゲームフリークのチェック
◆姿かたちは、最初のチェックでOKをいただきました。
◆紙の色は、はじめ黄色でつくっていたのですが、この濃い黄色の山吹色に変更のご指示がありました。
つくり方の折り図
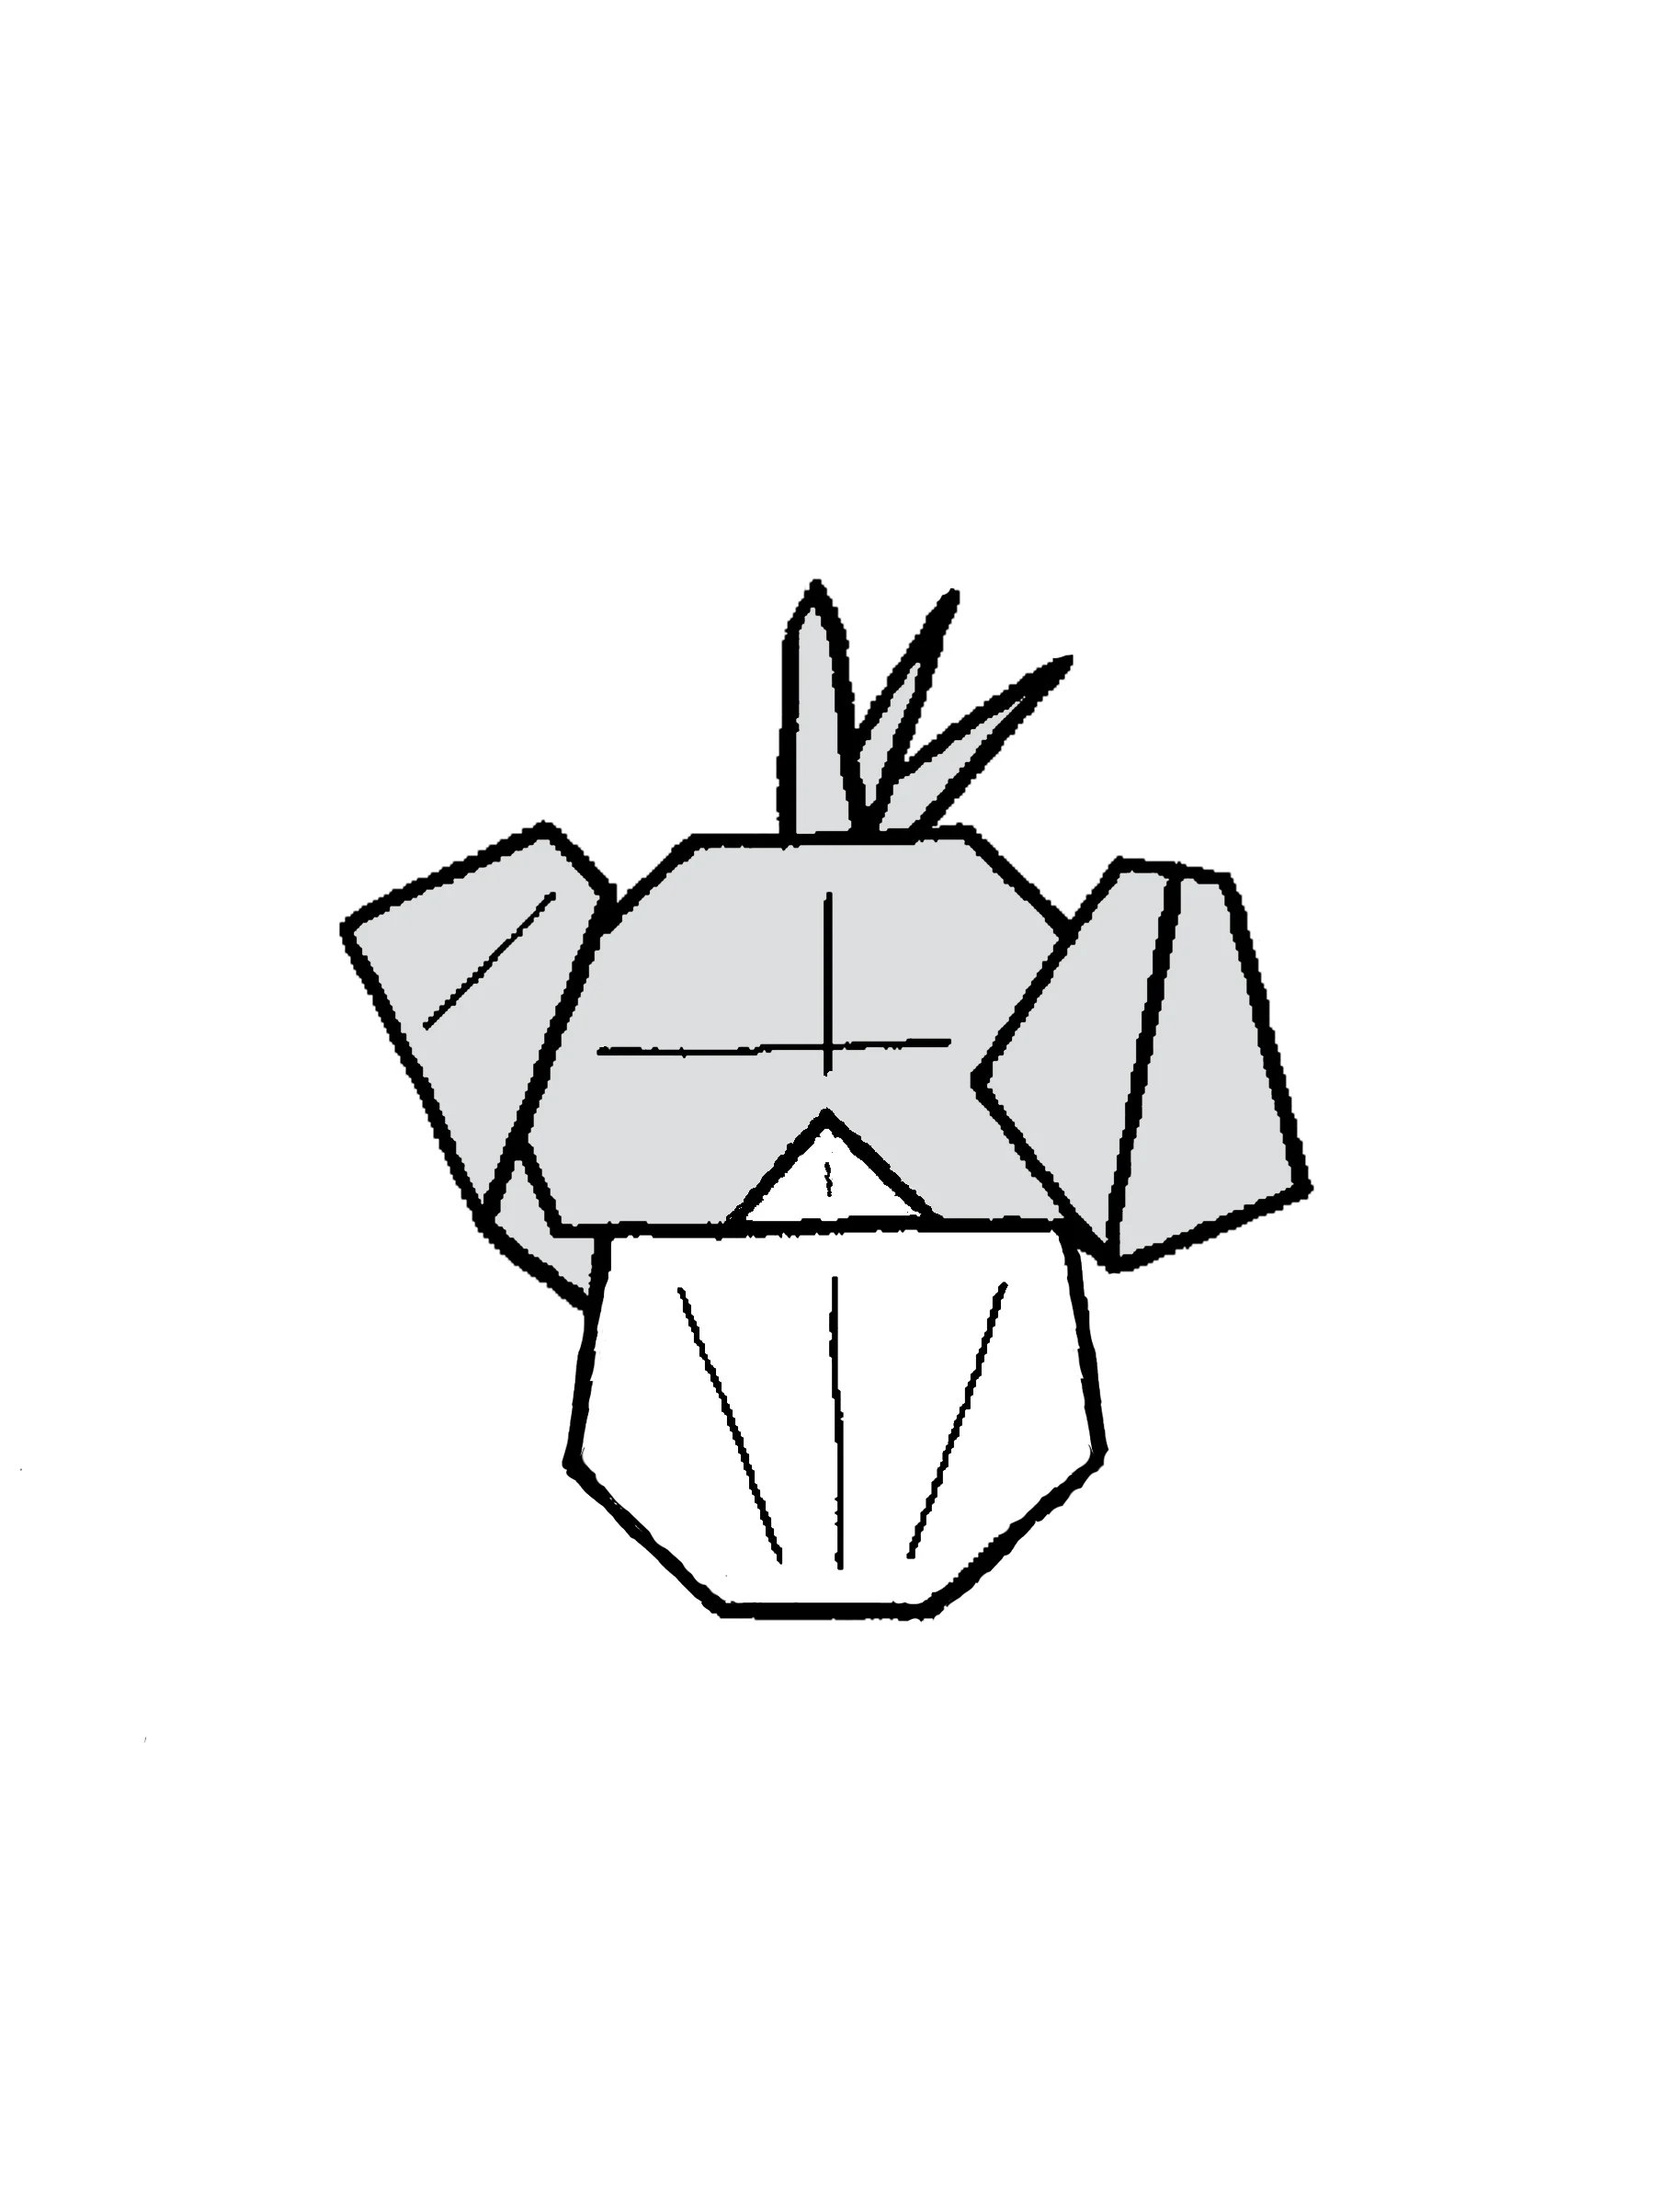
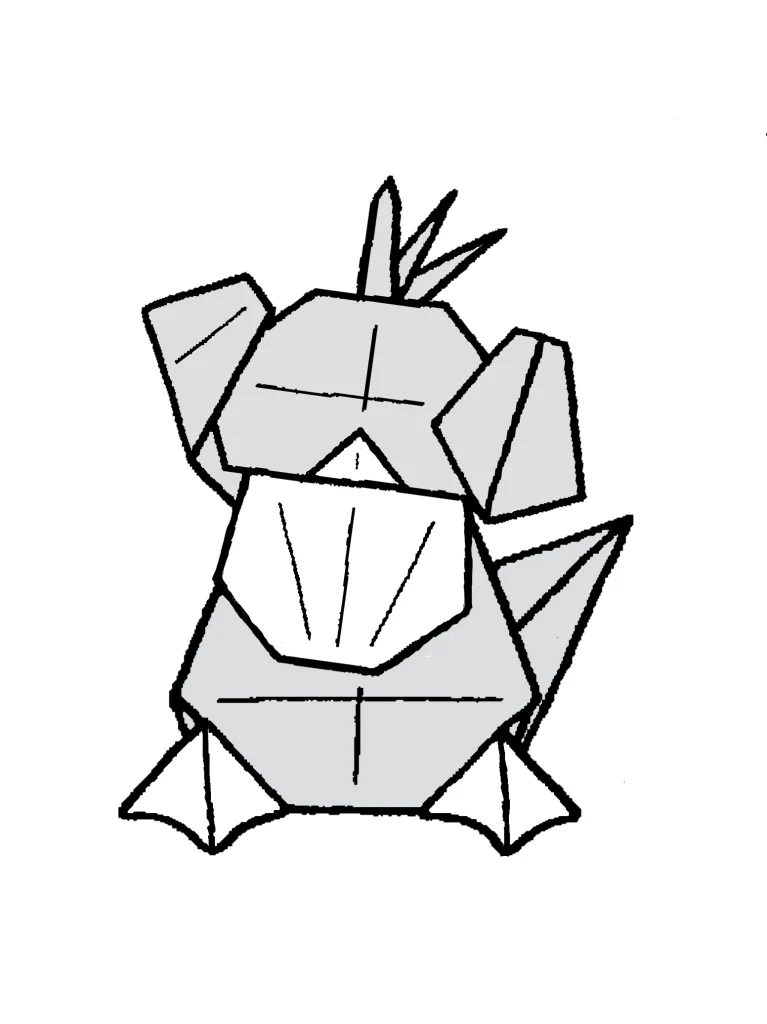
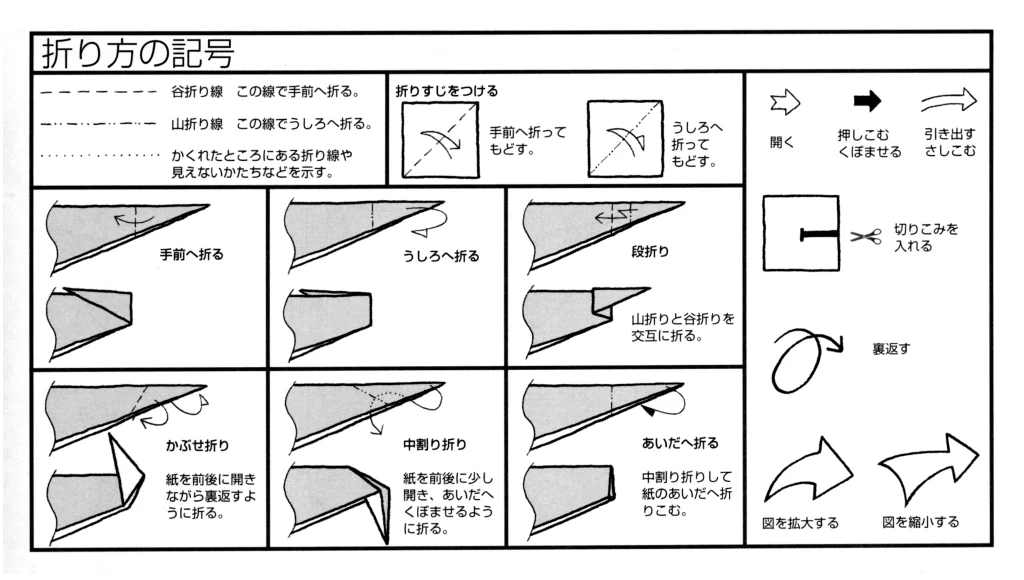
今回制作した折り図
◇折り図
1 基本折り
2 コダックのあたま
3 コダックのからだ
■コダックのあたまは、濃い黄色の山吹色の紙で、まず基本折りの図20まで折る。
■コダックのからだは、濃い黄色の山吹色の紙で、こちらも基本折りの20のかたちまで折る。
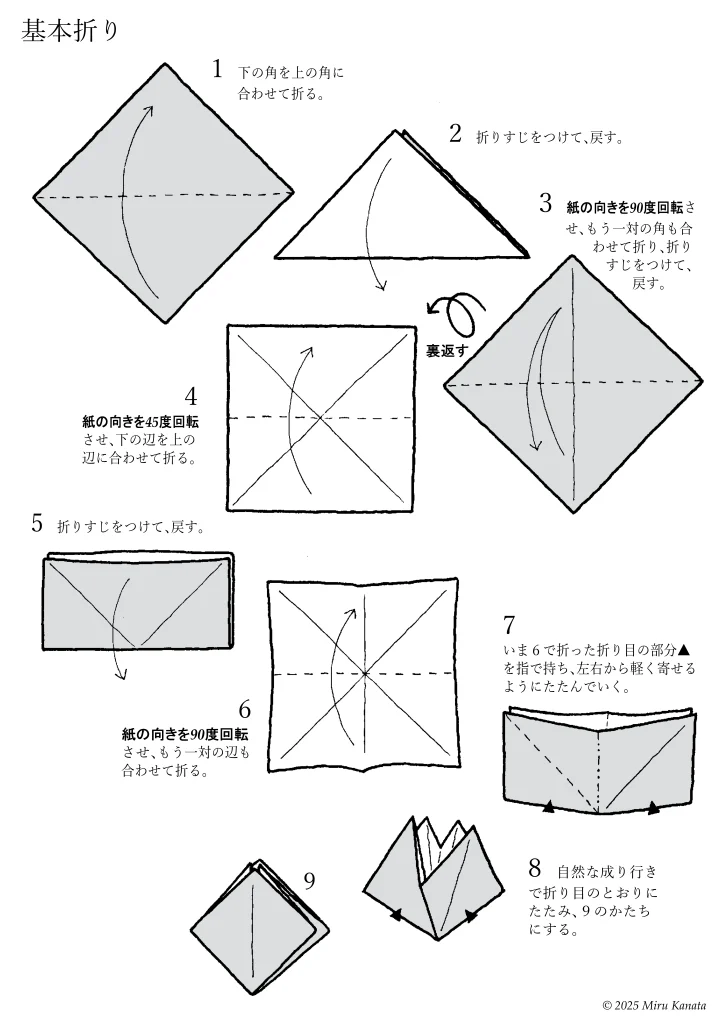
1 基本折り
English Commentary
Basic Folding
1 Fold the bottom corner to meet the top corner.
2 Make a crease and return it to its original position.
3 Rotate the paper 90 degrees, fold the other pair of corners together, make a crease and return it to its original position.
{Flip}
4 Rotate the paper 45 degrees and fold the bottom edge to meet the top edge.
5 Make a crease and return it to its original position.
6 Rotate the paper 90 degrees and fold the other pair of edges together.
7 Hold the crease ▲ made in step 6 with your fingers and fold it gently from both sides.
8 Let it naturally fold along the creases to form the shape of 9.
9
English Commentary
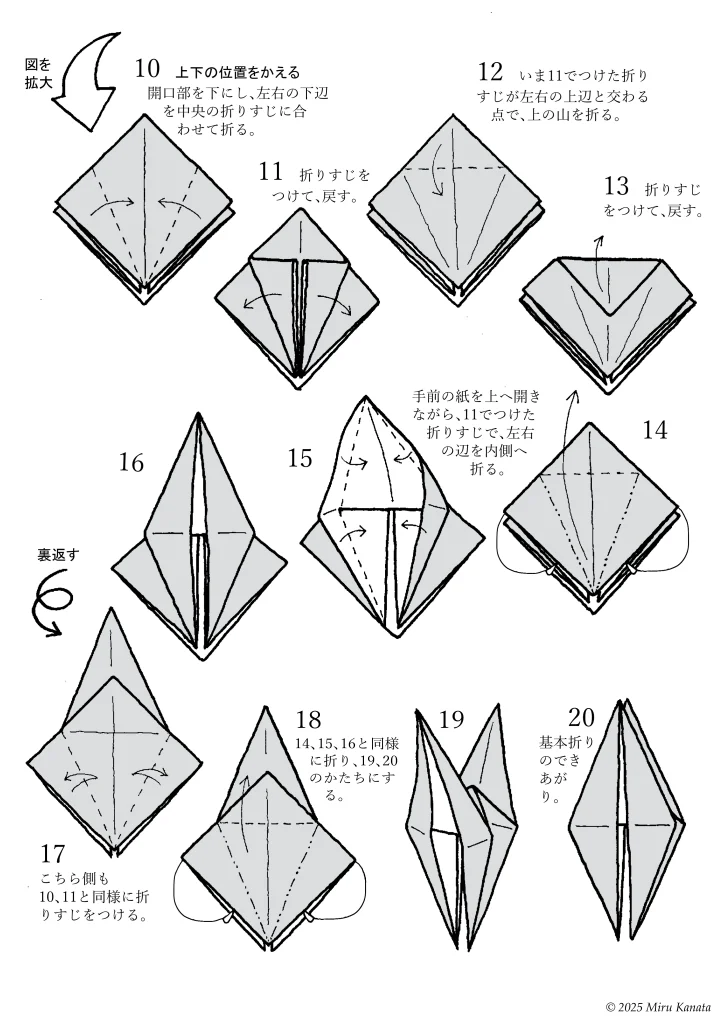
{Enlarge image}
10 Change the top and bottom positions.
With the opening facing downwards, fold the bottom left and right edges to meet the crease in the middle.
11 Make a crease and return.
12 Fold the top at the point where the crease made in 11 intersects with the top left and right edges.
13 Make a crease and return.
14 While opening the front paper upwards, fold the left and right edges inward along the crease made in 11.
15
16
{Flip}
17 Make creases on this side in the same way as 10 and 11.
18 Fold in the same way as 14, 15 and 16 to form 19 and 20.
19
20 The basic fold is complete.
2 コダックのあたま
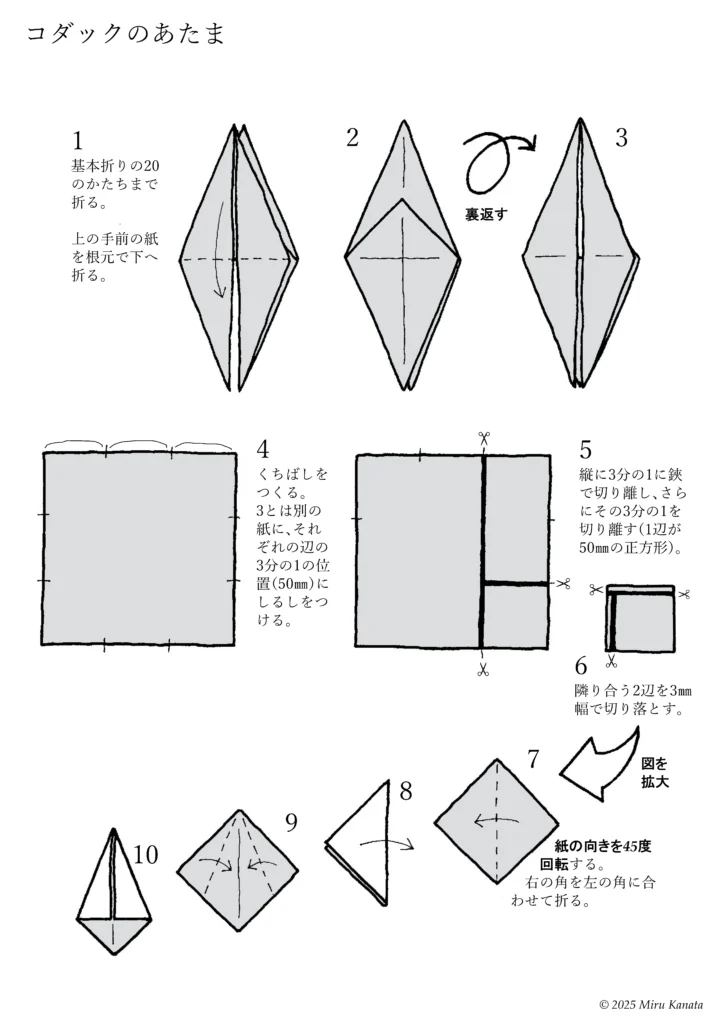
English Commentary
Psyduck’s head
1. Fold up to the 20th basic fold. Fold the top front piece of paper downwards at the base.
2.
{Flip}
3.
4. Make the beak. On a separate piece of paper from step 3, mark the 1/3 mark (50 mm) from the halfway point on each side.
5. Cut vertically into thirds with scissors, then cut off another third of that (a square with sides of 50 mm).
6. Trim off two adjacent sides by 3 mm.
{Enlarge diagram}
7. Rotate the paper 45 degrees. Fold the right corner to meet the left corner.
8.
9.
10.
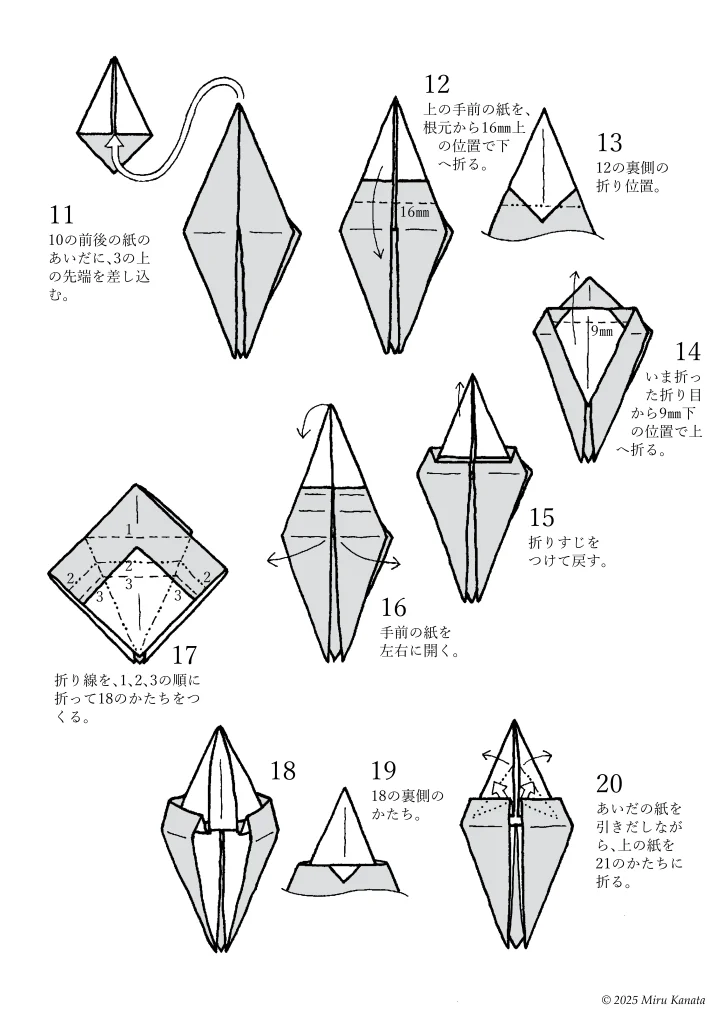
English Commentary
11 Insert the top tip of 3 between the front and back pieces of paper 10.
12 Fold the front piece of paper downwards at a position 16 mm above the base.
13 The fold on the back of 12.
14 Fold upwards at a position 9 mm below the crease you just made.
15 Make a crease and unfold.
16 Open the front piece of paper to the left and right.
17 Fold the creases in the order of 1, 2, and 3 to create the shape of 18.
18
19 The shape on the back of 18.
20 While pulling out the paper in between, fold the top piece of paper into the shape of 21.
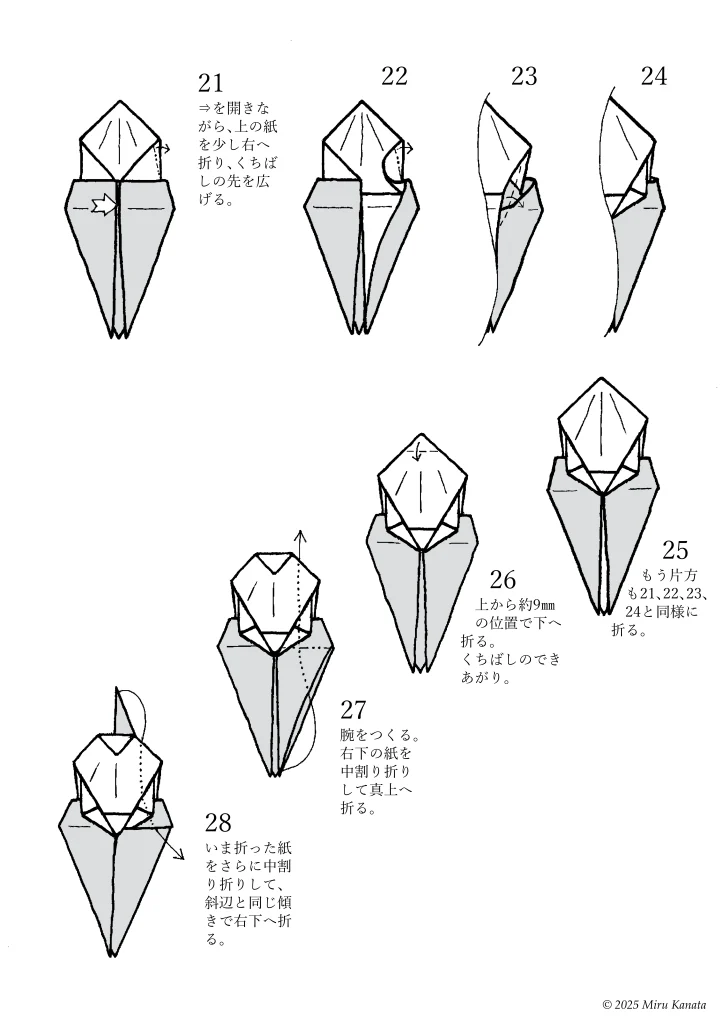
English Commentary
21 While opening the arrow, fold the top piece of paper slightly to the right to spread the tip of the beak.
22
23
24
25 Fold the other side in the same way as 21, 22, 23, and 24.
26 Fold it down at a position about 9 mm from the top. The beak is complete.
27 Make the arms. Fold the bottom right piece of paper in an inside reverse fold and fold it straight up.
28 Fold the paper you just folded in an inside reverse fold again and fold it to the bottom right at the same angle as the hypotenuse.
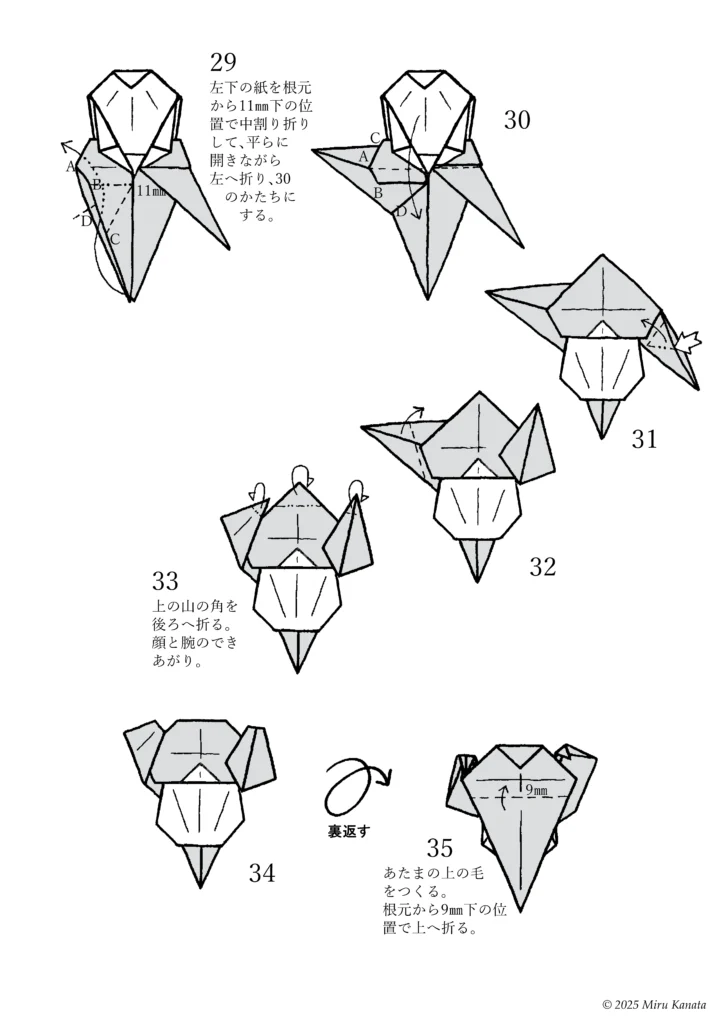
English Commentary
29 Fold the bottom left piece of paper in a reverse fold 11 mm below the base, then fold it to the left while flattening it to create the shape of 30.
30
31
32
33 Fold the corner of the top mountain backward. The face and arms are complete.
34
{Flip}
35 Make the hair on top of the head. Fold it upward 9 mm below the base.
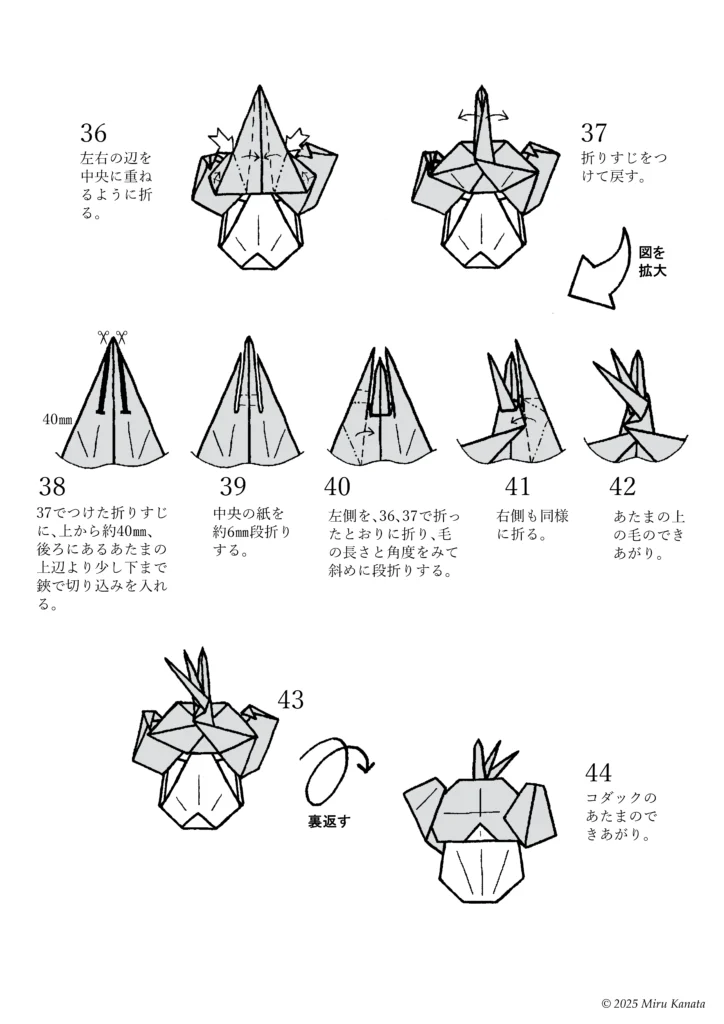
English Commentary
36 Fold the left and right edges towards the center.
37 Make a crease and unfold.
{Enlarge diagram}
38 Make a cut with scissors along the crease made in 37, about 40 mm from the top and slightly below the top edge of the head at the back.
39 Fold the center paper inwards by about 6 mm.
40 Fold the left side as you did in 36 and 37, and make a diagonal fold, checking the length and angle of the hair.
41 Fold the right side in the same way.
42 The hair on top of the head is complete.
43
{Flip}
44 The head of Psyduck is complete.
3 コダックのからだ
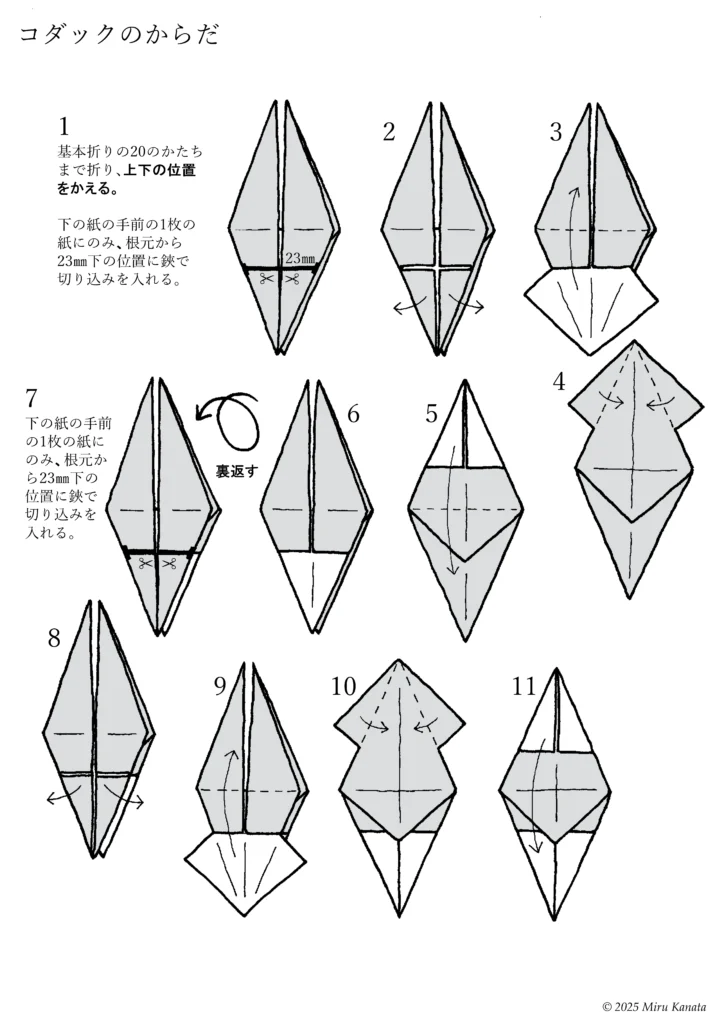
English Commentary
Psyduck’s body
1. Fold to the basic fold shape 20, then change the top and bottom positions. Make a cut with scissors 23 mm below the base of only the bottom front sheet of paper.
2
3
4
5
6
{Flip}
7. Make a cut with scissors 23 mm below the base of only the bottom front sheet of paper.
8
9
10
11
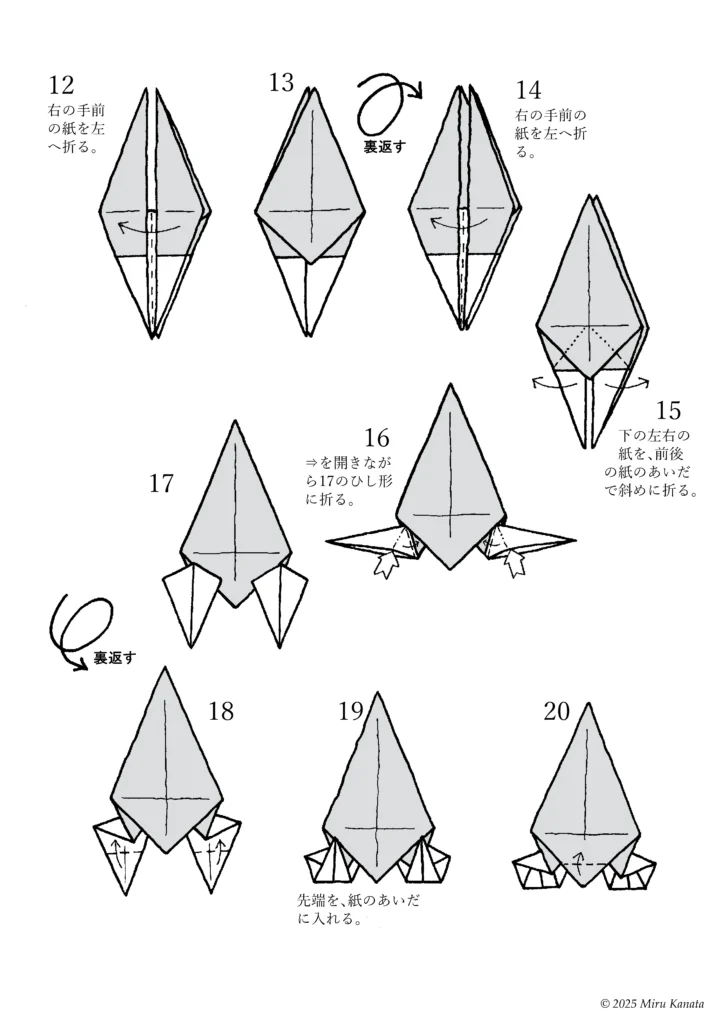
English Commentary
12 Fold the front right piece of paper to the left.
13
{Flip}
14 Fold the front right piece of paper to the left.
15 Fold the bottom left and right pieces of paper diagonally between the front and back pieces of paper.
16 Fold into the diamond shape of 17 while opening the arrow.
17
{Flip}
18
19 Insert the tip between the pieces of paper.
20
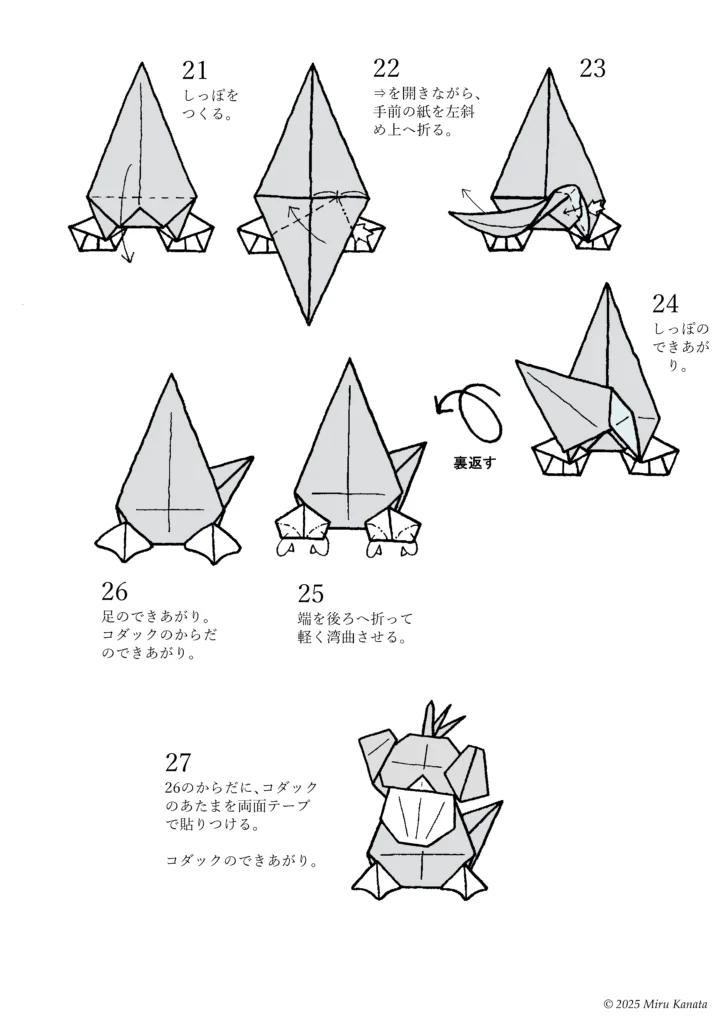
English Commentary
21 Make the tail.
22 While opening the arrow, fold the front piece of paper diagonally upwards to the left.
23
24 The tail is complete.
{Flip}
25 Fold the end backwards and create a slight curve.
26 The legs are complete. The body of Psyduck is complete.
27 Attach Psyduck’s head to the body from step 26 with double-sided tape. Psyduck is complete.
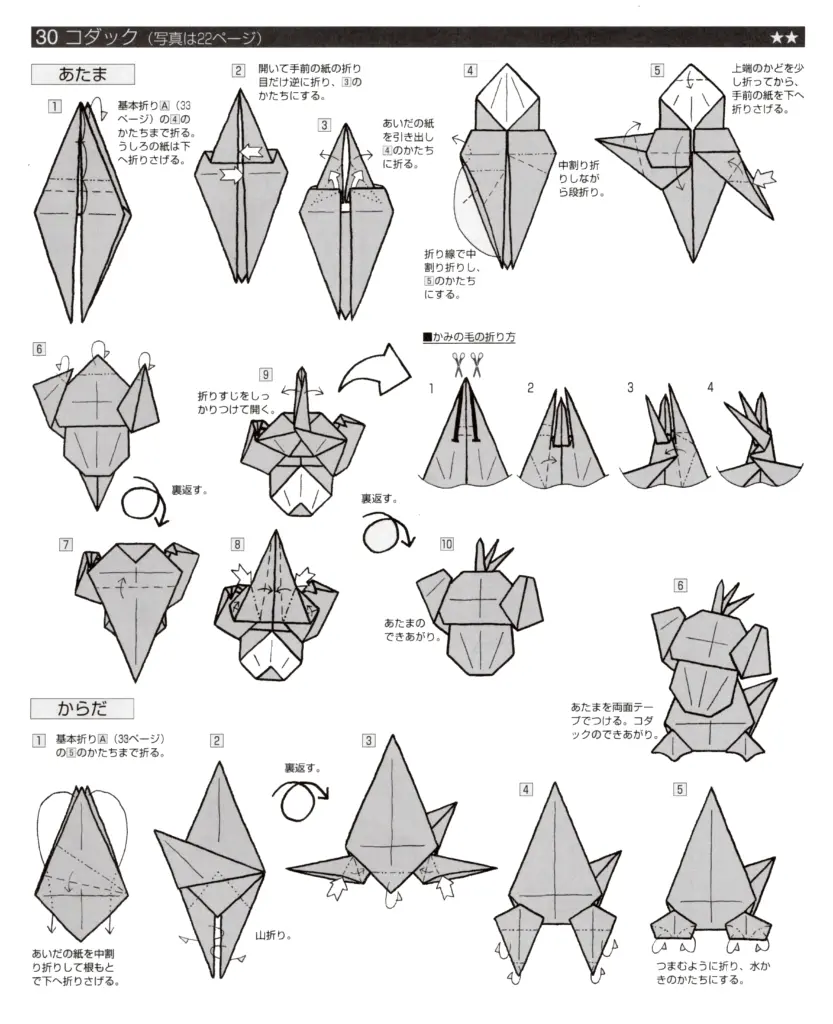
参考・2000年の本に掲載した折り図
みるかなた本棚>『ポケットモンスターおりがみコレクション』>ポケモンおりがみ一覧表>0054コダック
◇ ◇ ◇