
みるかなた本棚>『ポケットモンスターおりがみコレクション』>ポケモンおりがみ一覧表>0015スピアー
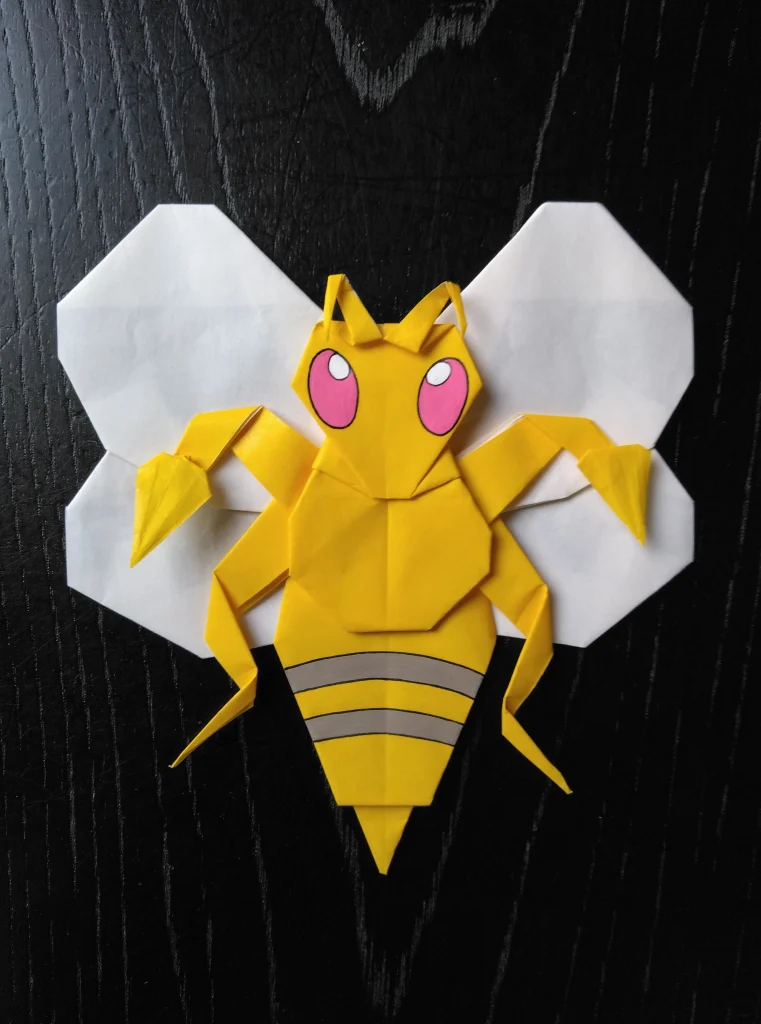
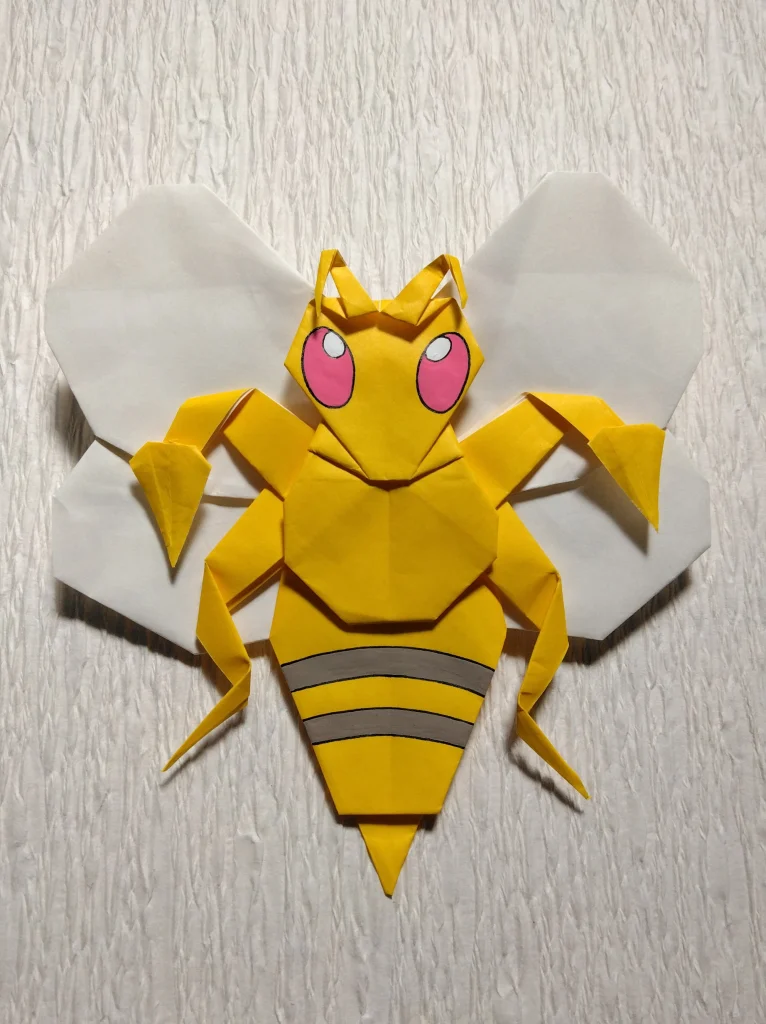
0015 スピアー
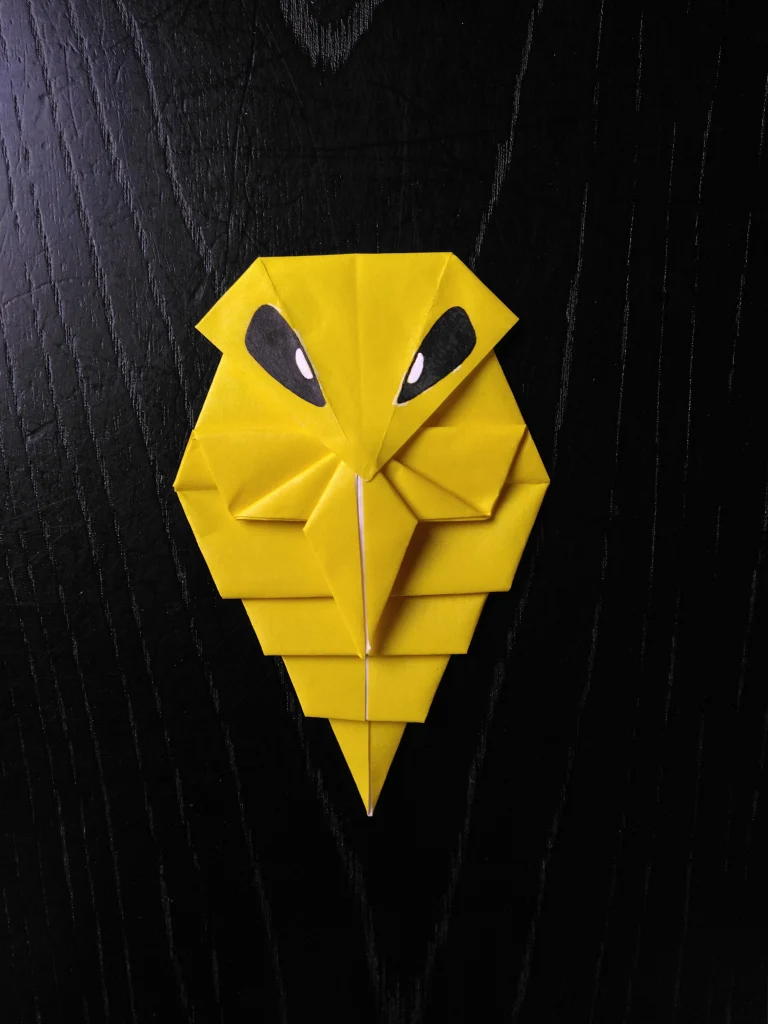
かっこいい出来上がりの、スピアー。
スピアーの、あたま、胸、腹、とつながった長いからだ、そして腕の先のニードル。
これらを1枚の紙から折りだす素敵な方法を思いつきました。
これをつくった1998年時点では、ほかで見たことのない、ふつうとはちょっと違った折り方です。
ところで。
スピアーがふつうの昆虫のように脚が6本だったら、あと2本をどこから折り出すか、と、ときどき考え込んでいることにふと気づきます。
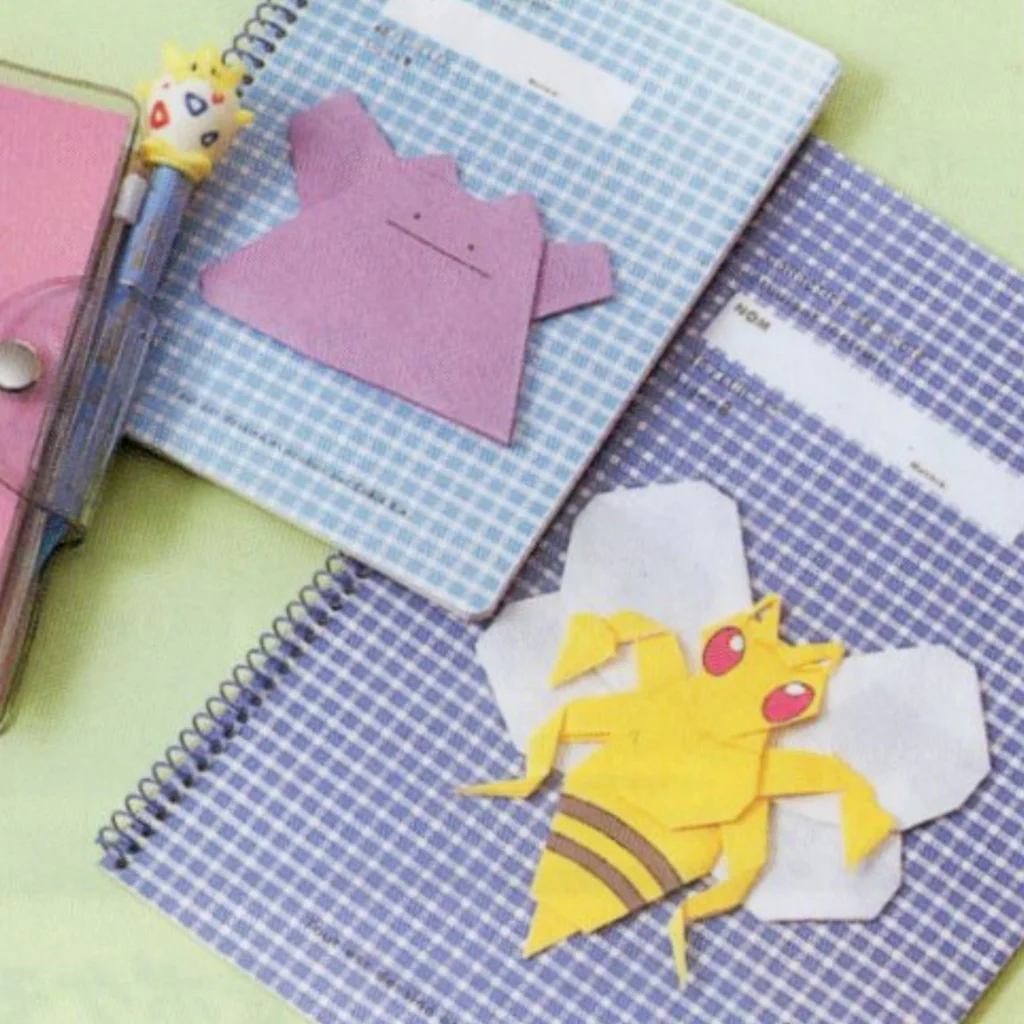
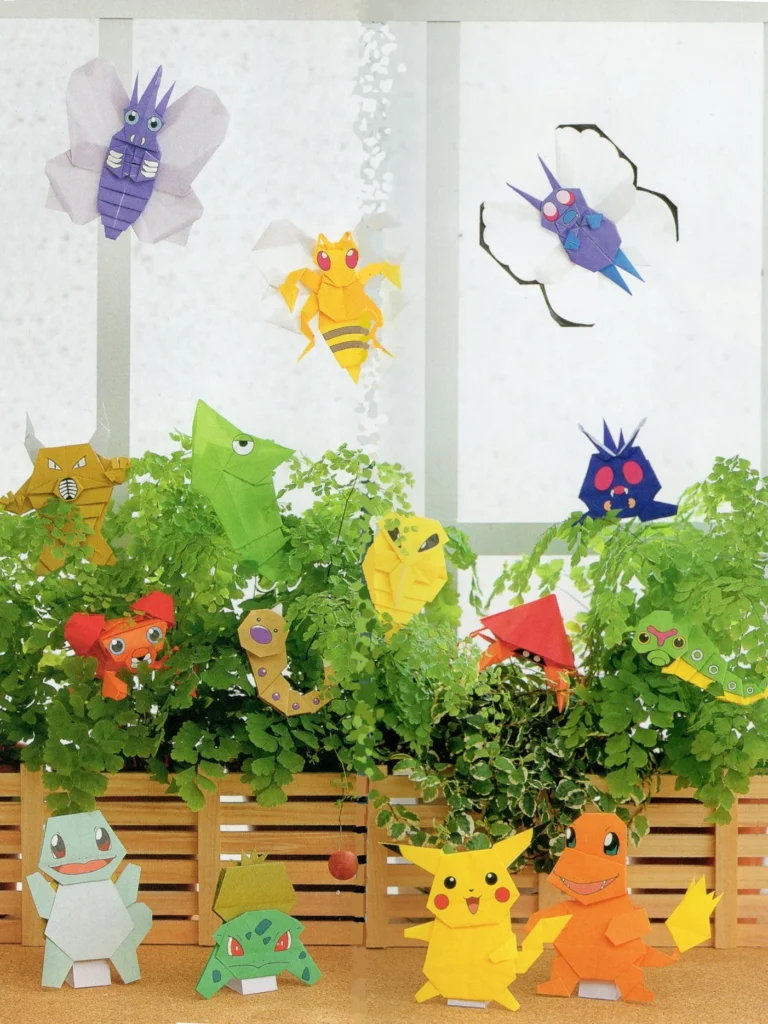
この作品は1999年に著作権者の監修を受け正式に許諾を得たものです。
★ゲームフリークのチェック
◆姿かたちは、最初のチェックでOKをいただきました。
◆スピアーのからだを黄色の紙でつくったところ、この山吹色に変更、と指示がありました。
つくり方の折り図
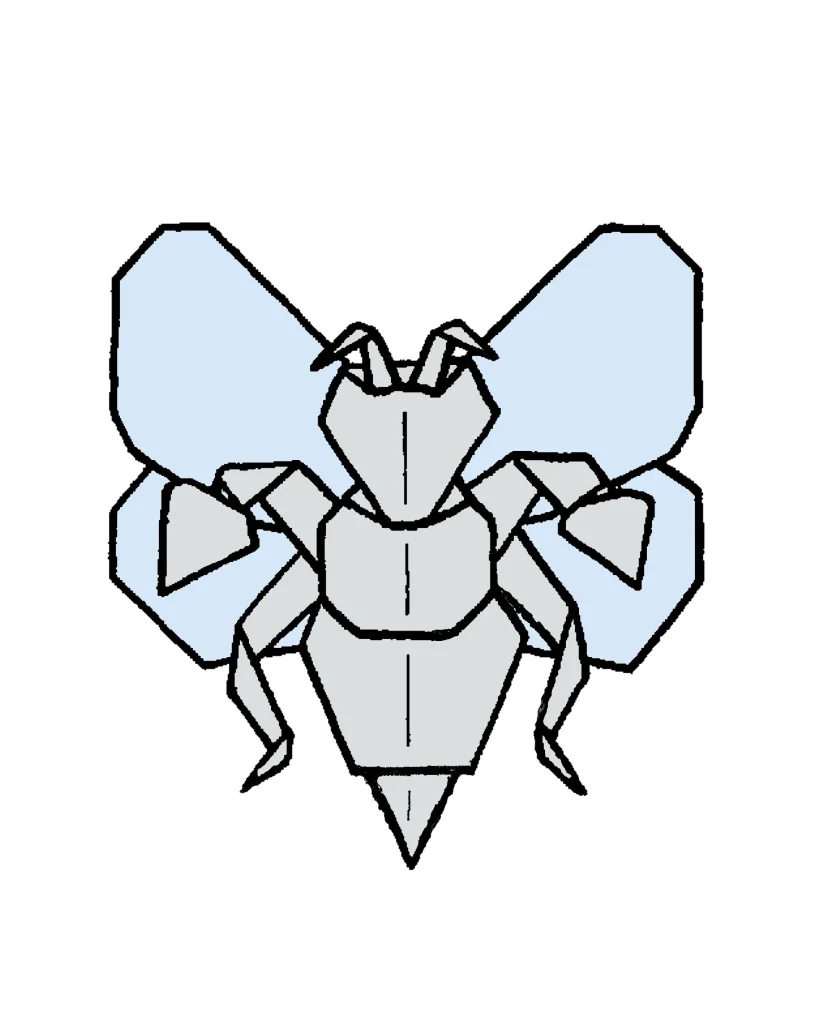
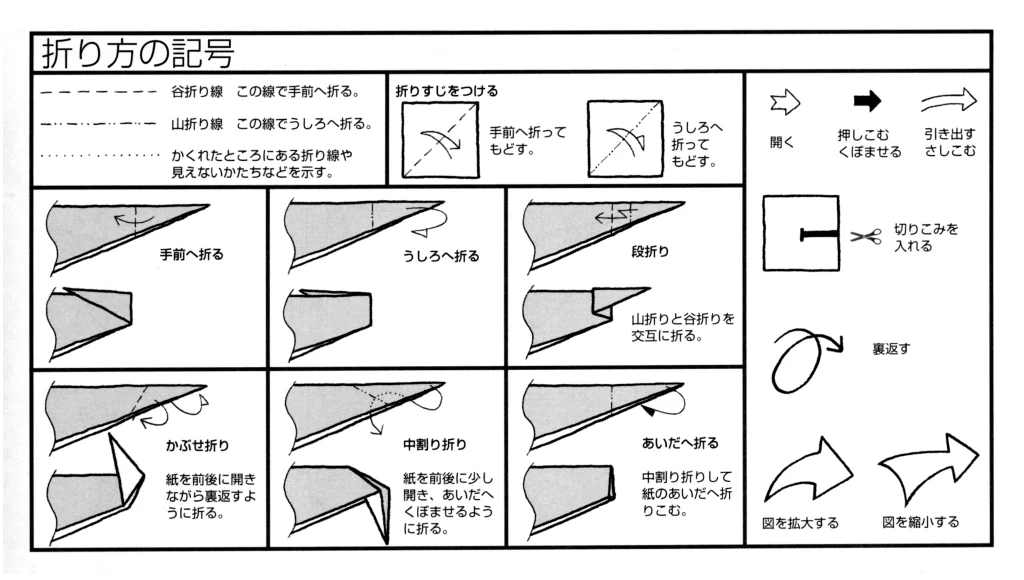
今回制作した折り図
◇折り図
1 基本折り
2 スピアーのからだ
3 スピアーのはね
■スピアーのからだは、 濃い黄色の山吹色の紙で、まず基本折りの20まで折る。
■スピアーのはねは、白い紙で折る。
1 基本折り
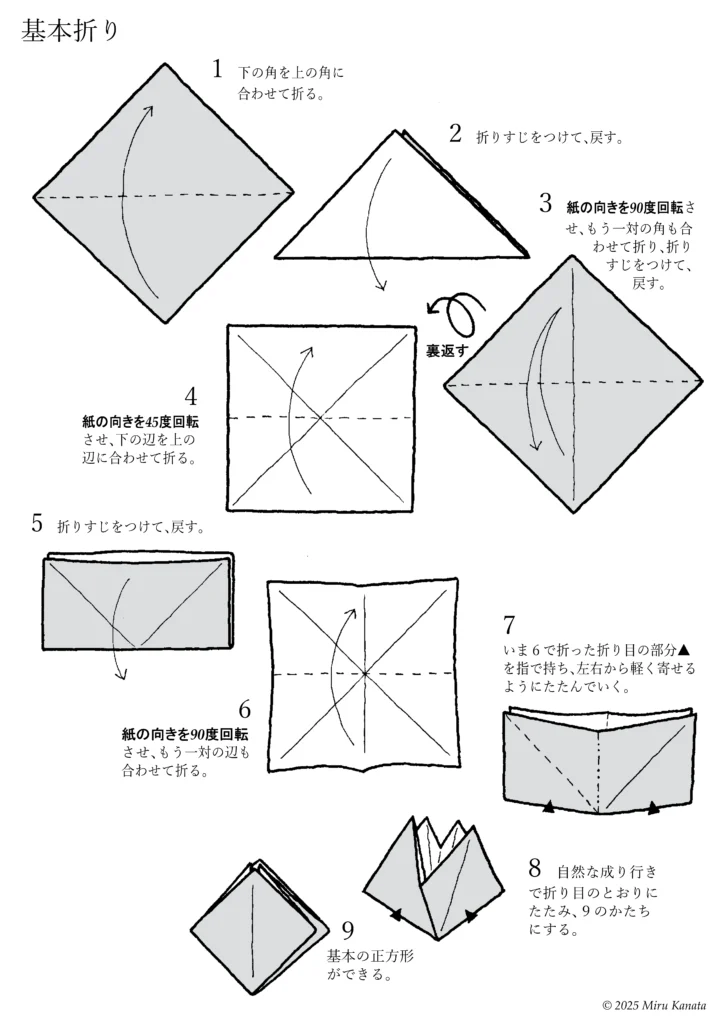
English Commentary
Basic Folding
1 Fold the bottom corner to meet the top corner.
2 Make a crease and return it to its original position.
3 Rotate the paper 90 degrees, fold the other pair of corners together, make a crease and return it to its original position.
{Flip}
4 Rotate the paper 45 degrees and fold the bottom edge to line up with the top edge.
5 Make a crease and return it to its original position.
6 Rotate the paper 90 degrees and fold the other pair of edges together.
7 Hold the crease ▲ made in step 6 with your fingers and fold gently from both sides together.
8 Let the paper naturally fold along the creases to form the shape of 9.
9 A basic square is created.
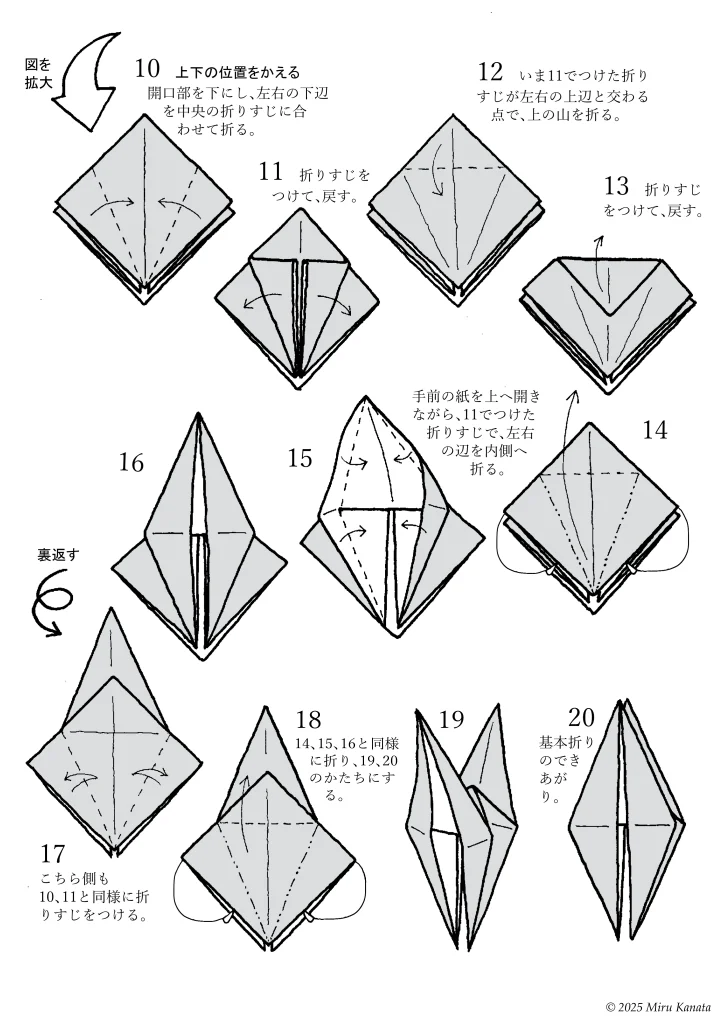
English Commentary
{Enlarge image}
10 Change the top and bottom positions.
With the opening facing downwards, fold the bottom left and right edges to meet the crease in the middle.
11 Make a crease and return.
12 Fold the top at the point where the crease made in 11 intersects with the top left and right edges.
13 Make a crease and return.
14 While opening the front paper upwards, fold the left and right edges inward along the crease made in 11.
15
16
{Flip}
17 Make creases on this side in the same way as 10 and 11.
18 Fold in the same way as 14, 15 and 16 to form 19 and 20.
19
20 The basic fold is complete.
2 スピアーのからだ
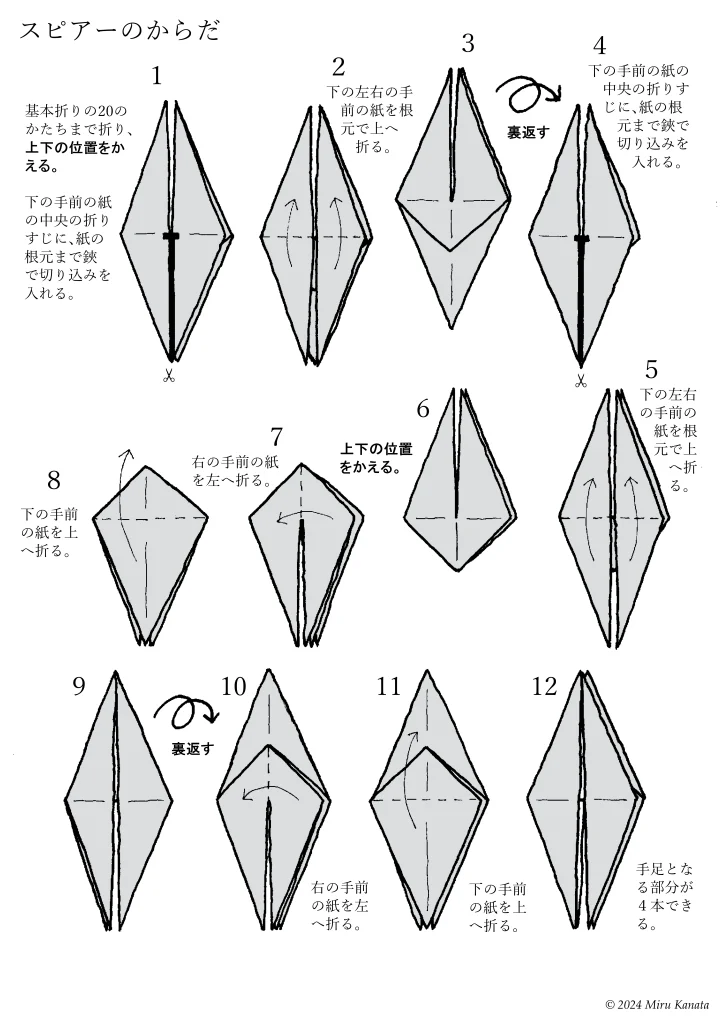
English Commentary
Beedrill’s body
1. Fold up to the 20th basic fold, then change the top and bottom positions. Make a cut with scissors along the center fold of the bottom front paper, from the bottom tip to the base.
2. Fold the bottom left and right papers upwards at the base.
3.
{Flip}
4. Make a cut with scissors along the center fold of the bottom front paper, from the bottom tip to the base.
5. Fold the bottom left and right papers upwards at the base.
6.
7. Change the top and bottom positions. Fold the right front
paper to the left.
8. Fold the bottom front paper upwards.
9.
{Flip}
10. Fold the right front paper to the left.
11. Fold the bottom front paper upwards.
12. Four limbs are now formed.
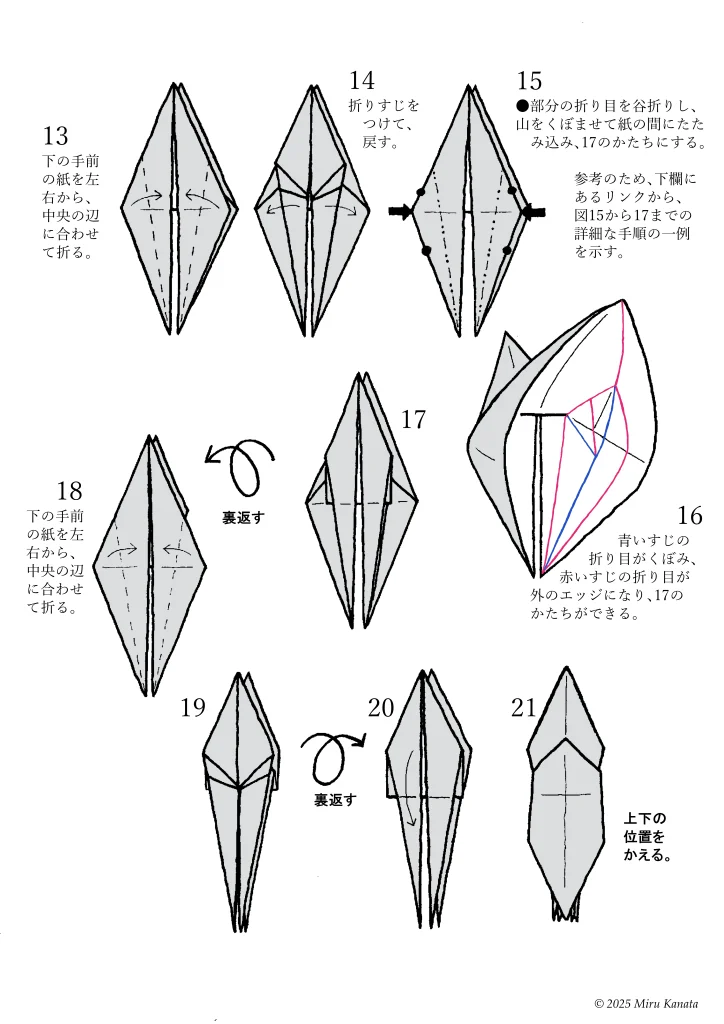
English Commentary
13 Fold the bottom front piece of paper from the left and right sides to meet the center edge.
14 Make a crease and unfold.
15 Valley fold the ● section and indent the mountain, folding it between the papers to create the shape of 17.
◆For reference, a detailed example of the procedure from Figures 15 to 17 is shown via the link in the section below.
16 The blue crease becomes indented, and the red crease becomes the outer edge, creating the shape of 17.
17
{Flip}
18 Fold the bottom front piece of paper from the left and right sides to meet the center edge.
19
{Flip}
20
21 Change the top and bottom positions.
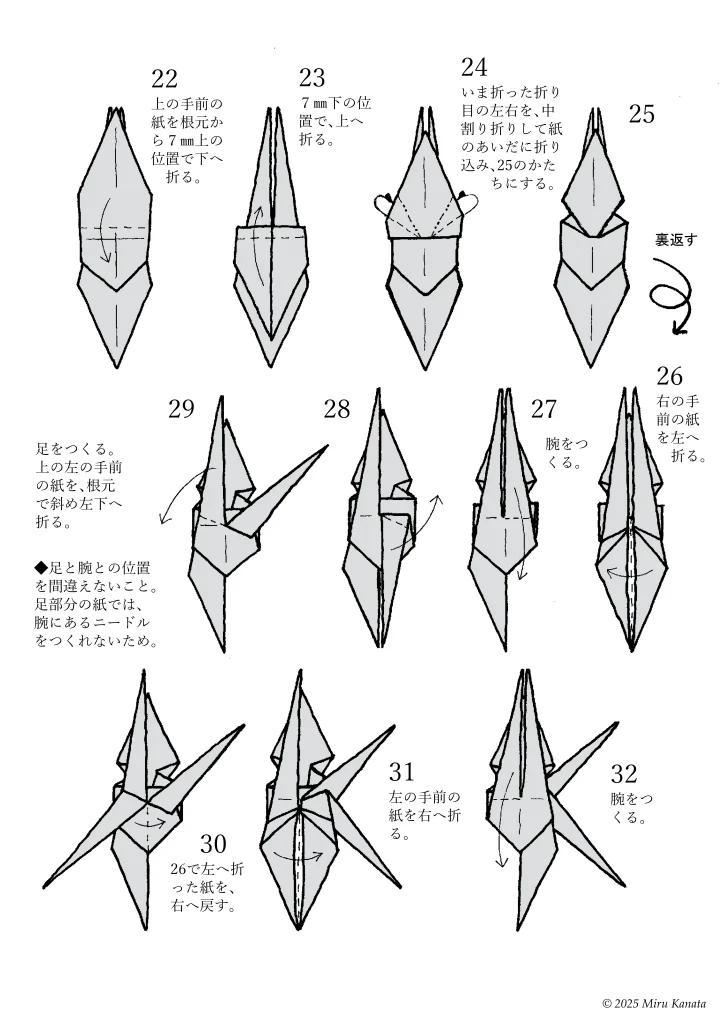
English Commentary
22 Fold the top front piece of paper downwards at a position 7 mm above the base.
23 Fold it upwards at a position 7 mm below.
24 Fold the left and right sides of the crease you just made into the gap between the papers using an inside reverse fold to create the shape of 25.
25
{Flip}
26 Fold the right front piece of paper to the left.
27 Make the arms.
28
29 Make the legs. Fold the top left front piece of paper diagonally downwards at the base.
◆Make sure you don’t mix up the positions of the legs and arms. You cannot make the needles on the arms with the paper for the legs.
30 Fold the paper that you folded to the left in 26 back to the right.
31 Fold the left front piece of paper to the right.
32 Make the arms.
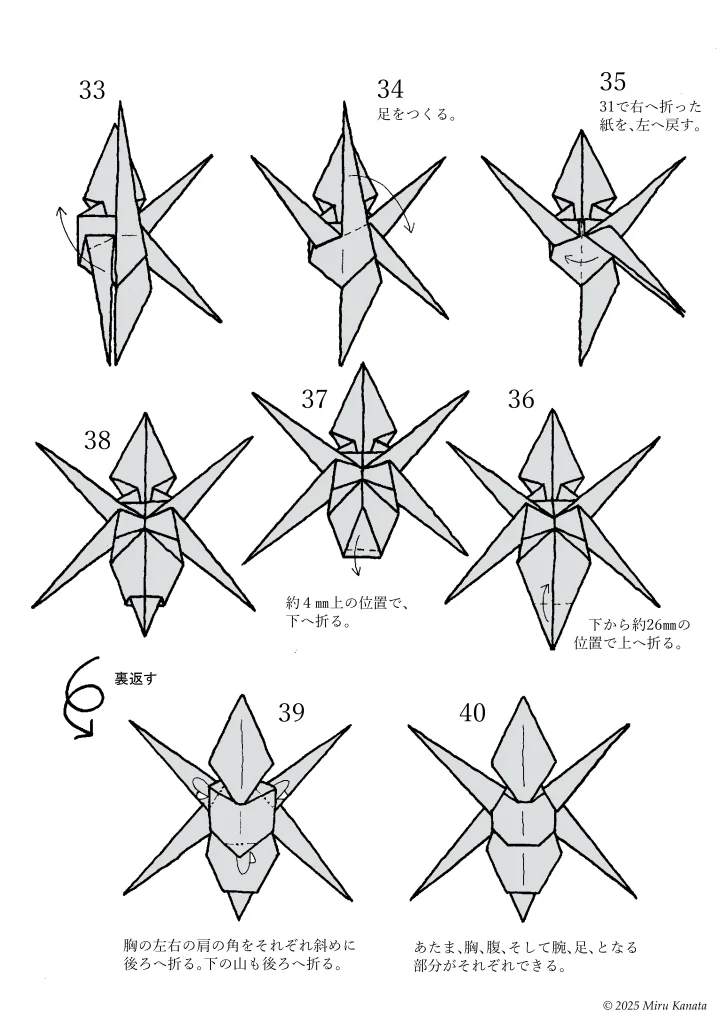
English Commentary
33
34 Make the legs.
35 Fold the paper that you folded to the right in step 31 back to the left.
36 Make the stomach. Fold upwards at a position about 26 mm from the bottom.
37 Fold downwards at a position about 4 mm above the crease you just made.
38
{Flip}
39 Fold the corners of the shoulders on both sides of the chest diagonally backwards. Fold the corner of the mountain that touch the stomach backwards as well.
40 You now have the parts that will become the head, chest, stomach, arms, and legs.
English Commentary
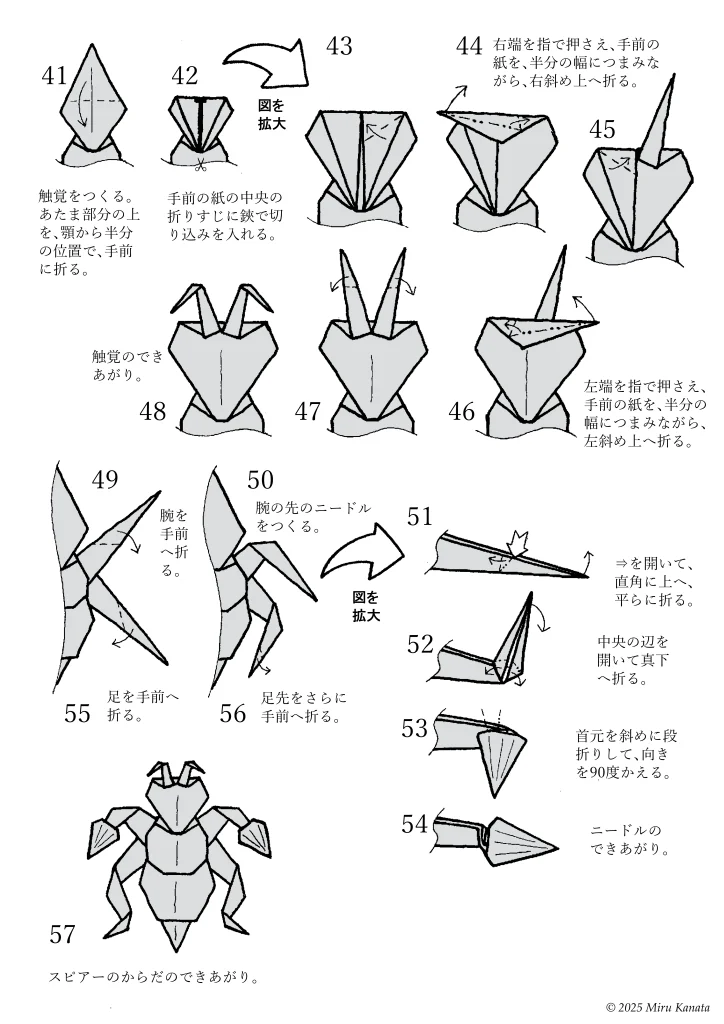
41 Make the antennae. Fold the top of the head section in half from the jaw towards you.
42 Make a cut with scissors along the center fold of the paper in front.
{Enlarge diagram}
43
44 Hold down the right edge with your fingers and fold the paper in front diagonally upwards to the right, pinching it in half.
45
46 Hold down the left edge with your fingers and fold the paper in front diagonally upwards to the left, pinching it in half.
47
48 The antennae are complete.
49 Fold the arms towards you.
50 Make the needles at the ends of the arms.
{Enlarge diagram}
51 Open the arrow and fold it flat upwards at a right angle.
52 Open the center edge and fold it straight down.
53 Fold the neck diagonally in a step fold and change the direction by 90 degrees.
54 The needles are complete.
55 Fold the legs diagonally towards you.
56 Fold the toes further towards you.
57 Beedrill’body is complete.
3 スピアーのはね
English Commentary
Beedrill’s Wings
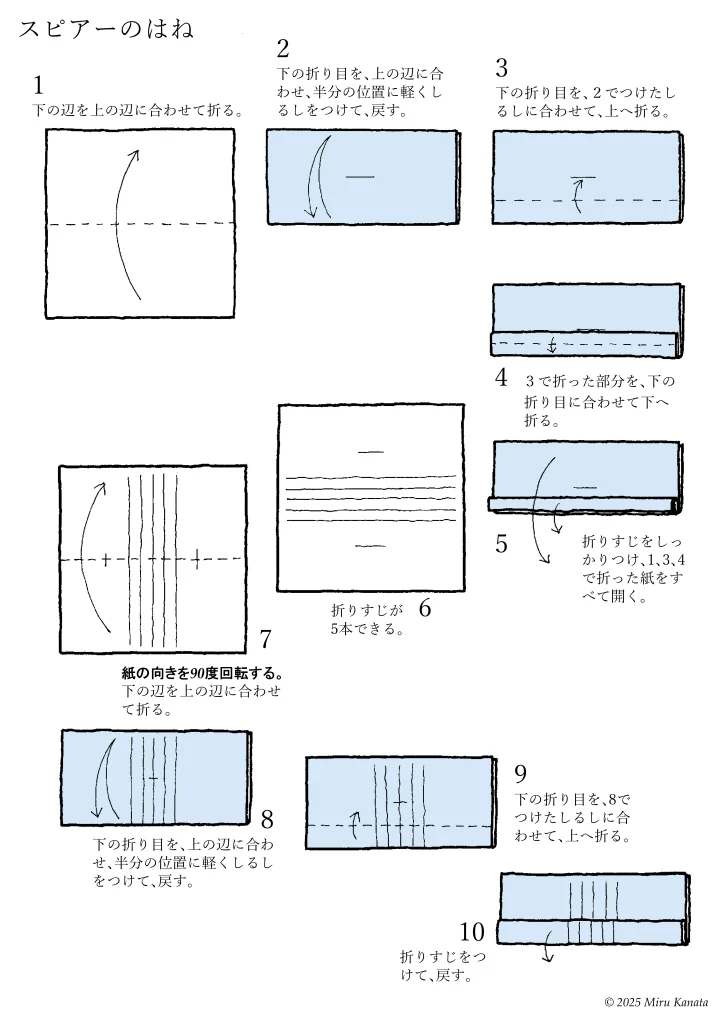
1. Fold the bottom edge to meet the top edge.
2. Align the bottom fold with the top edge, lightly mark the halfway point, and unfold.
3. Fold the bottom fold upwards, aligning it with the mark made in step 2.
4. Fold the part folded in step 3 downwards, aligning it with the bottom fold.
5. Make sure to crease the paper firmly, and unfold all the paper folded in steps 1, 2, 3, and 4.
6. You will have 5 creases.
7. Rotate the paper 90 degrees. Fold the bottom edge to meet the top edge.
8. Align the bottom fold with the top edge, lightly mark the halfway point, and unfold.
9. Fold the bottom fold upwards, aligning it with the mark made in step 8.
10. Make a crease and unfold.
English Commentary
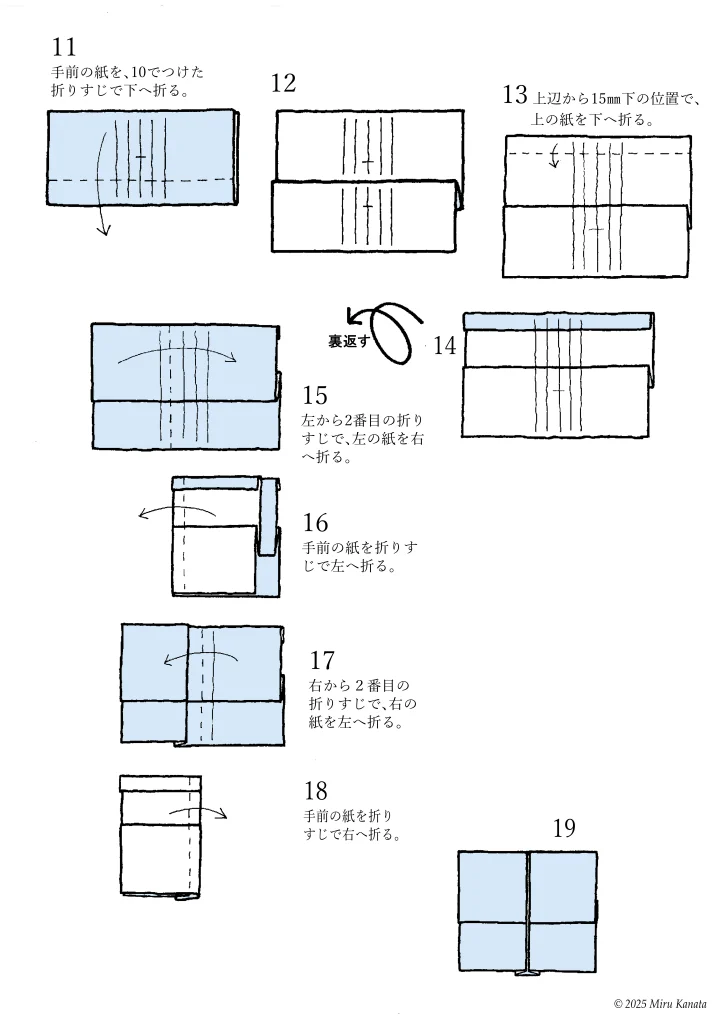
11 Fold the front paper down along the crease made in step 10.
12
13 Fold the top paper down at a point 15 mm below the top edge.
14
{Flip}
15 Fold the left paper to the right along the second crease from the left.
16 Fold the front paper to the left along the crease.
17 Fold the right paper to the left along the second crease from the right.
18 Fold the front paper to the right along the crease.
19
English Commentary
{Flip}
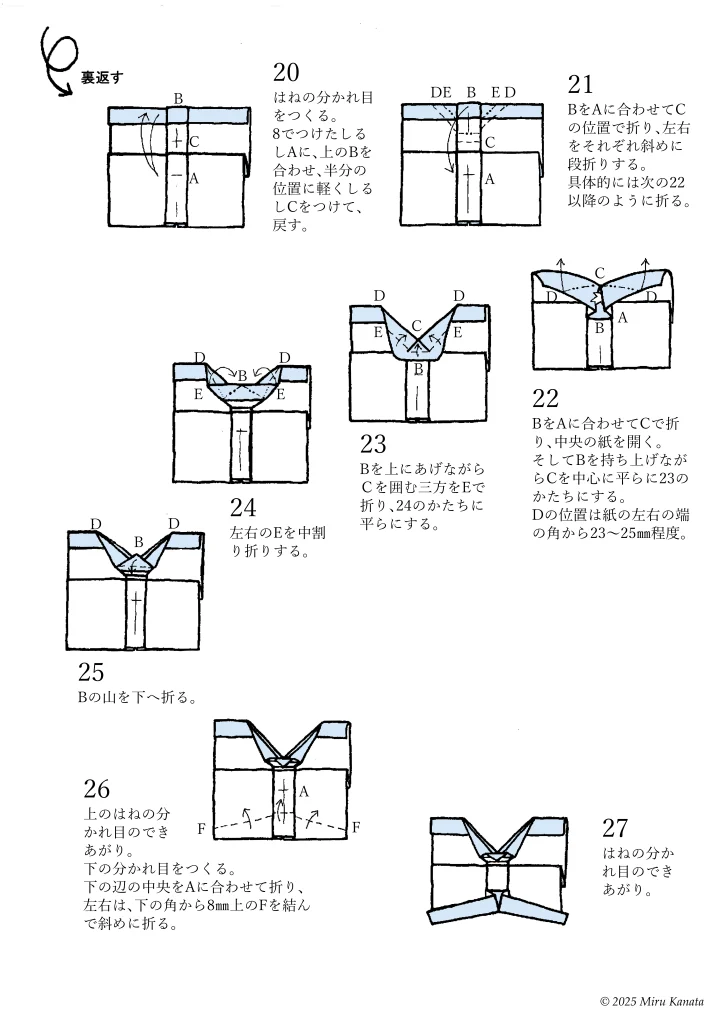
20 Create the split for the wing. Align the top B with the mark A made in 8, lightly mark C at the halfway point, and return.
21 Fold B to A at position C, and make diagonal step folds on both sides. Specifically, fold as shown in 22 and onwards.
22 Fold B to A at C, and open the paper in the center. Then, while lifting B, flatten it to the shape of 23 with C as the center. Position D is about 23-25 mm from the left and right corners of the paper.
23 While lifting B upwards, fold the three sides surrounding C at E, and flatten it to the shape of 24.
24 Do inside reverse folds on the left and right E.
25 Fold the mountain of B downwards.
26 The split for the upper wing is complete. Create the split for the bottom. Fold the center of the bottom edge to A, and on the left and right sides, fold diagonally connecting F, which is 8 mm above the bottom corner.
27. The parting of the wing is complete.
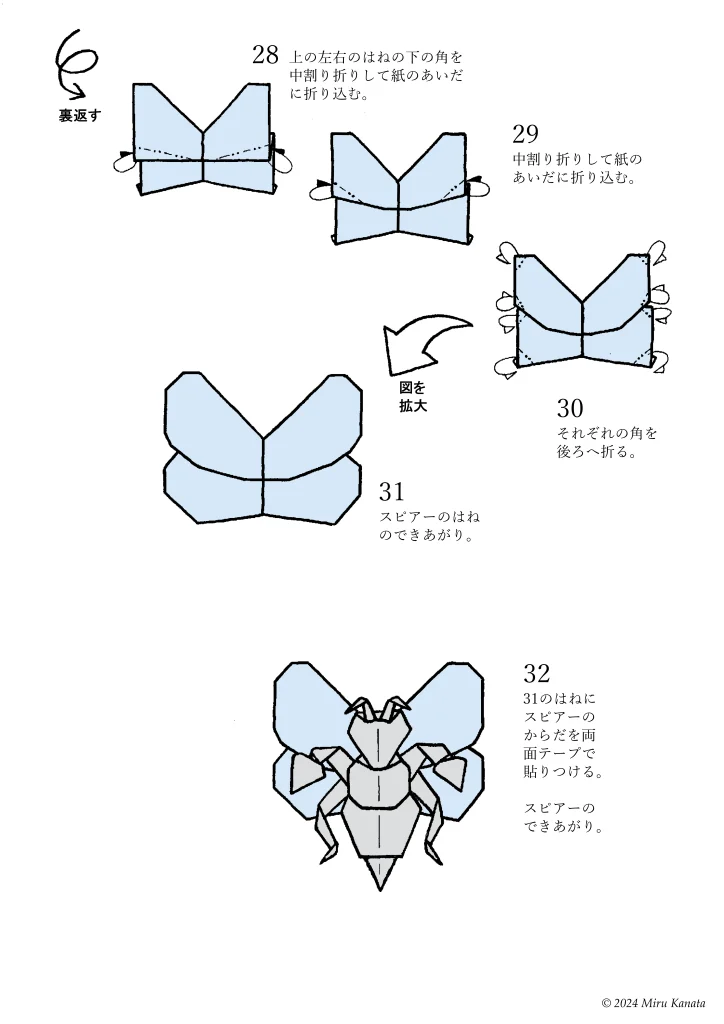
English Commentary
{Flip}
28 Fold the bottom corners of the upper left and right wings inwards using a reverse fold and tuck them into the paper.
29 Fold inwards using a reverse fold and tuck them into the paper.
30 Fold each corner backward.
{Enlarge diagram}
31 Beedrill’s wings are complete.
32 Attach Beedrill’s body to the wings from step 31 with double-sided tape. Beedrill is complete.
ORIGAMI Topics
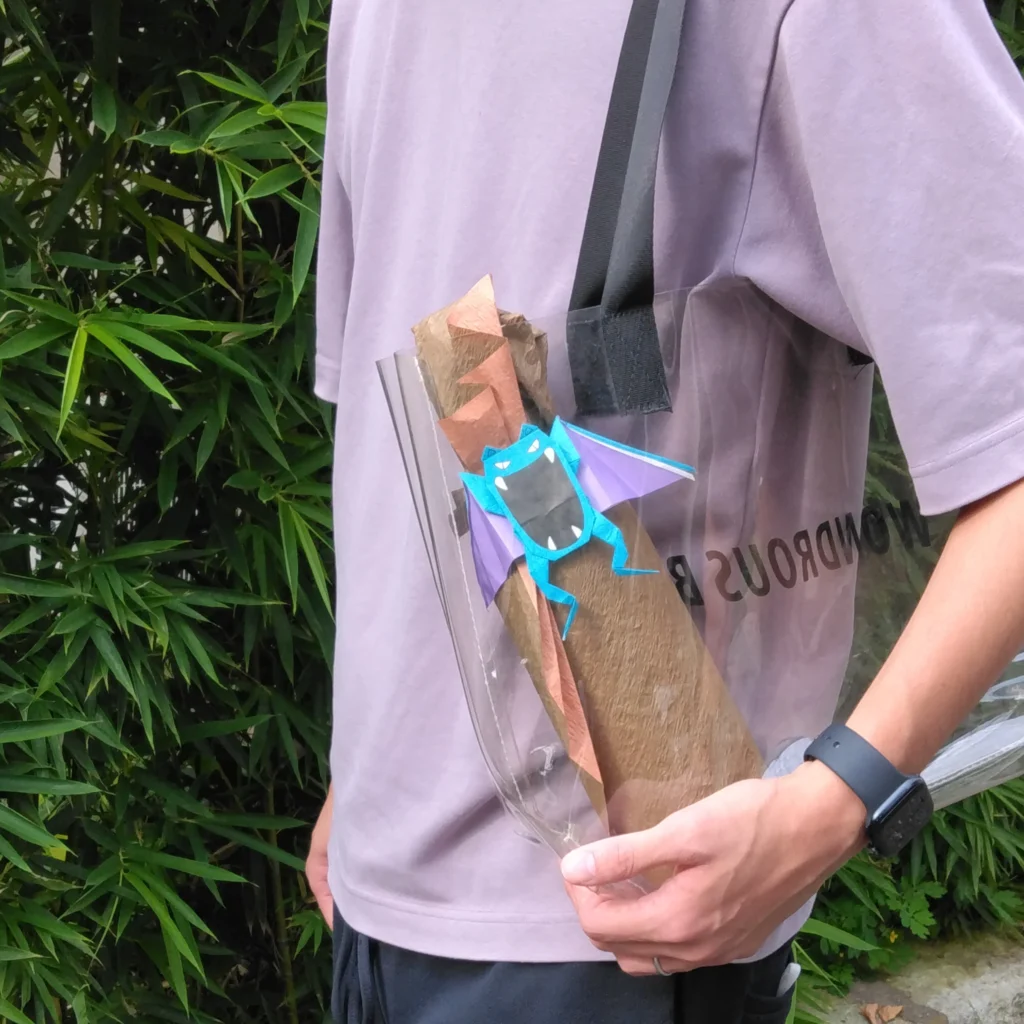
■スピアーのからだは、ズバット、ゴルバットとも共通の、ちょっと変わった折り方をします。
1998年当時、複数の図書館から古今のおりがみの書籍20冊あまりをお借りして、掲載されているおりがみをすべて折りましたが、この折り方の前例はありませんでした。*
伝承『折鶴』の背中部分をくぼませる折り方は複数見かけましたが、この折り方はありませんでした。
この折り方を見いだすことができて、スピアーの長いからだとニードル、ズバットのからだと耳、ゴルバットの広いからだ、が実現しました。
*本の出版後の2000年、日本折紙協会の、おりがみ専門の月刊の機関誌『おりがみ』のその時点で入手できたバックナンバー65冊の、おりがみ作品をすべて折って確認しましたが、前例はありませんでしたし、似た考え方もありませんでした。
参考・2000年の本に掲載した折り図
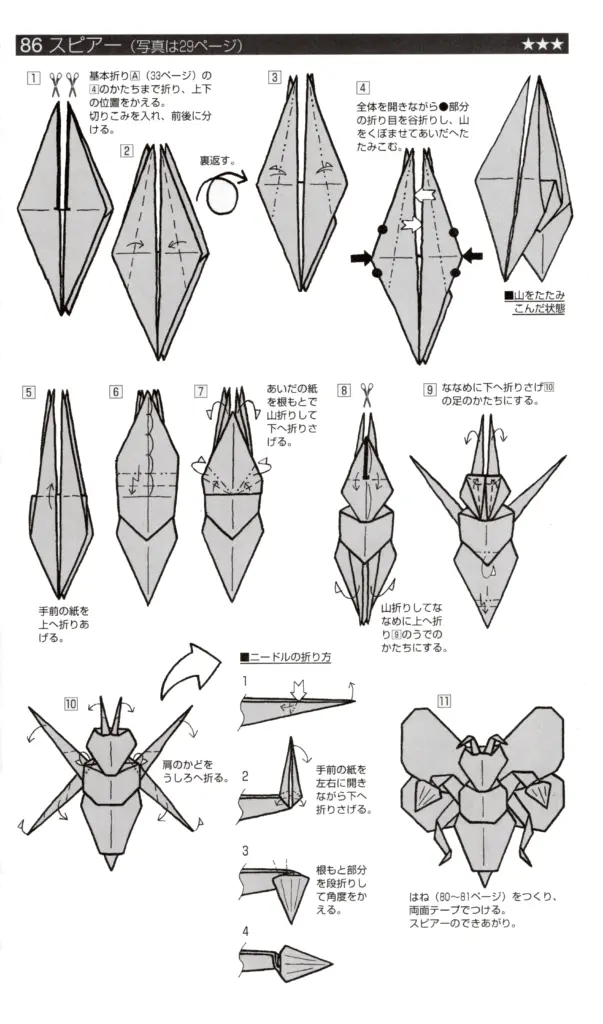
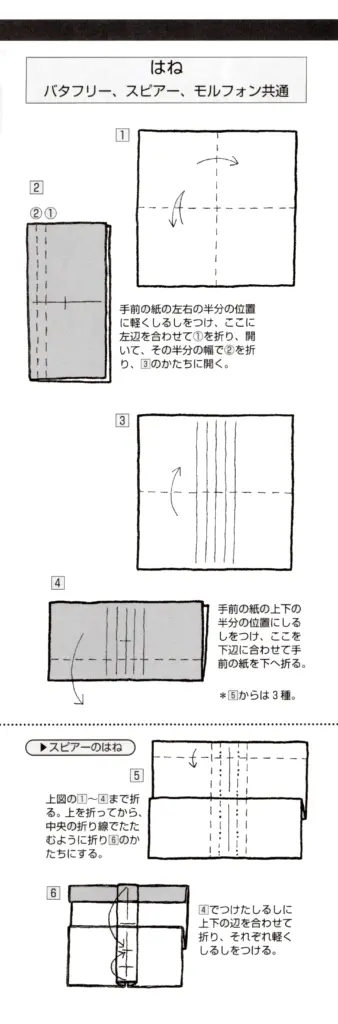
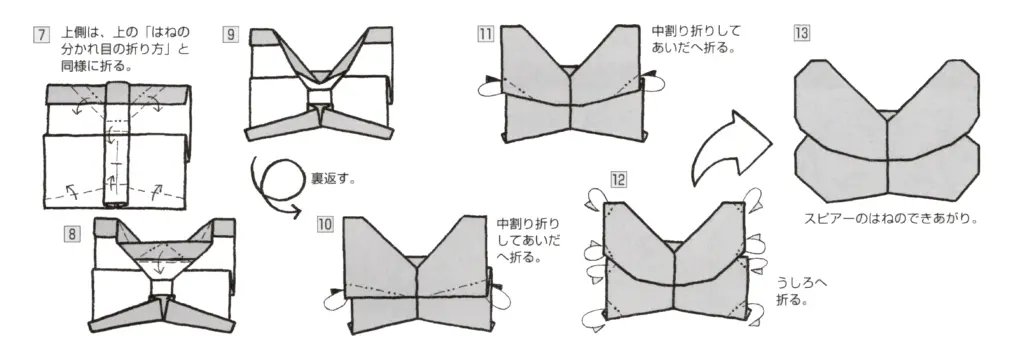
みるかなた本棚>『ポケットモンスターおりがみコレクション』>ポケモンおりがみ一覧表>0015スピアー
◇ ◇ ◇