
みるかなた本棚>Nice Origami素敵折紙>p080ヤドラン
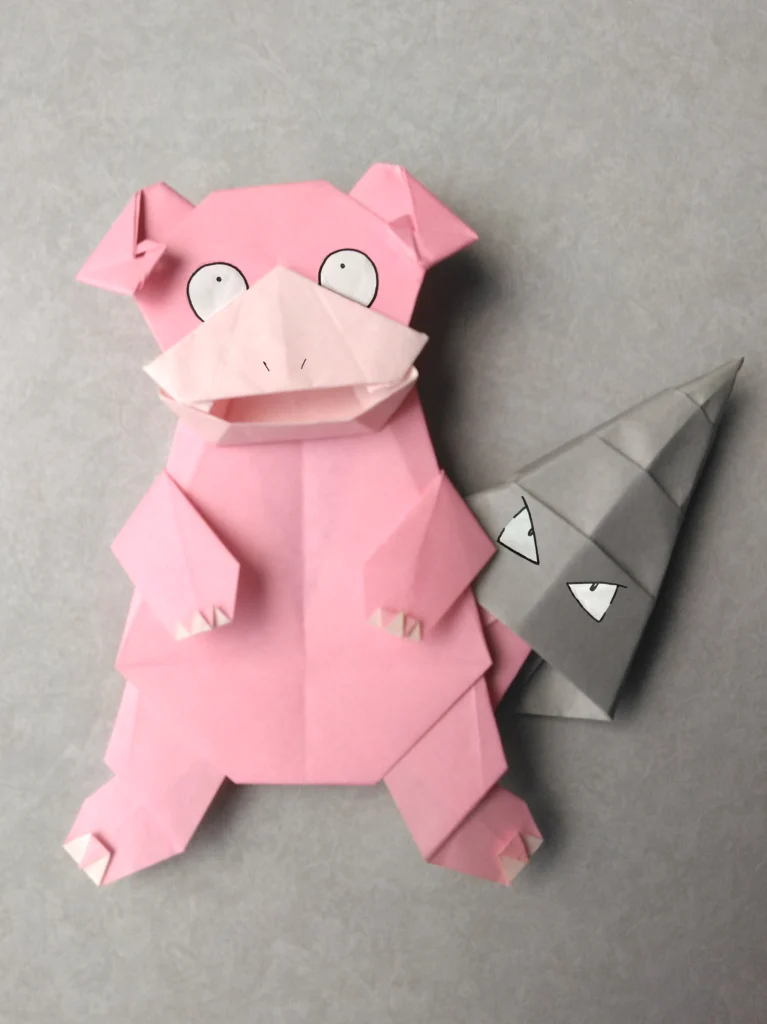
p080 ヤドラン
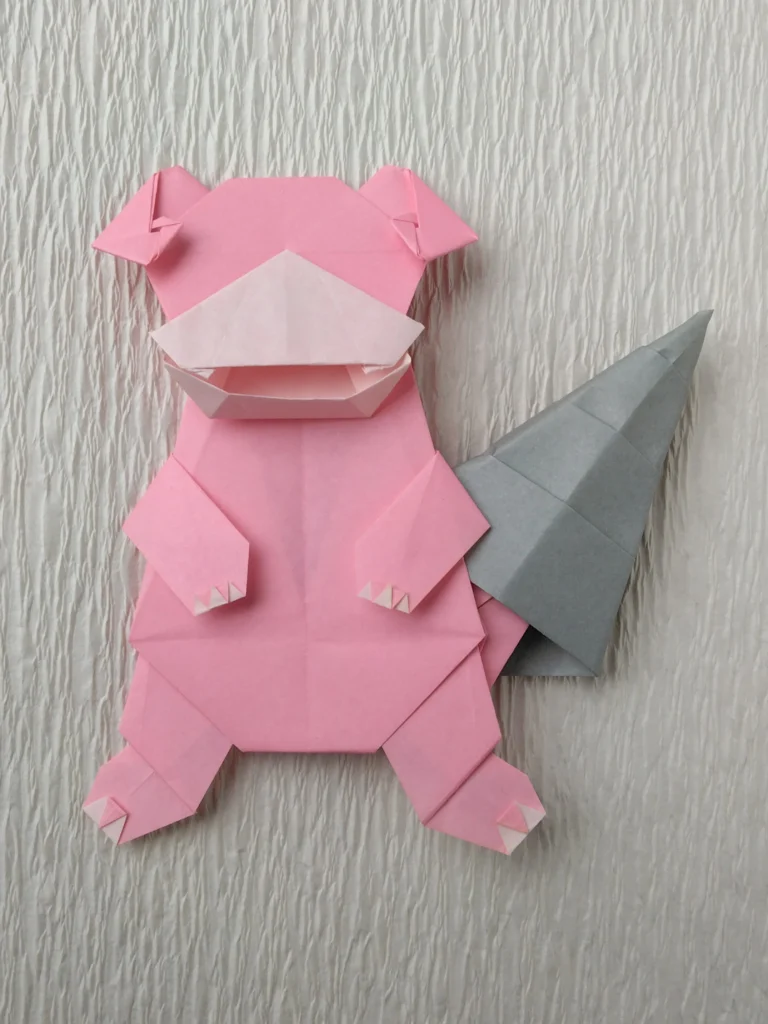
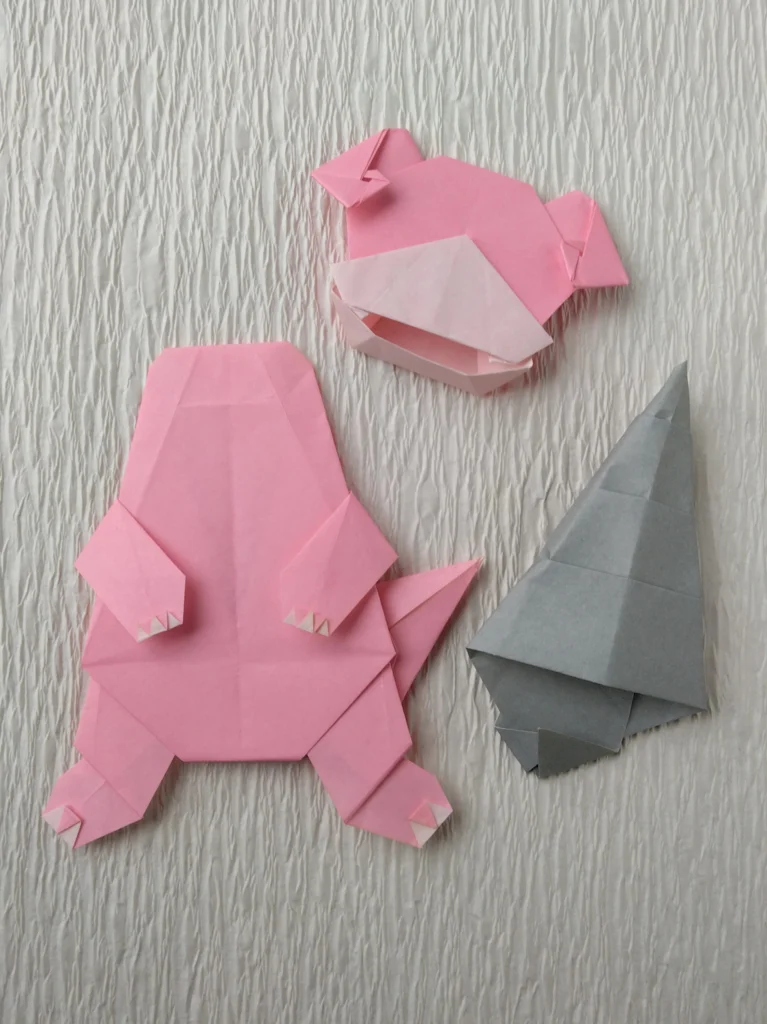
上唇からのぞく2本の牙がかわいいヤドラン。
ヤドランの雰囲気を出せたかなと思います。
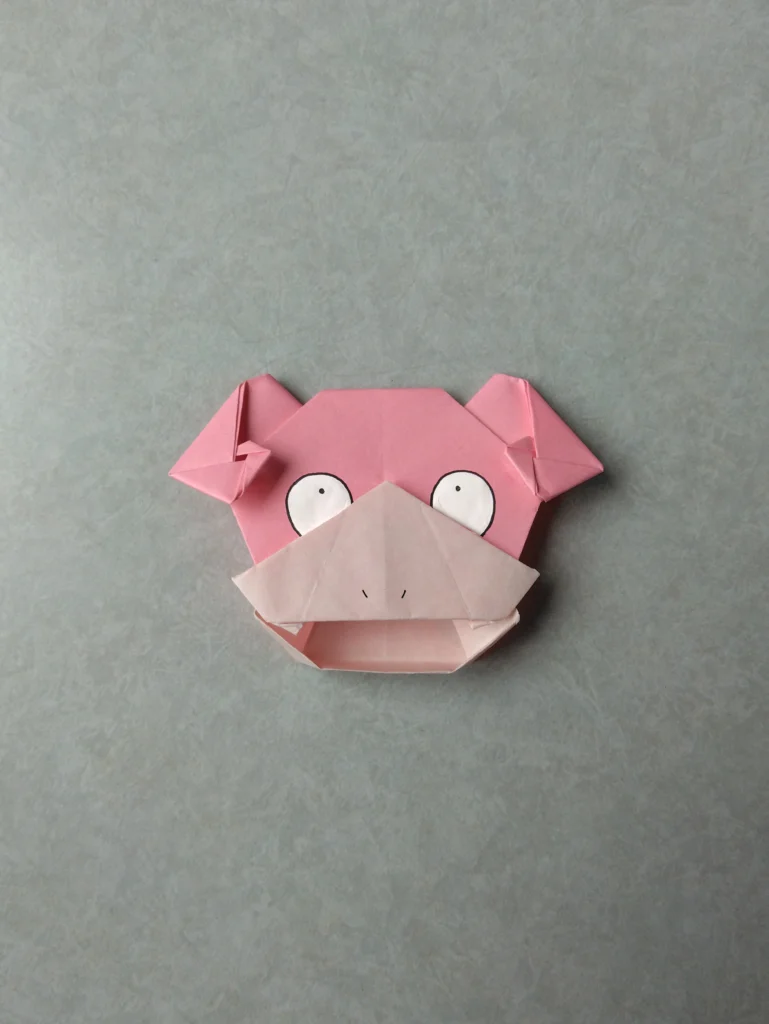
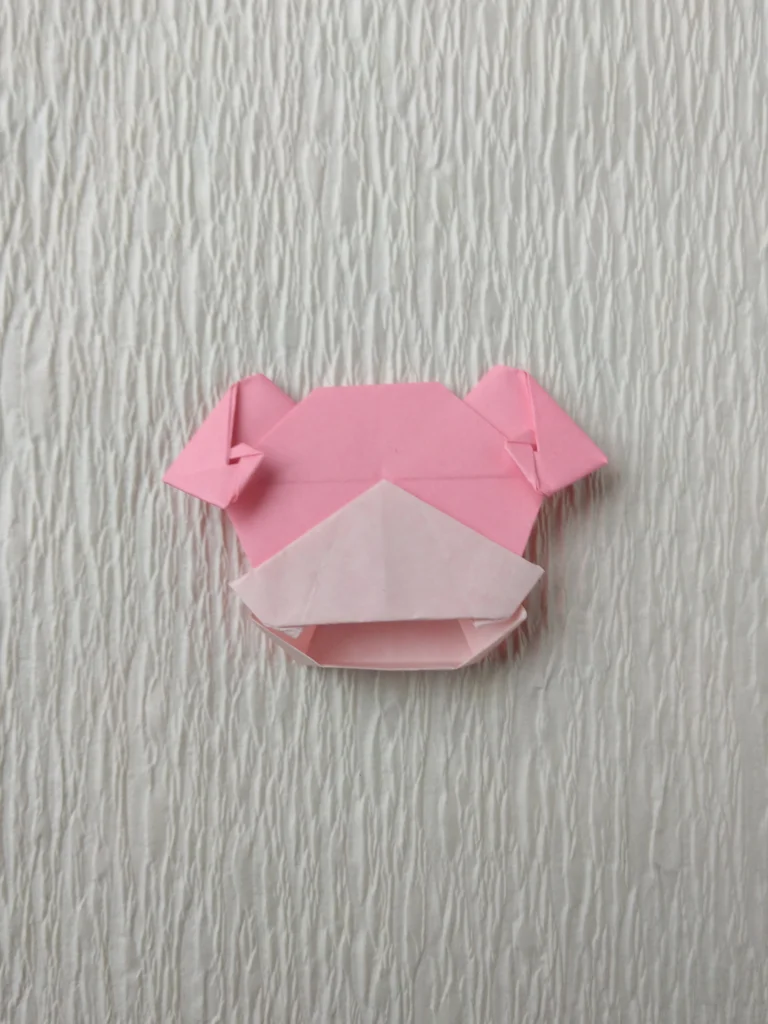
ヤドランのあたまは、イーブイやウインディでも使用している、紙の面を裏返す「うらB」の方法で作っています。
また、ヤドランのおなかは、ピカチュウと同じ、幅広につくる、ちょっと変則的な折り方をしています。
◇ここにご紹介するものは個人的に制作したファン創作です。
◇著作権者の許諾を受けていない未監修のものです。
◇2000年の本に掲載した作品は
0080ヤドランのページ、また、
ポケモンおりがみ一覧表のページ
をご覧ください。
つくり方の折り図
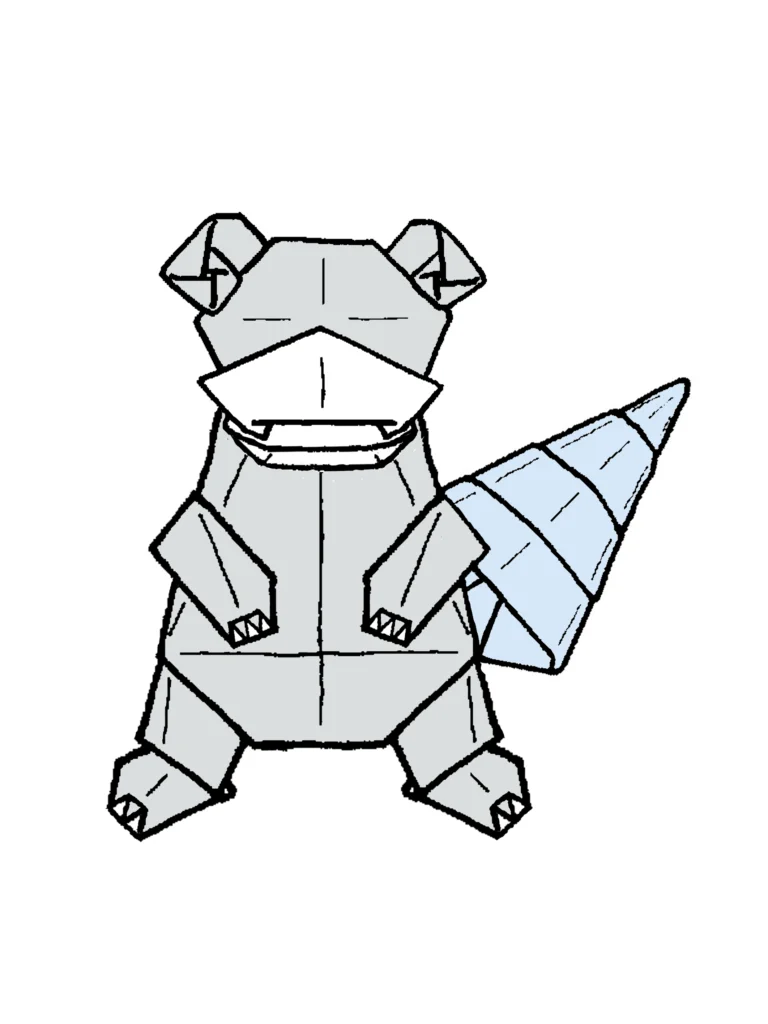
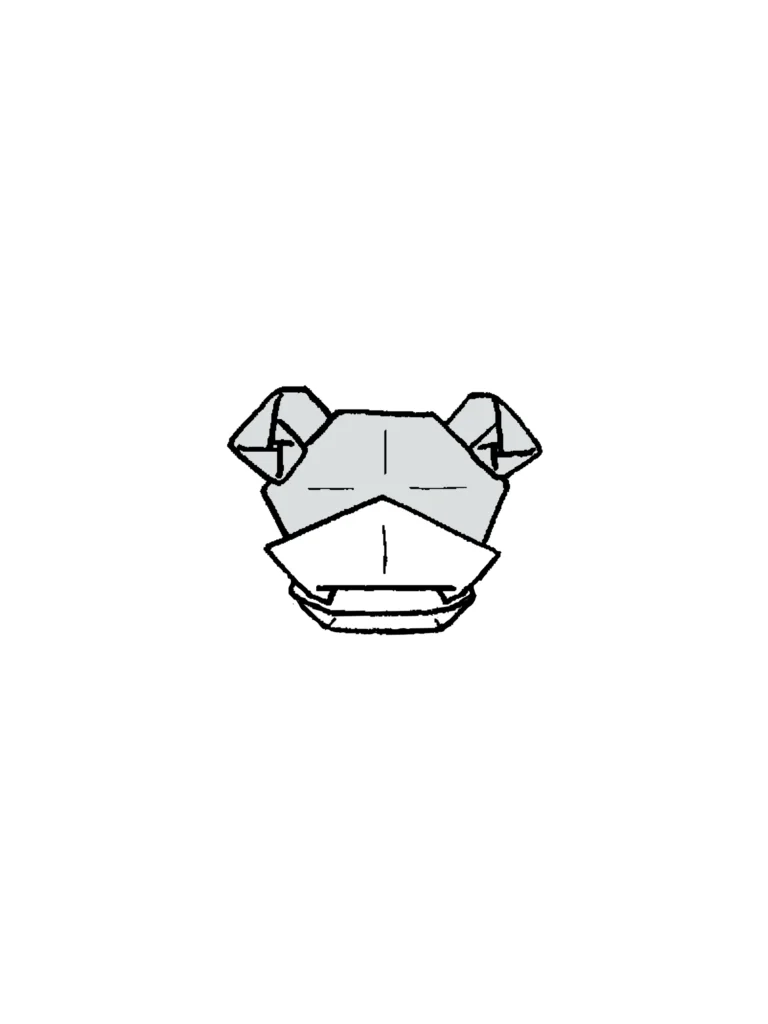
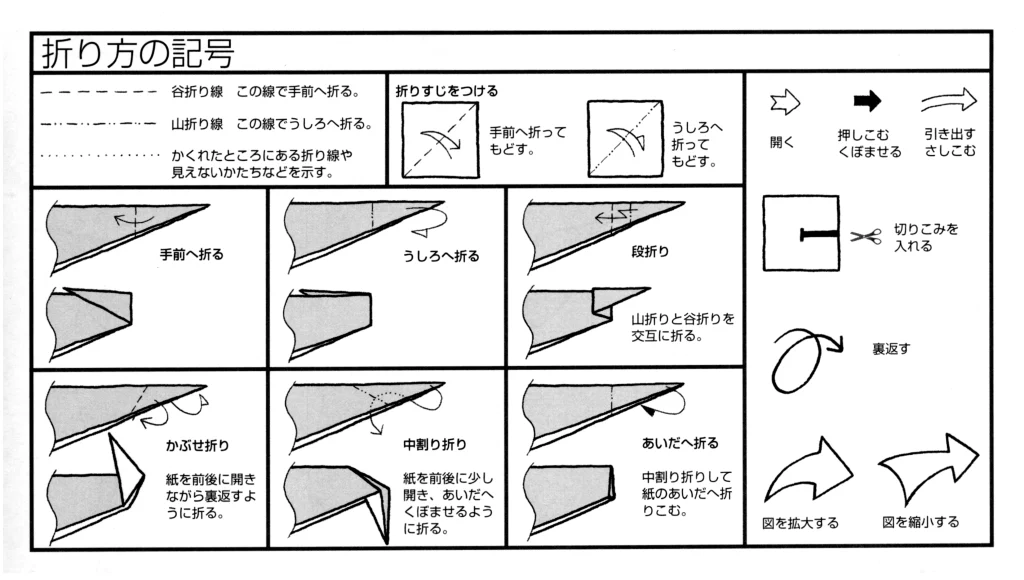
今回制作した折り図
◇折り図
1 基本折り
2 ヤドランのからだ
3 ヤドランのあたま
4 ヤドランの巻貝
■ヤドランのからだは、ピーチ色の紙で、基本折りの図20まで折る。
■ヤドランのあたまは、ピーチ色の紙で、サイズを調整してから、基本折りの図20まで折る。
■ヤドランの巻貝は、灰色の紙で、サイズを調整してから折る。
1 基本折り
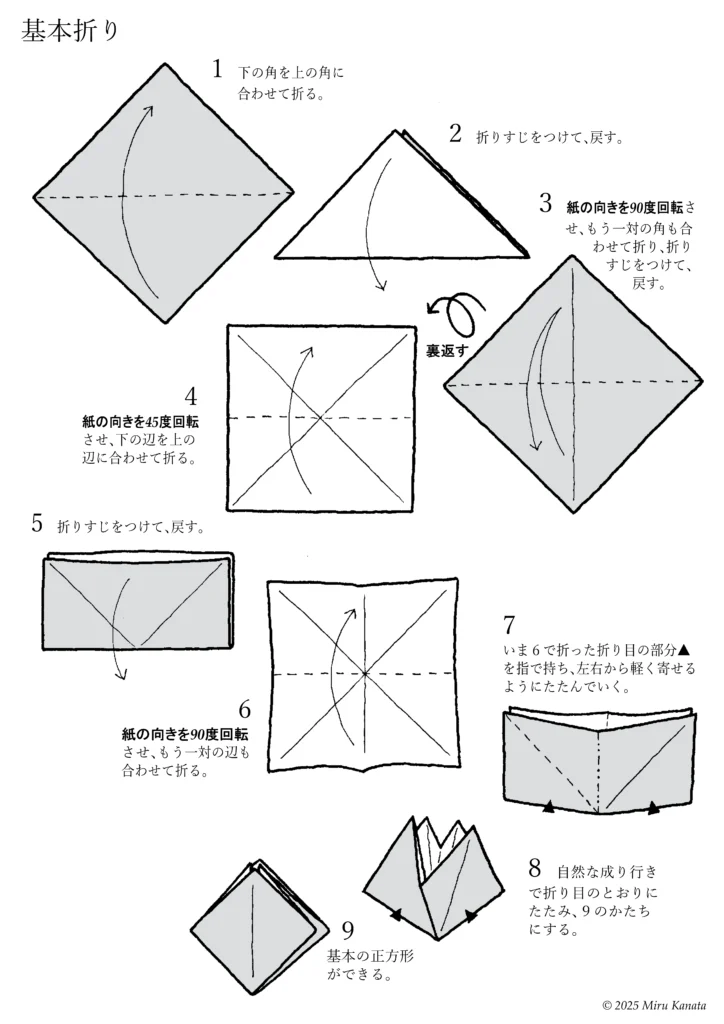
English Commentary
Basic Folding
1 Fold the bottom corner to meet the top corner.
2 Make a crease and return it to its original position.
3 Rotate the paper 90 degrees, fold the other pair of corners together, make a crease and return it to its original position.
{Flip}
4 Rotate the paper 45 degrees and fold the bottom edge to line up with the top edge.
5 Make a crease and return it to its original position.
6 Rotate the paper 90 degrees and fold the other pair of edges together.
7 Hold the crease ▲ made in step 6 with your fingers and fold gently from both sides together.
8 Let the paper naturally fold along the creases to form the shape of 9.
9 A basic square is created.
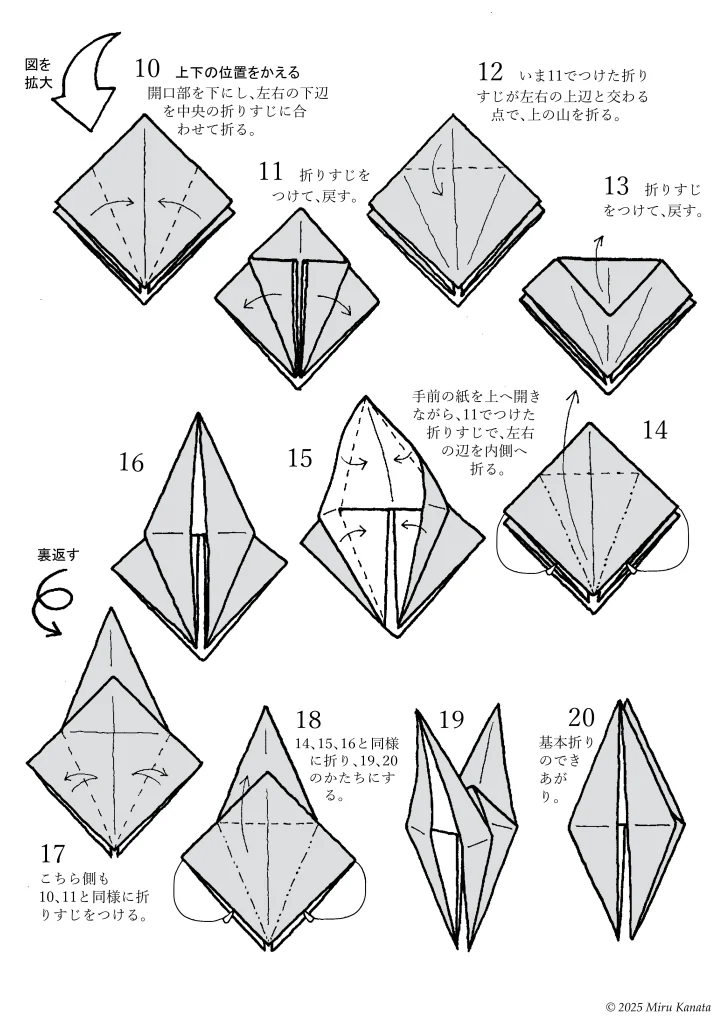
English Commentary
{Enlarge image}
10 Change the top and bottom positions.
With the opening facing downwards, fold the bottom left and right edges to meet the crease in the middle.
11 Make a crease and return.
12 Fold the top at the point where the crease made in 11 intersects with the top left and right edges.
13 Make a crease and return.
14 While opening the front paper upwards, fold the left and right edges inward along the crease made in 11.
15
16
{Flip}
17 Make creases on this side in the same way as 10 and 11.
18 Fold in the same way as 14, 15 and 16 to form 19 and 20.
19
20 The basic fold is complete.
2 ヤドランのからだ
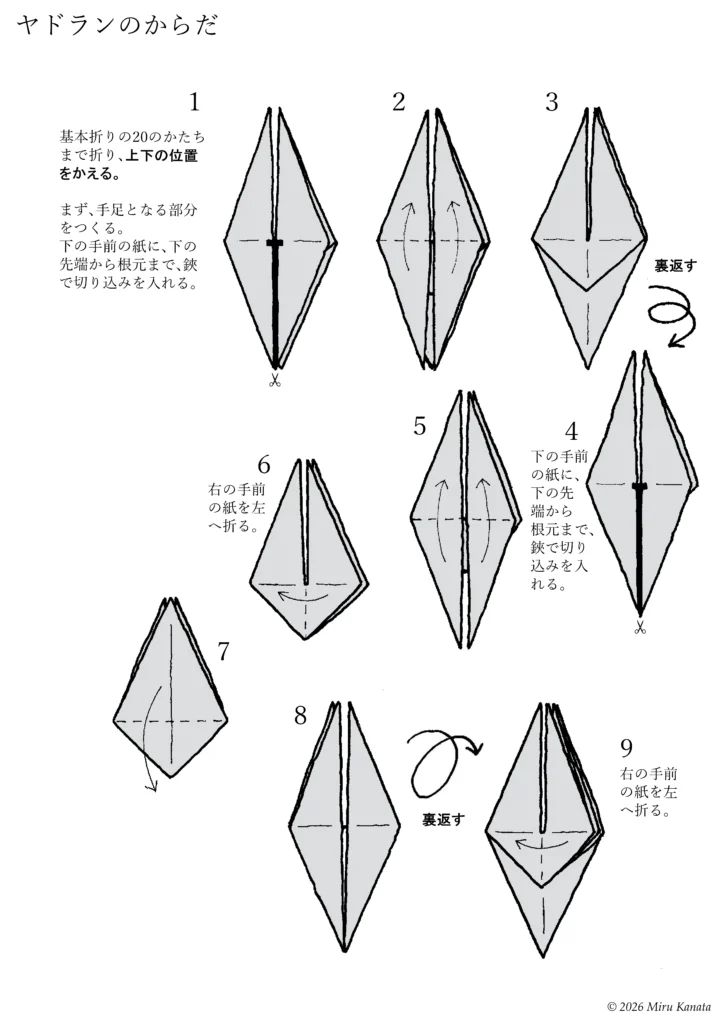
English Commentary
Slowbro’s body
1. Fold up to the 20th basic fold, then change the top and bottom positions. First, make the parts that will become the arms and legs. Make a cut with scissors from the bottom tip to the base of the bottom paper in front of you.
2.
3.
{Flip}
4. Make a cut with scissors from the bottom tip to the base of the bottom paper in front of you.
5.
6. Fold the right front paper to the left.
7.
8.
{Flip}
9. Fold the right front paper to the left.
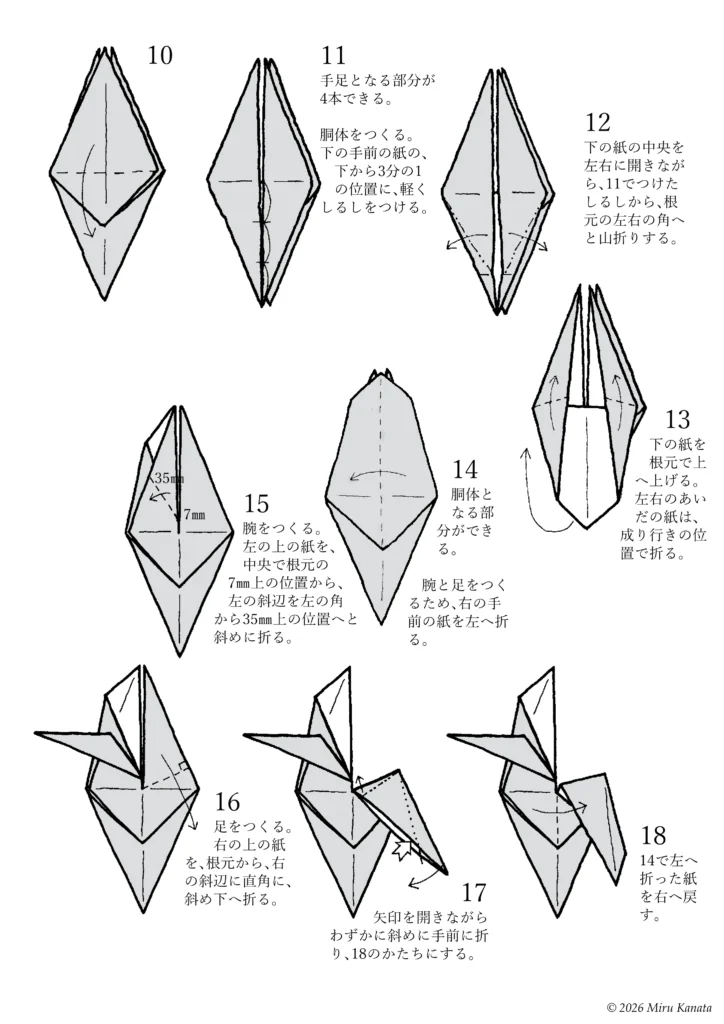
English Commentary
10.
11. You will have four parts that will become arms and legs. Make the torso. Lightly mark the bottom third of the bottom of the paper in front of you.
12. Open the center of the bottom paper to the left and right, and make mountain folds from the marks made in 11 to the left and right corners of the base.
13. Lift the bottom paper upwards at the base. Fold the paper in between to where it will naturally be.
14. The torso is now complete. Next, to make the arms and legs, fold the front right paper to the left.
15. Make the arms. Fold the top left paper diagonally from the center, 7 mm above the base, to 35 mm above the left corner along the left hypotenuse.
16. Make the legs. Fold the top right paper diagonally downwards from the base, perpendicular to the right hypotenuse.
17. Open the arrow and fold it slightly diagonally towards you to make the shape of 18.
18. Fold the paper that you folded to the left in step 14 back to the right.
English Commentary
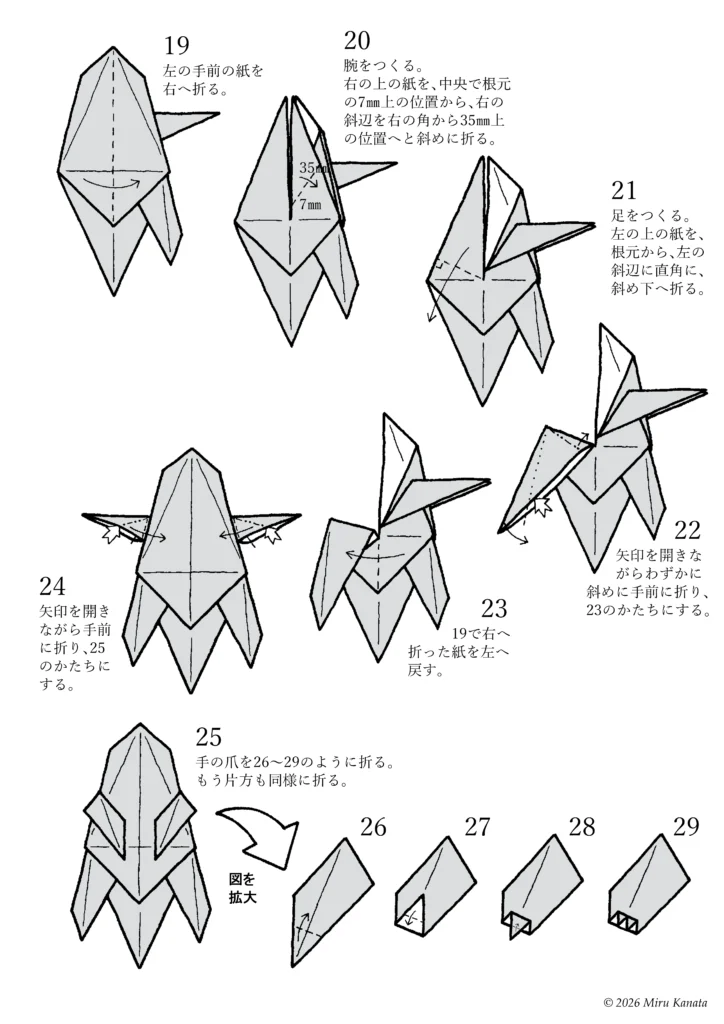
19. Fold the front left piece of paper to the right.
20. Make the arms. Fold the top right piece of paper diagonally from the center, 7mm above the base, to a position 35mm above the right corner along the right hypotenuse.
21. Make the legs. Fold the top left piece of paper diagonally downwards from the base, perpendicular to the left hypotenuse.
22. Open the arrow and fold it slightly diagonally towards you to create the shape of 23.
23. Return the paper that was folded to the right in 19 to the left.
24. Open the arrow and fold it towards you to create the shape of 25.
25. Fold the fingernails as shown in 26-29. Fold the other side in the same way.
26.
27.
28.
29.
English Commentary
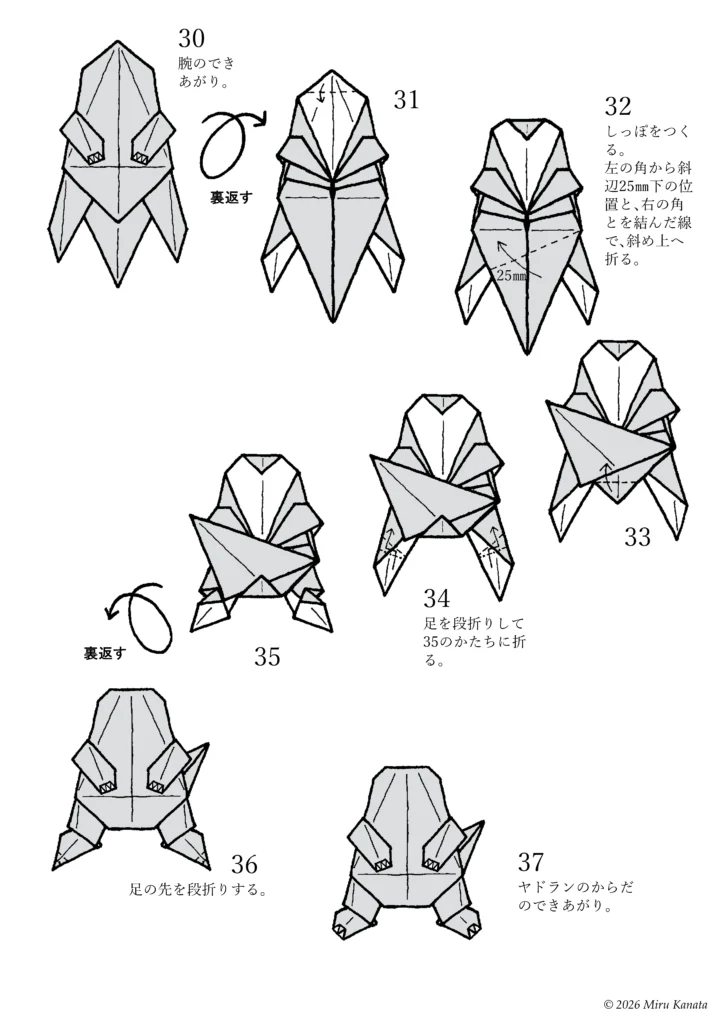
30. The arms are complete.
{Flip}
31.
32. Make the tail. Fold diagonally upwards along the line connecting the left corner 25 mm below the hypotenuse and the right corner.
33.
34. Fold the legs in a step fold to make the shape of 35.
35.
{Flip}
36. Fold the tips of the feet in a step fold.
37. Slowbro’s body is complete.
English Commentary
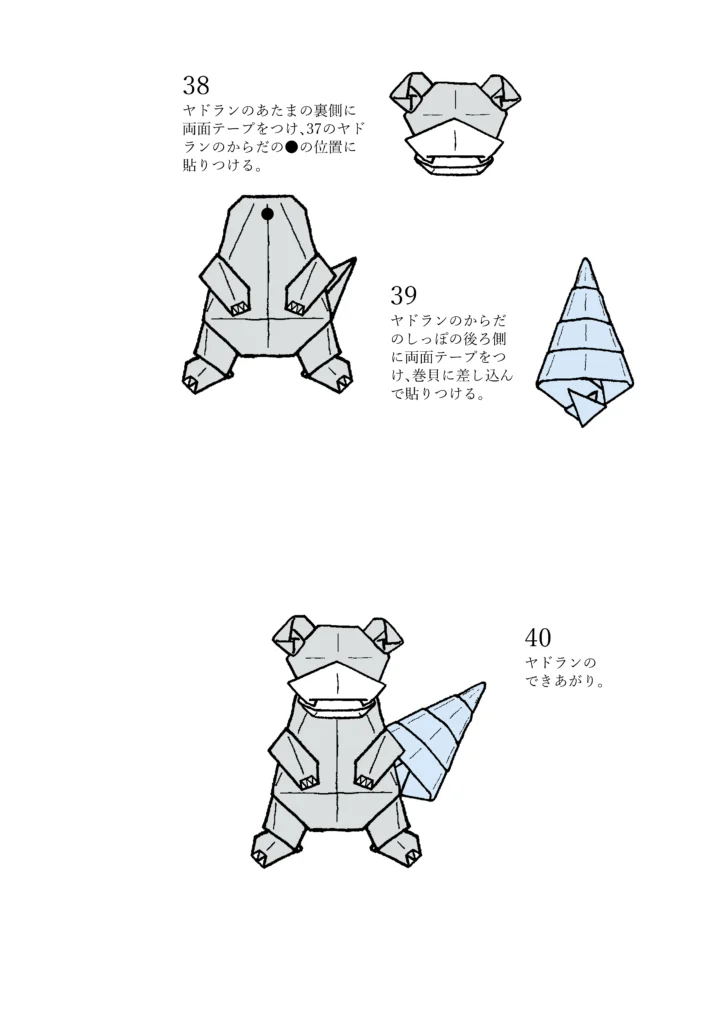
38. Attach double-sided tape to the underside of Slowbro’s head and stick it to the ● position on Slowbro’s body from step 37.
39. Attach double-sided tape to the back of Slowbro’s tail and insert it into the conch shell and stick it in place.
40. Slowbro is complete.
3 ヤドランのあたま
English Commentary
Slowbro’s head
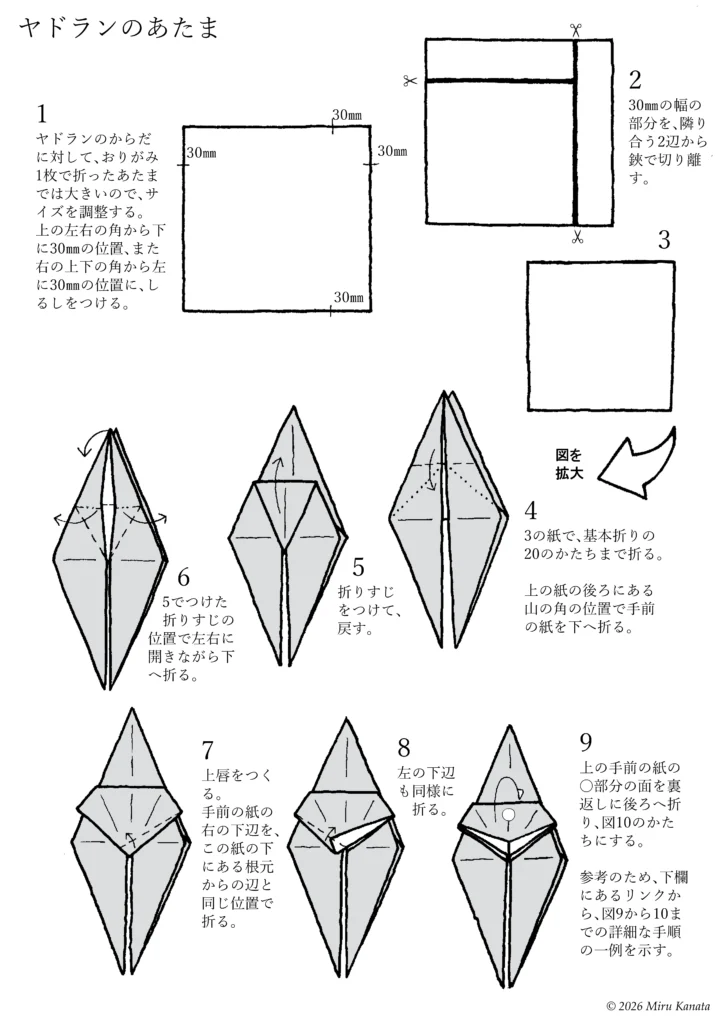
1. The head, folded from a single sheet of origami paper, is too large for Slowbro’s body, so adjust the size. Mark points 30mm down from the top left and right corners, and 30mm to the left from the top and bottom right corners.
2. Cut the 30mm wide section from two adjacent sides with scissors.
3.
{Enlarge the diagram}
4. Fold the paper from step 3 to the shape of basic fold 20. Fold the front paper down at the position of the mountain corner behind the top paper.
5. Make a crease and unfold.
6. Fold downwards while opening to the left and right at the position of the crease made in step 5.
7. Make the upper lip. Fold the bottom right edge of the front paper to the same position as the edge from the base below this paper.
8. Fold the bottom left edge in the same way.
9. Fold the ○ part of the top front paper backwards to make the shape shown in diagram 10. For reference, a detailed example of the procedure from Figures 9 to 10 is shown via the link below.
English Commentary
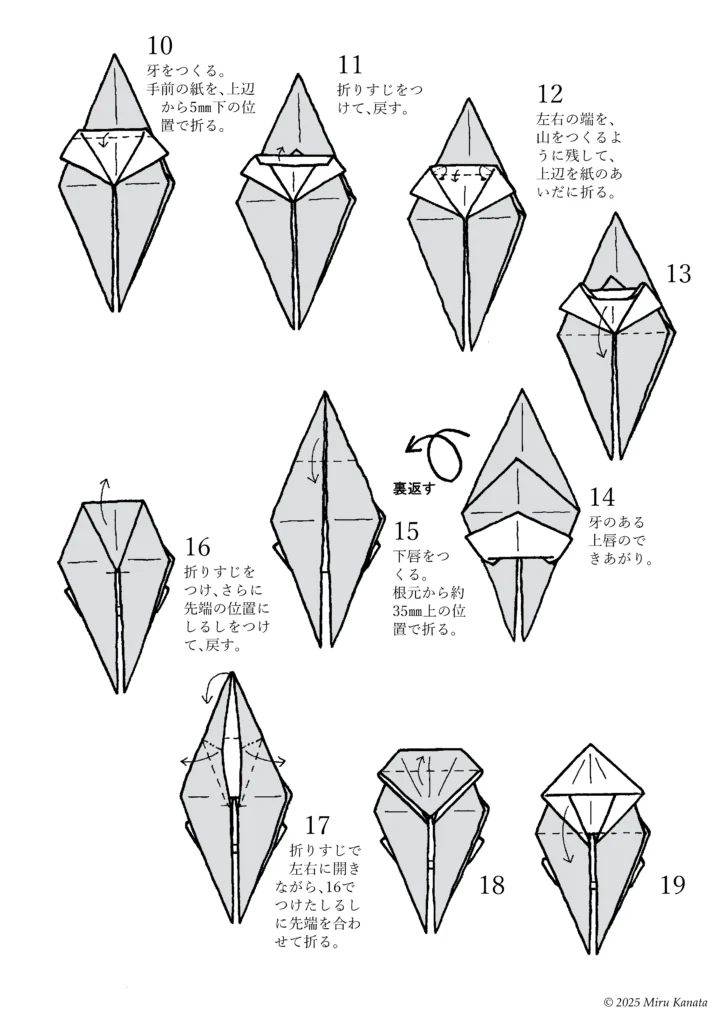
10. Make the fangs. Fold the front piece of paper downwards at a position 5 mm below the top edge.
11. Make a crease and unfold.
12. Fold the top edge of the paper, leaving the left and right edges to form a mountain shape.
13.
14. The upper lip with fangs is complete.
{Flip}
15. Make the lower lip. Fold it at a position approximately 23 mm above the base.
16. Make a crease, then mark the tip and unfold.
17. Open the paper to the left and right along the crease, and fold the tip to align with the mark made in step 16.
18.
19.
English Commentary
20.
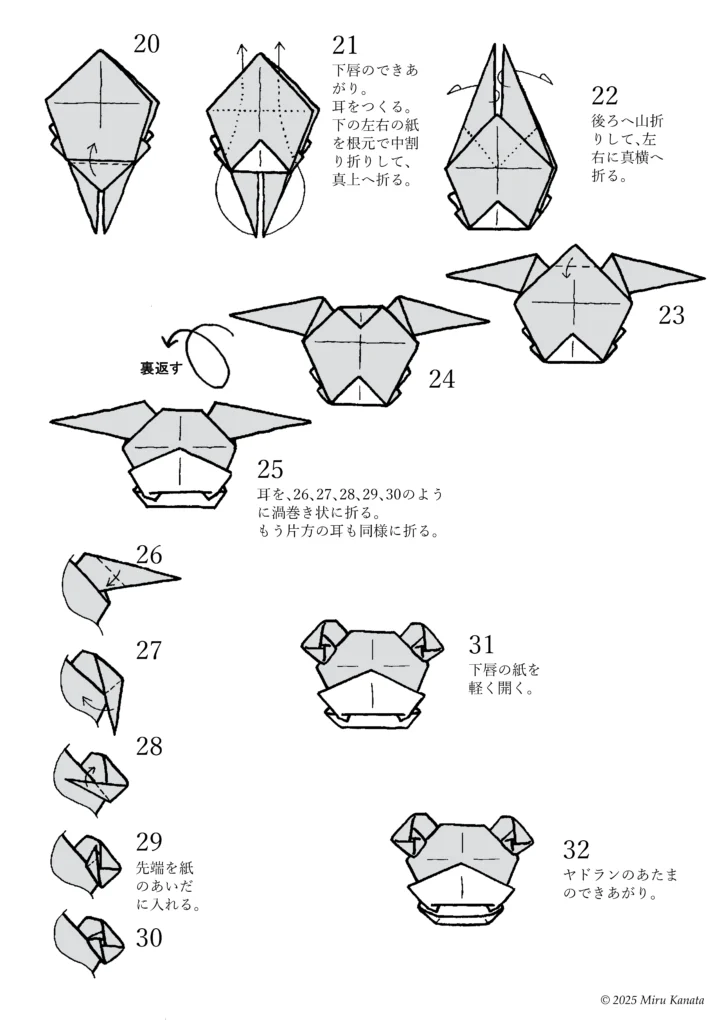
21. The lower lip is complete. Make the ears. Fold the bottom left and right pieces of paper in an inside reverse fold at the base and fold them straight up.
22. Fold them backward in a mountain fold and fold them straight to the sides.
23.
24.
{Flip}
25. Fold the ears in a spiral shape as shown in 26, 27, 28, 29, and 30. Fold the other ear in the same way.
26.
27.
28.
29.
30.
31. Gently open the paper of the lower lip.
32. Slowbro’s head is complete.
4 ヤドランの巻貝
English Commentary
Slowbro’s Snail
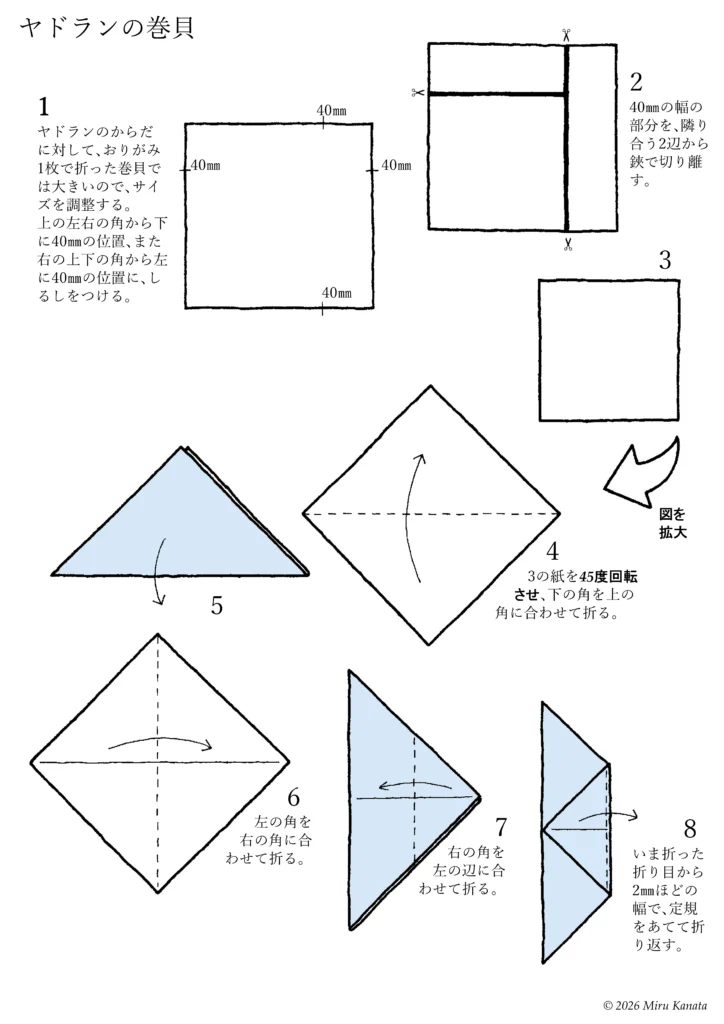
1. The seashell folded from a single sheet of origami paper is too large for Slowbro’s body, so adjust the size. Mark points 40 mm down from the top left and right corners, and 40 mm to the left from the top and bottom right corners.
2. Cut the 40 mm wide section from two adjacent sides with scissors.
3.
{Enlarge the diagram}
4. Rotate the paper from step 3 by 45 degrees and fold the bottom corner to meet the top corner.
5.
6. Fold the left corner to meet the right corner.
7. Fold the right corner to meet the left edge.
8. Using a ruler, fold back about 2 mm from the crease you just made.
English Commentary
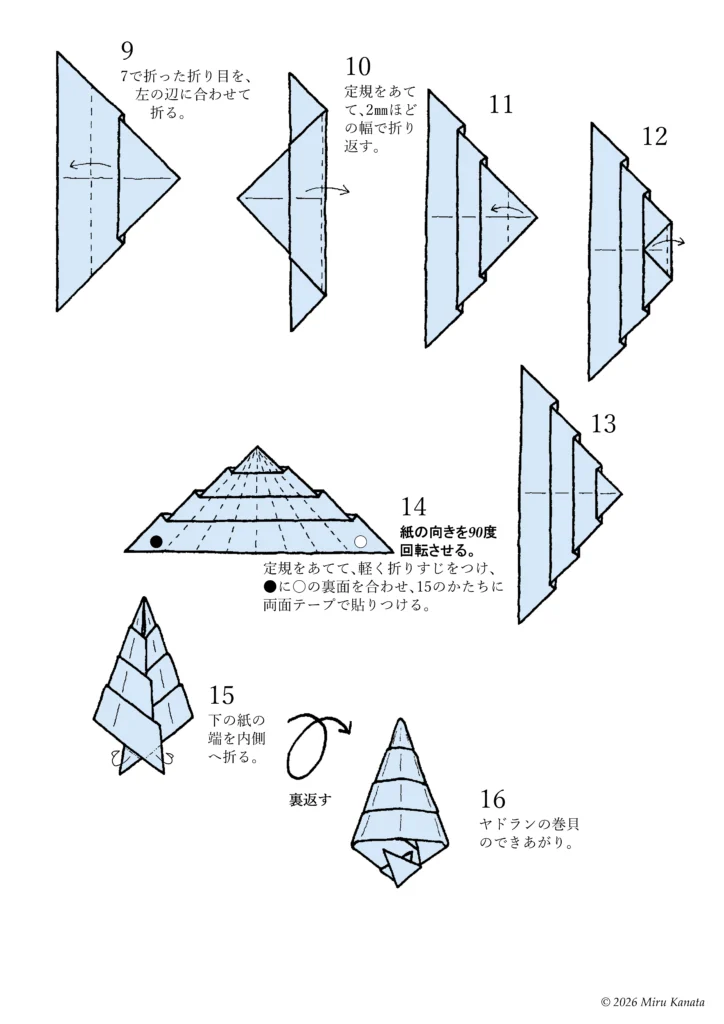
9. Fold the crease made in step 7 to the left edge.
10. Use a ruler to fold back about 2 mm wide.
11.
12.
13.
14. Rotate the paper 90 degrees. Use a ruler to lightly crease the paper, align the back of the ○ with the ●, and attach it to the shape of step 15 with double-sided tape.
15. Fold the bottom edge of the paper inward.
{Flip}
16. The Slowbro’s seashell is complete.
ORIGAMI Topics
■つくり方の途中に出てくる「○の面を裏返す」という折り方ですが、これを思いついた1998年、他所でこの折り方を見たことはありませんでした。
コンパクトに紙の裏面を利用する方法はないかな、と思案して、自然に思いついた折り方です。
意外に利用価値があり、いろいろなキャラクターで使用しています。
個人的には、「紙の面を裏返すB」「うらB」と呼んでいます。
■ヤドランのからだは、ピカチュウのからだと同様、ちょっと幅広なので、少し変則的な折り方をしています。
自然に思いついたので、難しいものではないと思うのですが、ほかでは見かけない折り方です。
*1998年当時、複数の図書館から古今のおりがみの書籍20冊あまりをお借りして、掲載されているおりがみをすべて折りましたが、この折り方の前例はありませんでした。
*本の出版後、日本折紙協会の、おりがみ専門の月刊の機関誌『おりがみ』のその時点で入手できたバックナンバー65冊の、おりがみ作品をすべて折って確認しましたが、前例はありませんでした。
みるかなた本棚>Nice Origami素敵折紙>p080ヤドラン
p080ヤドラン
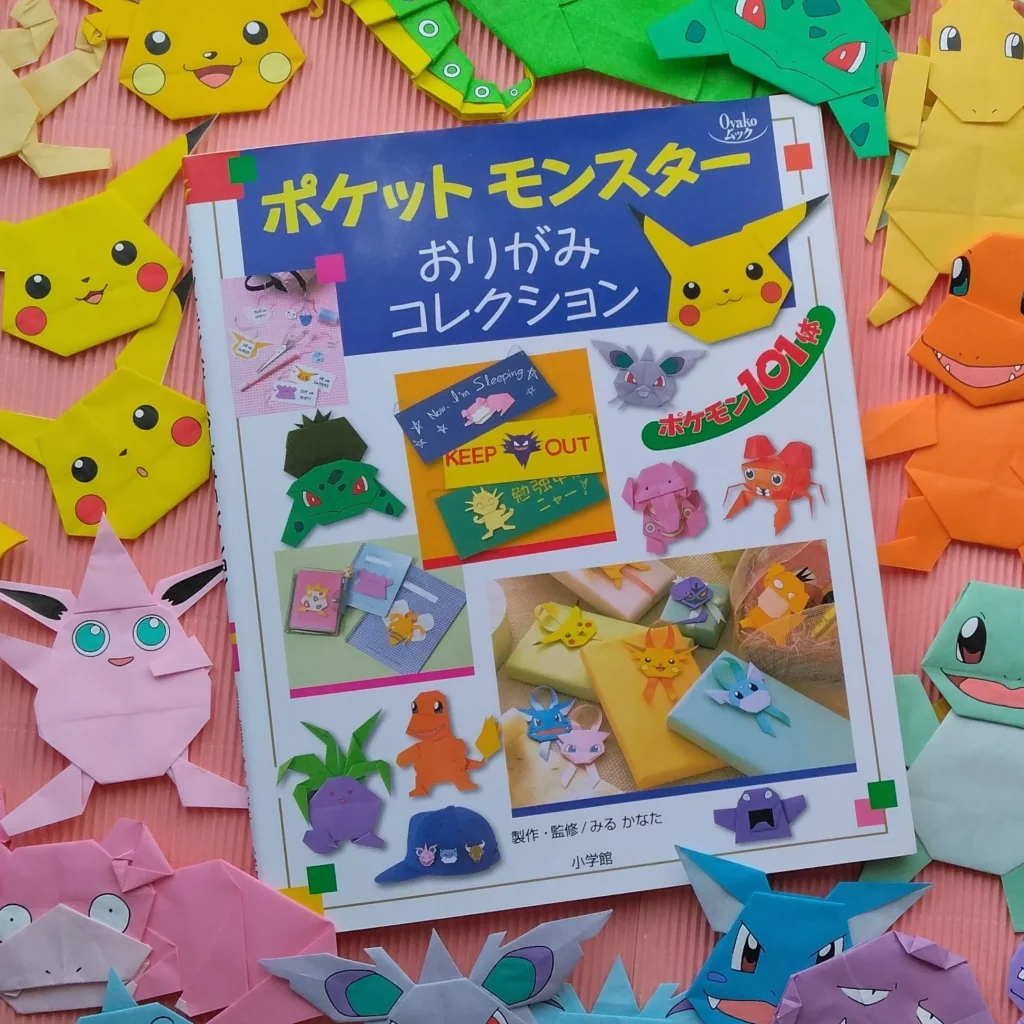
◆ポケットモンスターおりがみコレクション


◇ ◇ ◇